


– 29 –
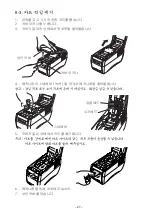
DIP-Switch
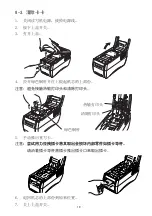
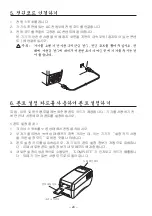
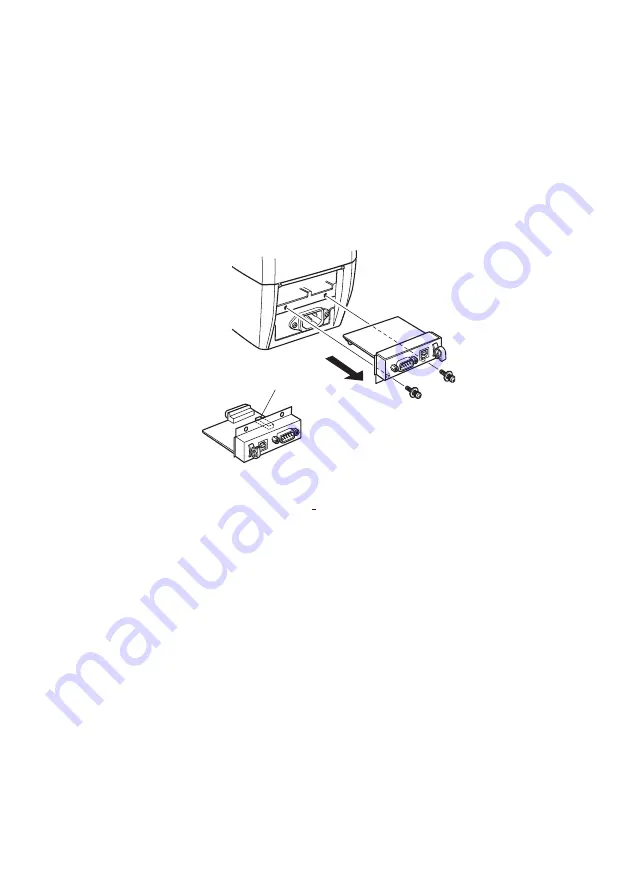
To change the DIP switch settings, do the following.
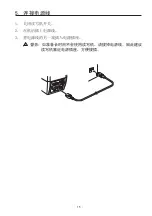
1. Check that the power is turned off for both the reader/writer and the host computer.
2. Remove the two screws.
3. Pull out the interface card to remove it.
4. Change the DIP switch settings on the interface card.
5. Push in the interface card to mount it.
6. Tighten the two screws.
7. Turn on the power for both the reader/writer and the host computer.
Note: The new settings will take effect when the reader/writer power is turned back on.
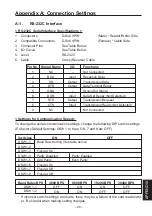
A-2. USB Interface Specifications
1 Communication Rating
Conforms to USB 2.0 Specifications
2 Communication Speed
USB Full Speed Mode (Max. 12 MBPS)
3 Communication Method
USB Bulk Transmission Mode
4 Power Specifications
USB Self-power Function
5 Connectors
Type-B
Summary of Contents for TCP400 SERIES
Page 1: ...THERMAL RE WRITABLE CARD READER WRITER TCP400 SERIES User s Manual...
Page 13: ...1 11 2 13 3 13 4 14 5 15 6 16 7 16 8 18 28...
Page 14: ...11 1 1 1 1 2 3 4 5 6 7 8 9 1 2 1 Star 2 3 4 5 6 7...
Page 15: ...12 8 9 10 11 12 13 14 15 16 17 18 19 20 21 22 23...
Page 16: ...13 2 1 2 3 4 5 6 3 6 5 4 3 7 2 1 1 2 3 4 5 6 7...
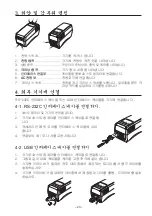
Page 17: ...14 4 RS 232C USB 4 1 RS 232C 1 2 3 4 4 2 USB 1 USB 2 USB USB 3 USB USB 4...
Page 18: ...15 5 1 2 3...
Page 19: ...16 6 1 2 3 4 COMPLETE 7 7 1 85 6 89 6 22 0 54 0...
Page 20: ...17 7 2 1 300 2 3 300 7 3 1 2 3 4 1 2 85 3 4 85 5 30...
Page 21: ...18 8 8 1 8 2...
Page 22: ...19 8 3 1 2 3 4 5 6 7...
Page 23: ...1 21 2 22 3 23 4 23 5 24 6 24 7 25 8 26 28 KOREAN...
Page 24: ...21 21 1 1 1 1 2 3 4 5 6 7 8 9 1 2 1 2 3 TV 4 5 6 7 8 9 10 11 12 13 14 15...
Page 25: ...22 16 17 18 19 20 21 22 23 DC 2 1 4 2 5 3 2 6...
Page 26: ...23 3 6 5 4 3 7 2 1 1 2 3 4 5 6 AC 7 4 RS 232C USB 4 1 RS 232C 1 2 3 4 4 2 USB 1 2 USB 3 4...
Page 27: ...24 5 1 2 AC 3 AC 6 1 2 3 4 COMPLETE...
Page 28: ...25 7 7 1 7 2 1 300 2 3 300 LED 7 3 1 2 3 4 1 2 85 3 4 85 5 30 85 6 89 6 22 0 54 0...
Page 29: ...26 8 8 1 LED 8 2...
Page 30: ...27 8 3 1 2 3 4 5 6 7...


