


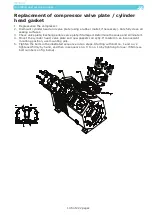


Operating and service manual
198 of 222 pages
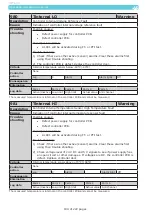
Pump down of unit
Main power supply to unit shall be switched off during pump down of unit.
Pump down of unit is done by the following procedure:
1. Connect a vacuum pump with a service gauge manifold to the two evacuation points, pos. 6 &
27 (P & I – diagram).
2. Close the compressor discharge and compressor suction servicevalves, pos. 5 & 26, (P & I –
diagram), 4 turns.
3. Remove the electrical coils and mount permanent magnet on the two electronically expansion
valves, pos. 16 & 18 (P & I – diagram).
4. Pump down the unit pressure to vacuum, indicated on the gauges of the service gauge mani
fold.
5. Continue vacuum – pumping for at least 2 hours.
6. Switch off the vacuum pump and close the stopvalve for the suction line to the vacuum pump
on the service gauge manifold. Observe the vacuum for minimum ½ hour.
7. If the vacuum is maintained, then the unit can be charged as described this manual.
If the vacuum pressure is not maintained, there is a possible leak somewhere, check all hose
connections between unit and vacuumpump. If these are ok, check the unit.
8. Close the compressor stopvalves, pos. 5 & 26, (P & I – diagram).
9. Remove the permanent magnets and reinstall the electrical coils on the two electronically
expansion valves, pos. 16 & 18 (P & I – diagram).
10. Disconnect the service gauge manifold.
Pressure Test
After performing a major repair to the unit piping system, it is recommended to perform a pressure
test.
Pressure test has the purpose of checking the piping system for leakages.
The pressuretest is done by means of a high pressurized gas, ex. N2, which is let into the piping
system through the two evacuation points, pos. 6 & 27 (P & I – diagram). The procedure for this is
as follows:
NOTE: DO NOT USE OXYGEN (O
2
) FOR A PRESSURE TEST
1. Install a service gauge manifold on the unit to the two evacuation points, pos. 6 & 27
(P & I – diagram).
2. Close the compressor discharge stopvalve and compressor suction stopvalve, pos. 5 & 26
(P & I– diagram), 4 turns
3. Connect the pressurized gas bottle (ex. N2) to the discharge stopvalve of the service gauge
manifold.
4. Remove the electrical coils and mount permanent magnet on the two electronically expansion
valves, pos. 16 & 18 (P & I – diagram).
5. Open the discharge stopvalve of the service gauge manifold.
6. Carefully open the hand valve of the pressurized gas bottle until the two gauges of the service
gauge manifold show a pressure of 12 BarE.
7. Close the discharge stopvalve of the service gauge manifold.
8. Do a leakage detection as described in this manual.
9. Leave the unit pressurized for minimum 2 hours. If the pressure gauges still show 12 BarE after
2 hours, the unit is without any leakages.
10. If the pressure gauges are below 12 BarE, perform a leakage detection as described in this
manual
11. Disconnect the pressurized gas bottle.
12. Open the discharge stopvalve on the service gauge manifold to release the pressure from the
unit.
13. Do a pump down of unit as described in this manual.
14. Charge the unit as described in this manual.