background image

3

4

5

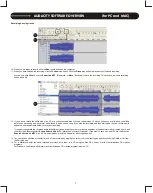
2. Press the EDITOR button on the toolbar to bring up the editing window. This is where you will record and edit your audio files. After pressing the

EDITOR button, the screen below will appear.

3. Press the (3) Input Monitoring button. This will allow you to listen to the audio as you record it from the T.55 USB.


4. Press the red (4) Record button. This will also light up the (5) Pause button. Play a record on your turntable and you will see the meters at the

right of window show you the recording level. Now you are ready to record your record album. 

5. Press the Pause button and Audio Creator will start recording. Then, start playing your record. It is suggested to let the entire side of the record

play even if there are multiple tracks. When you are done recording the tracks you want, press the Stop button. The Editor screen will now display

the audio waveform.

RECORDING AUDIO FROM A RECORD

Summary of Contents for T.55 USB

Page 1: ...5 0 3 0 5...

Page 2: ...All other servicing should be referred to qualified service personnel 16 Ventilation Slots and openings in the cabinet are provided for ventilation and to ensure reliable operation of the product and...

Page 3: ...s protective wrapping and place on the platter 4 Place the counter weight on the back of the tonearm assembly 5 If desired place the 45rpm adaptor in its allocated holder on the main unit Do not place...

Page 4: ...op onto the mat or the turntable platter during this adjustment You might damage the needle tip Now carefully hold the tone arm in one hand while rotating the numbered ring on the front of the counter...

Page 5: ...tone arm then turn the locking nut clockwise with the head shell firmly held horizontally 10 Tonearm 11 Tonearm clamp and rest Use this rest for the tone arm and clamp it in position during transporta...

Page 6: ...e track crossfading to another To take full advantage of these features be sure to read the User Manual or Help files in the software Audacity is free software licensed under the General Public Licens...

Page 7: ...ng and then start again the new recording will appear as new audio tracks below the previous recording If you want to separate the recorded audio into different tracks drag the cursor over a song segm...

Page 8: ...for your soundcard for the T 55 USB MME 32 Bit is suggested Latency refers to how fast the software responds to commands Higher latency values are safer when recording and playing back audio Iif audio...

Page 9: ...This will also light up the 5 Pause button Play a record on your turntable and you will see the meters at the right of window show you the recording level Now you are ready to record your record album...

Page 10: ...ll also separate the songs to create new Clips It is easy to see the separation between songs This is where the volume of the waveform is at a low level If there is only a short space between songs th...

Page 11: ...of each Clip and press the 8 Insert Marker button You can also automatically create Markers at the start of each Clip Under the Edit Menu select the Insert Markers at Clip Start This will create marke...

Page 12: ...CLIPS Audio Creator LE allows you to process your audio clips The two most common processing functions are Normalizing and Audio Restore Normalizing raises the level of your audio clip to a maximum us...

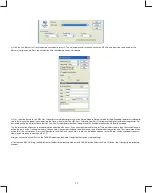
Page 13: ...rst press the 9 Clip Select button Then place the cursor over a Clip and click to select it 10 Next press the 10 Normalize button This brings up the Normalize window as shown below Clip before normal...

Page 14: ...tor LE includes an audio plug in that helps eliminate noise clicks and pops from a record The plug in is called Audio Restore by iZotope To select the Audio Restore Plug in from Cakewalk right click o...

Page 15: ...try different settings In the example below there was a click in the audio from the record Audio Restore removed the click Before Audio Restore After Audio Restore Creating Audio CD s Creating an Audi...

Page 16: ...on the BURNER button This brings up the window below 7 The CD tracks will already be in the list You can add more tracks by pressing the Add Tracks button Press the OPTIONS button to set the speed fo...

Page 17: ...pth the MP3 encoder examines the file prior to encoding The ID3 Info section allows you to write information about the MP3 tracks If you have selected the Markers as Track Indicators feature then the...

Page 18: ...ton and the CD will be created Congratulations You have successfully digitized your 1st vinyl record Feel free to experiment with the other features of Pyro Audio Creator LE The online Help screens of...

Page 19: ...me Less than 1 sec with 331 3rpm Braking Time Less than 1 sec with 331 3rpm Time for Speed Change Less than 1 sec from 331 3 to 45 rpm Less than 1 sec from 45 to 331 3 rpm USB Function USB Rec Play Fu...

Page 20: ...old or as set forth above will void this warranty To initiate a warranty repair you must contact the authorized Stanton dealer from whom you purchased the merchandise and follow such authorized Stanto...

Reviews: