background image

DE

15

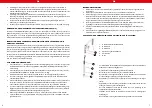
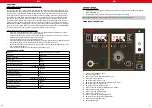
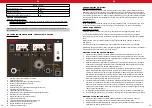
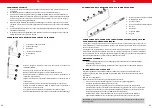
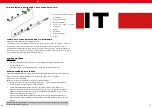
REPLACEMENT OF HOT AIR REWORK HEATING ELEMENT

EN

1. 

HOT AIR gun covers

2. 

element of the handle

3. 

heater

4. 

heater cover

5. 

outlet pipe

6. 

nozzle

Before heater replacement make sure that the HOT AIR gun is completely cold.

Remove the screws in the gun covers.
Unscrew the element of the handle (2) and take off the gun covers.
Gently remove the fan and remove the wire board screws.
Disconnect the heater from the wire board (pay attention to the wires 
connection order).
Remove the heater from the housing, pay attention to the steel grounding wire.
New heater should be wrapped with new mica paper and then it should be 
placed inside the housing.

1

2

3

4

5

6

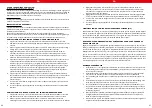
SAFETY ISSUES REMARKS

1.   Nozzles should be installed without the use of excessive force, also do not use the pliers or tweezers. 

Do not over tighten the mounting screws of the nozzle.

2.   Tips and nozzles can be changed when the HOT AIR gun and the soldering iron are completely cold.
3.   It is forbidden to use the device near the flammable or combustible elements and objects or in simi

-

lar places. Tips and nozzles as well as the air coming out of the HOT AIR gun have very high tempera

-

tures, it is forbidden to touch these elements as well as it is forbidden to direct the hot air at face or 
body. This can cause serious burns.

4.   After long time of use, the outlet of HOT AIR gun may be covered with some dust. The outlet should 

be cleaned on a regular basis in order to ensure undisturbed air flow.

5.   Too high temperature of the soldering iron may be the cause of reduction of the functionality of the 

soldering tips.

6.   Soldering iron tip must be cleaned regularly using sponge and plate on a layer of tin to prevent tips 

oxidation.

EN

REGULAR CLEANING

Generalities
• 

Never clean the device with a pressurized water-jet, industrial cleaners, and brushes or any other 
type of cleaning utensil that could damage the surface of the appliance.

• 

Before cleaning you must remove the electricity supply plug isolating the appliance from the main 
power circuit.

REGULAR CONTROL OF THE DEVICE

Control regularly that the device doesn´t present any damage. If there is any damage, please stop using the 
device. Please contact your customer service to solve the problem.

What to do in case of problem?

Please contact your customer service and prepare following information:
• 

Invoice number and serial number (the latest is to be found on the technical plate on the device).

• 

If relevant, a picture of the damaged, broken or defective part.

• 

It will be easier for your customer service clerk to determine the source of the problem if you give 

a detailed and precise description of the matter. Avoid formulations like “the device doesn´t heat”, 

which may mean that it doesn´t heat enough or even not at all. These two possibilities have a different 
causation!

• 

The more detailed your information, the better the customer service will be able to answer your 

problem rapidly and efficiently!

CAUTION: Never open the device without the authorization of your customer service. This can lead to a 

loss of warranty!

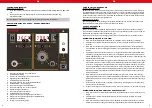
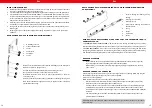
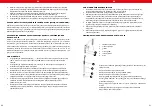
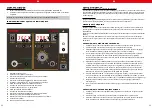
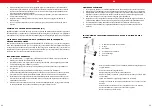
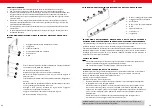
REPLACEMENT OF THE SOLDERING IRON TIP AND SOLDERING IRON HEATING 
CORE ELEMENT

1. 

nut for mounting the soldering iron tip 
housing

2. 

soldering iron tip housing

3. 

soldering iron tip

4. 

plastic nut for mounting the heater and 
the board wires

5. 

spring

6. 

heater

7. 

wires board

8. 

handle

BEFORE HEATER REPLACEMENT MAKE SURE THAT THE SOLDERING IRON IS 
COMPLETELY COLD.

1.  SOLDERING  IRON TIP  REPLACEMENT:  remove  the  nut  for  mounting  the  soldering  iron  tip  housing 
and take off the housing. Replace the tip with the new one, place the housing and fix all with the plastic nut.

2. HEATER REPLACEMENT: remove the nut for mounting the soldering iron tip housing and take off the 

housing along with the tip. Remove the nut for fixing the heater (4) and gently remove the heater (6) along 

with the board with wires (7). Replace the whole remembering the wires connection order.

1

2

3

4

5

6

7

8

14

Summary of Contents for 6132 S-LS-16

Page 1: ...S LS 16 S LS 16 Basic w w w S T A M O S W E L D I N G c o m User manual Manuel d utilisation Istruzioni per l uso Manual de instrucciones BEDIENUNGSANLEITUNG...

Page 2: ...satz von Putzmitteln und achten Sie darauf dass keine Fl ssigkeit in das Ger t eindringt bzw darin verbleibt Das Innere dieses Ger tes enth lt keine durch den Benutzer zu wartende Teile berlassen Sie...

Page 3: ...G NUR DER L TSTATION 1 Das Ger t ist auf stabilen Boden aufzustellen der L tkolben ist in der Halterung zu befestigen 2 Verbinden Sie das Ger t mittels des Netzsteckers montieren Sie die gew nschte L...

Page 4: ...ber ist und keine Hindernisse oder Blockaden aufweist 5 W hrend der Nutzung kleinerer D sen ist daran zu denken dass die Luftzufuhr der montierten D se entspricht sowie um zu vermeiden dass der Hei lu...

Page 5: ...ursachen Geben Sie stets den Zustand der Leuchten an da dies die Diagnose erleichtert Je detaillierter Ihre Angaben sind umso schneller kann Ihnen geholfen werden ACHTUNG ffnen Sie niemals das Ger t o...

Page 6: ...ace the device close to combustible materials When first using the device the heating element may produce a light smoke This is absolutely normal Simply ensure that the smoke can evaporate and that a...

Page 7: ...ly disconnected from the power source OPERATION SMD REWORK STATION ONLY 1 Device must be placed on stable work table SMD rework gun must be placed into the holder 2 Fix the appropriate nozzle and conn...

Page 8: ...could damage the surface of the appliance Before cleaning you must remove the electricity supply plug isolating the appliance from the main power circuit REGULAR CONTROL OF THE DEVICE Control regular...

Page 9: ...o urz dzenia i lub tam nie pozosta a Nale y wy czy urz dzenie natychmiast po zauwa eniu nieprawid owo ci w sposobie jego funkcjonowania Powinno si r wnie wyci gn wtyczk z gniazdka sieciowego gdy urz d...

Page 10: ...Nale y pami ta o tym by zasilanie urz dzenia energi odpowiada o danym podanym na tabliczce znamionowej Po ustawieniu urz dzenia w odpowiednim miejscu nale y usun wkr t znajduj cy si na spodzie urz dze...

Page 11: ...dnych blokad ani przeszk d 5 Podczas korzystania z ma ych dysz nale y pami ta o tym aby przep yw powietrza by dostosowany do zamontowanej dyszy oraz aby unikn uszkodzenia kolby hot air nie nale y utrz...

Page 12: ...y dwuznaczne i oznaczaj zar wno e urz dzenie grzeje za s abo lub w og le nie grzeje S to jednak dwie r ne przyczyny usterek Im bardziej szczeg owe s dane tym szybciej mo na Pa stwu pom c UWAGA Nigdy n...

Page 13: ...des autres appareils et assurez vous que la pi ce dans laquelle vous devez travailler soit suffisamment a r e Assurez vous que l appareil ne soit pas plac c t de substances inflammables Dans certains...

Page 14: ...il l aide de l interrupteur situ l arri re de la station allumez la fonction dessoudage air chaud au moyen de l interrupteur 3 la buse air chaud commence alors chauffer FR 4 R glage de la temp rature...

Page 15: ...tilisez pas de brosses ou ustensiles capables d endommager l appareil Avant de commencer le nettoyage veuillez d connecter l appareil de son alimentation lectrique EXAMEN R GULIER DE L APPAREIL Contr...

Page 16: ...penetre y se estanque en el equipo El mantenimiento de los componentes del dispositivo debe de ser realizado por t cnicos autorizados Una intervenci n por personal no autorizado conlleva la p rdida de...

Page 17: ...en el sitio previsto retire el tornillo en la parte inferior del equipo marcado en color rojo En caso de tener que desplazar el equipo vuelva a colocar el tornillo en el mismo alojamiento OPERACI N DE...

Page 18: ...e la pistola de aire est limpia y sin objetos que la bloqueen 5 Cuando utilice boquillas peque as aseg rese que el flujo de aire es acorde con su tama o para evitar que la unidad de aire caliente resu...

Page 19: ...ner origen en 2 causas diferentes Por ello es importante detallar el estado de los pilotos luminosos ya que ayudan a elaborar un diagn stico En cuanto m s detallada sea la informaci n que aporte m s r...

Page 20: ...cchio ad una distanza di pi di 10 cm dalle pareti o da altri attrezzi e assicurarsi che l ambiente di lavoro sia correttamente arieggiato Assicurarsi che non vi siano elementi infiammabili vicino all...

Page 21: ...ivo alla corrente montare la punta saldante desiderata sul saldatoio 3 L apparecchio si accende premendo l interruttore principale posto sul retro il saldatore si accende premendo l interruttore 5 Il...

Page 22: ...he potrebbero danneggiare le superfici dell apparecchiatura Prima di effettuare operazioni di pulizia scollegare il dispositivo dalla corrente REGOLARE CONTROLLO DELL APPARECCHIO Verificare regolarmen...

Page 23: ...44...

Page 24: ...les appareils pr sent s dans ce mode d emploi sont conformes aux normes Ce PL Niniejszym potwierdzamy e urz dzenia opisane w tej instrukcji s zgodne z deklaracj CE IT Con la presente documentazione si...

Page 25: ...kgabe oder Sammlung von Altger ten 1 RICHTLINIE 2002 96 EG DES EUROP ISCHEN PARLAMENTS UND DES RATES BER ELEKTRO UND ELEKTRONIK ALTGER TE 2 Gesetz ber das Inverkehrbringen die R cknahme und die umwelt...

Reviews: