background image

PRODUCT PARTS DRAWING

18

FRONT

BACK

18

19

23

22

20

33

35

8

71

46

8

17

16

17

79

45

44

43

43

44

24

27

47

9

54

43

14

18

19

72

21

44

34

36

43

43

27

25

46

71

50

46

71

50

75

52

12

52

64

31

31

80

81

39

39

49

6

59 71

69

59

71

69

1

9

67

59

60

59

60

40

74

73

5

65

15

13

71

45

46

30

40

4

28

70

70

32

37

30

48

68

68

29

56

57

58

7

55

71

59

45

28

59

71

45

50

46

49

51

51

38

38

76

62

28

10

28

42

26

66

62

10

42

11

63

53

41

2

3

77

78

68

59

61

67

68

59

71

76

Summary of Contents for 15-1345

Page 1: ...immediately discontinue use of this equipment Serious bodily injury can occur if this equipment is not assembled and used correctly Serious bodily injury can also occur if all instructions are not fo...

Page 2: ......

Page 3: ...eplace any worn or loose components prior to use 12 Before using always check the Seat Frame 65 to be sure it is secure The Locking Knob 74 must be tightened 13 Each user should adjust the seat per in...

Page 4: ...and to help us better serve you please go onlineand register your new product register staminaproducts com ONLINE customer care staminaproducts com www staminaproducts com TELEPHONE 1 800 375 7520 FA...

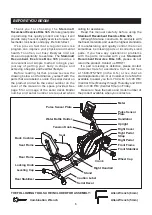
Page 5: ...lf with the parts that are labeled Locate the serial decal on the product and write the serial number on the cover of the manual in the space provided See page 5 for an image of the serial decal Model...

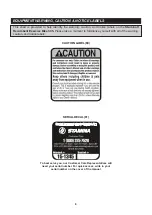
Page 6: ...lease take a moment to familiarize yourself with all of the warning caution and notice labels EQUIPMENT WARNING CAUTION NOTICE LABELS 6 CAUTION LABEL 80 To best serve you our Customer Care Representat...

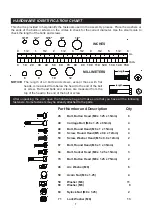
Page 7: ...After unpacking the unit open the hardware bag and make sure that you have all the following fasteners Some fasteners may be already attached to the parts MILLIMETERS 0 10 20 30 40 50 60 70 80 90 100...

Page 8: ...cumbent Bike stable 8 Place all parts from the box in a cleared area and position them on the floor in front of you Remove all packing materials from your area and place them back into the box Do not...

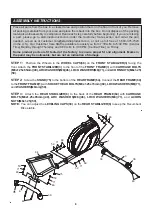
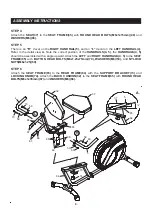
Page 9: ...e HANDRAILS 4 5 should be assembled with a angle upward Attach the LEFT and RIGHT HANDRAILS 4 5 to the SEAT FRAME 65 with BUTTON HEAD BOLTS M8x1 25x75mm 70 WASHERS M8 59 and NYLOCK NUTS M8x1 25 60 STE...

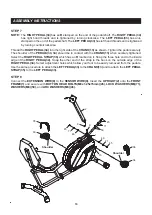
Page 10: ...should be in contact with the CRANK 13 when securely tightened Select the RIGHT PEDAL STRAP 36 which has an R marked on it Snap the three hole end to the inside edge of the RIGHT PEDAL 34 Snap the ot...

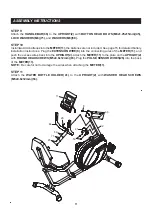
Page 11: ...instructions Plug the EXTENSION WIRE 8 into the connecting wires of the METER 11 and push the excess wires back into the UPRIGHT 2 Attach the METER 11 to the plate on the UPRIGHT 2 with ROUND HEAD SCR...

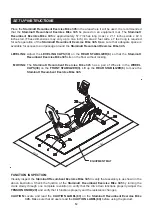
Page 12: ...e Stamina Recumbent Exercise Bike 345 sits on the floor without rocking MOVING The Stamina Recumbent Exercise Bike 345 has a pair of Wheels in the WHEEL CAPS 38 on the FRONT STABILIZER 3 Lift up the R...

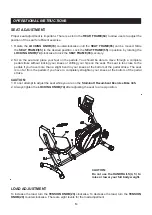
Page 13: ...h a complete pedal stroke without locking your knees or shifting your hips on the seat The seat is too close to the pedals if you have more than a slight bend in your knees at the bottom of the pedal...

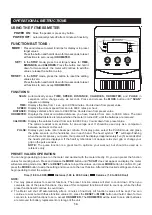
Page 14: ...nd release the MODE button until SCAN does not appear on display the meter will enter setting mode Use SET and RESET buttons to input the values and press MODE button to confirm Or just press the MODE...

Page 15: ...bolts are present and properly tightened Replace missing nuts and bolts Tighten loose nuts and bolts 4 Verify that the CAUTION LABEL 80 is in place and easy to read Call Stamina Products immediately...

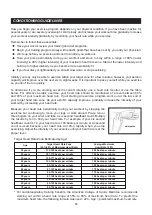
Page 16: ...of your maximum heart rate zone Start at the lower intensity and build up to higher intensity as you become more aerobically fit If you feel dizzy or lightheaded you should slow down or stop exercisin...

Page 17: ...cool down should include the stretches listed above and should be completed after each strength training session Lower Body Stretch Place feet shoulder width apart and lean forward Keep this position...

Page 18: ...2 21 44 34 36 43 43 27 25 46 71 50 46 71 50 75 52 12 52 64 31 31 80 81 39 39 49 6 59 71 69 59 71 69 1 9 67 59 60 59 60 40 74 73 5 65 15 13 71 45 46 30 40 4 28 70 70 32 37 30 48 68 68 29 56 57 58 7 55...

Page 19: ...ng Snap Washer 1 23 Outside Bearing Collar 1 24 Right Cover 1 25 Left Cover 1 26 Pulse Plug Wire 1 27 Crank Cap 2 28 Round Plug 25mm 4 29 Tension Knob 1 30 Rectangular Plug 23 5mm x 53 5mm 2 31 Rectan...

Page 20: ...ylock Nut M8 x 1 25 2 61 Magnet 1 62 Screw Flat Head ST4 2 x 20mm 2 63 Screw Round Head M5 x 0 8 x 12mm 4 64 Rear Frame 1 65 Seat Frame 1 66 Handlebar 1 67 Bolt Round Head M6 x 1 0 x 35mm 4 68 Washer...

Page 21: ...RANTY INCLUDING MERCHANTABILITY AND FITNESS FOR A PARTICULAR PURPOSE MAY BE COMMENCED MORE THAN ONE 1 YEAR AFTER DELIVERY OF THE PRODUCT TO THE PURCHASER These warranties are not transferable IF ANY P...

Page 22: ...NOTES 22...
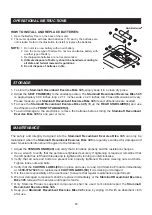
Page 23: ...nvenience Stamina s customer care representatives can be reached by email at customer care staminaproducts com or by phone at 1 800 375 7520 in the U S Our customer care representatives are available...

Reviews: