background image

STACKER 500KS USER GUIDE 41 


E) 

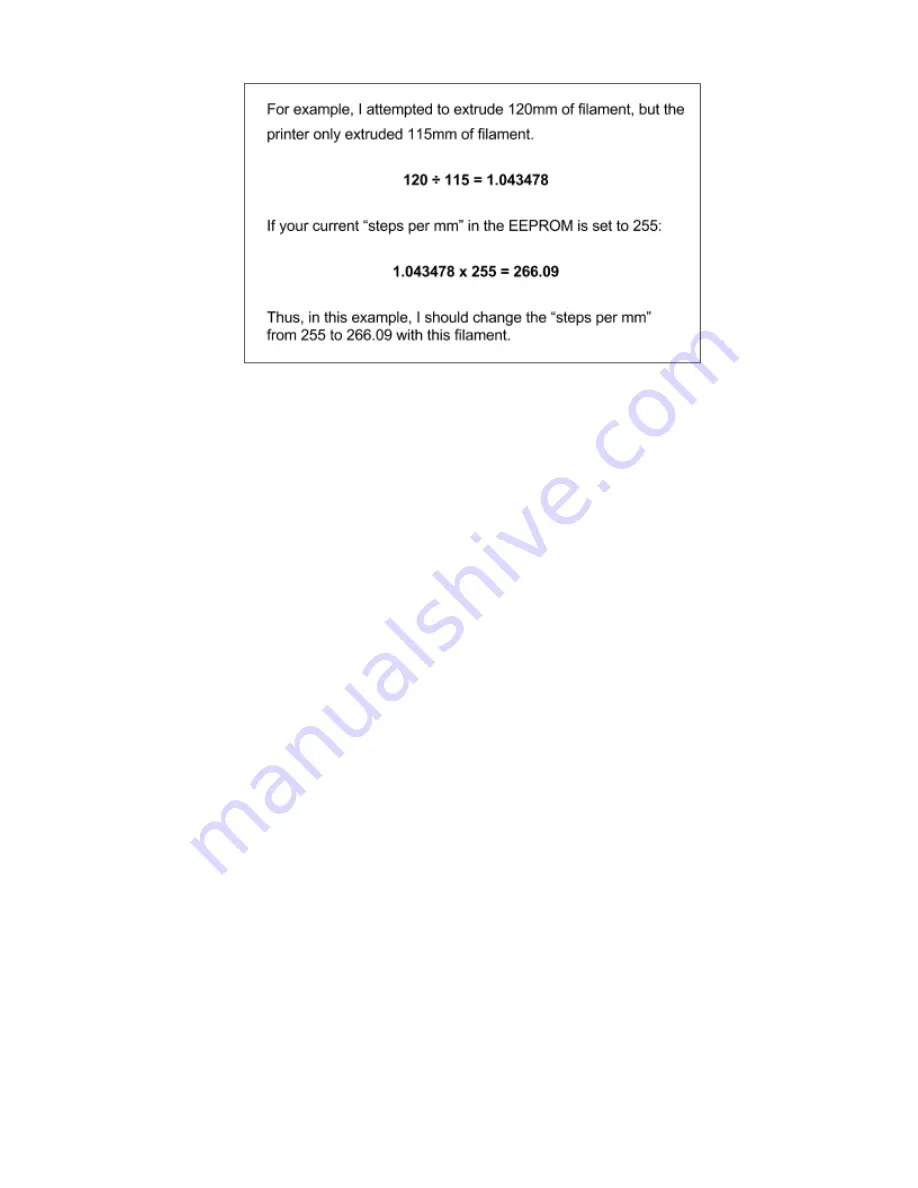
Enter your new E­Steps for your extruder. It is now time to test your result. Go back and repeat 

steps 2 through 5 again to confirm your result.   
 

(4) Extrusion Multiplier  

 
For even finer volumetric calibration you can adjust the extrusion multiplier in your slicing engine. 
Most filaments will print VERY accurately with a 100% extrusion multiplier setting in your slicing 
engine. However, some filaments like XT­CF20 Carbon Fiber filament will over extrude due to die 
swell, and will therefore require a lower extrusion multiplier, perhaps as low as .88. Printing a simple 
single wall test cube will allow you to see exactly how accurate your print widths are. There are 
many of these types of calibration models available on the internet. As you gain experience in 3D 
printing your will accomplish accurate results quite easily. Using the same filament will also help you 
maintain consistency.  


Summary of Contents for 2105-KS

Page 1: ...User Guide MODEL 500 2015 KS Copyright 2016 STACKER LLC Minneapolis MN 55427 http stacker3d com STACKER is the registered trademark of STACKER LLC Revised 20 February 2016...

Page 2: ...RUN Software 5 Printer Set up 5 1 Power Up Printer 5 2 Level The Print Bed 5 3 Adjusting Nozzle Height 5 4 Changing Nozzles Filament Guide Tube 5 5 Loading Filament 5 6 Manual control via STACKER RUN...

Page 3: ...out the need for support materials The following list of CAD apps is a good balance of power and value some of which are free and have robust online training and user communities Nearly all of these a...

Page 4: ...inted copy of the User Guide may not be the most current version We recommend downloading the User Guide from our website to confirm you have the latest version The revision date is noted on the cover...

Page 5: ...pdf desktop start stkr500ks pdf If you have a full height model that arrived on a pallet carefully cut away the packaging and set the unit upright on its casters 3 1 Locate the two hardware boxes and...

Page 6: ...STACKER 500KS USER GUIDE 6 Box 2 contains three main hardware bags...

Page 7: ...corner brackets You will reuse these screws to mount the Filament Rail Brackets in the next step Use the supplied 3mm hex wrench and an 8mm wrench socket pliers not provided Step 3 Attach the filamen...

Page 8: ...ead Cap Screws and 2 M4 Thumb nuts as shown Note the red coating on the Screws this red coating will prevent the thumb nuts from backdriving Step 2 Attach the filament drive idler assembly hardware to...

Page 9: ...d You MUST remove all of this packing tape before continuing Clean off any residue with an alcohol wipe if necessary 3 5 Attach the cable ties on your filament guide tubes Use the supplied zip ties to...

Page 10: ...critical that your blower fans are positioned correctly during the operation of your printer If the fans are positioned in the in the incorrect position see images below the blower fans will crash in...

Page 11: ...our own http stacker3d com kickstarter support When attaching the blower duct make sure it is attached with the proper orientation otherwise the blower duct can crash into the bed when homing the Z ax...

Page 12: ...allation instructions Built into the program are other online resources for learning how to use this software Please familiarize yourself with the software before continuing STACKER RUN software is an...

Page 13: ...power supply to help you properly connect it to your power source and determine compatibility Please reference this data in Section 9 1 We also strongly recommend using an uninterruptible power supply...

Page 14: ...inal test If your bed is way out of adjustment you will need to follow the full adjustment process You begin this process by homing the z axis on the aluminum setup block and then you level the bed to...

Page 15: ...ft corner A drop down menu will allow you to select the correct model as shown by the arrow Step 2 Home the Z axis on the aluminum setup block Place the aluminum setup block under the z probe adjustme...

Page 16: ...to the same plane as the nozzles You are not leveling the bed with a level You are setting the bed to the same plane as the x y gantry Step 3 Move the X Y gantry to the back of your print bed and posi...

Page 17: ...t leveling screw found underneath the bed with the supplied 7mm nut driver Note There are three leveling screws with heavy duty springs When you adjust the leveler your are actually moving the 4mm hex...

Page 18: ...ossible to run out of travel on your z probe height adjustment screw and or your leveling springs If this happens you can make macro height adjustments by moving the entire z probe bracket up or down...

Page 19: ...ent with setup block You must now rehome the z axis on your setup block and retest the levelness Fine adjust if necessary Use the same procedures as steps 5 and 6 above IMPORTANT If you need to adjust...

Page 20: ...gauge When retightening the two nuts be sure to move back and forth between the two nuts and tighten them gradually and equally Do not overtighten 5 4 Changing Nozzles Filament Guide Tube Your new STA...

Page 21: ...clean Use a glove to protect yourself from getting burned After the nozzle is clean TURN OFF THE HOT END and wait for it to cool IMPORTANT Turn off the heat and wait until the hot end has cooled down...

Page 22: ...SE A PLIERS because pliers can easily damage these plastic connectors Next using the 1 5mm hex wrench loosen the two heater block screws on the right side of the block that clamp on to the nozzle The...

Page 23: ...he end of the tube once or twice before the tube becomes too short for use Also we recommend trimming the end of your tube with a sharp knife to ensure the end of the tube properly seals within the no...

Page 24: ...e tube is seated in the nozzle use the nozzle wrench and tighten the nozzle snuggly Do NOT overtighten The filament guide tube should rise as you tighten the nozzle As the tube rises it will tighten o...

Page 25: ...hand until it catches on the fitting while using your other hand to tighten the fitting see image below The tube must not have any play To test simply grasp the tube and try moving it up and down If t...

Page 26: ...ar then push the filament upward past the gear and through the filament guide just above the gear Step 3 Extrude filament by hand optional If your hot end has reached the recommended temperature for y...

Page 27: ...e heat bed and extruders Learn more about the manual control panel on the Repetier website http www repetier com documentation repetier host rhmanual control 2 Sending gcode to the printer From the ma...

Page 28: ...S12345 M27 Report SD print status M28 Start SD write M28 filename g M29 Stop SD write M80 Turn on power supply M81 Turn off power supply M82 Set E codes absolute default M83 Set E codes relative while...

Page 29: ...USB connection For example if your computer shuts down or hibernates it can result in a failed print You may want to change your computer s settings so that it does not go to sleep during a print When...

Page 30: ...ame method of saving to SD on your computer and then transferring it to your printer s controller 5 8 First Print First Layer Height It is really important to get the first layer height spot on If you...

Page 31: ...ease take a look at the Simplify3D print quality troubleshooting guide It provides excellent visuals of common problems and solutions https www simplify3d com support print quality troubleshooting 5 9...

Page 32: ...s you wish to print Click on the desired number of copies and close the window Take note that the build area in the graphic of the bed changes size depending upon the number of print heads being used...

Page 33: ...the distance between heads In the image below the head are being set for 4 head printing so they are separated by 115mm as shown To easily setup your print heads for multihead printing we recommend us...

Page 34: ...ved to the far right side of the gantry Note if the unused heads are pushed too far to the right they will trip the X Max End Stop When each print head has been moved to its location along the X gantr...

Page 35: ...stl file of into gcode which operates the printer The gcode provides the commands for the printer to print your 3D object STACKER RUN includes two open source slicing engines Slic3r and Cura and both...

Page 36: ...for the cooling fans to fully cool your extruders before turning off the printer You can observe the temperatures of your extruders on the Manual Control tab of STACKER RUN Shutting down the printer w...

Page 37: ...as a host of other controls to ensure consistent filament diameters Regardless of what filament brand you use start with a digital caliper and measure the diameter of your filament in few different p...

Page 38: ...ments that require temperatures between 270 and 300 C we recommend using our HIGH TEMP nozzles The HIGH TEMP nozzles have a special machined band to distinguish them from our MID temp nozzles Again fo...

Page 39: ...an ink pen Please follow these steps A Heat up your hot end and leave it on this will allow you to manually extrude Release the filament drive idler bearing assembly and manually pull back approximat...

Page 40: ...n STACKER RUN by pressing Alt E or select Firmware EEPROM Configuration under the Config menu to see your current E STEPS for each extruder To calculate the new E STEPS number use this formula 120mm Y...

Page 41: ...usion multiplier setting in your slicing engine However some filaments like XT CF20 Carbon Fiber filament will over extrude due to die swell and will therefore require a lower extrusion multiplier per...

Page 42: ...uareness 4 X Y Z Motor Steps MM Please take each one of these calibration steps in order For example it s important to get your gantry square and belts tensioned properly BEFORE you change the motor s...

Page 43: ...The belts should be properly tensioned and stay this way for many hours of use In case the belts do come loose or the tension changes simply tighten the thumb nuts by hand or use a 7mm wrench for the...

Page 44: ...bracket in one direction and the Right side Y Axis bearing belt tension bracket in the opposite direction until the X gantry is square to the Y Axis You can either use a test print to validate the squ...

Page 45: ...he orientation of the part on the print bed so you know which way to move the tension blocks Step 4 X Y Z Motor Steps MM and Z axis Backlash settings The easiest way to adjust the X Y Z steps is to pu...

Page 46: ...bration Setup Z Axis Calibration Setup for Steps MM and Z Axis Backlash Change your steps in the EEPROM Now you need to open your EEPROM window in STACKER RUN by pressing Alt E or select Firmware EEPR...

Page 47: ...gantry 10mm Write down the number measured Make the calculation and update the EEPROM with the new step number Repeat the process for the Y and Z axis if needed Z Axis Backlash Calibration Procedure...

Page 48: ...oved It is extremely important that you do not run the motors prior to adjusting the Vref Also exceeding the motor s current rating can damage both the motor and the stepper motor driver To check the...

Page 49: ...CKER 500KS USER GUIDE 49 More information about the stepper motor drivers can be found at http files panucatt com datasheets sd8825_user_guide pdf http files panucatt com datasheets sd6128_user_guide...

Page 50: ...STACKER 500KS USER GUIDE 50 9 Useful Information 9 1 Power Supply Data Sheet...

Page 51: ...ching the printer or any of the printer s electronic components Discharge your static before touching your printer Step 1 Remove the electronics controller housing cover Use a 2mm hex key to remove th...

Page 52: ...this will make it easier to push the individual wires through the bushing Use a small 5 5mm socket or similar sized object to pre bend the tabs Only push about 3 or 4 wires through at a time This is...

Page 53: ...housing by pressing it with your finger See photos below Step 5 Attach the Wires to the Controller Board The wires are separated into two groups the universal cable with 12 wires and the 4 pin cable...

Page 54: ...e recommend using a pliers and starting on the far left side with the yellow wire from the universal cable It is best to take care of these wires first because they are most challenging Step 6 Reattac...

Page 55: ...ipped with your Smart Controller If so the housing will ship separately and will include a separate user guide We are expecting the new housings to arrive by late December 2015 and we will send them o...

Page 56: ...back on to verify that no wires are hitting fans in the controller housing WARNING If your cooling fans are not functioning properly your control board will overheat and be permanently damaged The con...

Page 57: ...the LCD Smart Controller is installed the microSD port on the controller housing will no longer function Also if the dual LED ring is showing both red and blue it means that your printer is in an erro...

Page 58: ...gested settings for STACKER Filament Nozzle Temp Bed Temp for Glass Bed Temp for BuildTak Fan PLA PHA 215 225 55 45 50 Yes XT 255 65 75 50 60 No nGen 235 245 65 75 50 60 No Woodfill Bamboofill 220 55...

Page 59: ...ler s quotation and or sales documents 1 PRICES Except as otherwise set forth in writing by Seller the price for Goods shall be as set forth in the applicable Seller s quotation and or sales documents...

Page 60: ...merchandise subject to a 10 restocking fee For non electronic items excluding filament the Seller accepts returns only on unopened items within thirty 30 calendar days from the date of Buyer s receip...

Page 61: ...erms in this Agreement and 2 for Software that is not embedded Software Buyer shall have a permanent right to transfer all its Software rights under this Agreement to another party provided Buyer pass...

Page 62: ...REACH OF WARRANTY HEREUNDER SHALL BE LIMITED TO REPAIR REPLACEMENT OR REFUND UNDER THE LIMITED WARRANTY SET FORTH IN SECTION 9 ABOVE IN NO EVENT REGARDLESS OF THE FORM OF THE CLAIM OR CAUSE OF ACTION...

Page 63: ...greement may be brought by Buyer more than two 2 years after the cause of action has accrued c Seller shall not be liable for delays in performance or for non performance due to acts of God war terror...

Page 64: ...STACKER 500KS USER GUIDE 64 Notes...

Reviews: