background image


     SCF-Revolution Manual 

13 

VENTING: TERMINATION REQUIREMENTS


In determining optimum vent termination, carefully evaluate external conditions especially when 
venting directly through a wall. Since you must deal with odors, gases, and fly ash, consider 
aesthetics, prevailing winds, distances from air inlets and combustibles, location of adjacent 
structures and any code requirements. 

1.  Exhaust must terminate above combustion air inlet elevation. 

2.  Do not terminate vent in any enclosed or semi-enclosed area, (i.e. Carports, garage, attic 

crawl space, etc.) or any location that can build up a concentration of fumes. 

3.  Vent surfaces can get hot enough to cause burns if touched by children. Non-combustible 

shielding or guards may be required 

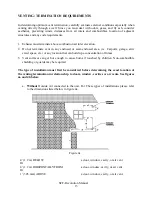
The type of installation must first be considered before determining the exact location of 
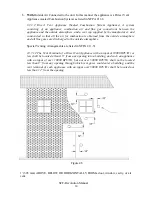
the venting termination in relation ship to doors, window, cavities or air vents. See figures 
4a and 4b below. 

a.


Without

 Outside Air connected to the unit. For These types of installations please refer 

to the dimensions listed below in figure 4a. 


Figure 4a 

 
4’ (1.2 m) BELOW 


 a door, window, cavity, or air vent  

Or             
4’ (1.2 m) HORIZONTALLY FROM  


 a door, window, cavity, or air vent     

Or                                   
1’ (305 mm) ABOVE                            


 a door, window, cavity, or air vent 

Summary of Contents for SCF-Revolution

Page 1: ...SCF Revolution Manual 1 SCF REVOLUTION MULTI FUEL FURNACE Installation Operations Manual 1108...

Page 2: ...12 Venting Termination Requirements 13 14 Venting Termination Clearance Requirements 15 Venting Into an existing Chimney 16 Combustion Air 17 Connecting to Existing Duct Work 18 19 Mobile Home Instal...

Page 3: ...n Air Damper 34 37 Diagnostic Safety Features 38 39 Pilot Settings Thermostat Control 39 SCF Revolution Maintenance 40 Daily Maintenance 40 Periodic Maintenance 41 43 Yearly Maintenance 44 45 Safe Ope...

Page 4: ...n requirements DEFINITION OF FURNACE The word Furnace as used in this manual is interpreted to mean a corn or wood pellet burning Add On Furnace This model is not intended as the sole source of heat S...

Page 5: ...that the outside air inlet is connected to draw fresh air from outside the building 2 All joints of PL vent and single wall stainless steel pipe should be fastened by at least 3 screws and correctly...

Page 6: ...in the furnace is the St Croix Patent Pending Revolution Burn System This burn system is Self Cleaning and Self Igniting during operation There are 2 versions of this Burn System one designed for pell...

Page 7: ...ler cover gives access to the following components Combustion Fan Vacuum Switch and Proof of Fire Switch The larger cover allows access to the Convection Blower for maintenance when needed The Fan Lim...

Page 8: ...16 in front of the unit and 8 on either side of the fuel loading and ash removal doors A listed stove board or any non combustible solid sheet material may be used as a spark arrestor RIGHT SIDE Mini...

Page 9: ...CONDENSATION When planning the installation of your Furnace keep in mind that condensation is detrimental to exhaust systems Corn Wheat Rye Distiller s Grain have a higher moisture content than pellet...

Page 10: ...impson DuraVent and Selkirk Metalbestos and is carried by many local pellet Furnace dealers In this manual approved venting will be referred to a PL vent or Single wall vent All single wall vent adapt...

Page 11: ...L VENT COMPONENTS RAIN CAP VERTICAL OR WALL THIMBLE CHIMNEY SUPPORT BRACKET HORIZONTAL ADAPTER ADJUSTABLE LENGTH SINGLE TEE SINGLE REDUCTION DOUBLE TEE PIPE w TEE CAP TEE w TEE CAP w TEE CAP PIPE ADAP...

Page 12: ...he exhaust port on the back of the furnace FAILURE TO PROVIDE THE NATURAL DRAFT THAT RESULTS FROM A VERTICAL RISE MAY RESULT IN SMOKE BEING RELEASED INTO THE HOUSE WHEN ELECTRICITY TO THE UNIT IS INTE...

Page 13: ...rage attic crawl space etc or any location that can build up a concentration of fumes 3 Vent surfaces can get hot enough to cause burns if touched by children Non combustible shielding or guards may b...

Page 14: ...outside atmosphere and all flue gases are discharged to the outside atmosphere Special Venting Arrangements are listed in NFPA 211 31 10 7 1 2 The Vent Terminal of a Direct Vent Appliance with an inp...

Page 15: ...ST BE AT LEAST 1 305 mm ABOVE the ground level 7 2 1 m FROM a public walkway 1 305 mm FROM The wall penetration point 3 915mm FROM a gas meter regulator assembly 2 610 mm FROM any adjacent combustible...

Page 16: ...hen chimneys are relined a chimney chase cap that reduces the outlet of the chimney to the size of the liner is required Extend the exhaust vent above the chimney chase cap and finish it off with a ra...

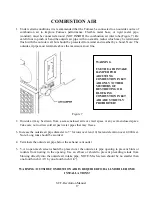
Page 17: ...ny semi enclosed space Take care not to draw cold air past water pipes that may freeze 3 Increase the outside air pipe diameter to 3 for runs over ten 10 feet and elevation over 4 000 feet Note Long r...

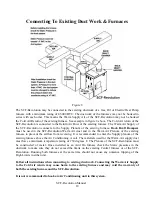
Page 18: ...m of the existing furnace to prevent the airflow from reversing It is recommended to enter the Supply plenum of the existing furnace above the Air Conditioning A coil The materials used for the Warm A...

Page 19: ...ction of this control is set at a maximum setting of 200 degrees F CAUTION DO NOT TAMPER WITH THE HIGH LIMIT SETTING There are two adjustable Fan Control Settings They control when the Convection Blow...

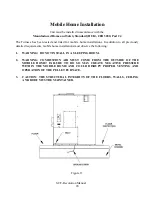
Page 20: ...l previously detailed requirements mobile home installations must observe the following 1 WARNING DO NOT INSTALL IN A SLEEPING ROOM 2 WARNING COMBUSTION AIR MUST COME FROM THE OUTSIDE OF THE MOBILE HO...

Page 21: ...Single wall vent is not allowed Follow PL Vent manufacturer s installation directions and observe all listed clearances to combustibles DO NOT CONNECT THE SCF REVOLUTION FURNACE TO A DOWN FLOW FURNAC...

Page 22: ...tem will terminate REMEMBER Condensation from a corn furnace is detrimental to the venting system Only buy venting systems that are warranted with burning corn PREVENTING CHIMNEY FIRES Chimney fires c...

Page 23: ...h 3 16 mesh screening Large pieces of cob may plug the auger Store corn in a tight container or use other methods to ensure they do not become rain soaked or absorb moisture from damp or wet floors Th...

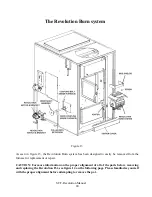
Page 24: ...esigned to easily be removed from the furnace for replacement or repair CAUTION For more information on the proper alignment of all of the parts before removing and replacing the Revolution Pot see fi...

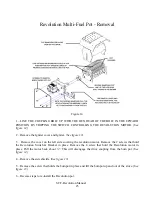
Page 25: ...the cover on the left side covering the revolution motor Remove the 2 screws that hold the Revolution Switch Bracket in place Remove the 4 screw that hold the Revolution motor in place Pull the motor...

Page 26: ...of the burnpot c The clinker Cutters To Disassemble the Pot assembly 1 First remove the Retainers and open the hinged Ash Retainer on one side and the Clinker Cutters on the other 2 The drum will now...

Page 27: ...t Pending Ignition System using pellets to ignite the furnace and automatically switch over to Corn Wheat Rye Cherry Pits or Distiller s Grain after ignition has taken place This allows the furnace to...

Page 28: ...furnace firebox during operation may cause skin burns 6 To avoid the possibility of smoke and or sparks entering the room always keep firebox and ash pan doors closed whenever the furnace is operating...

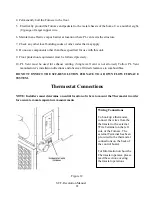
Page 29: ...nace These areas are 1 High Temperature Limit 2 Proof of Fire Sensor 3 Vacuum in the Firebox A closer look at the Control Board to the right in figure 17 will explain how the board works There are ess...

Page 30: ...s up or down from the factory setting Watch the LED lights to see the setting is on it will flash the new setting This new setting will stay in memory from this point on b To adjust the Feed rates Hol...

Page 31: ...illers Grain Pellets only See figure 20 on page 32 3 Program 3 The Cycle Time is 6 5 seconds This program is for use with Pellets Cherry Pits See figure 20 on page 32 4 Program 4 The Cycle Time is 5 5...

Page 32: ...ER SEE PAGE 34 COMBUSTION AIR DAMPER Changing the program on the Control Board To change the program the furnace must be in the OFF position the furnace must be cooled down so the Proof of Fire disc i...

Page 33: ...ion process 1 Make sure there is Fuel in the hopper 2 Press the ON OFF button once to turn on the furnace The Start up Program works as follows a The Combustion Fan comes on at high speed and the cont...

Page 34: ...Your Furnace is equipped with an air inlet damper The purpose of this damper is to adjust combustion airflow to match the characteristic of each specific air inlet and chimney configuration The dampe...

Page 35: ...perience problems adjusting the Furnace during the Break In Period contact your dealer Some chimney systems will fall outside the norm for example a chimney with excessive draft or one with a long hor...

Page 36: ...n at this setting for an hour Check the burn pot to see if it is balanced Remember Look at the coals in the pot not at what the flame looks like Most likely the damper will not need to be adjusted d A...

Page 37: ...ult to wipe off up is noticed on the glass and inner surfaces after the furnace runs on the low pilot setting for extended periods of time the damper must be closed some This may require the Furnace t...

Page 38: ...See Figure 17 on Page 29 3 The Vacuum switch For the Furnace to operate correctly the firebox needs to be sealed During the first 30 seconds after the Furnace has been turned on the control board wil...

Page 39: ...is a 60 second window to allow for cleaning the glass before then Furnace shuts down This is sufficient for the Daily Maintenance 3 Proof of Fire switch also called the P O F This senses the temperatu...

Page 40: ...lution Pot when it runs a cleaning cycle 2 The Tube Scraper Pull the Tube Scraper back and forth a couple of times to keep the tubes clean If the Tube Scraper feels sticky and difficult to move check...

Page 41: ...ot Clean burn grate holes whenever needed Clean the burnpot while it is in the furnace Remove the pot Side Shields See Figure 12 on Page 23 and use a stiff bristle brush to remove any ash build up in...

Page 42: ...o clean the ash traps will cause the Furnace to become plugged with Fly Ash 4 Heat Exchange Baffle Remove the baffle and clean the ashes that accumulate on a regular basis Once a month or sooner depen...

Page 43: ...stallations with elbows and horizontal runs require more frequent chimney cleanings See Page 22 Preventing Chimney Fires The products of combustion will also contain small particles of fly ash The fly...

Page 44: ...l fuel from the hopper and the auger system Thoroughly clean the burn pot burn pot box ash pan and ash traps behind the ash pan To locate the ash traps see figure 23 on page 42 2 The exhaust system sh...

Page 45: ...r until all cinders have thoroughly cooled 2 Never use Gasoline gasoline type lantern fluid Kerosene charcoal lighter fluid or similar liquids to start or freshen up a fire in this heater Keep all suc...

Page 46: ...ce is 120 Volt 60 Hz 4 AMP The minimum recommended circuit is 15 Amp A dedicated circuit for the furnace is recommended CAUTION The electrical components of the Furnace are not owner serviceable Call...

Page 47: ...SCF Revolution Manual 47 Figure 27 Parts Layout...

Page 48: ...SCF Revolution Manual 48 Parts Layout Continued Figure 28...

Page 49: ...ABINET TOP 17 80P53824 HOPPERLID 18 80P30169 FAN LIMIT MOUNT BOX 19 80P53812 HOPPER TOP WELDMENT 20 80P52579 ROD SLIDER TOOL 21 80P53795 CABINET FRONT 22 80P30147 FAN LIMIT CONTROL 23 80P30312 EXHAUST...

Page 50: ...SHAFT 53 80P30209 MOTOR MOUNT BRACKET 54 80P20248 5 8 COLLAR WITH SETSCREW 55 80P30206 HEAT EXCHANGE BAFFLE 56 80P52237 ASH TRAP COVERS 57 80P30162 ASH TRAP COVER BEHIND ASHPAN 58 80P53864 ASH PAN 59...

Page 51: ...eration Requirements 1 Store Corn Pellets in sealed containers in a dry environment to prevent the fuel from absorbing moisture and becoming damaged 2 Creosote formation and Cleaning a Establish a rou...

Page 52: ...RIC FURNACE INSTALLATION 6 DO NOT CONNECT WITH ANY GAS FURNACE THAT HAS NOT BEEN CERTIFIED INITIALLY AS COMPLYING WITH CAN CGA 2 3 7 THE OPERATION OF THE GAS FURNACE MUST BE VERIFIED FOR ACCEPTABLE OP...

Page 53: ...Doors and Door Latching Systems for air leaks Any leaks in these areas will negatively affect the burn process and cause the pot to overload 3 My Furnace isn t burning and the number 2 LED light is b...

Page 54: ...urning and the 4 LED light is blinking This means the high Limit has shut the Furnace down The Convection Blower could be defective or may need cleaning The high limit switch may be also defective It...

Page 55: ...creasing the feedrates LED s 1 2 The ON time is increased or decreased 25 seconds with each adjustment Figure 29 9 Are there any adjustments that can be made through the control board to the Combustio...

Page 56: ...LED s flash twice This program is for use with Pellets Corn Program 3 6 5 second cycle time The LED s flash three times This program is for use with Pellets Corn When using this program with Corn the...

Page 57: ...er s total responsibilities and liabilities shall be to repair or replace at the manufacturer s option the defective part s All costs of removal shipment to and from the dealer or manufacturer any los...

Page 58: ...st Draft Trim Circle one See point 4a on page 30 LED 1 LED 2 LED 3 LED 4 LED 5 Feed Trim Circle one See point 4b on page 30 LED 1 LED 2 LED 3 LED 4 LED 5 FUEL Circle One PELLETS CORN WHEAT RYE CHERRY...

Reviews: