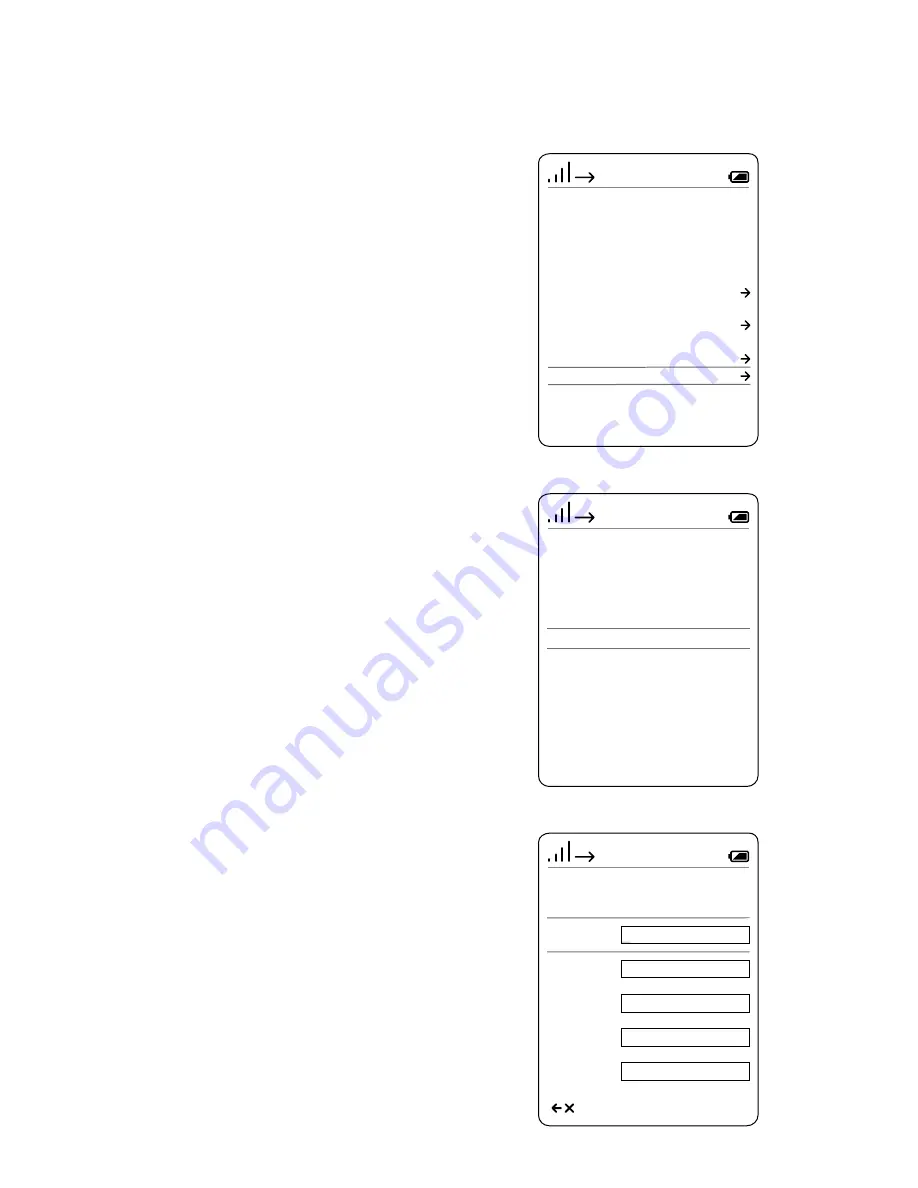
background image

84

Phone directory

Edit contact

• 

Using the navigation buttons (top/

bottom), scroll between the lines.

• 

The customary special symbols 

for the set language can be found 
by multiple pressing of a nume

-

rical button: For example, the “Ä“ 
appears after pressing the A button 
four times.

• 

An incorrect entry can be corrected 

with the left-hand softkey (<-X).

• 

Using the end call button (red 

receiver symbol) you can cancel the 
entry and return to the phonebook.

Tip:

If your phonebook is very extensive, 
press on the various letters to jump 
directly to the names starting with 

the relevant letter. 

Procedure:

In the drop-up menu Options 

select the entry Edit contact, in order 

to edit an existing directory entry.

2 Select

 the entry in the 

Phonebook

.

Confirm

 with the 

right-hand 

softkey (Select)

.

Press the right-hand softkey (

Edit

).

Confirm

 with the 

right-hand 

softkey

 (

Save

).


confirmation

 is displayed.

After around 1 second, the 

phonebook

 is displayed.

42

Phone directory

Handset 2

Mon. 27/04/2015

12:30

Back

Edit

Alpers, Heinrich
Abt, Heidrun

Abdullah, Rayan

AIGA
Alves, Maria Teresa
Arthus Company, London
Bailey, Stuart
Baldinger, Andrea

A

B

42

Edit

Handset 2

Mon. 27/04/2015

12:30

Save

Surname

Abt

Heidrun

First name

1234567890

Private

0987654321

Mobile

1234567890 

Office

42

Phone directory

Handset 2

Mon. 27/04/2015

12:30

Back

Select

Delete directory

Copy contact 

Delete contact 

Create new contact

Copy directory
Edit contact

Summary of Contents for Siedle S 851-0

Page 1: ...Operating Instructions Siedle Scope Scope cordless handset Smart Gateway Mini S 851 0 SZM 851 0 SGM 650 0...

Page 2: ...ng a call 32 Dial the required number 32 Entering and editing texts 33 Switching handsfree on and off 34 Confirm navigation buttons Functions during a call 35 Activating and deactivating microphone si...

Page 3: ...stem status 100 Change the password 101 Change the network settings 102 Setting the date and time 103 Change PIN 104 Switching on the registration mode Register handset 105 Managing cordless handsets...

Page 4: ...y 30 32 Triggering the door release 30 31 91 Actuate speed dial 59 Calling indoor devices 86 Call door call stations 87 Actuating switching functions 88 Switching Doormatic on and off 89 Activating de...

Page 5: ...nus and navigate 8 Door release button Triggering the door release 9 End call button red receiver symbol Press briefly Reject call end call one menu level back cancel current function activate operati...

Page 6: ...igate the menu structure of the Scope cordless handset Cancel OK Selection is possible using one of the following but tons Confirm button navigation Right hand navigation button Right hand softkey OK...

Page 7: ...in the display In the case of calls with video transmission the functions can be selected using the right hand softkey options 42 Cancel OK Main menu Handset 1 Mon 27 04 2015 12 30 Navigation buttons...

Page 8: ...tery full medium low and almost empty one of the following symbols is displayed Ringtone muting activated Battery charging process Ring tone silencing is acti vated for all incoming calls The battery...

Page 9: ...anguage Date time Tones signals Call Telephone call Door call Storey call Intercom Notifications Handset Door call on Handset name Register handset Display Speed dial System Eco mode on Registration m...

Page 10: ...stalled Siedle intercom in the overall system Overview DECT WLAN LAN BVPC 850 BTSV 850 BVNG 650 Internet Router Siedle intercom system building installation Siedle Scope S 851 In Home bus Scope base s...

Page 11: ...nother make at the Siedle Scope base station provided it is compatible with the GAP standard GAP capable terminal However only basic functions at the Siedle Scope such as telephone calls accepting aud...

Page 12: ...with precise workmanship bespoke design and a discernable weight are all an expression of value awareness and a design aimed at many years of reliable use as is the lengthy availability of spare part...

Page 13: ...ery away from sources of heat and naked flames Never expose the battery to high pressure Never immerse the battery in water salt water other fluids or sub stances of any other type Avoid dropping the...

Page 14: ...ble top devices and so impair the surface of the furniture Please appreciate that the manufacturer is unable to accept any liability Keep all documentation supplied with Siedle Scope in a safe place C...

Page 15: ...ownload area at www siedle com and clean the indoor device accordingly Contact with liquids In case of intensive contact with or contamination by liquids such as water damage due to burst pipes droppi...

Page 16: ...cordless handset with battery Li Ion 3 7 V Charging cradle with power supply unit Charging cradle for the Scope cordless handset Remarks There are 2 buttons on the charging cradle Left hand button wi...

Page 17: ...struction Product information Data carrier Operating instructions Commissioning instruction Product information Base station with power supply unit Connecting cable TAE RJ11 Network cable RJ45 In Home...

Page 18: ...cordless handset for around 3 hours The battery is pre charged in the as delivered status The battery may become discharged during storage and transport The cordless handset must be fully charged befo...

Page 19: ...the signal strength of the base station and the DECT repeater in order to guarantee the best possible wireless connection This causes the battery to discharge more quickly in the standby and call mod...

Page 20: ...m the scope of supply Base station with power supply unit Connecting cable TAE RJ11 Network cable RJ45 In Home Network cable RJ45 shielded LAN Commissioning instructions S 851 0 Commission the base st...

Page 21: ...registered in the set The left hand symbol indicates the strength of the connection in the status bar at the top If this should not occur the message Search will be displayed You need to register the...

Page 22: ...the right hand navigation button Open the Phonebook menu using the bottom navigation button Open the Intercom menu using the left hand navigation button Pressing the end call button red receiver symb...

Page 23: ...andset 6 In the Cordless handset menu select Register cordless handset 7 Confirm with the right hand softkey Select 8 The active base station is indicated in the display 9 Confirm with the right hand...

Page 24: ...reen 12 Select the Main menu using the right hand navigation button 13 In the Main menu select Settings 14 In the Settings menu select the handset 15 In the Cordless handset menu select Register cordl...

Page 25: ...wing steps at the base station 2 If this is not already displayed change to the start screen 3 Select the Main menu using the right hand navigation button 4 In the Main menu select Settings 5 In the S...

Page 26: ...is displayed 10 After around 1 second the Settings menu is displayed 42 Settings Handset 1 Mon 27 04 2015 12 30 Back Select Language Date time Tones signals Handset Display Deregister handset All cor...

Page 27: ...oftkey Select 6 The date format selection is dis played 7 Using the navigation buttons top bottom select the date format 8 Confirm your selection with the Confirm button 9 Press the right hand softkey...

Page 28: ...r example 12 for hours 30 for minutes 13 Confirm with the right hand softkey Save 14 A confirmation is displayed 15 After around 1 second the Settings menu is displayed 16 The indication of the date a...

Page 29: ...t switches back on again If the keypad lock is switched on it is not possible to dial the emergency call numbers or activate the speed dial function Procedure In order to switch the cordless handset o...

Page 30: ...witched on If the cordless handset is in the charging cradle the call can also be picked up using the Speech button on the charging cradle Basic functions Triggering the door release Procedure 1 Press...

Page 31: ...s book management etc Manufacturer specific functions of a GAP capable terminal e g listening to mailbox messages are not pos sible at all or only conditionally Condition Your GAP capable terminal fro...

Page 32: ...he Speech button on the charging cradle Dial the required number Remarks An incorrect entry can be corrected with the left hand softkey X Use the right hand softkey Cancel or the red button to cancel...

Page 33: ...the set language Using the left hand softkey X already entered characters can be deleted When making entries in the phonebook the first letter of the name is automatically capitalized the following le...

Page 34: ...2 Press the left hand softkey mouth symbol during the call to change between the handsfree mode and the receiver mode Switching handsfree on and off Handsfree on Handsfree off Press the left hand soft...

Page 35: ...nly during telephone calls Procedure 1 Press the confirm button during an existing external telephone internal call 2 The functions of the navigation buttons are indicated for around 1 second in the d...

Page 36: ...ng an existing call The functions of the navigation buttons are indicated for around 1 second in the display 2 Press the top navigation button in order to switch on microphone silencing 3 As an indica...

Page 37: ...depending on the call mode this applies either to the receiver or the handsfree volume The call volume can be set in five steps Procedure 1 Press the left hand navigation button to reduce the call vo...

Page 38: ...phone system network provider to which the Scope is connected Depending on the configuration for example it can be used to park the call to confer with a third party user to whom the call is then forw...

Page 39: ...1 second in the display 2 Press the bottom navigation button down to activate the flash 3 Tap in the required control code of your telephone system your net work provider in order to initiate the req...

Page 40: ...is press the end call button red receiver button It is not possible to accept two different door calls or two different public network calls at the same time Procedure 1 Accept the door call or public...

Page 41: ...5 A list of all available cordless handsets to which the call can be forwarded is displayed 6 Select the cordless handset to which you wish to forward the call 7 Press the right hand navigation button...

Page 42: ...cerpt can be changed using the navigation buttons The last selected picture excerpt is saved automatically when ending the door call Pressing the confirm button twice will send you to the default cent...

Page 43: ...en 2 Using the top navigation button open the menu Door call images At the display a log of stored door call images appears 3 Using the navigation buttons top bottom select an image 4 Use the confirm...

Page 44: ...hen in the standby status The Phonebook can also be opened from the start screen Procedure 1 If this is not already displayed change to the start screen 2 Using the right navigation button select the...

Page 45: ...l type Internal external telephone call Right hand softkey function Options Using the right hand softkey Options you can access the Options drop up menu Using this you can Delete individual entries De...

Page 46: ...em Status Procedure 1 If this is not already displayed change to the start screen 2 Using the right navigation button select the main menu 3 Select the Settings menu 4 Confirm with the right hand soft...

Page 47: ...creen 2 Using the right navigation button select the main menu 3 Select the Settings menu 4 In the Settings menu select Tones signals 5 Confirm with the right hand softkey Select 6 Select whether you...

Page 48: ...t the receiver volume or handsfree volume 8 Confirm with the right hand softkey Select 9 Using the navigation buttons left right set the volume and 10 Confirm with the right hand softkey Save 11 A con...

Page 49: ...all type is displayed in the following The current setting is displayed under the relevant entry Setting the ring tone Procedure 1 In the Tones Signals menu select Door call 2 Select the entry Select...

Page 50: ...ume in the example Door call 2 Press the right hand navigation button or confirm with the right hand softkey Select 3 Set the required ring tone volume and using the navigation but tons left right 4 C...

Page 51: ...e charging cradle Procedure 1 If this is not already displayed change to the start screen 2 Using the right navigation button select the main menu 3 Select the Settings menu 4 In the Settings menu sel...

Page 52: ...he keypad enter a name for the cordless handset When doing so observe the instructions in the section Entering and editing texts For more information see page 33 7 Confirm with the right hand softkey...

Page 53: ...m with the right hand softkey Select 9 The active base station is indicated in the display 10 Confirm with the right hand softkey Select 11 The entry Enter PIN is selected 12 Enter the current PIN def...

Page 54: ...ect Display in the Settings menu 5 The brightness setting is displayed 6 Using the navigation buttons left right set the display brightness and 7 Confirm with the right hand softkey Save 8 A confirmat...

Page 55: ...the relevant numerical button you can then activate the speed dial function hold down the button for 3 seconds In addition you can program addi tional telephone numbers intercom users or intercom func...

Page 56: ...hand softkey Add 7 Select how you wish the speed dial button to be assigned Number from the phonebook Entry from the Intercom menu Entry from the Switching menu switching functions 8 New entry which i...

Page 57: ...4 2015 12 30 Cancel Next Alpers Heinrich Abt Heidrun Abdullah Rayan AIGA Alves Maria Teresa Arthus Company London Bailey Stuart Baldinger Andrea A B 42 Speed dial Handset 2 Mon 27 04 2015 12 30 Cancel...

Page 58: ...he Speed dial menu are not trans mitted to the phonebook and can be accessed exclusively as speed dial entries This allows you to create private entries in your cordless handset which are not transfer...

Page 59: ...Confirm with the right hand softkey Save 10 A confirmation is displayed The speed dial is actuated by holding down the relevant numer ical button for appr 3 seconds Selection using speed dial buttons...

Page 60: ...the right navigation button select the main menu 3 Select the Settings menu 4 Select Speed dial in the Settings menu 5 Confirm with the right hand softkey Select 6 From the speed dial list select the...

Page 61: ...ready displayed change to the start screen 2 Using the right navigation button select the main menu 3 Select the Settings menu 4 Select System in the Settings menu 5 Confirm with the right hand softke...

Page 62: ...on Eco mode on is selected 8 Press the right hand softkey Save or the right hand naviga tion button to change the current setting 9 A confirmation is displayed If you have switched on the Eco mode the...

Page 63: ...he function Eco mode on is selected 7 Select the function Registration mode on 8 Press the right hand softkey Save or the right hand naviga tion button to change the current setting 9 A confirmation i...

Page 64: ...er to increase the range of the base station you can use the DECT repeater DR 800 0 up to 6 repeaters per base station Using the Activate repeater mode function repeaters can be registered at the base...

Page 65: ...ght hand navigation button in order to activate the Repeater mode 8 A confirmation is displayed 9 Briefly disconnect the base station from the power mains and reconnect 10 Insert the repeater in the s...

Page 66: ...the Settings menu 4 Select System in the Settings menu 5 The System menu is displayed 6 Select the entry Dial pause 7 Confirm with the right hand softkey Select 8 The selection of different dial paus...

Page 67: ...ystem in the Settings menu 5 The System menu is displayed 6 Select the entry Prefix 7 Confirm with the right hand softkey Select 8 Enter the dialling prefix for the international dialling code e g 00...

Page 68: ...ne digit using the keypad For a single external line digit tap the required number e g 0 in the two fields and delete the first number with the left hand softkey X 10 Confirm with the right hand softk...

Page 69: ...ngs menu 2 Confirm with the right hand softkey Select 3 The System menu is displayed 4 Select the entry Flash time 5 Confirm with the right hand softkey Select 6 The possible flash times are dis playe...

Page 70: ...the base sta tion Procedure 1 Select System in the Settings menu 2 Confirm with the right hand softkey Select 3 The System menu is displayed 4 Select the entry PIN 5 Confirm with the right hand softk...

Page 71: ...0000 7 Confirm with the right hand softkey Reset 8 A confirmation is displayed Factory setting Handset 42 System Handset 2 Mon 27 04 2015 12 30 Back Save Registration mode on Repeater mode Eco mode o...

Page 72: ...deregistered All app users are deactivated con nection via the Siedle app for Smart gateway Mini is no longer possible If activated the door call rerouting Doormatic function are deactivated again Th...

Page 73: ...p or similar and hold it down until you have carried out the following steps 3 Plug the patch cable for the In Home bus back into the base station 4 When the Prog LED flashes twice release the Prog bu...

Page 74: ...of the display Procedure 1 Select Status in the Settings menu 2 The Status menu is displayed 3 After having looked through the status settings change back to the Settings status level using the left h...

Page 75: ...ebook can be edited either using the cordless handset or the browser based user inter face at the base station Contacts you add at one cordless handset can be copied to other cord less handsets if the...

Page 76: ...ain menu 1 Using the right navigation button select the main menu 2 The Main menu is displayed 3 In the main menu select the Phonebook using the bottom navi gation button 4 Confirm with the right hand...

Page 77: ...d for the same contact 4 Press the Dial button green receiver symbol 5 The call is established The display changes to the telephony mode 42 Internal call Handset 2 Mon 27 04 2015 12 30 Smith Jennifer...

Page 78: ...ct Copy contact Delete directory Copy directory Edit contact Using the functions Copy contact and Copy phonebook you can transfer an individual contact entry or the whole phonebook to a diffe rent Sco...

Page 79: ...con tact in order to make a new entry in the phonebook 2 Confirm with the right hand softkey Select 3 Enter the contact data 4 Confirm with the right hand softkey Save 5 A confirmation is displayed Cr...

Page 80: ...d softkey Select 4 The system requests confirmation that you really wish to delete the contact 5 Select the entry Yes 6 Confirm with the right hand softkey confirm 7 A confirmation is displayed 42 Del...

Page 81: ...om one cordless handset to a different cord less handset 3 Confirm with the right hand softkey Select 4 Select a cordless handset or all cordless handsets from the list of found cordless handsets 5 Co...

Page 82: ...r Siedle Scope cordless handset 2 Confirm with the right hand softkey Select 3 The system requests confirmation that you really wish to delete all entries 4 Select the entry Yes 5 Confirm with the rig...

Page 83: ...ight hand softkey Select 3 Select a cordless handset or all cordless handsets from the list of found cordless handsets 4 Confirm your input with the con firm button navigation 5 Confirm with the right...

Page 84: ...nu Options select the entry Edit contact in order to edit an existing directory entry 2 Select the entry in the Phonebook 3 Confirm with the right hand softkey Select 4 Press the right hand softkey Ed...

Page 85: ...ing Within the Intercom menu the switching and control functions are subdivided into the following categories Indoor devices Doors Switching Door call options The control and switching functions must...

Page 86: ...act you wish to call 5 Confirm with the right hand softkey Select 6 The call is established The display changes to the telephony mode 42 Indoor devices Handset 2 Mon 27 04 2015 12 30 Back Select Summe...

Page 87: ...softkey Select 3 The Doors menu is displayed 4 Select the door you wish to call 5 Confirm with the right hand softkey Select 6 The call is established The display changes to the telephony mode 42 Doo...

Page 88: ...e switching function you wish to execute e g open garage door 4 Confirm with the right hand softkey Select 5 The switching function is ini tiated 6 A confirmation is displayed 42 Intercom Handset 2 Mo...

Page 89: ...tercom settings in the Intercom menu 2 Confirm with the right hand softkey Select 3 The Door call options menu is displayed 4 Select the Doormatic function 5 Confirm with the right hand softkey Select...

Page 90: ...ight hand softkey Select 6 The Phonebook menu is dis played 7 Select the entry in the Phonebook 8 Confirm with the right hand softkey Select 9 A confirmation is displayed Menu Intercom 42 Phone direct...

Page 91: ...using any optional landline public network telephone For this a control code must be entered with the currently valid PIN of the base station during an existing call Procedure 1 Enter the following c...

Page 92: ...e remotely before you end the call Procedure 1 Before ending the door call enter the following character sequence using the keypad of the landline mobile phone in order to silence the door loudspeaker...

Page 93: ...ntercom system on the internet protocol IP level and in this way permits the integration of smartphones and tablets in your door communication system Two users with different rights are created for th...

Page 94: ...cture User interface Menu level 1 Menu level 2 System status Change the password Network Date time In Home bus DECT Base station Handsets Telephony Siedle app Contacts Manage Create Update Servicing H...

Page 95: ...en the Firefox web browser and enter the IP address of the base station Standard 169 254 1 1 3 The Registration page opens 4 Enter the user name admin 5 Enter the relevant password standard admin 6 If...

Page 96: ...different web browser to the Mozilla Firefox display errors can occur As an administrator the following functions are available to you on the user interface System status Change the password Network...

Page 97: ...97 Log out If you use a different web browser to the Mozilla Firefox display errors can occur Procedure 1 Click on Log out 2 You have been logged out of the base station and are now on the Log in page...

Page 98: ...net work cable at the LAN socket of the base station 2 Open the Firefox web browser on your PC and enter the IP address of the base station default 169 254 1 1 3 The Registration page opens 4 Enter th...

Page 99: ...e user interface System status Change the password Contacts Service Before the next system configura tion steps you must have logged in again as administrator 1 Log in at the base station again as Adm...

Page 100: ...y errors can occur The system status provides a com pact overview of the statuses of all communication interfaces Network status Telephone connection status In Home Bus status Base station status Regi...

Page 101: ...Standard admin Log in as user user User password Standard User Procedure 1 Click on Change adapter set tings 2 The Change password menu appears 3 Enter the old password 4 Enter the new password 5 Rep...

Page 102: ...pact on the accessibility of the base station at the PC Siedle app in the network If you use a different web browser to the Mozilla Firefox display errors can occur Procedure 1 Click on Network 2 The...

Page 103: ...instance the door release to also be trig gered via the Siedle app for Smart Gateway Mini and all door images taken to be assigned the correct date and time at which the image was taken Procedure 1 C...

Page 104: ...mart Gateway Mini Change PIN Procedure 1 Click on DECT Base station 2 The Base station menu is dis played 3 Enter a new 4 digit PIN 4 Click on Apply 5 It is only possible to register a cordless handse...

Page 105: ...ck on DECT base station 2 The Base station menu is dis played 3 Click on the square button next to Registration mode 4 The Registration mode is now active for appr 2 minutes 5 Register your cordless h...

Page 106: ...play errors can occur Procedure 1 Click on DECT Cordless hand sets 2 The Cordless handsets menu is displayed 3 Click on a user INT 1 INT 8 4 Enter a new name for the cord less handset 5 Click on Apply...

Page 107: ...he brows er based user interface of the base station so that they are no longer displayed as internal users If a registered cordless handset is switched off defective or has been removed out of the ra...

Page 108: ...er 1 User 4 4 Enter the surname of the user 5 Enter the first name of the user 6 Enter a password 4 10 char acters 7 Repeat the password input 8 Click on Apply 9 Register the app on the mobile phone b...

Page 109: ...deregister several app users repeat the process for all App users 6 You have deregistered the app user If you are no longer using an iPhone iPad with the Siedle app for Smart Gateway Mini installed e...

Page 110: ...next to cordless handset 1 8 in order to select the target cordless handset s 5 Click on Apply 6 You have copied all contacts from the source cordless handset to the target cordless handset s Copying...

Page 111: ...he contact you are looking for 6 Click on Delete 7 If you wish to delete additional contacts repeat the process 8 You have deleted the contact in the central phonebook and in all the cordless handsets...

Page 112: ...his Procedure 1 Click on Contacts Create 2 The Create menu is displayed 3 Click on New 4 Enter the contact data names telephone numbers of the contact 5 Click on the square buttons next to Available o...

Page 113: ...which agree with your selection entry 5 Click on the contact you are looking for 6 Edit the contact data as required 7 Click on Apply 8 If you wish to edit additional con tacts repeat the process 9 Y...

Page 114: ...k on Contacts Manage Delete 2 The menu Manage Delete is displayed 3 Click on a letter A Z in order to find a contact or enter a surname under Find entry 4 All contacts are displayed which agree with y...

Page 115: ...on nection available for commissioning carry out a system update at a later date Procedure 1 Click on Update 2 The Update menu is displayed 3 Click on Download 4 The Siedle download area opens in the...

Page 116: ...12 If you have selected an incorrect file an error message appears 13 Repeat the process again 14 Click on the Update button in order to start the system update 15 A confirmation message appears on t...

Page 117: ...sets must be updated in turn Procedure 1 Using the right navigation button select the main menu 2 The Main menu is displayed 3 The Call lists menu is selected 4 Confirm with the right hand softkey Sel...

Page 118: ...14 Different information appears in the display Please take notice of this information The handset cannot be reached by incoming calls during the update 15 When the software download from the base sta...

Page 119: ...developed for the requirements of door communi cation Its functions correspond to those of a Siedle indoor station It receives the door call provides a live video image establishes a speech connectio...

Page 120: ...er interface differs from the iPhone When using the Siedle app for In Home you require a WiFi router with activated WiFi Please note the information provided by the router manufacturer for secure oper...

Page 121: ...uest that pictures be deleted based on the right of persons to their own likeness Never store pictures of persons you do not know in social networks or send them by email to others public groups This...

Page 122: ...a third person Delete the affected app user from the base station This ensures that the affected app user no longer has access to the door intercom In case of emergency Pull the network cable out of...

Page 123: ...r can receive door calls and release the door call The user receives storey calls The user can forward calls to cordless handsets at the same base station The user can receive and make public network...

Page 124: ...ready displayed change to the start screen 2 Press the hash button 3 Enter the number sequence 3 3 6 6 8 4 3 3 6 D E M O V I D E O 4 Press the hash button again 5 Confirm your input with the con firm...

Page 125: ...specialist dealer from which you purchased the product Simplified EC Declaration of Conformity Manufacturer S Siedle S hne Telefon u Telegrafenwerke OHG Address Bregstra e 1 D 78120 Furtwangen declare...

Page 126: ...entries 60 Deleting the phonebook 82 Demo mode 124 Deregistering a cordless handset 26 107 Deregistering and deleting app users 122 Dialling a call number 32 Display brightness 54 Display navigation...

Page 127: ...g 88 Switching handsfree on and off 34 Switching off the door loudspeaker 92 Switching on the cordless handset 21 Switching on the registration mode 63 Switching on the registration mode Registering a...

Page 128: ...efon und Telegrafenwerke OHG Postfach 1155 78113 Furtwangen Bregstra e 1 78120 Furtwangen Telefon 49 7723 63 0 Telefax 49 7723 63 300 www siedle de info siedle de 2014 05 15 Printed in Germany Best Nr...

Reviews: