
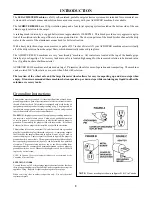


7
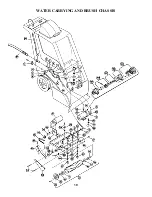
3. Vacuum Blower Replacement:
a) Remove the dome top and carefully turn the ma-
chine upside down.
b) Remove the two hex bolts at the base of the black
panel on the back of machine.
c) Remove the wheels in order to get at the hex bolts
in step (d). Shoulder bolts hold the wheels on.
d) Then remove the six hex head bolts on both sides
of blower chassis.
e) Disconnect the two power leads and the ground
wire coming through the back of the machine to
the blower.
f) Tip the blower and brush chassis away from the
machine and carefully feed the vacuum hose down
through the back of the machine.
g) Then remove the three (3) bolts that hold the bracket
for the blower. Remove the bracket.
h) Release the blower from the bracket by removing the
three bolts which hold them together.
i) The blower can now be removed.
j) When reassembling after any repairs, make certain
that all wire connections are properly plugged in and
secure.
k) Avoid abrasive contact with sharp edges on the metal
parts as injury can result.
l) Make sure all vacuum hose connections are secure.
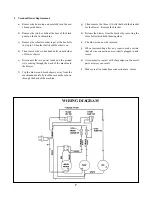
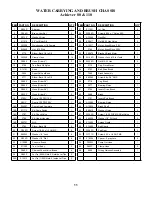
WIRING DIAGRAM
Summary of Contents for ACHIEVER 110
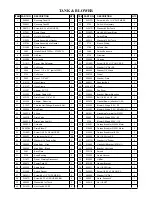
Page 8: ...TANK BLOWER 8 ...


