


6
SERVICING
ACHIEVER self-contained extractors are designed and manufactured to provide years of trouble free service with a minimum
of maintenance and service. The following recommendations are intended to assist the operator and Service Technician in
performing routine maintenance.
Failure to follow these recommendations can result in damage to your machine and diminished performance.
Warning: Always unplug your machine before performing any service. Severe personal injury could result if the elec-
trical power is not disconnected.
1. Always follow through with the recommended prestart-
up checks found in the Preparation and Transportation
section of this manual.
2. Store your machine in a dry, protected area with the
brush chassis raised and locked in place. Do not ex-
pose this machine to rain, standing water or freezing
temperatures.
3. We recommend a good, thorough cleaning after each
use. Clean the dome top, intake filter screen and recov-
ery tank with fresh, clean water. Flush the fresh water
tank and strainer periodically with clean water.
4. After continuous or repeated use, the jet tips and
strainer/check valves will need cleaning. Unplug the
cord and empty the recovery and solution tanks. Tilt the
machine backward allowing it to balance on the wheels
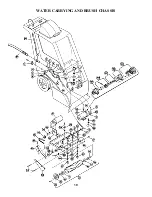
and drain valve. Remove the jet caps shown in the brush
chassis illustration and clean with white vinegar and a
soft bristle brush. Remove the jet tip and strainer/check
valve and soak it in vinegar until visible deposits are
dissolved, then scrub with a soft bristle brush.
Jet tips and strainer/check valves should be replaced
once a year because they tend to erode under ex-
tended use. This can cause overuse of solution and
possible streaking.
AN AUTHORIZED SERVICE CENTER SHOULD PERFORM THE FOLLOWING PROCEDURES
1. Drive Belt Adjustment and/or Replacement:
The
cogged drive belt system rarely needs tightening, so
if it becomes loose from wear, it is time to replace it.
Follow this procedure:
a) Remove the two screws that attach the hanger
bracket to the brush shroud. Then remove the
thru-bolt from the brush chassis and lift handle.
Remove the lift handle and lift stop.
b) Tilt the machine backward allowing it to balance
on the wheels and drain valve. The brush chassis
will remain on the floor exposing the brush drive
belt and motor.
c) Loosen the two motor bracket mounting bracket
mounting bolts with a 7/16
″
wrench. DO NOT
REMOVE THE BOLTS UNLESS YOU ARE
REPLACING THE MOTOR. Slide the motor
away from the brush to tighten the belt or toward
the brush for removal.
Unlike a “V” type belt, the cogged belt is run with basically
zero deflection. To test the belt tension, hold the belt between
your thumb and forefinger and twist to the side. It should
turn approximately 90
°
with little effort. If it twists more
than 90
°
, retighten the belt.
2. Pump Replacement:
a) Remove the lift stop handle as described in the
“Belt Drive” procedure (#1a).
b) Tilt the machine backward as described in the “Belt
Drive” procedure (#1b)
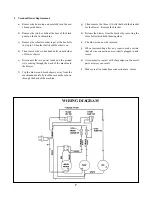
c) Disconnect black wire (#2) and the white wire
from the bridge rectifier (part #A130172). Also
disconnect the ground wire (this will need to be
respliced and reconnected to the ground wire on
the brush motor when reassembling). Reference
the electrical schematic.
d) Remove the two hoses from the pump. It is now
fully exposed for replacement.
e) When reassembling after any repairs, make certain
that all wire connections are properly plugged in
and secure.
f) Make all solution hose connections secure.
Summary of Contents for ACHIEVER 110
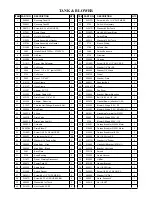
Page 8: ...TANK BLOWER 8 ...


