SSS Siedle ACHIEVER 110 Operating & Maintenance Instructions Download Page 4

4

PREPARATION AND TRANSPORTATION

PRESTART-UP CHECKS

ACHIEVER 80/110 machines are very simple and easy to 

operate.  Very little maintenance and service are required to 

keep your machine in top operating condition.

The following procedures are recommended to maintain 

the high level of performance expected from your machine.  

They are also intended to identify potential safety hazards 

and problems which could reduce the service life of the 

machine.  

READ BEFORE TRANSPORTING OR OPERATING 

YOUR MACHINE:

1.  Check 

power cord

plug

 and 

strain relief

 for worn or 

damaged insulation.  Repair or replace if necessary.

2.  Make sure the 

drain valve

 is closed (T-Handle pushed 

down).  If the valve is left open, the vacuum is dra-

matically reduced and any recovered solution will drain 

out.

3.  The 

knob

 for the 

spool valve

 is located on the lower 

back panel of the machine.  During normal operation 

as a self-contained extractor this knob is turned toward 

“machine”


(horizontal position).  

It should be turned 

to the 

“tool” position (vertical)

 when a wand or other 

tool is being used.1. 

4.  Lock the 

brush chassis

 in the up position for storage or 

transport.  This is done by pulling up on the 

lift-handle


at the front of the machine, then resting the round lift 

stop behind the bracket. 

5.  Inspect the 

vacuum head

 and 

brush

 by tilting the ma-

chine backwards, allowing it to balance on the wheels 

and drain valve spout.  

a)  Vacuum Head:

 Check for any damage.  Burrs on 

the contact surface may snag carpet fibers.  Gouges, 

scratches and chipped areas can reduce vacuum 

performance.

b)  Brush:

  Inspect for damaged or missing bristles, 

replace if necessary.

Return the machine to the upright position.

6.  Check the 

inlet strainer

 for damage or debris.  It is 

located at the bottom of the fresh water tank. Holes in 

the screen can allow contaminants to enter the pump 

resulting  in  costly  repairs.   A  clogged  strainer  will 

reduce pump performance and may cause permanent 

damage.

7.  Remove the clear dome on top of the recovery tank.

a)  Inspect for damage to the 

dome

 and 

gasket

.  

Dirt or debris on the gasket or sealing surface 

of the tank can cause a vacuum leak and reduce 

vacuum performance. 

b)  The 

intake filter screen

 at the vacuum hose 

connection  should  be  clean  of  debris  and 

checked periodically for any damage, replace 

if necessary.

c)  Ensure that  the 

deflector shield

 and 

intake


filter

  are in their proper positions to prevent 

recovered  water  from  entering  the  vacuum 

motor (blower).

Return the cover to its original position with the front 

lip seated under the retaining bracket.

YOUR MACHINE IS NOW READY FOR OPERATION.

TRANSPORTING 

The ACHIEVER 80/110 is equipped with large diameter 
(10

) wheels for balance and ease of transporting.  It is de-

signed to be tilted back on the wheels and pushed or pulled.  

The brush chassis should be locked in the up position any 

time the machine is in storage or being transported.  

The large diameter of the wheels permits you to pull the 

machine up stairs in the same manner you would use a 

hand truck.  

Never go up or down stairs with recovered 

water or solution in the tanks.

  Always empty the machine 

completely before transporting up or down stairs or in a 

vehicle.

When empty, the machine may be laid down on the side for 

transporting without damaging any of its components.

Summary of Contents for ACHIEVER 110

Page 1: ... S website www triple s com or write to Triple S 2 Executive Park Drive Billerica MA 01862 Carefully inspect all components to ensure that there is no concealed freight damage If such damage is discovered file a CONCEALED DAMAGE REPORT immediately with the delivering carrier The contents of this manual are based on the latest product information available at the time of publication Triple S reserve...

Page 2: ... malfunction or break down grounding provides a path of least resistance for electric current to reduce the risk of electric shock This machine is equipped with a cord having an equipment grounding conductor and grounding plug The plug must be inserted into an appropriate outlet that is properly installed and grounded in accordance with all local codes and ordinances WARNING Improper connection of...

Page 3: ... that is protected by a ground fault circuit interrupter Consult your electrical contractor 10 To prevent damage to the power cord do not move this machine over the power cord Always lift the power cord over the machine Do not pull or carry cord use cord as a handle close a door on cord or pull cord around sharp edges or corners Keep cord away from heated surfaces 11 Make sure all switches are tur...

Page 4: ...performance b Brush Inspect for damaged or missing bristles replace if necessary Return the machine to the upright position 6 Check the inlet strainer for damage or debris It is located at the bottom of the fresh water tank Holes in the screen can allow contaminants to enter the pump resulting in costly repairs A clogged strainer will reduce pump performance and may cause permanent damage 7 Remove...

Page 5: ...turned to the tool position 8 Pull backward during operation DO NOT AT TEMPT TO OPERATE IN A FORWARD DIREC TION Position yourself behind the machine grasp the handle and gently lift up on the actuator bar Lifting the actuator bar activates the brush drive motor and the pump Walk slowly backward to perform the cleaning process 9 Release the actuator bar approximately 6 inches before completing each...

Page 6: ... erode under ex tended use This can cause overuse of solution and possible streaking AN AUTHORIZED SERVICE CENTER SHOULD PERFORM THE FOLLOWING PROCEDURES 1 Drive Belt Adjustment and or Replacement The cogged drive belt system rarely needs tightening so if it becomes loose from wear it is time to replace it Follow this procedure a Remove the two screws that attach the hanger bracket to the brush sh...

Page 7: ...the machine to the blower f Tip the blower and brush chassis away from the machine and carefully feed the vacuum hose down through the back of the machine g Then remove the three 3 bolts that hold the bracket for the blower Remove the bracket h Release the blower from the bracket by removing the three bolts which hold them together i The blower can now be removed j When reassembling after any repa...

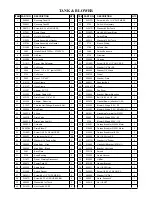
Page 8: ...TANK BLOWER 8 ...

Page 9: ...62 W362D Bolt 1 4 20 x 4 1 2 HH 3 20 A13006 Adaptor Reducing 1 63 603473 Gasket Blower effective 11 00 1 21 S102P Thru the Hull Fitting w Gasket Nut 1 64 A13504 Blower 3 Stage 115V 110 1 22 930008 Pop Rivet 5 215201 Blower 2 Stage 115V 80 eff 01 01 1 23 S400P6 0 Ring 1 S818N Grounding Terminal for 215201 24 S400PB Drain Valve 1 S589P Blower 2 Stage 230V 80 1 S400P2 Drain Valve Seal Kit 1 3738 Blow...

Page 10: ...10 WATER CARRYING AND BRUSH CHASSIS ...

Page 11: ...1 39 3718 Cog Brush 1 15 S250P Hose Order 36 1 40 3677 Bearing Rulon 1 16 S250P Hose Order 36 1 41 3722 Insert Drive Brush 1 17 S250P Hose Order 6 3 42 3689 Brush 1 18 3785V Pump 100 PSI 115V 1 43 3721 Insert End Brush 1 3821V Pump 100 PSI 220V 1 44 A13084 Bearing Rulon 1 18A 204557 Pump Head Complete 1 45 A12954 Brush Shaft 1 18B 911112 Kit Pump Switch 1 46 980612 Washer Nylon 2 18C 3787 Kit Chec...

Page 12: ...ormance and other information concerning the manufacturer s warranty policy 4 PROCEDURE TO BE TAKEN TO OBTAIN PERFORMANCE OF WARRANTY To secure repair of the SSSAchiever 80 110 or any warranted parts under this warranty the following procedure should be taken The inoperative SSS Achiever 80 110 or warranted parts together with satisfactory evidence of the purchase date must be delivered with shipp...

Reviews: