background image

-27-

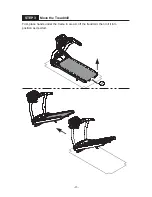
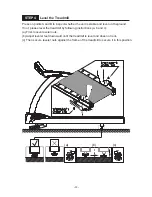
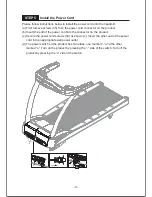
STEP 7    

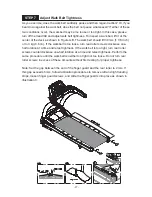
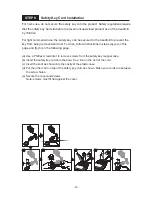
Adjust Walk Belt Tightness

As you exercise, does the walk belt suddenly pause and then regain traction? Or, if you 

bear down against the walk belt, does the belt not pause whatsoever? If either of these 

two conditions occur, the walk belt may be too loose or too tight. In this case, please 

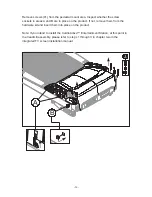
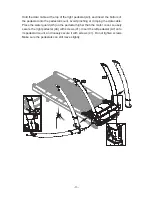
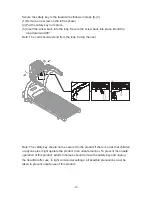
turn off the treadmill and adjust walk belt tightness. To inspect a walk belt, lift it at the 

center of the deck as shown in Figure A,B. The walk belt should lift 30 mm (1 1/8 inch) 

or to 3 kg (6.6 lb.). If the walk belt is too loose, turn rear roller screws clockwise one-

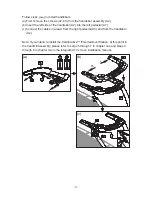
half rotation at a time and retest tightness. If the walk belt is too tight, turn rear roller 

screws counterclockwise one-half rotation at a time and retest tightness. Perform the 

same procedure until the walk belt is neither too tight nor too loose. Do not turn rear 

roller screws in excess of these amounts without first testing for proper tightness.

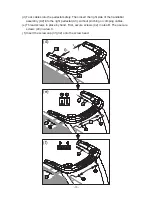
Note: Set the gap between the end of the finger guard and the rear roller to 2 mm. If 

this gap exceeds 6 mm, follow lubrication procedures to remove left and right landing 

strips, loosen finger guard screws, and slide the finger guards into place as shown in 

illustration C.

Summary of Contents for T625

Page 1: ...rd Installation 5 UNDERSTANDING THE T621 DISPLAY CONSOLE DISPLAY Overview DISPLAY Windows DISPLAY Keys 6 OPERATING THE T621 TREADMILL OPERATION Quick Start OPERATION Start Key OPERATION Workout Progra...

Page 2: ...signed and manufactured to become an integral part of your fitness regimen This product is a unique tool made to help you obtain your fitness goals But like every tool it must be used properly Please...

Page 3: ...l x3 glute 30 minute and 45 minute programs quick start manual track Heart rate control programs weight loss cardio conditioning ZoneTrainer Feedback Calories distance speed incline time calories per...

Page 4: ...3 2 SAFETY PRECAUTIONS are not IMPORTANT SAFETY PRECAUTIONS Such parts...

Page 5: ...ed to ensure that they do not play with the treadmill DO NOT stand on the walk belt when starting the treadmill Straddle the belt with one foot on each landing strip To reduce the risk of electric sho...

Page 6: ...5 The expense to correct such interference must be borne by the product owner or operator WARNINGS AND CAUTIONS FRENCH...

Page 7: ...de ce tapis par une personne responsable de leur s curit Les enfants doivent tre encadr s afin d emp cher qu ils ne jouent avec le tapis Les tapis de course doivent de pr f rence tre situ s loin des...

Page 8: ...tions peut provoquer des interf rences nuisibles aux communications radio Cependant il n y a aucune garantie que des interf rences ne se produiront pas dans une installation particuli re Si l utilisat...

Page 9: ...1 1 1 1 1 1 1 4 Assembly Parts A7 A8 A9 A10 8 Display Handlebar assembly Right pedestal Feeder cord Water guard ring Main frame Right side cover Left side cover A11 Left pedestal Owner manual Hardwar...

Page 10: ...22 green M4 L16 24 No Name Qty Notes Specification Screw cover rounded Screw cover flat Mushroom top Phillips screw Screw socket Screw clip L shaped Allen wrench L shaped Allen wrench L shaped Allen...

Page 11: ...e assembly and product operation by considering the following The site Do not install this product in an area of high humidity Exposure to extensive water vapor chorine bromine ammonia and other chemi...

Page 12: ...readmill on its cardboard box A Cut the corners of the cardboard box to lay the box flat B Lift the back end of the treadmill and remove packaging material in the back and center of the treadmill C Li...

Page 13: ...f the guides loosen screws at position A Place the walk belt below the guides as shown Then readjust walk belt tightness per instructions in part 6 Note If you intend to install the CardioActive Enter...

Page 14: ...13 STEP 1 Install the Pedestals...

Page 15: ...ce on the product If not remove them from the hardware kit and insert them into place on the product Note If you intend to install the CardioActive Entertainment Station at this point in the treadmill...

Page 16: ...flat on the floor with the bottom area of the pedestal nearest to the data cable Disconnect the feeder cord A4 from the bottom of the pedestal Then attach the feeder cord A4 to the top part of the dat...

Page 17: ...Avoid pinching or crimping the data cable Place the water guard A5 on the pedestal higher than the motor cover Loosely secure the right pedestal A3 with screws 41 Insert the left pedestal A7 onto its...

Page 18: ...left pedestal A7 c Connect the cables in area A from the right pedestal A3 and from the handlebar A2 Note If you intend to install the CardioActive Entertainment Station at this point in the treadmil...

Page 19: ...ht side of the handlebar assembly A2 into the right pedestal A3 without pinching or crimping cables e Thread screws in place by hand First secure screws 42 in area B Then secure screws 43 in area C In...

Page 20: ...secured in place fully secure screws in area A on both sides of the treadmill Snap left and right side covers A6a A6b into place and secure them with screws 33 Then slide the water guard A5 into plac...

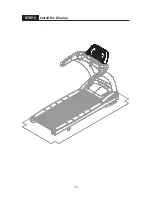
Page 21: ...20 STEP 2 Install the Display...

Page 22: ...avoid damaging the display board c Then slightly lift the display A1 d Temporarily secure the display by inserting it as indicated by arrows Note If you intend to install the CardioActive Entertainmen...

Page 23: ...way for safety Then slightly lift the display A1 and press it into place Note In area C the display cover must be outside of the handlebar cover g Use screws 44 to secure the display A1 in place Conne...

Page 24: ...23 STEP 3 Move the Treadmill First place hands under the frame in area A lift the treadmill then roll it into position as desired A...

Page 25: ...d level on theground If not please level the treadmill by following instructions a b and c a First loosen leveler nuts b Adjust leveler feet downward until the treadmill is level and does not rock c T...

Page 26: ...Insert the end of the power cord into the connector on the product c Secure the power cord screws 34 as shown c Insert the other end of the power cord into an appropriate wall power outlet d The power...

Page 27: ...on both sides between the belt edges and the landing strips If the space on either side is not the same rotate rear roller screws about one half turn at a time Turning the screw on one side clockwise...

Page 28: ...b If the walk belt is too loose turn rear roller screws clockwise one half rotation at a time and retest tightness If the walk belt is too tight turn rear roller screws counterclockwise one half rotat...

Page 29: ...follow instructions in steps a e on this page and f h on the following page a Use a Phillips screwdriver to remove screws from the safety key magnet case b Insert the safety key cord into the hole Tie...

Page 30: ...uld extend from the loop facing the user Note The safety key should not be secured to the product if there is a risk that children or anyone else might operate the product in an unsafe manner To preve...

Page 31: ...u get better results The following explains the display window and key functions Please read this manual understand the display functions and thereby get optimum enjoyment and benefit from this produc...

Page 32: ...o 99 59 DISTANCE 0 0 to 9999 miles or kilometers CAL HR 0 0 to 9999 calories per hour kCal METS 0 00 to 99 9 metabolic equivalency of task PACE 1 speed INCLINE 0 to 15 adjusts in increments of 0 5 SCA...

Page 33: ...LUTE Press this key to choose either a 30 minute or 45 minute incline based workout WT LOSS Press this key to activate a weight loss workout ZONE TRAINER Press this key during a workout to make your c...

Page 34: ...ey again to enter cool down mode Under any circumstance hold this key for two seconds to reset the unit and return to the startup banner screen SAFETY KEY While operating the treadmill put the safety...

Page 35: ...34 6 OPERATING THE T621 TREADMILL OPERATION Quick Start OPERATION Start Key OPERATION Workout Programs D Press the START key to begin exercising without the benefit of user information...

Page 36: ...ly by pressing the workout program key Your workout information such as time and distance will continue to accrue In all workout programs after inputting values press the SPEED key to begin exercising...

Page 37: ...ime incline and speed At each prompting press INCLINE to make selections or press numeric keys then press the ENTER key to confirm your choices Press the SPEED key to begin exercising Note The default...

Page 38: ...key to confirm your choice Press the SPEED key to begin exercising WT LOSS Weight loss is a heart rate control program in which speed or incline automatically adjusts to maintain an optimum target he...

Page 39: ...minute cool down mode Exercise time will show 2 00 Speed will slow to a stop within two minutes and the incline will gradually return to the 0 position When the time countdown arrives at 0 00 ACCU DAT...

Page 40: ...ram IC version number Press the ENTER key to proceed to view the drive board program IC version DRIVE BOARD IC VERSION The display will show DRV xxxxx xx where x represents either alphabetical or nume...

Page 41: ...free from interfering items 4 Place fitness products apart by at least 100 cm to avoid having the heart rate value from an exerciser on one product appear on another product 5 Heart rate values are fo...

Page 42: ...and shock people Suggestion Before touching metal parts of the product first touch a material with electrically isolative properties such as the plastic on the handlebars CAUTION Heart rate detection...

Page 43: ...raining zone for at least 15 to 20 minutes to realize an aerobic benefit Beginners should always start slowly and bring their workout sessions up to 20 minutes or more As your fitness level improves y...

Page 44: ...essive heat error Turn off the treadmill Then restart the treadmill as a test Or let the treadmill rest for one hour before restarting it If the message persists inspect the cable connection of the th...

Page 45: ...tions a g below a Press inward on the fuse cap b Turn the fuse cap counterclockwise c The fuse and fuse cap springs out d Remove the burnt fuse e Insert a new fuse into the fuse cap Insert the fuse in...

Page 46: ...treadmill exceeds 2500 miles 4000 km the message SERVICE NEEDED APPLY LUBE will appear after the walk belt stops rotating This is a reminder to lubricate the treadmill The treadmill can be operated n...

Page 47: ...1 2 Remove screws from the left end cap Then remove the left end cap Remove screw covers and screws from the left landing strip Then remove the left landing strip 46 MAINTENANCE Lubrication Procedure...

Page 48: ...ard Simultaneously press and hold INCLINE INCLINE 0 keys for two seconds This activates the lubrication mode The treadmill will operate at low speed At this point keys will not operate Insert the appl...

Page 49: ...vate the lubrication mode This clears the lubrication distance value A new lubrication distance value will begin to accrue After the lubrication process has been completed secure the finger guard back...

Page 50: ...activated at any time If you notice a buildup of static electricity or that the bottom side of the walk belt is dry applying lubricant may help Activate the treadmill s lubrication mode at any time Wa...

Page 51: ...ness Tighten if needed Inspect alignment Inspect for wear Lubricate with SportsArt lubricant Inspect for wear Inspect for normal rotation Inspect for normal rotation Inspect for normal rotation Remove...

Page 52: ...ave no tears or cracks Apply SportsArt Hyperglide lubricant Replace the walk belt as necessary Quarterly tasks 1 Inspect the walk deck for wear The surface of the deck should be smooth without cracks...

Page 53: ...ved and electronic components accessed Do NOT use cleaners with alcohol ammonia or other damaging chemicals The use of such chemicals can damage the product and void the warranty Never spray or pour a...

Page 54: ...35 Weeks 36 42 Weeks 43 49 Weeks 50 52 Weeks 1 7 Weeks 8 14 Weeks 15 21 Weeks 22 28 Completed Weekly Tasks 1 2 3 4 5 6 7 8 9 Completed Monthly Tasks Completed Weeks 29 35 Weeks 36 42 Weeks 43 49 Week...

Page 55: ...Your Authorized Distributor 54 T621 10 BLOCK DIAGRAM...

Reviews: