GB
SWITCHING ON AND USE
1. The cutting adjustment dial located at the front of the
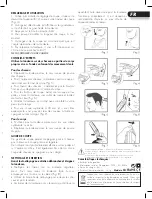
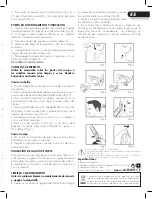
device (6) allows you to select cutting length (Fig.3).
2. The selected length is shown on the graduated scale on
the right or left side of the clipper.
3. Press the on/off button.
4. You can adjust cutting length at any time.
5. Cutting length remains the same, no matter what angle
the clipper is held at.
6. To switch off the clipper, you just need to shift the on/off
button to « 0 » (7).
Do Not ExCEED 20 HouRS of CHARGiNG timE.
EXPERT ADVICE
Only use the clipper on hair or parts of the body that are
clean and dry. Cut using slow movements.
For the head
Ð
Move the clipper against the direction of hair growth.
Ð
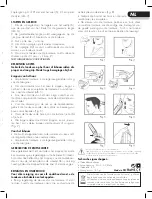
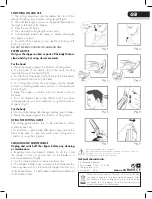
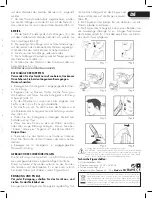
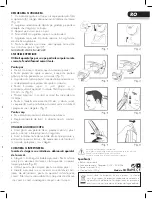
For the back of the head, start at the neck, moving
towards the top of the head (Fig.5).
Ð
For the front of the head: start at the top of the forehead,
moving towards the back of the head.
Ð
For cutting around the neck and legs, use the clipper
without its trimming attachments and cut in a downwards
motion (Fig.6).
Ð
Keep the clipper in contact with your head or skin at
all times.
Ð
For a cut length of more than 30mm, and if you have
some experience, you can create cuts using the «comb» or
«fingers» (Fig.7).
For the body
Ð
Do not use the clipper after having used any type of cream.
Ð
Move the clipper against the direction of hair growth.
USING THE CUTTING GUIDE
The cutting guide allows hair to be combed to obtain
a precise, even cut.
This instrument is particularly effective on legs and at the
back of the neck. It is also very useful when cutting with a
« comb » or using the « fingers ».
CLEANING AND MAINTENANCE
Unplug and switch off the clipper before any cleaning
or maintenance.
Ð
Regularly clean the clipper’s blades. To do this, hold
the clipper in front of you and push on the blades in a
backward direction (Fig.8).
Ð
Use the cleaning brush to remove residual hair.
Ð
The clipper’s blades have a reservoir that distributes the
necessary amount of oil to ensure the clipper functions cor-
rectly. Nevertheless, it is advisable to add some additional
oil from time to time.
Hair and body clipper
INSTRUCTIONS FOR USE
Ð
While charging, the clipper should be kept away from
dampness.
Ð
Never try to remove foreign items from inside the clipper
using a sharp object.
Ð
Always switch the clipper off before cleaning it or
changing the cutting head.
Ð
Protect the cable from damage and heat. Never pull at
the cable. If the cable is damaged, contact your retailer’s
after sales service department, or if you bought your
product directly from Sport-Elec: [email protected] or
call 02 32 96 50 51.
Ð
Do not touch the blades while the device is in operation.
Ð
Do not use the clipper if the trimming attachment or
cutting head is damaged or broken.
Ð
The device is designed to be used in an ambient
temperature of between 0° and 40° C.
Ð
Avoid exposure of the device and its accessories to
direct sunlight.
Ð
Never allow a child to handle your electrical device.
Ð
If you encounter difficulties or problems while using the
device, it should be switched off and unplugged. Return
the clipper, together with its adaptor to your retailer’s after-
sales service depot.
Ð
Do not use any cord or accessory other than those
supplied with the device.
CHARGING
Before first-time use, the clipper must be charged for 16
hours (Fig.1).
1. Plug in the cord of the clipper’s charging base. Then
plug the cord into the mains, ensuring that your plug socket
is compatible with the device’s electrical output.
2. Place the clipper onto its charging base. The charging
light will come on.
3. Once completely charged, you will be able
to use the clipper for a maximum of 45 min.
The cable may also be plugged into the clipper directly to
recharge it (Fig.2).
ATTACHING THE TRIMMING ATTACHMENTS
IMPORTANT: Only add or remove an attachment when
the clipper is switched off: on/off button set to «
0
» (7).
1. Attach the desired attachment to the clipper by « clic-
king » it in.
2. The cutting adjustment dial located at the front of the
device (6) allows you to choose cutting length (Fig.3).
3. The cutting guide may be set using the push-button
located at the front of the device (5).
4. To remove the trimming attachment, set cutting length to
3 or 21mm using the adjustment dial (6), then lift it using
your thumb (Fig.4).
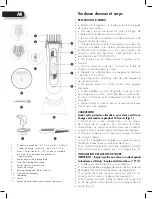
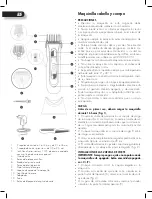
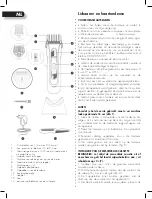
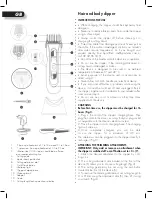
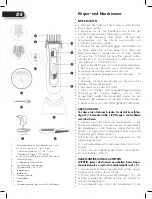
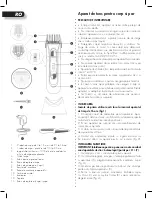
1. 2 trimming attachments of 3 to 18mm and 21 to 36mm
2. 1 «precision» trimming attachment of 0.5 to 2.5mm
3. Ultra resistant 100% stainless steel blades offering
an exceptional cutting line
4. Cutting guide
5. Blade sheath push-button
6. Cutting adjustment dial
7. On/off push-button
8. Charging light
9. Clipper charging base
10. Cleaning brush
11. Adaptor
12. Comb
13. Cutting length locking mechanism button
Summary of Contents for TONDEUSE CHEVEUX
Page 14: ......


