background image


30 


Console Setup 


Battery Installation 

 
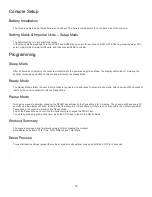
The console operates on 4*AA batteries (not included). The battery compartment is on the back side of the console. 


Setting Metric & Imperial Units 

– Setup Mode 

 
The default setting is in Imperial Units (mph). 
In the Ready Mode press and hold the START and ENTER keys for two (2) seconds until KM or M is flashing, pressing ▲ or ▼ to 
select metric (KM) or imperial (M) units, and then press ENTER to confirm. 


Programming 


Sleep Mode 

 
After 60 seconds of inactivity, the console will switch into the power-saving Sleep Mode. The display will switch off. Rotating the 
pedals or pressing any button on the console will launch the Ready Mode. 


Ready Mode 

 
The Ready Mode informs the user that the console is powered on and ready to enter into any mode. After a period of 60 seconds of 
inactivity the console will switch into the Sleep Mode. 


Pause Mode 

 
During any mode of operation, pressing the START key will launch the Pause Mode for 5 minutes. The console will beep every 30 
seconds and the display will flash, to remind that the console is in Pause Mode. If there is no activity within the 5 minute period of 
Pause Mode, the console will switch into Ready Mode.   
To exit the Pause Mode and continue the current program, press the START key.   
To quit the paused program at any time, press the STOP key to launch the Ready Mode. 


Workout Summary 

 
The console provides a brief workout summary after completed the workout.   
Data displayed includes: Total Time, Total Distance and Total Watts. 


Reset Process 

 
To reset all saved settings (except the metric or imperial units setting), press and hold the STOP for 2 seconds.


Summary of Contents for AirBike AB900

Page 1: ...AB900 AirBike OWNER SMANUAL...

Page 2: ...2...

Page 3: ...veling 34 Preventive Maintenance 34 Daily Maintenance 34 Weekly Maintenance 35 Monthly Maintenance 35 Inspection and Adjustment 35 Frame Care 36 Parts Replacement 36 Exploded Diagram 37 Parts List 38...

Page 4: ...2288 FAX 886 2 2515 9963 Email info dyaco com Dyaco Japan Dai 2 Shirako Bldg 501 6 16 7 Nishi Kasai Edogawa Tokyo 134 0088 Japan Tel 03 6808 4588 Fax 03 6808 4677 Email info dyaco jp Dyaco Shanghai Ro...

Page 5: ...n or following installation Routine maintenance of this unit as specified in this manual Exclusions This warranty does not cover the following CONSEQUENTIAL COLLATERAL OR INCIDENTAL DAMAGES SUCH AS PR...

Page 6: ...ne of our authorized service centers All repairs must be preauthorized by Spirit Fitness If the product is shipped to a service center freight charges to and from the service center will be the custom...

Page 7: ...y opening or within the area of the flywheel Do not attempt to remove any shrouds or modify the bike WARNING Your Air Bike manufactured by Spirit Fitness is designed for aerobic exercise in a commerci...

Page 8: ...ng staat beschreven Doe het volgende NIET Laat kinderen zonder toezicht de bike niet bedienen Niet zonder gymschoenen gebruiken Niet buiten bij regenachtig weer gebruiken of in dichte ruimte met een z...

Page 9: ...e Ne l utilisez pas sans porter de chaussures d athl tisme Ne l utilisez pas en ext rieur lors de temps pluvieux ni en int rieur dans une salle de piscine vitez de laisser tomber tout objet ou d intro...

Page 10: ...t nicht ohne Sportschuhe Benutzen Sie das Ger t bei regnerischen Witterungsbedingungen nicht im Freien und nicht In einer geschlossenen Schwimmbadumgebung Lassen Sie keine Gegenst nde in irgendwelche...

Page 11: ...on utilizzate lo bike senza scarpe atletiche Non utilizzate lo bike all esterno in condizioni piovose o in un ambiente con piscina interna Non lasciate cadere oggetti sullo bike e non inserite oggetti...

Page 12: ...n o fazer N o deixe crian as sem supervis o operarem o bike N o use sem os sapatos esportivos apropriados N o utilize em ambientes externos quando o tempo estiver chuvoso nem em um ambiente fechado d...

Page 13: ...te manual Lo que no se debe hacer No permita que los ni os operen su bike sin super visi n No lo use sin zapatos atl ticos No lo utilice afuera en la lluvia ni en un ambiente cerra do donde haya una p...

Page 14: ...nna handbok Man ska inte L ta barn anv nda bike utan uppsikt Anv nda bike utan sportskor Anv nda bike utomhus i fuktigt v der eller i ett innes lutet bass ngomr de Tappa in eller f ra in n got f rem l...

Page 15: ...15 Spirit Fitness Spirit Fitness...

Page 16: ...16 Spirit Fitness Air Bike DO DO NOT Air Bike Spirit Fitness...

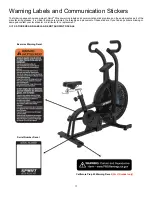
Page 17: ...as part of the manufacturing process It is critical that owners maintain the integrity and placement of these stickers If you find any stickers missing or damaged contact your local dealer or distribu...

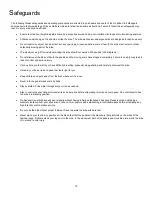
Page 18: ...and serious injury If at any time you feel dizzy or have difficulty breathing gradually stop pedaling and carefully dismount the bike Listen to your body ride at a pace that feels right for you Keep...

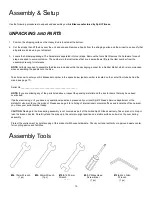
Page 19: ...the center floor tube behind the crank see page 17 Serial No _____________________________________________ NOTE If you are missing any of the parts listed above inspect the packing material and the b...

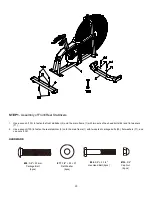
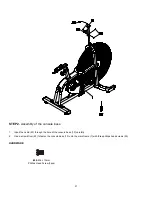
Page 20: ...with two sets of hex head bolts 84 and flat washers 71 2 Use a wrench 100 to fasten the rear stabilizer 5 onto the main frame 1 with two sets of carriage bolts 50 flat washers 71 and cap nuts 135 HARD...

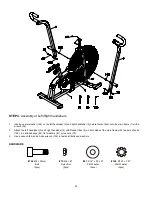
Page 21: ...base 1 Insert the cable 23 through the hole of the console base 10 carefully 2 Use a screw driver 93 to fasten the console base 10 onto the main frame 1 with three phillips head screws 90 HARDWARE 90...

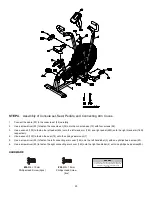
Page 22: ...95 2 Attach the left handlebar 3 and right handlebar 4 with Rocker links 8 on both sides of the main frame with two sets of bolts 136 rod end bearings 64 flat washers 81 nyloc nuts 75 3 Use a wrench 9...

Page 23: ...with four screws 58 3 Use a wrench 100 to fasten the left pedal 45L onto the left crank arm 16L and right pedal 45R onto the right crank arm 16R respectively 4 Use a wrench 100 to fasten the seat 19...

Page 24: ...stment for movement front to rear and check it by settings it at different settings Adjust seat post to your needs Refer to page 24 Ride test the bike for proper operation according to this owner s ma...

Page 25: ...ed on either side of the flywheel are to be used when exercising only with the movement arms Position feet securely on these platforms while pushing pulling on the movement arms NOTE that the pedals w...

Page 26: ...event potential injuries from occurring Your warm up should be sufficient once your breathing rate begins to increase and you begin to perspire lightly The warm up period should last about five minute...

Page 27: ...27 Console Operation CONSOLE KEYS Interval Display Panel Quick Mode Keys Quick Mode Keys Time Distance Calories Watts Speed RPM Display Panel Hear Rate Display Panel Bluetooth Key Control Keypad...

Page 28: ...is used to confirm a value as making adjustments to a mode The Quick Mode Keys will into the associated Mode immediately Use the Bluetooth key to upload the workout summary to APP Use the STOP key to...

Page 29: ...RPM Display Watts Speed and RPM will be displayed during all modes The watts will show the amount of work produced in a particular time during workout The Speed will show the value which is derivative...

Page 30: ...onsole is powered on and ready to enter into any mode After a period of 60 seconds of inactivity the console will switch into the Sleep Mode Pause Mode During any mode of operation pressing the START...

Page 31: ...USTOM MODE key Setup When operating the Interval Custom Mode after the console has been reset user will enter the total amount of intervals and work rest time interval Adjust the value by pressing or...

Page 32: ...lar goal When the users heart rate is lower than 65 of the calculated maximum HR range the 65 display will flash indicating minimum goal has not yet been achieved When the users heart rate is over 85...

Page 33: ...ole will return to Engineering mode While in this setting if there is no activity for 30 seconds the console will switch STANDBY Mode Pressing the RESET key twice will exit the Engineering Mode B Audi...

Page 34: ...d throughout the product Square Drive Ratchet Wrenches To use in conjunction with Allen head and or hex socket sets Torque Wrench Tightening various critical bolts throughout the product to specific t...

Page 35: ...possible loose assemblies Have an experienced rider ride each bike to identify and help diagnose any vibration noises and any unusual feeling from the drive belt Either faulty flywheel alignment or a...

Page 36: ...olution to wipe away any soap residue Using a second clean and dry terry cloth dry off any liquid residue Sealing The frame can be sealed by applying a wax or polishing coat that can help repel away l...

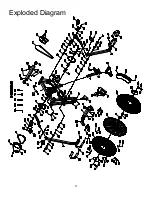
Page 37: ...37 Exploded Diagram...

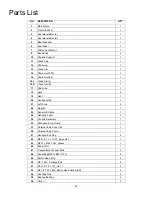
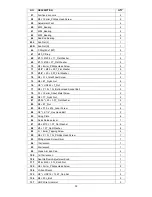
Page 38: ...1 17 Chainring 1 18 gear 2 19 Seat 1 20 Fan Assembly 1 21 Left Cone 2 22 Magnet 1 23 Sensor W Cable 1 24 Handgrip Foam 2 34 Console Assembly 1 35 Zhonghua Drum Group 1 37 Outside Chain Cover R 1 38 Ou...

Page 39: ...2 77 M6 P1 0 10L_Button Head Socket Bolt 3 79 3 5 12m m_Sheet Metal Screw 2 80 M8 7T_Nyloc Nut 2 81 5 16 20 3 0T_Flat Washer 2 82 M8 6T_Nut 2 83 M8 x P1 0 x 20L_Arbor Screw 4 84 3 8 2 1 4 _Hex Head B...

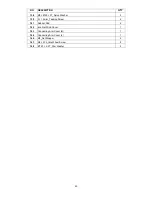
Page 40: ...25 5T_Nylon Washer 2 139 5 19m m_Tapping Screw 2 141 Rubber Pad 2 142 Iron Net Wind Cover 1 143 Connecting Arm Cover R 1 144 Connecting Arm Cover L 1 146 6_Nut Stopper 2 147 M6 40L_Idle Wheel Screw 2...

Page 41: ...41...

Page 42: ...42 AB900 AirBike Owner s Manual 2018 All Rights Reserved Revision 09 25 2018...

Reviews: