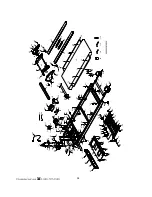
background image

21

How to wear your wireless chest strap transmitter:
1. Attach the transmitter to the elastic strap using the locking parts.
2. Adjust the strap as tightly as possible as long as the strap is not too tight to remain comfortable.
3. Position the transmitter with the Spirit logo centered in the middle of your body facing away from your
chest (some people must position the transmitter slightly left of center). Attach the final end of the elastic
strap by inserting the round end and, using the locking parts, secure the transmitter and strap around your
chest.
4. Position the transmitter immediately below the pectoral muscles.
5. Sweat is the best conductor to measure very minute heart beat electrical signals. However, plain water
can also be used to pre-wet the electrodes (2 black square areas on the reverse side of the belt and either
side of transmitter). It’s also recommended that you wear the transmitter strap a few minutes before your
work out. Some users, because of body chemistry, have a more difficult time in achieving a strong, steady
signal at the beginning. After “warming up”, this problem lessens. As noted, wearing clothing over the
transmitter/strap doesn’t affect performance.
6. Your workout must be within range - distance between transmitter/receiver – to achieve a strong steady
signal. The length of range may vary somewhat but generally stay close enough to the console to maintain
good, strong, reliable readings. Wearing the transmitter immediately against bare skin assures you of
proper operation. If you wish, you may wear the transmitter over a shirt. To do so, moisten the areas of the
shirt that the electrodes will rest upon.

Note: The transmitter is automatically activated when it detects activity from the user’s heart. Additionally, it
automatically deactivates when it does not receive any activity. Although the transmitter is water resistant, moisture
can have the effect of creating false signals, so you should take precautions to completely dry the transmitter after use
to prolong battery life (estimated transmitter battery life is 2500 hours). The replacement battery is Panasonic CR2032.

Erratic Operation:

Caution!

Do not use this treadmill for Heart Rate Control unless a steady, solid Actual Heart Rate

value is being displayed. High, wild, random numbers being displayed indicate a problem.
Areas to look for on interference:

(1) Treadmill not properly grounded -

A must!

(2) Microwave ovens, T.V.’s, small appliances, etc.
(3) Fluorescent lights.
(4) Some household security systems.
(5) Perimeter fence for a pet.
(6) Loose treadmill console / upright.

WARNING!
DO NOT USE THE HEART RATE CONTROL PROGRAM IF YOUR HEART RATE IS NOT
REGISTERING PROPERLY ON THE TREADMILL’S DISPLAY!

Special Operations of Heart Rate Functions:

All Spirit treadmills that are factory equipped with a Heart Rate Control system have many distinct features
both in the Heart Rate Control program and during heart rate monitoring. This section will give you a more
detailed background to use your treadmill in the most effective manner.

How the Heart Rate Control Program Works:

Heart Rate Control uses your treadmill’s incline system to adjust your heart rate. Increases and decreases
in elevation affect heart rate much more efficiently than changes in speed. Additionally, changes in incline
keep you in control of the machine’s speed instead of the machine controlling you.

Using a Heart Rate Transmitter

Summary of Contents for 1611600-1

Page 1: ...Retain For Future Reference Owner s Manual Model No 1611600 1 1611800 1 Assembly Operation Adjustments Parts Warranty CAUTION Read and understand this manual before operating unit...

Page 2: ...atures 18 Target Heart Rate 20 Using a Heart Rate Transmitter 21 Heart Rate Control Operation 22 Parts list and diagram 1611600 23 Parts list and diagram 1611800 29 General Maintenance 35 Service Chec...
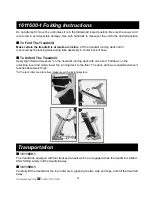
Page 3: ...dy Please take a moment at this time to record the name of the dealer their telephone number and the date of purchase below to make any future needed contact easy We appreciate your support and we wil...

Page 4: ...not use outdoors or near water 7 Do not insert any objects into any openings 8 Keep children and pets away from this equipment at all times while exercising 9 Handicapped individuals should have medic...

Page 5: ...nstalled and grounded in accordance with all local codes and ordinances DANGER Improper connection of the equipment grounding conductor can result in a risk of electric shock Check with a qualified el...

Page 6: ...s incline speed etc Do not use excessive pressure on console control keys They are precision set to function properly with little finger pressure Pushing harder is not going to make the unit go faster...

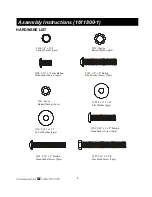
Page 7: ...x 2 Button Head Bolt 4pcs 140 8 x 23 x 1 5T Curved Washer 4pcs 93 5 16 x 2 3 4 Hex Head Bolt 2pcs 139 8 x 23 x 1 5T Flat Washer 4pcs 137 5 16 x 1 1 2 Button Head Bolt 2pcs 135 3 5 x 40m m Self Tappin...

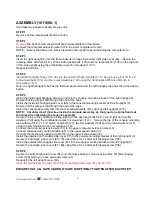
Page 8: ...ps Install the console assembly 52 into the mounting brackets of the right and left uprights 4 5 NOTE Carefully insert the wires inside the console assembly so that you do not pinch and cut the wires...

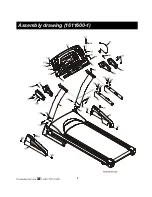
Page 9: ...8 Assembly drawing 1611600 1...

Page 10: ...2pcs 102 5 16 x 15m m Button Head Socket Screw 6pcs 103 3 8 x 2 Button Head Socket Screw 2pcs 122 10m m Raised Washer 2pcs 121 8m m Raised Washer 2pcs 101 5 16 x 2 Button Head Socket Screw 4pcs 109 8...

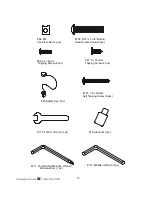
Page 11: ...m Wrench 1 pc 63 Safety Key 1pc 18 Lubricant 1pc 112 M6 Allen Wrench 1pc 111 Combination M5 Allen Wrench Screwdriver 1 pc 92 5 x 16m m Tapping Screw 6 pcs 84 M5 Iron Plate Nut 4 pcs 87 5 x 16m m Tapp...

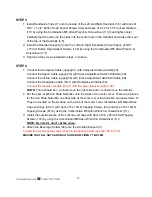
Page 12: ...by using the Combination M5 Allen Wrench Screwdriver 111 and M6 Allen Wrench 112 Do not tighten these screws until assembly is complete STEP 2 1 Install the L R Handgrip Side Caps 53 54 onto the ends...

Page 13: ...Cable 39 Connect the Handpulse Cable 50 1 with Handpulse W Cable 50 Connect the receiver w cable 37 21 with the lower receiver cable 139 NOTE There should be 3 connectors on the right side and 3 conne...

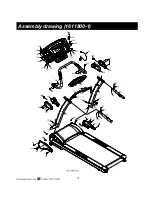
Page 14: ...121 121 84 84 84 84 32 33 39 50 50 50 1 35 110 104 104 110 102 102 48 3 102 4 107 107 7 105 109 109 106 92 92 41 87 92 92 92 92 40 87 63 109 105 109 106 53 5 52 107 55 54 37 21 123 123 Assembly drawin...

Page 15: ...mill Apply slight forward pressure on the treadmill running deck with one hand Pull down on the unlocking lever and slowly lower the running deck to the floor The deck will lower unassisted when it re...

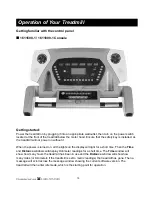
Page 16: ...turned on all the lights on the display will light for a short time Then the Time and Distance windows will display Odometer readings for a short time The Time window will show how many hours the trea...

Page 17: ...r more than 3 seconds the console will reset Incline Feature l Incline may be adjusted anytime after belt movement l Press and hold the Adjust keys console or hand rail to achieve desired level of eff...

Page 18: ...which cannot be used for medical purposes Auto Pilot feature This unique feature allows the user to instantly enter the Heart Rate Control mode at any time with the press of a button The HR2 program b...

Page 19: ...calorie burn for a particular person Even if someone is the exact same body weight age and height their calorie burn may be very different than yours The Calorie display is to be used as a reference o...

Page 20: ...nking Using the Fast Slow keys adjust the speed level to your desired effort for the first segment then press enter The second column will now be blinking Repeat the above process until all segments h...

Page 21: ...art and lungs and weight control The black columns on the chart above represent the Maximum Heart Rate for a person whose age is listed at the bottom of each column The training heart rate for either...

Page 22: ...as of the shirt that the electrodes will rest upon Note The transmitter is automatically activated when it detects activity from the user s heart Additionally it automatically deactivates when it does...
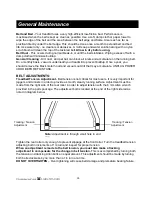
Page 23: ...your chosen target If in question enter a higher age value that will set a lower target goal CAUTION Intended for wireless transmitter chest strap only Do not use Pulse Grip bar for Heart Rate Control...
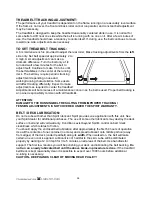
Page 24: ...18 CHENCHING ROTA SPRING 1 19 160019 CYLINDER 1 20 160020 DRIVE BELT 1 21 160021 FRONT ROLLER W PULLEY 1 22 160022 REAR ROLLER 1 23 160023 RUNNING DECK 1 24 160024 RUNNING BELT 1 25 160025 HANDGRIP FO...

Page 25: ...STIC WASHER 6 52 20 1 160052 20 1 POWER CORD OF AMPLIFIER 1 52 23 1 160052 23 1 RECEIVER 1 52 28 1 160052 28 1 SPEAKER W CABLE 750 m m 2 52 29 1 160052 29 1 SPEAKER W CABLE 300 m m 2 52 31 1 160052 31...

Page 26: ...94 160094 M8 x 60m m_ HEX HEAD BOLT 1 95 160095 M8 x 80m m_SOCKET HEAD CAP BOLT 2 96 160096 M8 x 35m m_FLAT HEAD COUNTERSINK SCREW 8 97 160097 M3 x 10m m_TAPPING SCREW 1 98 160098 M5 x 15m m_TAPPING S...

Page 27: ...1600128 3 8 x 6 5T_NUT 3 129 1600129 M3_NUT 1 130 1600130 3 5 x 32m m_SELF TAPPING SCREW 10 131 1600131 M5_IRON PLATE NUT 6 133 1600133 3x 8m m_SELF TAPPING SCREW 10 134 1600134 5 16 x 2 _BUTTON HEAD...

Page 28: ...3 133 37 48 38 39 2 52 1 52 2 134 140 134 52 3 52 12 140 134 134 6 39 5 39 5 52 20 80 79 146 146 144 144 115 117 145 145 52 31 147 52 32 52 14 52 15 130 52 16 52 15 124 124 39 4 39 4 39 3 39 3 123 123...

Page 29: ...3 113 105 105 20 34 117 115 118 36 78 22 95 95 71 72 53 117 117 102 99 51 117 58 58 58 58 58 110 117 117 110 117 110 110 117 126 29 126 29 126 29 40 117 76 86 86 98 109 18 17 45 46 47 127 108 111 117...

Page 30: ...OLLER 1 23 180023 SENSOR W CABLE 1 24 180024 BREAKER 1 25 180025 POWER SOCKET 1 26 180026 ON OFF SWITCH 1 27 180027 POWER CORD 1 28 180028 100mm x 764 x 764 CONNECTING CABLE BLACK 1 29 180029 150mm x...

Page 31: ...0050 2 HANDPULSE ASSEMBLY TOP 2 50 3 180050 3 HANDPULSE ASSEMBLY BOTTOM 2 51 180051 FRAME FRONT COVER 1 52 180052 LEFT HANDGRIP SIDE CAP L 1 53 180053 LEFT HANDGRIP SIDE CAP R 1 54 180054 RIGHT HANDGR...

Page 32: ...TAPPING SCREW 3 98 180098 3 8 NUT 3 100 1800100 SENSOR RACK 1 101 1800101 5 16 x 2 BUTTON HEAD SOCKET SCREW 4 102 1800102 5 16 x 15m m BUTTON HEAD SOCKET SCREW 10 103 1800103 3 8 x 2 BUTTON HEAD SOCK...

Page 33: ...32 KEY NO PART NO DESCRIPTION O TY 126 1800126 BOLT ACCESS CAP 2 137 1 1800137 1 3X8m m_SELF TAPPING SCREW 1 138 1 1800138 1 CONTROLLER BACK PLATE 1 140 1 1800140 1 AUDIO CABLE 1...

Page 34: ...89 80 8B 102 110 101 50 3 50 2 50 2 50 3 93 93 37 3 37 17 37 17 80 89 105 106 109 80 37 12 50 1 50 1 90 90 35 81 37 18 37 1 31 34 89 89 89 37 2 89 89 89 94 107 107 52 53 4 107 55 54 101 110 8A 94 37...

Page 35: ...6 87 87 46 92 43 43 32 87 23 76 78 24 43 65 83 87 83 87 83 87 98 60 28 29 30 17 96 95 82 87 65 47 47 98 98 75 25 26 27 87 74 87 87 68 19 73 73 78 76 78 67 73 78 73 78 75 2 59 59 44 44 44 44 42 42 10 7...

Page 36: ...EFORE THIS TASK BELT ADJUSTMENTS Treadbelt Tension Adjustment Belt tension is not critical for most users It is very important for joggers and runners in order to provide a smooth steady running surfa...

Page 37: ...f a maintenance concern as the belt is used Proper belt tracking is an owner responsibility common with all treadmills ATTENTION DAMAGE TO THE RUNNING BELT RESULTING FROM IMPROPER TRACKING TENSION ADJ...

Page 38: ...oot If this walking pattern is natural track the belt slightly off center to the side opposite from the belt movement See General Maintenance section on Treadbelt Tension Adjust as necessary Motor is...

Page 39: ...to misuse neglect accident or unauthorized repairs and alterations This warranty provided herein is in lieu of all other express warranties Any implied warranties including any implied warranties of...

Reviews: