background image

For Machines Mfg. Since 7/09

Model SB1016/SB1036

-105-

P A R T S

Headstock Internal Gears

101

102

103

104

105

106

107

108

109

110

111

112

113

123

124

A

D

E

A

F

F

A

D

E

C

A

D

D

C

E

E

F

F

106

114

115

116

117

118

119

120

121

122

125

126

127

128

129

130

131

132

133

134

135

136

138

139

140

141

142

143

144

145

146

147

148

149

150

151

152

153

154

155

156

157

158

159

160

161

162

163

164

165

166

115

127

140

124

122

116

132

122

138

132

149

140

122

128

132

128

116

151

Summary of Contents for MODEL SB1016

Page 1: ...s of Lathes Sold With a Tradition of Quality Since 1906 August 2010 by South Bend Lathe Co For Machines Mfg Since 7 09 OWNER S MANUAL 18 60 EVS TOOLROOM LATHES MODEL SB1016 220V Three Phase MODEL SB10...

Page 2: ...ess that happens through training and experience If you are not an experienced operator of this type of machinery read through this entire manual then learn more from an experienced operator schooling...

Page 3: ...4 Test Run 25 Spindle Break In 28 Recommended Adjustments 30 OPERATION 31 Operation Overview 31 Description of Controls Components 32 Main Power Control 32 Headstock Controls 32 Control Panel 32 Carri...

Page 4: ...on 87 TROUBLESHOOTING 88 ELECTRICAL 91 Electrical Safety Instructions 91 Wiring Overview 92 SB1016 36 Component Location Index 93 SB1016 36 Electrical Box Wiring 94 SB1016 36 Electrical Box Wiring 95...

Page 5: ...tock gear ranges is selected using the spindle speed range lever Next the EVS dial is used to dial in any available speed within that range Lastly a digital tachometer displays the current spindle spe...

Page 6: ...w Safety Position V Brake Pedal W Adjustable Feed Clutch Knob X Micrometer Stop Y Quick Change Gearbox Levers Z Headstock Oil Pump Reservoir Access AA Headstock Feed Direction Lever AB Quick Change R...

Page 7: ...GPV CEJKPG 9GKIJV NDU GPIVJ Z 9KFVJ Z GKIJV Z Z KP NGEVTKECN 2QYGT 4GSWKTGOGPV 8 2JCUG WNN QCF WTTGPV 4CVKPI KPKOWO KTEWKV 5K G OR PXGTVGT 6 RG CUMCYC 5YKVEJ CIPGVKE YKVJ 6JGTOCN 2TQVGEVKQP 5YKVEJ 8QN...

Page 8: ...EV TKXG GCTKPIU 5JKGNFGF CPF 2GTOCPGPVN 5GCNGF CKP 5RGEKHKECVKQPU 1RGTCVKQP PHQ 5YKPI 1XGT GF KP KUVCPEG GVYGGP GPVGTU KP 5YKPI 1XGT TQUU 5NKFG KP 5YKPI 1XGT 5CFFNG KP 5YKPI 1XGT CR KP CZKOWO 6QQN KV...

Page 9: ...CUV TQP GCFUVQEM GCTU NCOG CTFGPGF 5VGGN GF PFWEVKQP CTFGPGF CPF TQWPF GGJCPKVG CUV TQP 5VCPF CUV TQP 1VJGT QWPVT 1H 1TKIKP 6CKYCP 5QOG QORQPGPVU CFG KP 75 CPF GTOCP 9CTTCPV GCT 5GTKCN 0WODGT QECVKQP...

Page 10: ...PV 0QV XCKNCDNG 9GKIJV NDU GPIVJ Z 9KFVJ Z GKIJV Z Z KP NGEVTKECN 2QYGT 4GSWKTGOGPV 8 2JCUG WNN QCF WTTGPV 4CVKPI KPKOWO KTEWKV 5K G PXGTVGT 6 RG CUMCYC 5YKVEJ CIPGVKE YKVJ 6JGTOCN 2TQVGEVKQP 5YKVEJ 8...

Page 11: ...5JKGNFGF CPF 2GTOCPGPVN 5GCNGF CKP 5RGEKHKECVKQPU 1RGTCVKQP PHQ 5YKPI 1XGT GF KP KUVCPEG GVYGGP GPVGTU KP 5YKPI 1XGT TQUU 5NKFG KP 5YKPI 1XGT 5CFFNG KP 5YKPI 1XGT CR KP CZKOWO 6QQN KV 5K G KP QORQWPF...

Page 12: ...FUVQEM CUV TQP GCFUVQEM GCTU CUV TQP GF PFWEVKQP CTFGPGF CPF TQWPF GGJCPKVG CUV TQP 5VCPF CUV TQP 1VJGT QWPVT 1H 1TKIKP 6CKYCP 5QOG QORQPGPVU CFG KP 75 CPF GTOCP 9CTTCPV GCT 5GTKCN 0WODGT QECVKQP CDGN...

Page 13: ...follows Death or catastrophic harm WILL occur Moderate injury or re MAY occur Death or catastrophic harm COULD occur Machine or property damage may occur Basic Machine Safety 1 Owner s Manual All mac...

Page 14: ...ying that all fastening devices are properly secured and items attached to spindles have enough clearance to safely rotate 11 Chuck Keys or Adjusting Tools Tools used to adjust spindles chucks or any...

Page 15: ...personal protection gear change cutting fluid regularly and posi tion the cutting fluid nozzle where it will not splash or end up on the floor 1 Clearing Chips Metal chips can easily cut bare skin eve...

Page 16: ...l Spirits s Quality Metal Protectant Oil s 3AFETY Glasses s Wrench or Socket 21mm s Wrench or Socket 19mm s LOOR Mounting Hardware as Needed s Standard Screwdriver 2 The purpose of the preparation sec...

Page 17: ...e during operation and make sure it is connected to a power supply circuit that meets the requirements in the following section Full Load Current Rating Model SB1016 Full Load Rating 220V 30A Model SB...

Page 18: ...1 2 B1 B2 U T1 V T2 W T3 Swap any Two of These Wires Figure 3 Spindle motor power supply wires at variable frequency drive unit Grounding Requirements In the event of certain types of malfunctions or...

Page 19: ...power leads shown in Figure 4 Ground Hot Hot Hot DISCONNECT SWITCH as recommended L3 L2 L1 MASTER POWER SWITCH L3 L3 L2 L2 L1 L1 1 2 3 5 6 4 Figure 4 Machine incoming power supply wires Swap any Two o...

Page 20: ...12mm 1 Q Open End Wrench 14 17mm 1 R Open End Wrench 22 24mm 1 S Combo Wrench 27mm 1 T Phillips Screwdriver 2 1 U Standard Screwdriver 2 1 V ID Clamping Jaw Set Three Jaw Chuck 1 W Cast Iron Leveling...

Page 21: ...ts though test them on an inconspicuous area of a painted area to make sure they will not damage it Basic steps for removing rust preventative 1 Put on safety glasses and disposable gloves 2 OAT ALL S...

Page 22: ...covers as required by the maintenance and service described in this manual Physical Environment The physical environment where your machine is operated is important for safe operation and longevity o...

Page 23: ...ous personal injury may occur if safe moving methods are not used To reduce the risk of a lifting or dropping injury ask others for help and use power equipment and guide rods Lifting Strap Lathe Bed...

Page 24: ...from side to side and from front to back Re check the bedways 24 hours after installation two weeks after that and then annually to make sure they remain level Figure 11 Example of a precision level T...

Page 25: ...te If your lathe was shipped with oil in the gearboxes do not change that oil until after the break in period Lubricating Lathe GEARBOXES MUST BE FILLED WITH OIL NO OIL SHIPPED WITH MACHINE Refer to t...

Page 26: ...tion accidental startup during adjustments maintenance or service to the machine Power Source Locking Disconnect Switch Machine Conduit Conduit Figure 15 Typical hardwire setup with a locking disconne...

Page 27: ...fident troubleshooting the machine on your own contact our tech support at 360 734 1540 To test run your machine 1 Read and follow the safety instructions at the beginning of the manual take required...

Page 28: ...isengaged Engaged Disengaged 11 Make sure that the master power switch is OFF shown in Figure 23 Next connect the lathe to the power source and turn the master power switch ON Figure 23 Master power s...

Page 29: ...18 Move the spindle ON OFF lever up to the OFF position reset the stop button by twisting it clockwise until it pops out then restart the spindle with the lever 19 Push the foot brake The lathe shoul...

Page 30: ...phase polarity wiring as outlined on Page 16 The test run is now finished Shut the lathe down and begin the Spindle Break In procedure Cutting Fluid Pump Switch Chuck Guard Spindle Break In It is ess...

Page 31: ...e 33 Halfnut and carriage feed levers shown in the disengaged positions 7 Move the spindle ON OFF lever to the OFF center position as shown in Figure 34 Figure 34 Spindle ON OFF lever in OFF Neutral D...

Page 32: ...onvenience the adjustments listed below have been performed at the factory However because of the many variables involved with shipping we recommend that you at least verify the following adjustments...

Page 33: ...one full revolution 7 Moves slides to where they will be used during operation 8 If using power feed selects the proper feed rate for the operation 9 Turns the master power switch ON resets the stop b...

Page 34: ...hifts the quick change gearbox from neutral into high or low E Threading and Feed Chart Shows the configurations of the gearbox levers and displays the positions of the various gears for different thr...

Page 35: ...bricates the carriage and ways through various oil ports T Carriage Lock Secures the carriage in place for greater rigidity and accuracy when using the cross or compound slide for the machining operat...

Page 36: ...ocks the quill in position AD Tailstock Lock Lever Secures the tailstock in place along the bedway AE Handwheel Moves the quill toward or away from the spindle and is quipped with a graduated collar d...

Page 37: ...jaws move in unison when adjusted The included 4 jaw chuck features independent jaws which are used for square or unevenly shaped stock and to mount work that needs to be adjusted to near 0 total indi...

Page 38: ...ix camlock studs that may have to be installed before chuck mounting If you have not yet installed the camlock studs complete the instructions in Installing and Adjusting Camlock Studs on Page 37 To m...

Page 39: ...djusting Camlock Studs on Page on this page To make sure that the chuck centerline is aligned with the spindle centerline clamp a test rod in the chuck and use a test indicator mounted on the bedways...

Page 40: ...installed 6 Insert the chuck onto the spindle then check the position of each camlock making sure the cam line points between the V marks If one or more of the cams do not point between the V marks o...

Page 41: ...s Note The chuck does not need to be removed from the spindle to swap the jaws Changing Jaws Item Needed Qty Chuck Key 1 White Lithium Grease As Needed Chuck Cradle or Plywood 3 4 to protect bed 1 To...

Page 42: ...o it will not come loose during operation Figure 59 Typical of 3 jaw chuck mounting methods Mounting on an Outside Diameter Mounting in an Inside Diameter 4 Jaw Chuck Refer to Chuck Faceplate Mounting...

Page 43: ...gure 63 The tailstock quill is 3 diameter has an MT 5 taper and has 61 2 of travel If a tool ever becomes stuck in the bore where using the handwheel cannot extract the tool the quill is also equipped...

Page 44: ...ex Wrench 6mm 1 Wrench 28mm 1 To offset the tailstock from the spindle centerline loosen the tailstock and the front and rear lock bolts then rotate the tailstock offset screws shown in Figures 64 65...

Page 45: ...the drift key cannot contact the tool to push it out of the quill Should a tool become stuck under these conditions remove the quill or handwheel and drive the arbor or tool out with a long punch Fig...

Page 46: ...ock then set it aside for use in Step 6 4 Use the other piece of round stock to make a dead center and turn it to a 60 point as shown in Figure 68 Figure 68 Non tapered dead center in the chuck 5 Inst...

Page 47: ...eps 7 9 until the desired accuracy is achieved Move the tailstock toward the operator half the distance of the taper Looking down from above Figure 70 Adjust tailstock toward the operator If the machi...

Page 48: ...ECT LATHE FROM POWER 2 Drill center holes in both ends of the workpiece 3 Install the dead center in the spindle and the live center or carbide tipped dead center in the tailstock refer to Page 47 4 S...

Page 49: ...here the workpiece will rotate against it and generate friction The carbide tipped dead center can better withstand the effects of friction however the tip of the center must be lubricated to avoid pr...

Page 50: ...tening the center against the workpiece or it may become difficult to remove later and it will result in excessive friction and heat which may damage the workpiece and the center Removing Center from...

Page 51: ...r metric threads or left hand internal threads for the rst time set the compound so its travel is perfectly parallel with the cross slide Using a protractor rotate the compound 29 5 counterclockwise a...

Page 52: ...ending a cutting tool from the tool post will increase the risk of it breaking during operation which may cause metal pieces to be thrown at the operator or bystanders with great force Only extend a c...

Page 53: ...power feed Failure to heed this notice could result in the carriage crashing and causing severe machine or property damage Use the micrometer stop as a guide to help judge when to stop the carriage mo...

Page 54: ...ct spindle speed is important for safe and satisfactory results as well as maximizing tool life To set the spindle speed for your operation you will need to 1 Determine the best spindle speed for the...

Page 55: ...se before turning the lathe ON or the spindle may start up at a dangerously high rate of speed 4 Move the spindle range lever shown in Figure 87 to the range that covers your calculated spindle speed...

Page 56: ...n operation will also provide the optimal feed rate to use with that spindle speed Often the experienced machinist will use the feeds and speeds given in their reference charts or web calculators as a...

Page 57: ...the feed selection knob in to select carriage feed or pull the feed selection knob out to select cross feed 5 Adjust the feed clutch knob shown in Figure 92 to set at which point the feed clutch will...

Page 58: ...revent the half nut lever from applying the half nut Also to avoid shearing the leadscrew shear pin the carriage lock Figures 93 94 must be loosened before threading begins Figure 93 Carriage controls...

Page 59: ...use the thread dial chart TPI 4 72 Divisible By 4 Use any line position on the thread dial shown in Figure 97 for threading TPI divisible by four Figure 97 Any position marked on the dial can be used...

Page 60: ...he dial is selected for other fractional TPI Position 1 Only 2 2 3 3 27 8 TPI You cannot use the thread dial when cutting this thread The chart indicates that in order to cut this thread the process i...

Page 61: ...box Levers To cut a thread or establish a particular feed rate you may need to first reposition the transposing gears located behind the end gear cover Once you have confirmed that the change gears ar...

Page 62: ...ions Figure 105 Alternate change gear position for modular and diametral pitch threading Con guring Change Gears 1 DISCONNECT LATHE FROM POWER 2 Shift the gearbox range lever to Low so that the gears...

Page 63: ...ted completely Workpiece Dry Water Soluble Oil Synthetic Coolants Sulferized Oil Mineral OIl Figure 108 Cutting Fluid selection table BIOLOGICAL POISON HAZARD Use the correct personal protection equip...

Page 64: ...re the best cen ters in the industry made with pride and uncom promising quality s 3HAFTS ARE MADE OF ALLOY STEEL AND VACUUM heat treated to HRC60 1 for high rigidity and durability s ENTERS USE A COM...

Page 65: ...st don t do them justice They are very nice quality clocks and perfect for the South Bend Lathe aficionado Figure 112 Antique finished South Bend shop clocks SB1298 SB1299 SB1300 Figure 113 Official S...

Page 66: ...THE WAY DOWN s OVE THE POWER FEED LEVER ON THE APRON TO neutral to prevent crashes upon startup s NSURE CARRIAGE LOCK IS LOOSE Daily During Operations s 6ERIFY HEADSTOCK OIL mOWS WHEN POWER IS turned...

Page 67: ...itial the Day box for each item on the list If the box is blacked out maintenance is not required for that item on that day Use the maintenance poster included with your South Bend Lathe as a quick re...

Page 68: ...e from dry starts Review the lubrication system diagram shown in Figure 114 to familiarize yourself with the function and relationship of the components Oil Pressure Safety Switch To prevent costly da...

Page 69: ...p with a suction hose that can be inserted through the ller spout to the bottom of the oil tank instead If a remote oil pump system is not available use the headstock oil pump for this purpose as outl...

Page 70: ...Pump Fill Spout Figure 120 Location of tank Pump Suction Line and Tank Access Cover 9 Remove the pump suction line from the tank 10 Remove the three access cover cap screws and carefully remove the co...

Page 71: ...l and test pump operation and verify oil flow Figure 121 Priming location and check valve Change Gears Headstock Oil Supply Line Oil Flow Check Valve Figure 123 Location of gearbox fill and drain plug...

Page 72: ...6 lubricates the saddle and cross slide way guides with the oil from the apron reservoir Figure 126 Location of way pump and sight glass Sight Glass Fill Plug Way Pump Lead Screw Oil Type Mobil Vactra...

Page 73: ...pump type oil gun that has a plastic or rubberized cone tip Metal needle or lance tips are not recommended as they do not create a good seal These tips usually push the ball too far into the oiler bre...

Page 74: ...R 2 Remove the end gear cover 3 Clean the change gears thoroughly with mineral spirits to remove all the old grease Use a small brush if necessary to clean between the teeth 4 Clean the shafts from wh...

Page 75: ...g the system on a regular basis is mandatory Figure 131 Cutting Fluid system components and locations Nozzle Pump Switch Valve Vented Tank Cover Removed for Pump Tank Access Chip Drawer Catch Tray BIO...

Page 76: ...Optional Magnets Optional To change the cutting uid 1 Clean out the chip drawer 2 Remove the vented tank cover Lift and slide the pump and tank out of the cabinet as shown in Figure 13130 3 Connect t...

Page 77: ...15 Point the cutting fluid nozzle into the chip drawer and open the valve 16 Turn the cutting fluid pump ON to verify that fluid cycles properly then turn it OFF Cleaning Electrical Box The electrical...

Page 78: ...ections This will keep the bearings bushings gears and shafts well lubricated and protected from corrosion especially during the winter months To prepare your machine for long term storage a year or m...

Page 79: ...on directions with the handwheel This can be adjusted on the compound and cross slide leadscrews Before beginning any adjustment make sure that all associated components have been cleaned and re lubri...

Page 80: ...ave been cleaned and re lubricated or adjustments may be inaccurate The goal of adjusting gibs is to set the play between two sliding dovetailed surfaces so various cutting tasks can be accomplished w...

Page 81: ...Carriage Lock 4 To tighten the front saddle gib Figure 141 and move it toward the tailstock loosen the tailstock facing gib screw 1 4 turn and tighten the headstock facing gib screw 1 4 turn Thread D...

Page 82: ...be too stiff or too sloppy 5 Repeat Steps 3 4 if necessary until you are satis ed with the half nut adjustment If the half nut becomes too stiff turn the set screws counterclockwise to loosen it 6 Re...

Page 83: ...mount plate to prevent it from moving out of adjustment during operation then re install the motor cover Figure 146 V belt adjustment Pulley Deflection Pulley 3 Turn the hex nuts on the motor mount bo...

Page 84: ...ge is not worn and is the cause of the problem Tools Needed Qty Another Person 1 Hex Wrench 6mm 1 Hex Wrench 8mm 1 Needle Nose Pliers 1 Basic Caliper 1 Safety Glasses 1 Respirator Rated for Brake Dust...

Page 85: ...n the chuck is removed 6 Using the appropriate lifting apparatus remove the chuck as shown in Figure 148 Figure 148 Removing the 3 jaw chuck from a spindle nose Brake Linkage Cover 7 Remove the cap sc...

Page 86: ...gure 151 Complete brake system Brake Lever and Roller Motor Kill Switch Brake Pushrod E Clip Brake Drum and Shoes Brake Lever and Roller 16 Clean the brake shoes with hot soapy water and inspect When...

Page 87: ...Needed Qty Phillips Screwdriver 2 1 External Retaining Ring Pliers 90 2 1 Magnet 1 Safety Glasses 1 To replace the shear pin 1 DISCONNECT LATHE FROM POWER 2 Clean shear pin area shown in Figure 153 w...

Page 88: ...shroom the shear pin head preventing installation Instead le a slight chamfer on the end of the pin to make it easier to align and insert 7 Use the magnet to remove the shear pin head then rotate the...

Page 89: ...l pins back into their respective holes until seated This will further help align the gap insert and bed mating surfaces 5 Install all fasteners except the way set screws and lightly snug them in plac...

Page 90: ...t pumping or is wired with the incorrect phase polarity Correct pump phase polarity refer to Page 16 8 Motor connection wired incorrectly 8 Correct motor wiring connections 9 Oil pump motor operating...

Page 91: ...move from tailstock quill 1 Quill is not retracted all the way back into the tailstock 1 Turn the quill handwheel until it forces taper out of quill 2 Contaminants not removed from taper before insert...

Page 92: ...Emergency stop push button is engaged or at fault 2 Rotate button clockwise until it pops out to reset it for operation replace if not working properly 3 Power supply is switched OFF at master power s...

Page 93: ...m may lead to unpredictable results including serious injury or re 4 Motor Wiring The motor wiring shown in these diagrams is current at the time of printing but it may not match your machine Always u...

Page 94: ...99 Oil Pump Motor Page 98 Oil Pressure Switch Page 98 End Gear Cover Safety Switch Page 102 Brake Limit Safety Switch Page 102 Spindle ON OFF Switch Page 101 Spindle RPM Sensor Page 102 Chuck Guard S...

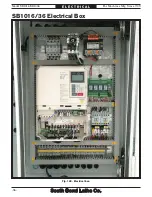
Page 95: ...98 Brake Pedal Safety Switch Page 102 Chuck Guard Limit Switch Page 102 Electrical Box Pages 94 95 Cooling Fan Page 94 Master Power Switch Page 94 Control Panel Page 100 Work Lamp Page 102 Work Lamp P...

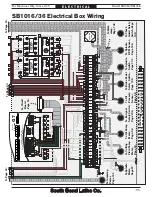
Page 96: ...R4 NO KR4 NC 0V KR4 KR3 KR2 NO 24V COM BRAKE NC NO NO SROTATION COM CHUCK NC COM JOG CSS 3 2 1 S2 COM S1 S5 S4 S3 COOLING FAN L13 L13 L11 L1 L1 L1 L3 L3 L3 L2 L2 L2 L1 L1 L1 L3 L2 L1 2 2 A1 11 11 9 6...

Page 97: ...B B 5 B 5 DB D D E E E E E E 9 3 4 5 7 9 G7 Varispeed N6H 6L6 K6G 67A HE 9 JC I G G ID N6H 6L6 DLC GH B6CJ6A Ground 11 10 U1 V1 W1 U2 V2 W2 0 1 2 2 3 4 5 6 7 8 9 K L COM L11 L13 A1 17 15 16 L1 L2 L3...

Page 98: ...96 For Machines Mfg Since 7 09 Model SB1016 SB1036 E L E C T R I C A L Fig 163 Electrical box SB1016 36 Electrical Box box photo...

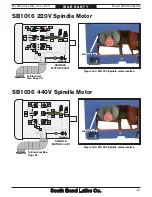
Page 99: ...pump motor Figure 164 SB1016 Spindle motor location Figure 165 SB1036 Spindle motor location SPINDLE MOTOR 220V Ground W U1 U5 V1 V5 W5 W1 V6 V2 U2 W6 L13 L11 U6 W2 V U Yl To Electrical Box Page 95 S...

Page 100: ...igure 167 SB1036 Oil pump motor pressure sensor location Oil Pump Motor Oil Pressure Sensor Ground OIL PUMP MOTOR 220V V2 W2 U2 U1 U5 V1 V5 W5 W1 U2 U2 V2 W2 To Electrical Box Page 95 Ground OIL PUMP...

Page 101: ...U1 Ground CUTTING FLUID PUMP MOTOR 440V Ground 3 2 1 4 6 5 W1 W1 V1 V1 U1 SB1016 220V Cutting Fluid Pump Wiring SB1036 440V Cutting Fluid Pump Wiring Figure 168 SB1016 Cutting fluid pump location Figu...

Page 102: ...2 110V 0V Bk X X 13 X 14 COM L K L11 1 3 3 TACHOMETER DISPLAY SPINDLE SPEED DIAL COOLANT PUMP SWITCH JOG BUTTON POWER LAMP EMERGENCY STOP BUTTON 1 2 3 X1 X2 4 4 3 3 2 1 20 19 L13 2 3 12 4 19 SB1016 36...

Page 103: ...36 Spindle ON OFF Switch Figure 171 spindle rotation and power conn tection SB1016 36 Power Connection Ground Hot Hot Hot DISCONNECT SWITCH as recommended L3 L2 L1 MASTER POWER SWITCH L3 L3 L2 L2 L1 L...

Page 104: ...switch COMMON NC NO A1 3 0 Bk Wt 0 2 13 14 21 22 NC NC NO NO 3 4 X 5 A1 X 9 1 K L COM End Gear Cover Safety Switch Figure 172 Work Light Brake Limit Switch Figure 173 Spindle RPM Sensor Figure 172 Ch...

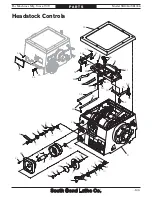
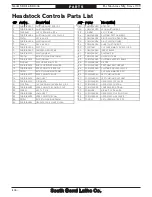
Page 105: ...016 SB1036 103 P A R T S Headstock Controls 1 2 3 4 5 6 7 8 9 10 11 12 13 14 15 16 17 18 19 21 22 23 24 25 26 28 29 30 32 34 35 36 38 39 40 41 42 43 44 45 46 47 48 49 50 51 52 53 54 55 56 1 1 2 3 4 5...

Page 106: ...NYLON OIL TUBE 12 PSB10160012 SHIFTING CAM 43 PSB10160043 SHIFTING SUPPORT FRAME 13 PFH06M FLAT HD SCR M6 1 X 20 44 PSB10160044 OIL PIPE 14 PSB10160014 END CAP BEVELED WASHER 45 PSB10160045 PIVOT ARM...

Page 107: ...1 112 113 123 124 A D E A F F A D E C A D D C E E F F 106 114 115 116 117 118 119 120 121 122 125 126 127 128 129 130 131 132 133 134 135 136 138 139 140 141 142 143 144 145 146 147 148 149 150 151 15...

Page 108: ...8 X 30 115 PR90M EXT RETAINING RING 110MM 149 PR68M EXT RETAINING RING 40MM 116 PSB10160116 KEY 10 X 8 X 36 150 PSB10160150 GEAR 35T 117 PSB10160117 GEAR 48T 151 P6008 OPEN BALL BEARING 6008 OPEN 118...

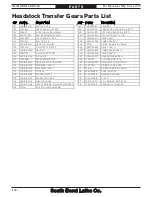
Page 109: ...Transfer Gears C B G H I J L K M C B G H I J L K M 186 187 188 189 190 191 192 193 194 195 196 197 198 199 200 201 202 203 204 205 206 207 208 209 210 211 214 215 216 217 218 186 187 188 122 194 187...

Page 110: ...30 204 PSB10160204 GEAR SHAFT H 154 PSB10160154 GEAR 31T 205 PSB10160205 COMBO GEAR 24T 48T 159 PORG075 O RING 74 4 X 3 1 G75 206 PSB10160206 GEAR SHAFT G 186 PSB10160186 O RING G16 207 PSB10160207 DO...

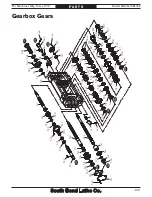
Page 111: ...1 312 313 314 315 316 317 318 319 320 321 322 323 324 325 326 327 328 329 330 331 332 333 334 335 336 337 338 339 340 341 342 343 344 345 346 347 348 349 350 351 352 353 354 355 356 357 358 359 360 36...

Page 112: ...ASHER 355 PSB10160355 DOUBLE GEAR 45T 18T 318 PR15M EXT RETAINING RING 30MM 356 PSB10160356 GEAR 22T 319 PSB10160319 SPLINE SHAFT G2 357 PSB10160357 GEAR 22T 320 PSB10160320 GEAR 22T 358 PSB10160358 G...

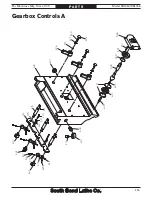
Page 113: ...es Mfg Since 7 09 Model SB1016 SB1036 111 P A R T S Gearbox Controls A 396 397 398 399 400 401 402 403 404 405 406 407 408 409 410 411 412 413 414 415 416 417 418 419 420 421 422 423 424 425 429 431 3...

Page 114: ...112 For Machines Mfg Since 7 09 Model SB1016 SB1036 P A R T S Gearbox Controls B 373 374 375 376 377 378 380 381 382 383 384 385 386 387 388 389 390 391 392 393 394 395 430 432 376 385 385...

Page 115: ...PSB10160413 SHIFT CONNECTION SHAFT 386 PSB10160386 LOWER MIDDLE FORK SUPPORT 414 PSB10160414 SHIFT SELECTOR BAR 387 PSB10160387 LOWER MIDDLE SHIFT FORK 415 PSB10160415 SHIFT ARM 388 PSB10160388 UPPER...

Page 116: ...02 503 504 505 506 507 508 509 510 511 512 513 514 515 516 517 518 519 523 524 525 526 527 528 529 530 531 532 533 534 535 536 537 538 540 541 542 543 545 546 547 548 549 550 551 552 553 554 555 557 5...

Page 117: ...6 577 578 579 580 581 582 583 584 585 586 587 588 589 590 591 592 593 594 595 596 597 598 599 600 601 602 603 604 605 606 607 608 609 610 611 612 613 614 615 616 617 618 619 620 621 622 623 624 625 62...

Page 118: ...BEARING D WASHER 568 PCAP26M CAP SCREW M6 1 X 12 522 PSB10160522 GEARED SHAFT B 11T 569 PSB10160569 HALF NUT GIB 523 PSB10160523 SOLID STEEL RIVET 2 8 X 10 570 PCAP177M CAP SCREW M6 1 X 16 BLK C12 9...

Page 119: ...M ROLL PIN 3 X 24 602 PSB10160602 SPRING CAP 624 PSB10160624 COUPLING 603 PSB10160603 COMPRESSION SPRING 625 PSB10160625 STEP SHAFT 604 PSB10160604 SPRING CAP 626 PORP018 O RING 17 8 X 2 4 P18 605 PRP...

Page 120: ...POST TURRET 724 PSB10160724 LEADSCREW END CAP 706 PSB10160706 POST TURRET SHAFT 725 PSB10160725 COMPRESSION SPRING 707 PSB10160707 INDENT PLUNGER 726 PCAP179M CAP SCREW M6 1 X 20 BLK C12 9 708 PSB101...

Page 121: ...2 803 804 805 806 807 808 811 812A 813 814 815 816 817 818 819 820 821 822 823 824 825 826 827 828 829 830 831 832 833 834 835 836 837 838 839 840 841 842 843 844 864 858 859 860 874 861 862 801 863 8...

Page 122: ...120 For Machines Mfg Since 7 09 Model SB1016 SB1036 P A R T S Cross Slide Saddle B 846 847 848 849 850 851 852 853 854 855 856 857 868 847 849 Viewed From Underneath Saddle X...

Page 123: ...PSB10160853 ALUMINUM OIL TUBE 6 X 175MM 818 PSB10160818 CROSS LEADSCREW END BRACKET 854 PSB10160854 OIL FILTER 6MM 819 PSB10160819 SADDLE CASTING 855 PSB10160855 CARRIAGE LOCK BLOCK 820 PSB10160820 S...

Page 124: ...036 P A R T S Bed Shafts 901 902 903 904 905 906 907 908 909 910 911 915 916 917 918 919 920 924 925 926 927 928 929 930 934 935 936 937 938 939 940 945 946 947 948 949 950 955 956 957 958 959 967 968...

Page 125: ...PSB10160957 SPRING CAP 916 P51105 THRUST BEARING 51105 958 PR37M EXT RETAINING RING 32MM 917 PSB10160917 SHAFT END BRACKET 959 PSB10160959 SPINDLE ROD 918 PSB10160918 LONGITUDINAL LEADSCREW 967 PEC01...

Page 126: ...0 PSB10161010 THRUST WASHER 1002 PSB10161002 GEAR FLAT WASHER 1011 PSB10161011 DOUBLE GEAR 44T 56T 1003 PSB10161003 GEAR 24T 1012 PSB10161012 GEAR SHAFT 1004 PSB10161004 PIVOT ARM 1013 PSB10161013 GEA...

Page 127: ...1110 1111 1111 1 1111 2 1111 3 1114 1115 1116 1117 1118 1119 1120 1122 1123 1124 1125 1126 1127 1128 1129 1130 1131 1132 1133 1134 1135 1136 1137 1138 1139 1140 1141 1142 1143 1144 1144 1 1144 2 1144...

Page 128: ...1111 3 PSB10161111 3 THIMBLE NUT 1143 PS14M PHLP HD SCR M6 1 X 12 1114 PSB10161114 CHECK VALVE 1144 PSB10161144 OIL HOSE 90 DEG CONNECTOR ASSY 1115 PSB10161115 FEMALE 90 DEG PIPE ELBOW 1 4 X 1 4 PT 1...

Page 129: ...1210 1211 1212 1213 1214 1215 1216 1217 1218 1219 1220 1221 1222 1223 1224 1225 1226 1227 1228 1229 1230 1231 1232 1233 1234 1235 1236 1237 1238 1239 1240 1241 1242 1243 1244 1245 1246 1247 1248 1249...

Page 130: ...D MOUNTING PLATE 1243 PSB10161243 LEFT CABINET SIDE ACCESS PANEL 1214 PSB10161214 CHUCK GUARD MOUNTING BRACKET 1244 PSB10161244 SPLASH GUARD MOUNTING BRACKET 1215 PB56M CAP SCREW M10 1 5 X 20 1245 PSB...

Page 131: ...Tailstock 1301 1302 1303 1304 1305 1306 1307 1308 1309 1310 1311 1312 1313 1314 1315 1316 1317 1318 1319 1320 1321 1322 1323 1324 1325 1326 1327 1328 1329 1330 1331 1332 1333 1334 1335 1336 1337 1338...

Page 132: ...T WAY WIPER PLATE 1311 PCAP02M CAP SCREW M6 1 X 20 1334 PSB10161334 STRAIGHT WAY WIPER 1312 PSB10161312 TAILSTOCK LEADSCREW ASSEMBLY 1335 PSB10161335 TAILSTOCK BASE 1313 PK10M KEY 5 X 5 X 12 1336 PW18...

Page 133: ...W 1410 PSS02M SET SCREW M6 1 X 6 1411 PSB10161411 GEAR SHAFT HEX NUT Micrometer Stop 1451 1452 1453 1454 1455 1456 1457 1458 1459 1460 1461 1462 REF PART DESCRIPTION 1451 PCAP185M CAP SCREW M10 1 5 X...

Page 134: ...W ASSY 1508 PSB10161508 LEAF SCREW 1502 PSB10161502 STEADY REST FINGER ASSEMBLY 1509 PSB10161509 DOWEL PIN 10 X 53 1503 PSS20M SET SCREW M8 1 25 X 8 1510 PN29M HEX NUT M18 2 5 1504 PSB10161504 KNURLED...

Page 135: ...1554 1555 1556 REF PART DESCRIPTION REF PART DESCRIPTION 1551 PSB10161551 FINGER ADJUSTMENT KNOB BOLT ASSY 1554 PSB10161554 FOLLOW REST CASTING 1552 PSB10161552 FOLLOW REST FINGER ASSEMBLY 1555 PSB10...

Page 136: ...1606 PSB10161606 PIVOT ARM 1625 PSB10161625 AXLE 1607 PSB10161607 PIVOT ARM BUSHING 1628 PCAP31M CAP SCREW M8 1 25 X 25 1608 PORP010 O RING 9 8 X 1 9 P10 1629 PW01M FLAT WASHER 8MM 1609 PR02M EXT RETA...

Page 137: ...SB1016 SB1036 135 P A R T S Electrical Cabinet Control Panel Control Panel Electrical Cabinet 1702 1703 1704 1705 1706 1707 1708 1709 1710 1711 1712 1713 1714 1717 1718 1719 1720 1721 1722 1723 1705 1...

Page 138: ...RD 1P LARGE 1705 PSB10161705 CABINET COOLING FAN 1717 PSB10161717 TACHOMETER DISPLAY 1706 PSB10161706 CIRCUIT BOARD 1718 PSB10161718 SPINDLE SPEED DIAL 1707 PSB10161707 RELAY OMRON MY4NJ 24V 1719 PSB1...

Page 139: ...08 CARBIDE TIP DEAD CENTER MT 5 1802 PSB10161802 3 JAW CHUCK 12 ASSEMBLY 1809 PSB10161809 SPINDLE SLEEVE MT 5 MT 7 1802 1 PSB10161802 1 3 JAW CHUCK 12 1811 PWR1012 WRENCH 10 12MM 1802 2 PSB10161802 2...

Page 140: ...SB1016 MODEL NUMBER LABEL 1904 PSBLABEL08HS ENTANGLEMENT HAZARD LABEL 1916 PSB10361916 SB1036 MODEL NUMBER LABEL 1905 PSB10161905 CHUCK KEY HAZARD LABEL 1917 SB1322 SOUTH BEND NAMEPLATE 1906 PSBLABEL0...

Page 141: ...ys to prevent injury The owner of this machine MUST maintain the original location and readability of these safety labels If any label is removed or becomes unreadable REPLACE that label before using...

Page 142: ...140 For Machines Mfg Since 7 09 Model SB1016 SB1036...

Page 143: ...arrant or represent that this machine complies with the provisions of any law act code regulation or standard of any domestic or foreign government industry or authority In no event shall South Bend s...

Page 144: ...South Bend Lathe Co P O Box 2027 Bellingham WA 98227 PHONE 360 734 1540 Administrative Of ces FAX 360 676 1075 International FAX 360 734 1639 USA only southbendlathe com Printed In Taiwan CRTSJB12960...

Reviews: