background image


12

Remote Control                                                                 


3.


DVD Button 

Press to enter DVD mode. 

4.


DTV Button 

Press to enter DTV mode. 

5.


ATV Button 

Press to enter ATV mode. 

6.


AV Button 

Press to shift to AV mode. 

7.


FM Button 

Press to shift to FM mode. 

8.


OK Button 

Press to confirm selections. 

9.


W


X

S

/CH+,

T

/CH- Buttons 

Press to select menu items or settings. 

Press 

W


X

 buttons to adjust value in 

the system setup menu.   

Press 

ST

 buttons to select channels 

or radio stations forward and backward 

in DTV/ATV and FM mode.     

Press to adjust the value of time when 

setting time on the display panel. 

10.


DVD SETUP/SET Button 

Press to enter the DVD system setup 

menu in DVD mode. 

Press to memorize the selected radio 

stations in FM mode. 

11.


/SEEK – , 

/SEEK + Buttons 

In FM mode, press once to fine tune 

frequency backward/forward.   

Press for about 1.5 seconds to search 

radio stations backward/forward 

automatically. 

In DVD mode, press to activate fast 

backward/forward playback. 

In program edit menu, use the red 

button to delete a program and the 

green button to rename a program. 

12.


/TTX Button 

Press to stop playback in DVD mode. 

Press to display the teletext 

information in ATV/DTV mode. 

13.


X

/TVR Button 

Press to start playback in DVD mode. 

In DTV mode, press to select DTV or 

Radio program. 

14.


MENU/FAV Button   

Press to access the disc menu under 

DVD mode. 

In ATV/DTV mode, press to enter the 

favorite list. 

15.


TITLE/EPG Button   

Press to display titles if present on the 

disc in DVD mode. 

Press to enter the program guide 

menu in DTV mode. 

16.


REPEAT/EXIT Button 

Press to repeat a title, chapter or the 

entire disc in DVD mode. 

Press to exit the system setup menu. 

17.


SLOW/STEREO Button 

Press to activate slow playback in DVD 

mode. 

Press to enter the audio language 

menu in DTV mode. 

Press to select sound track in ATV or AV 

mode. 

18.


  EJECT Button  

Press to open or close the disc tray. 


Summary of Contents for KTD 51002

Page 1: ...DEUTSCH ENGLISH FRAN AIS KTD 51002...

Page 2: ...4 Connecting to TV Signal Input Source 14 Connecting to Antenna 15 Connecting To the Power Adapter 15 First Time Installation 16 On Screen Menus and Displays 16 SETUP Setting 17 Picture Setting 19 Sou...

Page 3: ...The manufacturer should not hold responsibility for the damage caused by any substitutions and modifications of the product without authorization from the manufacturer or authorized unit WARNING The...

Page 4: ...the cart stand tripod bracket or table specified by the manufacturer or sold with the apparatus When a cart is used use caution when moving the cart apparatus combination to avoid injury from tip ove...

Page 5: ...in 2x5w stereo amplifier with left and right speakers Switching Power Adapter Automatically adapts to the voltage required Special Functions Supports Multi language Advanced Playing Function Compatib...

Page 6: ...5...

Page 7: ...s the operation of some DVD discs Please refer to the instruction manual with the disc Care of Discs Do not touch the playing surface of the disc Do not stick paper or labels on the disc Storage of Di...

Page 8: ...Button Press to stop playback in DVD mode 6 Button In DVD mode press once to go to beginning of the current track chapter Press twice to go to the previous track chapter 7 Button Press to go to the n...

Page 9: ...ton Press to select items in the system setup menu Press to select channels or radio stations forward in ATV DTV or FM mode 17 VOL Button Press to select items in the system setup menu Press for about...

Page 10: ...ATV DTV Radio program in ATV DTV mode 2 FM Coaxial Antenna Jack 3 Left Right AUDIO Input Jacks Connection for audio input 4 VIDEO Input Jack Connection for video input 5 DC 12V Input Jack Display Pan...

Page 11: ...ntrol works best at a distance less than 7m and at an angle of up to 60 to the front of the unit No obstacles may stand in the way between remote control and infrared sensor The battery normally lasts...

Page 12: ...1 POWER Button Press to access to or exit the STANDBY mode 2 SUBTITLE Button Press to select a subtitle language or to turn subtitles off when a DVD disc with multi subtitles is playing In DTV mode p...

Page 13: ...adio stations backward forward automatically In DVD mode press to activate fast backward forward playback In program edit menu use the red button to delete a program and the green button to rename a p...

Page 14: ...display the reference information about the current mode 26 LCD ON OFF Button Press to turn the LCD screen display On or Off 27 USB Button In DVD mode press the shift between disc playback and USB pl...

Page 15: ...the unit it remembers the last function used Please make all the connections before installing the unit in the kitchen Connecting to External AV Signal Source Connections should be made as follows Co...

Page 16: ...ntenna you should earth the system in order to avoid lightning strike Do not connect the earth wire to gas pipe to prevent gas explosion Connecting To the Power Adapter This unit is powered via the sw...

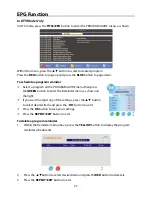
Page 17: ...w opens on the screen where the status of the searching is documented The values of the found TV broadcast programs of analogue digital and Radio are listed 5 After finishing of the searching all foun...

Page 18: ...Start will be selected Press the OK button and the search starts immediately 3 A new window opens on the screen where the status of the searching is documented The values of the found TV broadcast pr...

Page 19: ...as shown on the right 2 Press the button to select desired item and press the button to set 3 Press the red button to save the settings 4 To leave the ATV Manual tuning press the REPEAT EXIT or SETUP...

Page 20: ...you select Skip a program Within the menu press the button to select a program you want to skip and press the blue button to set the program skipped A symbol SKIP appears on the skipped program Press...

Page 21: ...d Setting The sound settings includes the options for Sound Mode Treble Bass Balance Auto Volume and Surround Sound Sound Mode With the button you can select Standard Music Movie Sports or User Treble...

Page 22: ...nged some settings please navigate to Close and press the ENTER button to save the changes This function is not available when there is DTV signal present in DTV mode Time Zone You can set the Time Zo...

Page 23: ...e options for Lock System Set Password Block Program and Parental Guidance Before you can change the settings you have to insert the preset password if you enter into the menu The default is 0000 Lock...

Page 24: ...then press the GREEN button to enter the Reminder menu as shown on the right If you want to adjust any of the settings press the button to select desired item and press the button to set it Press the...

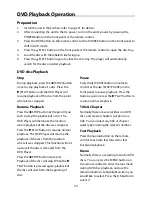
Page 25: ...on where playback of the disc was stopped Press the XPLAY button to resume normal playback The DVD Player will resume the playback of the disc from the location where it was stopped This function will...

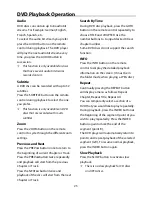
Page 26: ...Track Press the NEXT button twice and playback of the disc will start from the next Chapter or Track Search By Time During DVD disc playback press the GOTO button on the remote control repeatedly to c...

Page 27: ...e the direction button to select the contents Many discs have other contents besides pictures Picture Rotation This can be used only when the picture is normally displayed Once another picture is sele...

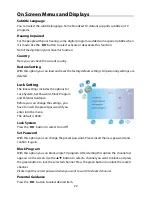
Page 28: ...he USB button to shift to DVD disc playback mode and pull out the USB device DVD System Setup You can customize the set up menu to your own preference General Operating Steps 1 In DVD mode press the D...

Page 29: ...or OFF OSD Lang There are several different OSD languages for selection Captions You can activate the captions display during playback with On or deactivate the display with Off Screen Saver When acti...

Page 30: ...rate to get different signal compression effects Video Setup Page The Video Setup menu will appear Select the submenu Quality using the direction buttons on the remote and press OK to confirm Select f...

Page 31: ...tal The parental function is applicable to DVD discs which are equipped with the child lock function By parental lock the selected senses or playback of the disc can be locked To access parental contr...

Page 32: ...ized stations Use the buttons to adjust the channel number for your preference and then press the SET button again the station will be memorized with the coded station number Press the SET button agai...

Page 33: ...unit under a cabinet The player unit may be installed in the kitchen with or without the spacer The suggested mounting position of the unit is under a wall cabinet See drawings below NOTE The dimensio...

Page 34: ...tep Quick hints Since the unit is rather heavy be careful while doing the installation work To reduce risk of fire do not place any heating or cooking appliance beneath the unit especially while the L...

Page 35: ...n of the picture is incorrect Make sure the video type of the AV signal source is PAL Make sure system connection is correct Is your disc dirty or warped Clean or replace it Cannot continue to play an...

Page 36: ...out 3 1 kg DESIGN AND SPECIFICATIONS ARE SUBJECT TO CHANGE WITHOUT NOTICE Manufactured under license from Dolby Laboratories Dolby and the double D symbol are trademarks of Dolby Laboratories Confiden...

Reviews: