


1-9
36
z
Hint
You can check whether the disc has been finalized or not.
If you cannot select [Finalize] in step 5 above, the disc
has already been finalized.
Notes
• The time required for finalizing depends on the disc
type, recording time, or the number of titles recorded
on the disc.
• Depending on the condition of the disc, recording, or
the DVD equipment, discs may not play even if the
discs are finalized.
• The recorder may not be able to finalize the disc if it
was recorded on another recorder.
37
Rec
o
rd
ing
Recording
Before Recording
Before you start recording…
• This recorder can record on various discs. Select
the disc type according to your needs (page 8).
• Use the Title List to check the available
recording time for the disc (page 29). For
DVD+RWs and DVD-RWs, you can erase titles
to free up disc space (page 59).
z
Hints
• Up to 49 titles can be recorded on a DVD+RW or
DVD+R. For other recordable discs, 99 titles.
• When using a DVD+RW, you can overwrite a
previously recorded title (page 45).
• You can select the picture size to be recorded on DVD-
RWs (VR mode). Select [4:3] or [16:9] for [Rec Aspect
Ratio] in [Rec Setting] Setup (page 77).
Recording mode
Like the SP or LP recording mode of VCRs, this
recorder has four different recording modes.
Select a recording mode according to the time and
picture quality you need. For example, if picture
quality is your top priority, select the High Quality
mode (HQ). If recording time is your priority,
Super Long Play mode (SLP) can be a possible
choice.
Press REC MODE repeatedly to switch the
recording modes.
Note that the recording time in the following table
is an approximate guide.
Note
Situations below may cause slight inaccuracies with the
recording time.
– Recording a programme with poor reception, or a
programme or video source of low picture quality.
– Recording on a disc that has already been edited.
– Recording only a still picture or just sound.
Recording stereo and bilingual
programmes
This recorder can receive and record stereo and
bilingual programmes based on the ZWEITON
system or the NICAM system.
Before you start recording bilingual programmes,
press the
(audio) button repeatedly to select
the audio channel (Main+Sub, Main, or Sub). The
selected channel is displayed on the TV screen and
applied to the recording. For timer recordings,
“Main+Sub” is automatically selected. Note that
you cannot switch the audio channel while
recording.
ZWEITON (German stereo) system
When a stereo or bilingual ZWEITON based
programme is received, “ST” or “BIL” appears in
the front panel display.
NICAM system
When a stereo or bilingual NICAM based
programme is received, “NICAM” appears in the
front panel display.
To record a NICAM programme, be sure to set
[NICAM/Standard] of [Channel Settings] in
[Settings] Setup to on (default). If the sound is not
clear when listening to NICAM broadcasts, set
[NICAM/Standard] to off (see “[Channel
Settings]” on page 70).
z
Hint
When playing on other DVD equipment, you may not be
able to switch between the main and sub sounds for
bilingual programmes. Select either “Main” or “Sub”
before you start recording if you plan to play the disc on
other DVD equipment.
Recording mode
Recording time
(minute)
HQ (High quality)
60
SP (Standard mode)
R
120
EP
r
240
SLP (Long duration)
360
,
continued
38
Unrecordable pictures
Pictures with copy protection cannot be recorded
on this recorder.
When the recorder receives a copy guard signal,
the recorder stops recording.
* The recorded disc can be played only on CPRM
Timer Recording (Standard/
VIDEO Plus+)
You can set the timer for a total of seven
programmes, up to one month in advance.
There are two methods to set the timer: the
standard method and VIDEO Plus+ method.
• Standard: Set the date, time, and programme
position of the programme manually.
• VIDEO Plus+: Enter the PlusCode number
designated for each TV programme (page 40).
Notes
• Timer recordings cannot be made if the recorder is
turned on.
• While recording, you cannot set additional timer
recordings.
Setting the timer manually
(Standard)
Copy control
signals
Recordable discs
Copy-Free
Copy-Once
+
RW
-RW
VR
-RW
Video
-
R
+
R
-RW
VR
-RW
VR
-RW
Video
+
RW
-
R
+
R
1
2
3
4
5
6
7
8
9
0
<
/
M
/
m
/
,
,
ENTER
Z
TIMER
O
RETURN
x
'/1
39
Rec
o
rdi
n
g
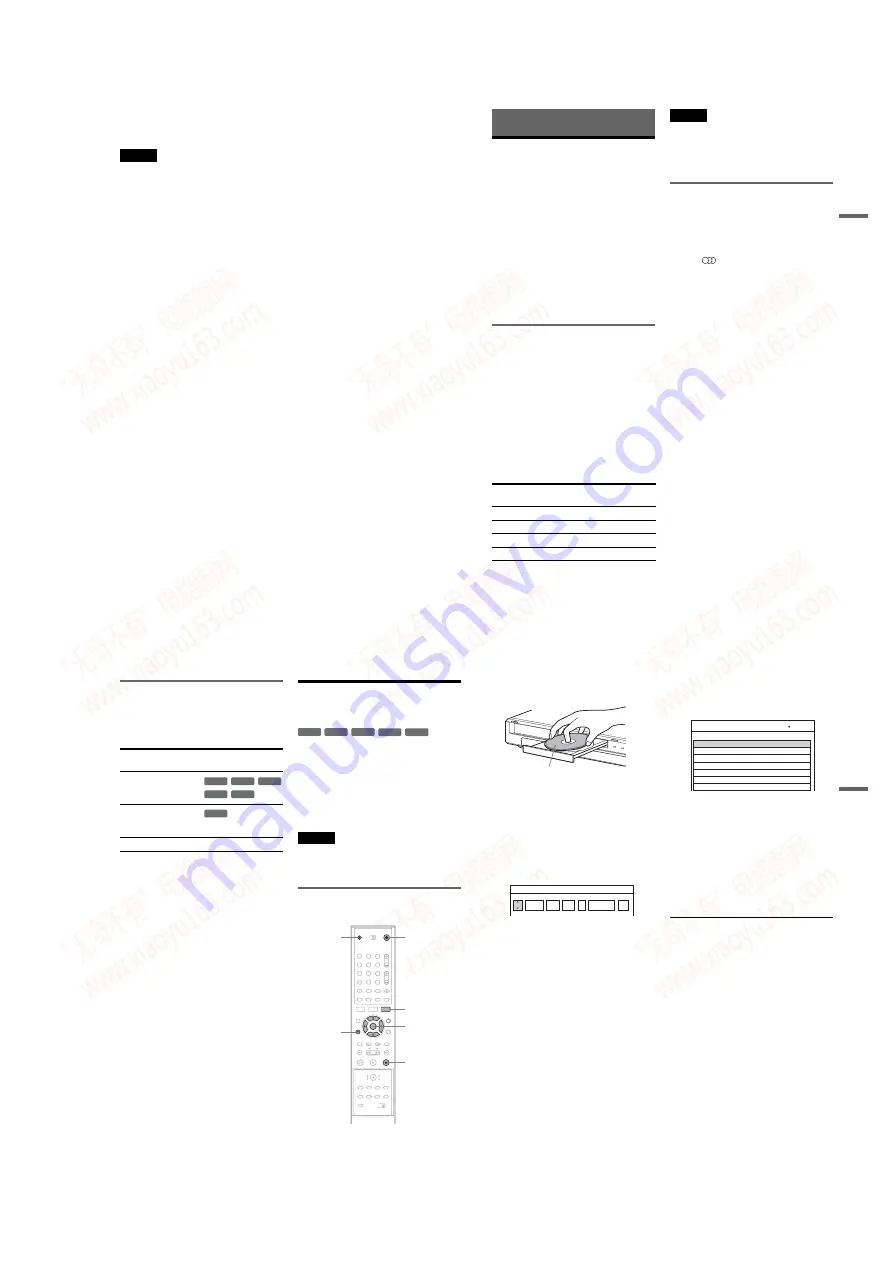
1
Press
Z
(open/close), and place a
recordable disc on the disc tray.
2
Press
Z
(open/close) to close the disc
tray.
Wait until “LOADING” disappears from the
front panel display.
For details on how to insert and format a new
disc, see “Inserting and Formatting a Disc”
(page 27).
3
Press TIMER.
• If the Timer List or [Video Plus +] menu
appears, press TIMER repeatedly to switch
the display to [Timer Standard].
4
Press
<
/
,
to select an item and press
M
/
m
to adjust the setting.
[PR]: Selects the programme position or input
source.
[Date]: Sets the date up to one month in
advance.
[Start]: Sets the start time.
[Stop]: Sets the stop time.
[Mode]: Selects the recording mode
(page 37). If you select [AT], you can use the
Rec Mode Adjust function. See “Rec Mode
Adjust” on page 40.
[Repeat]: Selects a repeat option from
[Today], [Mon-Fri], and [Weekly].
[PDC/VPS]: Sets the PDC/VPS function. See
“About the PDC/VPS function” below.
• If you make a mistake, select the item and
change the setting.
5
Press ENTER.
The Timer List appears with the timer setting
you made.
To make another timer setting, press TIMER
to return to the [Timer Standard] menu and
repeat steps 4 and 5.
6
Press
O
RETURN to turn off the Timer
List.
7
Press
'
/
1
to set your recorder to standby
mode.
The TIMER REC indicator lights up on the
front panel and the recorder is ready to start
recording.
To stop recording during timer recording
Press
x
. Note that it may take a few seconds for
the recorder to stop recording.
About the PDC/VPS function
PDC/VPS signals are transmitted with TV
programmes in some broadcast systems. These
signals ensure that timer recordings are made
regardless of any broadcast delays, early starts, or
broadcast interruptions.
◆
To use the PDC/VPS function
Set [PDC/VPS] to [On] in step 4 above. [*]
appears next to the [Start] time of the timer setting
in the Timer List.
When you turn on this function, the recorder starts
scanning the channel before the timer recording
starts. If you are watching TV when scanning
starts, a message will appear on the TV screen. If
you want to watch TV, switch to your TV’s tuner.
Labelled side facing up
100 Min Free
19:20
12/4 Tue
12
PR
Date
Start
Stop
Mode
Repeat
PDC/VPS
Timer Standard
19:50
Today
SP
Off
SP
12/4 Tue
Date
12
PR
Timer List
19:20
Start
30
Length
SP
Mode
Rec. OK
Check
: PDC/VPS
,
continued
www. xiaoyu163. com
QQ 376315150
9
9
2
8
9
4
2
9
8
TEL 13942296513
9
9
2
8
9
4
2
9
8
0
5
1
5
1
3
6
7
3
Q
Q
TEL 13942296513 QQ 376315150 892498299
TEL 13942296513 QQ 376315150 892498299


