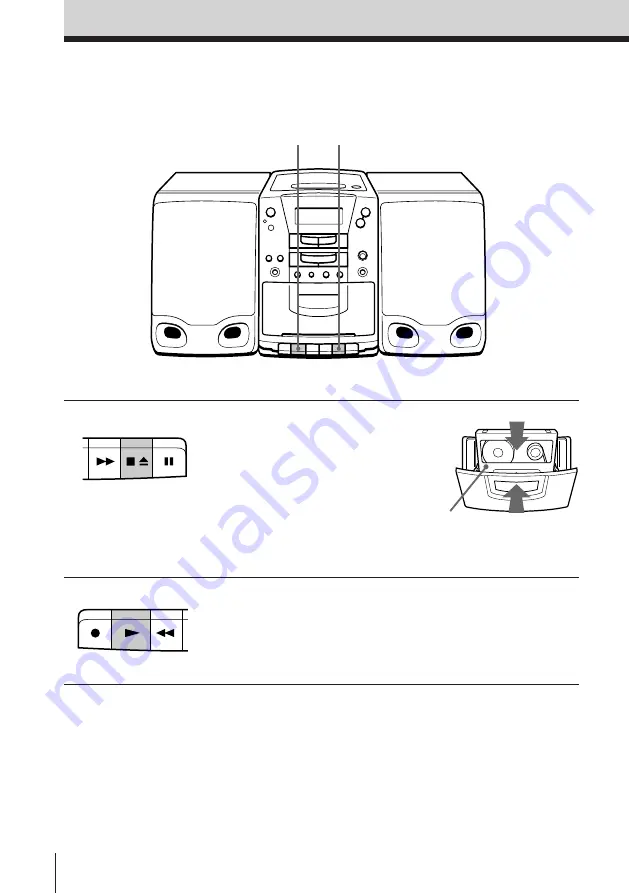
background image

Basic Operations

10

Playing a tape

For hookup instructions, see pages 28 - 30.

1

Press 

p6

 to open the tape

compartment and insert a
recorded tape. Use TYPE I
(normal), TYPE II (high position)
and TYPE IV (metal) tapes. Close
the compartment.

2

Press 

(

.

The player turns on (direct
power-on) and starts playing.

With the side you want
to play facing you

1

2

Summary of Contents for PMC-222V

Page 1: ...3 862 115 11 1 1998 by Sony Corporation Personal Component System Operating Instructions PMC 222V ...

Page 2: ...12 cm and 8 cm Their longest play time is 74 and 20 minutes respectively The actual play time however varies among the CDs Note on VIDEO CDs This player conforms to Version 1 1 and 2 0 of VIDEO CD standards You can enjoy two kinds of playback according to the CD type Disc type VIDEO CDs without PBC functions Version 1 1 VIDEO CDs with PBC functions Version 2 0 You can enjoy video playback moving p...

Page 3: ...ogram Program Play 20 Playing a multiplex CD The CD Player VIDEO CD 21 Using the TV screen 22 Locating a specific track or scene 23 Playing a VIDEO CD with PBC functions The Radio 24 Presetting radio stations 25 Playing preset radio stations The Tape Player 26 Recording through a microphone Using as a PA system The KARAOKE 27 Singing along the KARAOKE Setting Up 28 Hooking up the system 31 Selecti...

Page 4: ...ress 6 PUSH OPEN CLOSE down to open the lid of the CD compartment and place the CD on the CD compartment 2 Close the lid of the CD compartment 3 Press direct power on The player plays all the tracks once Display Playing time Track number With the label side up 1 2 3 Basic Operations ...

Page 5: ... playback Press the button again to resume play after pause go to the next track NEXT go back to the previous track PREV remove the CD 6 PUSH OPEN CLOSE turn on off the player POWER Tip Next time you want to listen to a CD just press The player turns on automatically and starts playing the CD 6 PUSH OPEN CLOSE VOLUME p POWER PREV NEXT ...

Page 6: ...30 1 Set the COLOR SYSTEM at the rear to NTSC or PAL according to the color system of your TV 2 Press 6 PUSH OPEN CLOSE down to open the lid of the CD compartment and place the VIDEO CD on the CD compartment 3 Close the lid of the CD compartment With the label side up 2 3 4 1 ...

Page 7: ...ene remove the CD 6 PUSH OPEN CLOSE turn on off the player POWER Only for VIDEO CDs without PBC functions Version 1 1 Tips Next time you want to play a VIDEO CD just press The player turns on automatically and starts playing the VIDEO CD NTSC system countries Japan Korea Taiwan the U S A etc PAL system countries China India Indonesia Singapore Malaysia etc 6 PUSH OPEN CLOSE VOLUME p PREV NEXT POWE...

Page 8: ...isplay direct power on 2 Hold down TUNING or until the frequency digits begin to change in the display The player automatically scans the radio frequencies and stops when it finds a clear station If you can t tune in a station press the button repeatedly and change the frequency step by step Display Indicates an FM stereo broadcast 2 1 ...

Page 9: ...s possible see page 29 AM Keep the AM loop aerial supplied away as far as possible from the player and then reorient the aerial see page 29 Tips If the FM broadcast is noisy press PLAY MODE MONO ST until Mono appears in the display and the radio will play in monaural Next time you want to listen to the radio just press BAND The player turns on automatically and starts playing the previous station ...

Page 10: ...s 28 30 1 Press p6 to open the tape compartment and insert a recorded tape Use TYPE I normal TYPE II high position and TYPE IV metal tapes Close the compartment 2 Press The player turns on direct power on and starts playing With the side you want to play facing you 1 2 ...

Page 11: ...LUME stop playback p6 fast forward or rewind the tape or 0 pause playback P Press the button again to resume play after pause eject the cassette p6 turn on off the player POWER Tip Next time you want to listen to a tape just press The player turns on automatically and starts playing the tape p6 0 VOLUME POWER P ...

Page 12: ... insert a blank tape Use TYPE I normal and TYPE II high position tapes only 2 Select the program source you want to record To record from the CD player insert a CD see page 4 and press p To record from the radio press BAND and tune in the station you want see page 8 3 1 With the side you want to record on facing you Display ...

Page 13: ...e AM loop aerial connected to the player as far away as possible To erase a recording proceed as follows 1 Disconnect the microphone if connected to the MIX MIC jack 2 Turn on the power 3 Press FUNCTION on the remote until TAPE appears in the display 4 Press r To Press stop recording p6 pause recording P Press the button again to resume recording turn on off the player POWER p6 P POWER 3 Press r t...

Page 14: ...remaining time Press DISPLAY ENTER MEM while playing a CD The track numbers in the music calendar disappear after they are played To display Press DISPLAY ENTER MEM the current track number once and the remaining time on the current track remaining time on the CD twice and the number of tracks left the current track number three times and playing time For a track whose number is more than 20 the r...

Page 15: ... NEXT forward or the sound PREV backward while playing and hold down until you find the point a point while observing NEXT forward or the display PREV backward in pause and hold down until you find the point Note You cannot locate a specific track if SHUF or PGM is lit in the display Turn off the indication by pressing p Tip When you locate a track numbered over 10 press 10 first then the correspo...

Page 16: ...gle track REP 1 all the tracks REP ALL tracks in random order SHUF REP programed tracks PGM REP 3 Do either of the following to start repeat play When you ve selected REP1 select the track by pressing the number button pressing PREV or NEXT then on the player When you ve selected REP ALL or SHUF REP press SELECT on the player When you ve selected PGM REP program tracks see step 3 on page 18 then p...

Page 17: ...D in random order 1 Press p CD appears in the display 2 Press MODE until SHUF appears in the display 3 Press SELECT to start shuffle play To cancel Shuffle Play Press MODE until SHUF disappears from the display On the player 1 Press p 2 Press PLAY MODE MONO ST repeatedly until SHUF appears in the display 3 Press p SELECT MODE ...

Page 18: ...isplay 3 Press the number buttons for the tracks you want to program in the order you want You can program up to 20 tracks The programed tracks appear in the music calender 4 Press SELECT to start program play On the player 1 Press p 2 Press PLAY MODE MONO ST until PGM appears in the display 3 Press the PREV or NEXT then press DISPLAY ENTER MEM for the tracks you want to program in the order you w...

Page 19: ...the programed order To change the current program Press p once if the CD is stopped and twice if the CD is playing The current program will be erased Then create a new program following the programing procedure Tips You can play the same program again since the program is saved until you turn off the power or open the lid of the CD compartment You can record your own program After you ve created t...

Page 20: ...f the selected channel In this case the stereo effect will be lost Press ST L R while playing a multiplex CD Each time you press the button the indication and sound you hear change as follows Press Indication You will hear once L CH left channel sound twice R CH right channel sound three times STEREO stereo sound The initial setting is STEREO ST L R Tip You can do the same operation using a VIDEO ...

Page 21: ...BC ON PBC mode has been switched to ON PBC OFF PBC mode has been switched to OFF SELECT Waiting for you to select something For instance at the time of menu display Locating the next or succeeding tracks or scenes Locaing the current or preceding tracks or scenes Searching forward 0 Searching backward STEREO Hearing stereo sound L CH Hearing left channel sound R CH Hearing right channel sound INVA...

Page 22: ... or scene the number button of the directly when PBC OFF track or scene is selected a point while monitoring NEXT forward or the the picture PREV backward while playing and hold down until you find the point Tip When you locate a track or scene numbered over 10 press 10 first then the corresponding number buttons Example To play track or scene number 23 press 10 first then 2 and 3 Number buttons P...

Page 23: ...tions or scenes appearing on the TV screen When you want to select an item number you want to go back to the top or the previous menus you want to locate the next or succeeding scenes you want to locate the previous or preceding scenes Where to go back differs according to the VIDEO CD you are playing Press the number buttons of the item you want then SELECT on the remote MENU or to select the ite...

Page 24: ...ct the preset number over 10 press 10 first then the corresponding number buttons You need to hold down the last number button to enter for 2 seconds Example To select 12 press 10 and 1 then hold down 2 for 2 seconds The new station replaces the old one On the player 1 Press BAND to select the band 2 Set the frequency to the station you want 3 Hold down DISPLAY ENTER MEM for 2 seconds PRESET and a...

Page 25: ...e stations 1 Press BAND to select the band 2 Press the number buttons to tune in the stored station To tune in a preset station over 10 press 10 first then the corresponding number buttons Example To tune in the preset station 11 press 10 and then press 1 and 1 On the player 1 Press BAND to select the band 2 Press PRESET or to tune in the stored station Number buttons BAND ...

Page 26: ...r when you use a microphone with echo function If acoustic feedback howling occurs turn down the volume or move the microphone away from the speaker Recording through a microphone 1 Plug the microphone into the MIX MIC jack and turn on the microphone if it has a power switch 2 Turn on the power 3 Press FUNCTION on the remote until TAPE appears in the display 4 Insert a cassette for recording into ...

Page 27: ...edly until you can hear the accompaniment from both speakers 5 Adjust the microphone volume turning the MIC VOL volume control 6 Adjust the volume of the player using VOLUME or 7 Starts to sing To record KARAOKE sound and your voice 1 Insert a cassette for recording 2 Do steps 1 to 6 above 3 Press r is depressed automatically Notes Acoustic feedback howling tend to occur when you use a microphone ...

Page 28: ...e black wire to minus and the red wires to plus terminals the right speaker wires to the R and the left speaker wires to the L terminals Note Connect the supplied speakers to this player If you connect any other speakers or equipment a malfunction may occur 3 To a wall outlet 1 Speaker terminals AM loop aerial 5 TV 2 AM aerial terminal to the video input jack Speaker cord Right speaker Left speake...

Page 29: ...ntal as possible Setting up the AM loop aerial 3 Connecting the AC power cord Connect the AC power cord to the wall outlet The POWER STANDBY indicator lights up to indicate when the player is connected to the power source The indicator lights regardless of whether the power is on or off 4 Setting the MAIN POWER switch Set the MAIN POWER switch on the side of the player to ON FM aerial AM loop aeri...

Page 30: ...d the video input jack of the TV 2 Turn on the TV and set the input mode selector on the TV to the proper position 6 Inserting batteries into the remote Insert two R6 size AA batteries not supplied Replacing batteries With normal use the batteries should last for about six months When the remote no longer operates the player replace all the batteries with new ones Hooking up the system continued ...

Page 31: ... emphasis you want Choose To get powerful clean sounds emphasizing low and high range audio percussive sounds emphasizing bass audio the presence of vocals stressing middle range audio the whole dynamic range for music such as classical music light bright sounds emphasizing high and middle range audio Reinforcing the bass sound Press MEGA BASS MEGA BASS appears in the display To return to normal s...

Page 32: ...please consult your nearest Sony dealer On safety As the laser beam used in the CD player section is harmful to the eyes do not attempt to disassemble the casing Refer servicing to qualified personnel only Should any solid object or liquid fall into the player unplug the player and have it checked by qualified personnel before operating it any further On power sources The player is not disconnecte...

Page 33: ...atch dirt or fingerprints on the CD it may cause tracking error Notes on cassettes Break off the cassette tab from side A or B to prevent accidental recording If you want to reuse the tape for recording cover the broken tab with adhesive tape To record on a tape with its tab broken off cover the respective tab hole for side A or B with adhesive tape Take care not to cover the detector slots on TYP...

Page 34: ...lean the CD or replace it if the CD is badly damaged Place the player in a location free from vibration Press ST L R repeatedly until STEREO appears on the TV screen Make sure the TV is turned on Make sure you select the correct video input on the TV Connect the video connecting cord correctly An audio CD is being played Close the lid of the player Make sure the following mark is on the CD You may...

Page 35: ...ame as the one the CD is recorded with Check the setting of the COLOR SYSTEM selector Move the player away from the TV If you are using the remote while listening to AM radio noise may be heard This is unavoidable If you are listening to an FM program near the TV with an indoor antenna move the player away from the TV Close the tape compartment securely Make sure the safety tab on the cassette is ...

Page 36: ... Symptom The remote does not function Remote Remedy Replace all the batteries in the remote with new ones if they are weak Make sure that you are pointing the remote at the remote sensor on the player Remove any obstacles in the path of the remote and the player Make sure the remote sensor is not exposed to strong light such as direct sunlight or fluorescent lamp light Move closer to the player wh...

Page 37: ...abrasive pad scouring powder or solvent such as alcohol or benzine Cleaning the lens If the lens becomes dirty it may cause a skipping of sound during CD operation Clean with a commercially available blower Cleaning the tape heads and tape path Wipe the heads the pinch roller and the capstan with a cleaning swab slightly moistened with cleaning fluid or alcohol after every 10 hours of operation fo...

Page 38: ...14 oz Supplied accessories Remote control 1 AM loop aerial 1 Video cord 1 Design and specifications are subject to change without notice Optional accessories Sony MDR headphones series CD player section System Compact disc digital audio video system Laser diode properties Material GaAlAs Wave length 780 nm Emission duration Continuous Laser output Less than 44 6 µW This output is the value measure...

Page 39: ... appears on the display VIDEO CD A compact disc containing moving pictures Picture data is compressed to 1 120th of the original data in the MPEG 1 format one of the worldwide standards of digital compression technologies and recorded on a disc A 12 cm VIDEO CD can reproduce up to 74 minute s length of moving pictures Audio data is also compressed so that a VIDEO CD can contain 6 times as much aud...

Page 40: ... specific track 15 22 M N O MEGA BASS 31 P Q PA system 26 Playing a tape 10 a multiplex CD 20 a VIDEO CD 6 a VIDEO CD with PBC functions 23 an audio CD 4 preset radio stations 25 tracks repeatedly 16 PBC 2 23 39 Power sources 28 Presetting radio stations 24 Program Play 18 Public address system See PA system R Radio stations playing 25 presetting 24 Recording on a tape 12 Repeat Play 16 S Selectin...

Reviews: