


NW-A100TPS/A105/A105HN/A106HN
21
Sony CONFIDENTIAL
For Authorized Servicer
7. Setting Check
After completing all settings, perform all the following checks.
Press the [
1
] button on the WALKMAN main unit to start up the
WALKMAN main unit.
Note:
When the initial setting screen is displayed after startup, touch
[START] to start the initial setting, and select skip for initial setting
inputs.
7-1. Check the model information
You can check the information of the set WALKMAN main unit.
Make sure that each setting on the WALKMAN main unit is set
correctly.
Advance preparation:
a. Windows PC (OS: Windows 10 or later)
b. USB Type-C cable (USB-A
y
USB-C)
c. Model information check tool
(NWA100ZX500_ModelInfo_Vx.xx.xx.zip)
Note 1:
The PC con
fi
guration setting tool performed in “5. Pre-Installed
Content Setting” is not required. The model information check can
be written on a normal Windows PC (OS: Windows 10 or later).
Note 2:
“x.xx.xx” of each tool name indicates the version. Be sure to use
the latest version.
Note 3:
Con
fi
rm with each service headquarters for the obtaining method of
model information check tool and its latest version.
Note 4:
Model information check tool, be sure to used by OS of Windows
10 or later.
a. Windows
PC
b. USB Type-C
cable
c. Model information
check tool
(OS: Windows
10 or later)
(USB-A
y
USB-C)
Procedure:
Note:
If the model information check tool does not work properly, restart
the computer and start again from step 1.
1. Connect the WALKMAN main unit to a PC by the USB Type-C
cable.
(The power supply of the WALKMAN is automatically turned
on)
USB Type-C cable
2. Check that the WALKMAN is recognized by the MTP connec-
tion.
3. The “Use USB for” screen will be displayed on the WALKMAN
main unit screen. Select “File Transfer” and touch OK.
4. Unzip the model information check tool prepared in advance
and open the folder.
5. In the non-selected state for
fi
les in the folder, and put a cursor
to blank space in the folder.
In the model information check tool folder
cursor
blank space
6. The right-click while pressing the Shift key in the state of step 5.
7. Select the “Open PowerShell window here” from the displayed
menu, and launch the PowerShell application software.
8. Input the following command and press the Enter key.
“.\getmodelinfo.bat”
PS C:\Users\xxxx\Desktop\xxxx>.\getmodelinfo.bat
Input
Tool folder name
9. Check that the following
fi
gure message has been displayed, and
input “y”, and press the Enter key.
Input
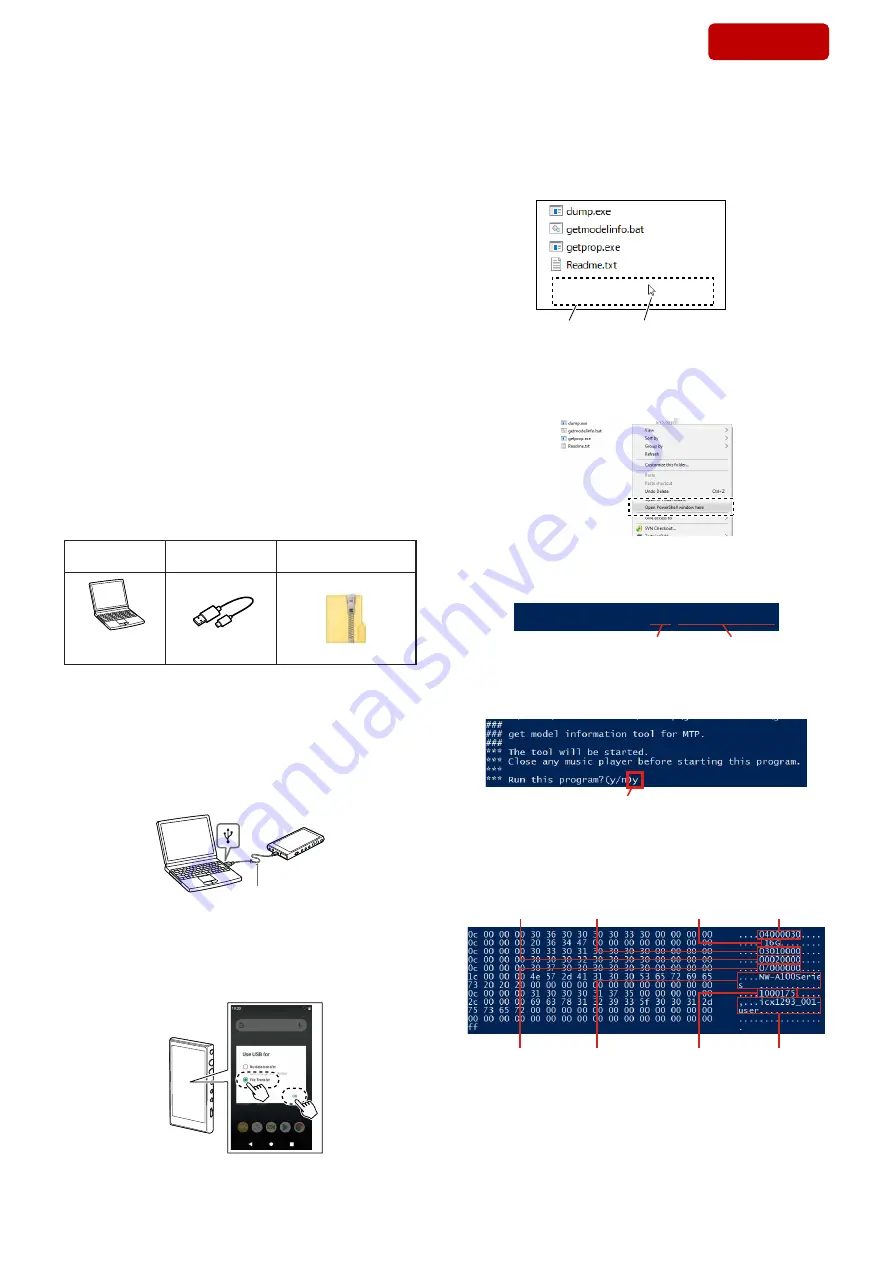
10. It will appear the following
fi
gure results.
(Displayed characters/values in the following
fi
gure are exam-
ple)
NAND capacity
code number
Destination
code number
Service ID
code number
Model ID
code number
Factory setting
code number
Serial No.
Model name
(series name)
Body color
code number
– Continued on next page –
SYS SET
2020/02/27 22:57:21 (GMT+09:00)


