


– 14 –
25
GB
Specifications
Additional Information
TV system:
Depending on your country selection:
B/G/H, D/K, L, I
Colour system:
PAL
SECAM, NTSC 3.58, 4.43 (only Video In)
Channel Coverage:
VHF: E2-E12
UHF: E21-E69
CATV: S1-S20
HYPER: S21-S41
D/K: R1-R12,
R21-R69
L:
F-2F-10, B-Q, F21-F69
I:
UHF B21-B69
Projected picture size:
44
” (approx. 112 cm. measured diagonally)
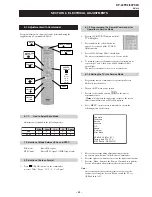
Rear Terminals
1/
1
21-pin scart connector (CENELEC standard)
including audio/video input, RGB input, TV audio/video output.
2/
2
21-pin Scart connector (CENELEC standard)
including audio / video input, RGB input, monitor audio/video output.
3/
3
21-pin Scart connector (CENELEC standard) including audio / video input, S video input,
selectable audio / video output and Smartlink interface.
audio outputs (Left/Right) - phono jacks
Side Terminals
4
S Video input
– 4 pin DIN
4
video input
– phono jack
4
audio input
– phono jacks
headphones jack
Sound Output:
2 x 30 W (music power)
2 x 15 W (RMS)
Power Consumption:
225 W
Standby Power Consumption:
< 0.7 W
Dimensions (w x h x d) :
approx. 1100 x 1160 x 536 mm.
Weight:
approx. 61 Kg.
Accessories supplied:
1 Remote Control (RM-938)
2 Batteries (IEC designated, AA size)
Other features:
•
Digital Comb Filter (High resolution).
•
100 Hz picture, Digital Plus.
•
Teletext, Fastext, TOPtext (250 page
TEXT memory).
•
NICAM.
•
Sleep Timer.
•
SmartLink (direct link between your
projection TV set and a compatible VCR.
For more information on SmartLink,
please refer to the Instruction Manual of
your VCR).
•
TV system autodetection.
•
Dolby Virtual.
•
BBE.
•
PIP.
•
Auto Format.
•
ACI (Auto Channel Installation).
S
S
(SMARTLINK)
Design and specifications are subject to change without notice.
Ecological Paper - Totally Chlorine Free
26
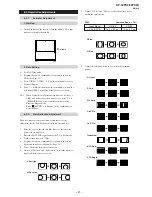
Troubleshooting
Here are some simple solutions to problems which may affect the picture and sound.
Additional Information
If you continue to experience problems, have your projection TV serviced by qualified personnel.
Never open the casing yourself.
Problem
No picture (screen is dark) and no sound.
Poor or no picture (screen is dark), but good
sound.
No picture or no menu information from
equipment connected to the Scart connector.
Good picture, no sound.
No colour on colour programmes.
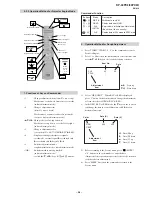
When you switch on the TV the last channel
you were watching before switching the TV
off does not appear.
Undefined picture with different colour on
the outlines of the images.
Noisy picture when viewing a TV channel.
No unscrambling or unstable picture whilst
viewing a scrambled channel with a decoder
connected through the Scart connector
3/
3.
Distorted picture when changing
programmes or selecting teletext.
Wrong characters appear when viewing
teletext.
Wrong characters appear when viewing
NexTView.
Brightness level of the picture is notoriously
decreased when viewing a teletext page.
Remote control does not function.
The standby indicator
on the projection
TV flashes.
S
Solution
•
Check the aerial connection.
•
Plug the TV in and press the
button on the front of the projection TV.
•
If the standby indicator
is on, press
TV
button on the remote control.
•
Using the menu system, select the
“Picture Adjustment
” menu and select
“Reset
” to
return to the factory settings.
•
Check that the optional equipment is on and press the
button repeatedly on the
remote control until the correct input symbol is displayed on the screen.
•
Press the
+ button on the remote control.
•
Check that
“TV Speakers
” is
“On
” in the
“Sound Adjustment
” menu.
•
Check that headphones are not connected.
•
Using the menu system, select the
“Picture Adjustment
” menu and select
“Reset
” to
return to factory settings.
•
This is not a malfunction. Press the number buttons on the remote control to select the
desired channel.
•
Adjust the colour registration. For more details, please refer to
“Adjusting Colour
Registration (Convergence)
” section on page 10.
•
Using the menu system, select the
“Manual Programme Preset
” menu and adjust Fine
Tuning (AFT) to obtain better picture reception.
•
Using the menu system, select the
“Noise Reduction
” option in the
“
Picture
Adjustment
” menu and select
“Auto
” to reduce the noise in the picture.
•
Using the menu system, select the
“Features
” menu. Then enter to
“Detail Set Up
”
option and set
“AV3 Output
” to
“TV
”.
•
Check that the Decoder is not connected on the scart
2/
2.
•
Turn off any equipment connected to the Scart connector on the rear of the projection
TV.
•
Using the menu system, enter to the
“Language/Country
” menu and select the
country in which you operate the projection TV set. For Cyrillic languages, we
recommend to select Russia country in the case that your own country does not
appear in the list.
•
Use the menu system to enter the
“Language/Country
” menu (see page 14) and select
the same language that NexTView is broadcast in.
•
This is not a malfunction. After 5 minutes viewing the same teletext page and without
any button being pressed, the projection TV automatically decreases the brightness
level to avoid any damage to the picture tube. To reset the brightness level, press any
button of the remote control.
•
Check that the Media Selector on the remote control is set to the device you are using
(VCR, TV or DVD).
•
If the remote control does not operate the VCR or DVD even when the Media Selector
has been set correctly. Enter the necessary code set as explained in the
“Remote
Control Configuration for VCR/DVD
” chapter on page 23.
•
Replace the batteries.
•
Contact your nearest Sony service centre.
Summary of Contents for KP-44PX2
Page 34: ... 34 KP 44PX2 44PX2U RM 938 MEMO ...
Page 97: ......


