background image

Using i.LINK

82

Notes on Using This Connection

Notes on Connecting i.LINK Devices

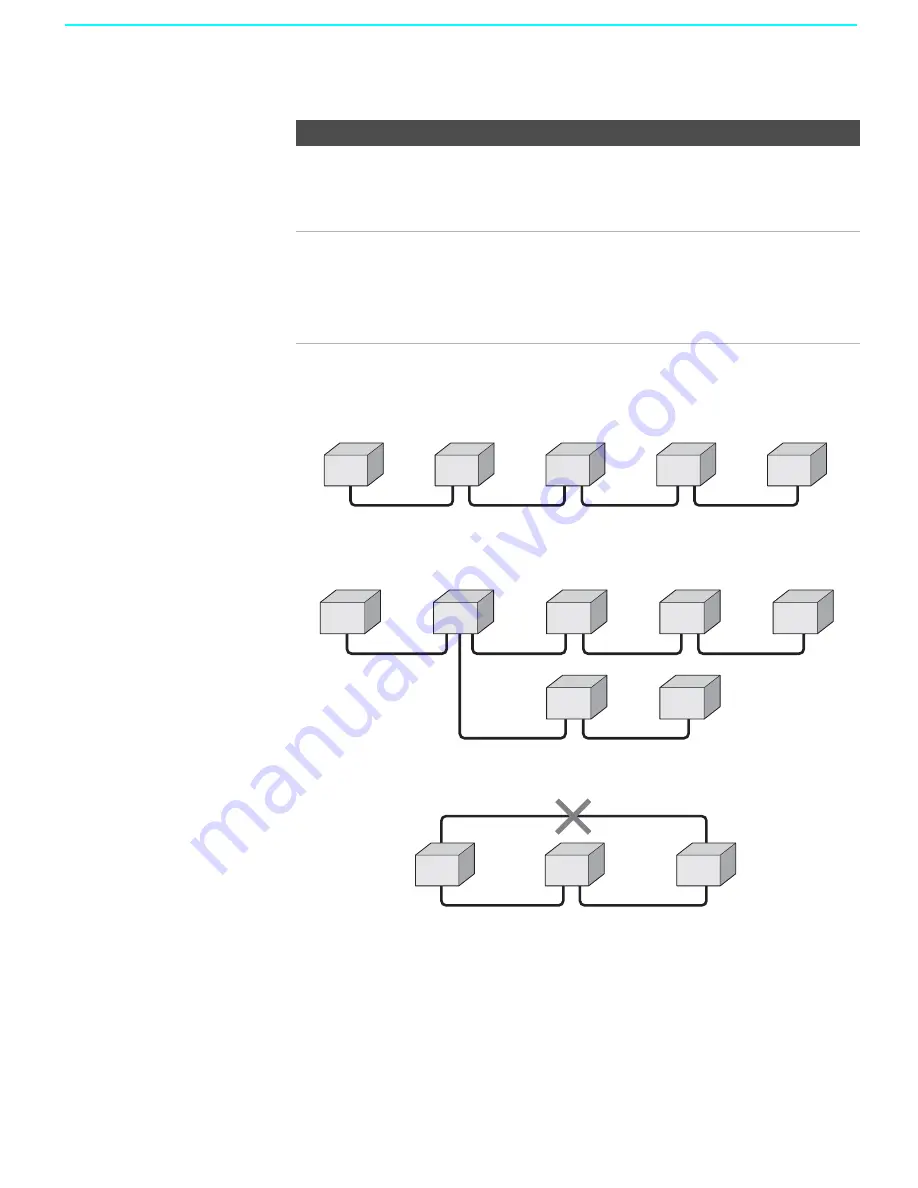
To connect two or more i.LINK devices, use i.LINK cables to connect them 
as shown below.

You can connect up to 63 i.LINK devices. However, the maximum number 
of cables in any serial route is 16.

Do not connect i.LINK devices in a way that creates a loop.

Connecting non-compatible devices, such as PCs or PC peripherals, may 
result in malfunctions.

To Do This ...

Do This ...

Set up a digital i.LINK 
device

For digital i.LINK devices (devices that require only the 
i.LINK connection), no setup is necessary. The LCD 
projection TV automatically recognizes the device as soon 
as the connection is made.

Set up an i.LINK 
device that supports an 
EIA-775A analog 
connection

Connect analog A/V cables to the VIDEO 3 
input (see page 81).

Use the i.LINK Control Panel to activate the 
analog connection to your i.LINK device (see 
page 86).

A

B

C

D

E

i.LINK

i.LINK

i.LINK

i.LINK

A

B

C

D

F

G

E

i.LINK

i.LINK

i.LINK

i.LINK

i.LINK

i.LINK

A

B

C

i.LINK

i.LINK

i.LINK

Summary of Contents for KDF-60XBR950 - 60" Rear Projection TV

Page 1: ...displayed Date SUPP CORR Description of SUP COR Change of main text 2003 10 NEW 2004 3 CORR 1 Power cord repair parts modification Yes 2005 2 SUPP 1 CAUTION Sentence Additon Yes Model Name KDF 60XBR950 70XBR950 SERVICE MANUAL Part No 9 965 384 02 ...

Page 2: ...MODEL COMMANDER DEST CHASSIS NO MODEL COMMANDER DEST CHASSIS NO LA 2A KDF 60XBR950 RM Y914 US KDF 60XBR950 RM Y914 Canadian KDF 70XBR950 RM Y914 US KDF 70XBR950 RM Y914 Canadian LCD PROJECTIONTV RM Y914 KDF 60XBR950 70XBR950 ...

Page 3: ...d and is not intended for use with personal computers Video IN 4 1 Vp p 75 ohms unbalanced sync negative S Video IN 4 Y 1 Vp p 75 ohms unbalanced sync negative C 0 286 Vp p Burst signal 75 ohms Audio IN 6 500 mVrms 100 modulation Impedance 47 kiloohms AUDIO VAR FIX OUT 1 500 mVrms at the maximum volume setting Variable 500 mVrms Fixed Impedance output 2 kiloohms CONTROL S IN 1 minijack CONTROL S O...

Page 4: ...onsumption In Use 250 W In Standby Under 1 W In i LINK Standby Under 20 W Supplied Accessories Remote Control RM Y914 AA R6 Batteries 2 supplied for remote control Cleaning Cloth 1 Optional Accessories TV Stand SU GW3 Lamp XL 2100U AV Cable VC 810S 820S 830S Component Video Cable VMC 10 30 i LINK cables VMC IL4415 4 pin to 4 pin 1 5 meters VMC IL4435 4 pin to 4 pin 3 5 meters ...

Page 5: ...age as described below LEAKAGE TEST The AC leakage from any exposed metal part to earth ground and from all exposed metal parts to any exposed metal part having a return to chassis must not exceed 0 5mA 500 microampers Leak age current can be measured by any one of three methods 1 A commercial leakage tester such as the Simpson 229 or RCA WT 540A Follow the manufacturers instructions to usc these ...

Page 6: ...FE OPERATION ARE IDENTIFIED IN THIS MANUAL FOLLOW THESE PROCEDURES WHENEVER CRITI CAL COMPONENTS ARE REPLACED OR IMPROPER OPERA TION IS SUSPECTED ATTENTION AFIN D EVITER TOUT RISQUE DELECTROCUTION PROVE NANT D UN CHÁSSIS SOUS TENSION UN TRANSFORMATEUR D ISOLEMENT DOIT ETRE UTILISÉ LORS DE TOUT DEPAN NAGE LE CHÁSSIS DE CE RECEPTEUR EST DIRECTEMENT RAC CORDÉ Á L ALIMENTATION SECTEUR ATTENTION AUX CO...

Page 7: ...gram 7 101 4 2 Frame Schematic Diagram 102 4 3 Circuit Boards Location 103 4 4 Schematic Diagrams 103 1 Schematic Diagram of A 1 5 Board 104 2 Schematic Diagram of A 2 5 Board 105 3 Schematic Diagram of A 3 5 Board 106 4 Schematic Diagram of A 4 5 Board 107 5 Schematic Diagram of A 5 5 Board 108 6 Schematic Diagram of F Board 109 7 Schematic Diagram of G1 Board 110 8 Schematic Diagram of G2 Board ...

Page 8: ... 5 4 Chassis 2 145 5 5 Block 1 146 5 6 Block 2 147 5 4 Screen Mirror Block Assembly 148 6 ELECTRICAL PARTS LIST 149 A Board 149 F Board 154 G1 Board 155 G2 Board 157 H1 Board 158 H3 Board 158 H4 Board 159 QH Board 160 QI Board 160 QM Board 162 QT Board 167 T Board 168 U Board 168 UD Board 172 Section Title Page ...

Page 9: ... the results regarding all the diagnosis items listed below The display 0 means that no malfunctions occurred Defected symptoms Lamp cover error 3 times Lamp cover is not attached securely Diagnosis Item Number of times POWER STANDBY indicator blinks Probable Cause Location Power does not turn on 0 Power cord is not plugged in Fuse is burned out F1901 F board No picture No sound Temp error 4 times...

Page 10: ...es off occasionally or when the screen disappears occasionally there is a screen display on whether the malfunction occurred or not in the past and whether the detection circuit operated or not in order to allow confirmation Screen Display Method Quickly press the remote command button in the following order from the standby state Channel Vol Be aware that this differs from the method of entering ...

Page 11: ...CD Engine u com pin 24 of IC3208 on the C2 board detects it and make turn off the lamp 4 Temp When a temperature sensor on the H4 board detects a high temperature or IIC E line connector CN8041 A board CN3951 H4 board is not attached securely LCD Engine u com IIC E Line detects it and make turn off the lamp 5 Lamp driver When lamp is not turned on then pin 29 of LCD Engine u com IC3208 on the C2 b...

Page 12: ...AIN u com 49 59 53 SP DC PROT LOW B ERR D OVP H4 A board 8 D OVP 6 B OVP G3 A board G1 A board 17V DET CN8034 3 Lamp cover 5 Lamp driver Lamp 4 Fan Lamp HV DET SW S8001 T A board LAMP PRT Fan1 Fan2 Fan3 CN8003 FAN1 PRT FAN2 PRT FAN3 PRT CN8035 Audio amp Audio amp 7 Audio IC8505 IC8504 C2 board A board Lamp driver Temp sensor 3 3V 2 5V 1 8V 17V 6 7 1 1 2 8 5 11 Fan4 FAN4 PRT ...

Page 13: ... 12 KDF 60XBR950 70XBR950 K RM Y914 RM Y914 SECTION 2 DISASSEMBLY 2 1 REAR COVER 2 2 SERVICE POSITION 2 Rear cover 1 Twelve screws BVTP 4x16 A block 1 ...

Page 14: ... 2 Connectors 2 USB cable 9 Two screws BVTP 4x16 qa Two screws BVTP 4x16 0 Two screws BVTP 4x16 9 Side cover R 7 8 4 5 6 Side cover L 3 Control door assembly qf Two screws IDETITE 4x16 HEX qs Screw BVTP 4x16 qd Washer 4x25 Note In case of removing qf screws be sure to support the screen mirror block assembly not falling forward ...

Page 15: ... FAN 2 5 DC FAN 2 Three screws PWH 4x16 5 Two screws PWH 4x16 A block 1 4 Connector 6 DC fan 3 Fan bracket chassis with DC fan 2 Three screws BVTP 4x12 5 Four screws PWH 4x35 1 Fasten tag 4 Connector 6 Fan plate 7 DC fan 3 Duct fan bracket with DC fan ...

Page 16: ...7 POWER SUPPLY BLOCK 1 Screw BVTP 4x16 6 Two screws BVTP 3x12 3 Fasten tag 7 F board 5 Two connectors 2 F bracket with F board 4 Power cord 1 Screw BVTP 4x16 4 Two screws BVTP 3x12 3 Two connectors 2 Ballast bracket with power supply block 5 Power supply block ...

Page 17: ...XBR950 K RM Y914 RM Y914 2 9 G1 BOARD 2 8 WOOFER BLOCK ASSEMBLY 1 Four screws TPTWH 4x25 2 Connector 3 Woofer block assembly 2 Four screws BVTP 3x12 1 Fasten tag 1 Fasten tag 3 G1 board 1 Nine connectors 1 Two connectors ...

Page 18: ...0 K RM Y914 RM Y914 2 10 OPTICAL UNIT BLOCK ASSEMBLY 2 11 T BOARD 3 Screw PSW 3x8 1 Three screws BVTP 4x16 4 Four screws BVTP 4x16 6 Optical unit block assembly 5 OU bracket 2 G1 bracket 1 Screw BVTP 3x12 3 T board 2 Connector ...

Page 19: ...RD 2 Screw PSW 3x8 3 Screw BVTP 3x12 0 Two screws BVWHTP 3x12 7 Two hexagonal washers qa H4 board 9 Connector 1 Three connectors 4 UD block 6 Connector 5 Two P P cables 5 P P cable 8 Antenna switch 2 Screw PSW 3x8 3 Seven screws BVTP 3x12 5 U board 1 Two connectors 4 Terminal board 1 Connector ...

Page 20: ...2 BLOCK 4 Two screws BVTP 3x12 6 Q box assembly 5 2 G2 board 1 Two connectors 1 Two connectors 3 Connector 3 Connector 3 USB cable 3 IEEE1394 cable 3 P P cabe 5 Screw BVWHTP 3x12 2 Screw BVWHTP 3x12 5 Screw BVWHTP 3x12 2 Screw BVWHTP 3x12 3 DIC block 4 Two connectors 1 Connector 6 C2 block ...

Page 21: ... Four screws BVTP 3x12 3 Fasten tag 3 Fasten tag 5 A board 4 Five connectors 4 Eight connectors 4 Four connectors 2 ATSC bracket 5 Four screws BVTP 3x12 2 Four screws BVTP 4x16 7 H3 board 4 Connector 4 Two connectors 6 IEEE1394 cable 1 Control door assembly 3 Control panel with H3 board ...

Page 22: ...cover 3 USB cable 9 Connector 7 QH board 0 H1 board 5 MS bracket with QH board Screen frame block assembly 3 Two screws PWH 4x16 3 Five screws PWH 4x16 6 Two screws PWH 4x16 1 Two screws BVTP 4x16 9 Two screws PWH 4x16 6 Two screws PWH 4x16 9 Two screws PWH 4x16 3 Six screws PWH 4x16 0 Speaker block L assembly 2 MS cover 4 Mirror coner assembly 8 Connector 5 Connector 7 Speaker block R assembly ...

Page 23: ... 22 KDF 60XBR950 70XBR950 K RM Y914 RM Y914 MEMO ...

Page 24: ...he data 4 Press 2 or 5 ontheremotecommandertoselectthecategory Every time you press 2 Category up Service mode changes in the order as shown below VERSION CCPS 7 MID4 CCPM 1 CCPS 8 MID5 CCPM 2 CCPS 10 CCPM 3 DCP INT DLBY CCPM 4 DCP OSD MID1 CCPM 5 D9671TPN CCPS 5 MID2 CCPM 6 D9671TG1 CCPS 6 MID3 CCPM 7 D9671CUR D9671TG2 D9671 1 CCD D9671PIC DCP ADJ2 DCP USER DCP AVP USR NR CXA2171 DCP BLK DCP ADJ1...

Page 25: ...Shipping Conditions 3 1 4 Adjusting Buttons and Indicator Commander Function Button Mode Description MUTING ENTER WRITE Writes data to NVM ENTER READ Reads data from NVM 8 ENTER RESET Set the shipping condition FUNCTION OF KEYS ON COMMANDER 1 Changes adjustment item item No moves up 4 Changes adjustment item item No moves down 2 Changes adjustment category category moves up 5 Changes adjustment ca...

Page 26: ...0 0 0 1 FUP2 0 0 0 0 0 0 2 YNR 0 0 0 0 0 0 3 CNR 0 0 0 0 0 0 4 SSHP 7 7 7 7 7 7 5 YEQ 3 3 3 3 3 3 6 SHF0 1 1 1 1 1 1 Standard Pro Reserved Standard Pro Reserved 0 SHPC 0 0 0 0 0 0 1 FUP2 0 0 0 0 0 0 2 YNR 0 0 0 0 0 0 3 CNR 0 0 0 0 0 0 4 SSHP 7 7 7 7 7 7 5 YEQ 3 3 3 3 3 3 6 SHF0 1 1 1 1 1 1 Standard Pro Reserved 0 SHPC 0 0 0 1 FUP2 0 0 0 2 YNR 0 0 0 3 CNR 0 0 0 4 SSHP 7 7 7 5 YEQ 3 3 3 6 SHF0 1 1 1...

Page 27: ...andard Pro Reserved Standard Pro Mild 0 SHPC 0 0 0 0 0 0 1 FUP2 0 0 0 0 0 0 2 YNR 0 0 0 0 0 0 3 CNR 0 0 0 0 0 0 4 SSHP 7 7 7 7 7 7 5 YEQ 3 3 3 3 3 3 6 SHF0 1 1 1 1 1 1 Standards 2 No Name Video 7 SECA 10 480p 1080i 720p 480p 1080i 720p VGA VGA OTHER 7 SECA 0 0 0 0 0 0 0 480p 1080i 720p 7 SECA 0 0 0 0 480p 1080i 720p 7 SECA 0 0 0 DATA INDEPENDENT OTHER 480i 7 SECA 0 0 0 Lower 0 ATSC MS 0 DATA ADD 4...

Page 28: ...ON GCR OFF 11 SHUE 7 7 7 12 CEQ 1 1 0 13 CBPF 2 2 0 14 CBPA 1 1 0 15 KILV 2 2 2 16 APGA 0 0 0 17 NCOM 0 0 0 GR ON Video ATSC for XBR not 480i AVM Y Cb Cr i LINK 480i and ex DV for XBR i LINK DV ATSC for XBR 480i AVM Y Cb Cr DVI 480i AVM RGB DVI i LINK not 480i and ex DV for XBR Video Component not 480i No Name No Name No Name UV 8 180 100 DVI not 480i AVM RGB DVI 7 178 187 7 3 Component 480i 7 175...

Page 29: ...0 0 0 0 0 0 3 CLPG 0 0 0 0 0 0 0 0 0 4 CLPA 0 0 0 0 0 0 0 0 0 5 AFCV 1 1 1 1 1 1 1 1 1 6 HSSL 2 2 2 2 0 0 0 3 3 7 VSSL 2 2 2 2 2 2 2 3 3 8 STIP 2 2 2 2 2 2 2 2 2 9 SYLP 0 0 0 0 0 0 0 0 0 10 SYFI 1 0 1 0 1 1 0 0 0 11 AFCG 1 1 2 2 0 1 1 1 1 12 LOWG 0 0 0 0 0 0 0 0 0 13 AFCM 0 0 0 0 0 0 0 0 0 14 LOCO 0 0 0 0 0 0 0 0 0 15 HICO 0 0 0 0 0 0 0 0 0 16 CDM1 2 2 2 2 2 2 2 2 2 17 CDM2 0 0 0 0 0 0 0 0 0 18 CD...

Page 30: ...YFI 1 0 1 0 0 1 1 11 AFCG 1 1 2 2 1 2 3 12 LOWG 0 0 0 0 0 1 3 13 AFCM 0 0 0 0 0 0 0 14 LOCO 0 0 0 0 0 0 0 15 HICO 0 0 0 0 0 0 0 16 CDM1 2 2 2 2 2 2 2 17 CDM2 0 0 0 0 0 0 0 18 CDM3 0 0 0 0 0 0 0 19 BGPS 10 10 10 10 10 10 10 20 VINT 7 7 7 7 7 7 7 21 HSPO 7 7 7 7 7 7 7 22 MVSW 2 2 2 2 2 2 2 23 MVCT 7 7 7 7 7 7 7 24 MVHC 4 4 4 4 4 4 4 25 CLAL 0 0 0 0 0 0 0 26 ADPS 0 0 0 0 0 0 0 27 CLGA 2 2 2 2 2 2 2 2...

Page 31: ...ction H 1 APED 2 1 0 1 2 3 1 6 DCTR 2 1 0 1 2 3 1 BLK Correction Off BLK Correction L BLK Correction M BLK Correction H 1 APED 3 2 0 1 2 3 1 6 DCTR 3 2 0 1 2 3 1 BLK Correction Off BLK Correction L BLK Correction M BLK Correction H 1 APED 3 2 0 1 2 3 1 6 DCTR 3 2 0 1 2 3 1 BLK Correction Off BLK Correction L BLK Correction M BLK Correction H 1 APED 3 2 0 1 2 3 1 6 DCTR 3 2 0 1 2 3 1 No Name AD1E 1...

Page 32: ...1 1 1 1 16 INST 0 0 0 0 0 17 UPRL 1 1 1 1 1 18 OFSL 0 0 0 0 0 19 SLOF 0 0 0 0 0 20 FR43 2 2 2 2 2 21 FRWI 2 2 2 2 2 22 FRTI 2 2 2 2 2 23 LPFL 1 1 1 1 1 24 4CNT 1 1 1 1 1 25 REFP 1 1 1 1 1 26 REFM 5 5 5 5 5 27 AWSN 0 0 0 0 0 28 AWRE 0 0 0 0 0 11 AWOF 0 0 0 0 12 UPAR 0 0 0 0 13 UPTH 0 0 0 0 14 X149 0 0 0 0 15 DMST 1 1 1 1 16 INST 0 0 0 0 17 UPRL 1 1 1 1 18 OFSL 0 0 0 0 19 SLOF 0 0 0 0 20 FR43 2 2 2 ...

Page 33: ... 0 0 0 0 0 0 0 8 PIX2 0 0 0 0 0 0 0 0 0 0 0 9 VLN1 0 0 0 0 0 0 0 0 0 0 0 10 VLN2 0 0 0 0 0 0 0 0 0 0 0 11 SYSC 1 1 1 1 1 1 1 0 0 0 0 12 DSPC 3 3 3 3 3 3 3 1 1 1 1 13 PLLD 0 0 0 0 0 0 0 0 0 0 0 14 PLLR 1 1 1 1 1 1 1 1 1 1 1 15 DCLP 2 2 2 2 2 2 2 2 2 2 2 16 DCON 0 0 0 0 0 0 0 0 0 0 0 17 CO2P 0 0 0 0 0 0 0 0 0 0 0 18 CONV 0 0 0 0 0 0 0 0 0 0 0 19 HO2O 1 1 1 1 1 1 1 1 1 1 1 20 BLKM 1 1 1 1 1 1 1 1 1 1...

Page 34: ...2 2 16 DCON 0 0 0 0 0 0 0 17 CO2P 0 0 0 0 0 0 0 18 CONV 0 0 0 0 0 0 0 19 HO2O 0 0 0 0 0 1 0 20 BLKM 1 1 1 1 1 1 1 21 OSDL 3 3 3 3 3 3 3 22 OSDR 1 1 1 1 1 1 1 23 CO2O 0 0 0 0 0 0 0 24 COLS 0 0 0 0 0 0 0 25 VFRQ 3 3 3 3 3 3 3 26 PLLS 0 0 0 0 0 0 0 27 PIFW 0 0 0 0 0 0 0 28 PIBW 0 0 0 0 0 0 0 29 PLL4 0 0 0 0 0 0 0 30 CDAD 0 0 0 0 0 0 0 31 CDAS 0 0 0 0 0 0 0 32 PLD1 0 0 0 0 0 0 0 33 PLTS 0 0 0 0 0 0 0 ...

Page 35: ... MNSW 0 0 31 MDYB 0 0 32 LCBP 2 2 33 BPSE 1 1 34 CR2H 0 0 35 IMPR 3 3 36 IMPS 1 1 37 IMPL 0 0 38 PLPL 1 1 39 MDYE 3 3 40 PLCL 1 1 41 BPL2 1 1 42 HPL 1 1 43 CVFP 0 0 44 BPL3 7 7 45 D2F3 2 2 46 LPSW 1 1 47 LCR 1 1 48 F2CR 1 1 49 YIR 1 1 50 MOMO 0 0 Functionality Data Rremarks CCPM 7 STANDARD NOT STANDARD 0 SCTP 0 2 1 CYBP 0 0 2 Y2BP 0 0 3 C2LE 1 1 4 DTCN 1 2 5 VEDL 3 3 6 HP 2 2 7 PNR 0 0 8 NCDT 0 0 ...

Page 36: ...8 No Name 0 VECR 1 1 VECL 1 2 VECN 1 3 VEGA 1 Standards 1 Vivid Standard Pro Reserved Vivid Standard Pro Reserved 0 VECR 0 0 0 0 0 0 0 0 1 VECL 0 0 0 0 0 0 0 0 2 VECN 2 2 2 2 2 2 2 2 3 VEGA 0 0 0 0 0 0 0 0 Functionality Data Rremarks Video No Name UV ...

Page 37: ...Mild Vivid Standard Pro Mild 0 RNRL 0 0 0 0 0 0 0 0 9 RNRM 0 0 0 0 0 0 0 0 Vivid Standard Pro Mild Vivid Standard Pro Mild 0 RNRL 0 0 0 0 0 0 0 0 9 RNRM 0 0 0 0 0 0 0 0 Vivid Standard Pro Mild Vivid Standard Pro Mild 0 RNRL 0 0 0 0 0 0 0 0 9 RNRM 0 0 0 0 0 0 0 0 Vivid Standard Pro Mild Vivid Standard Pro Mild 0 RNRL 0 0 0 0 0 0 0 0 9 RNRM 0 0 0 0 0 0 0 0 Vivid Standard Pro Mild Vivid Standard Pro ...

Page 38: ...0 0 9 RNRM 0 0 0 0 0 0 0 0 Standards 2 No Name RNRL 0 RNRL 1 RNRL 2 RNRL 3 RNRL 4 RNRL 5 RNRL 6 RNRL 7 1 NYLP 0 0 0 0 0 0 0 0 2 NYG 1 1 1 1 1 1 1 1 3 NYPH 13 13 13 13 13 13 13 13 4 NYLM 0 1 4 6 8 10 12 14 5 NCLP 0 0 0 0 0 0 0 0 6 NGC 1 1 1 1 1 1 1 1 7 NCPH 13 13 13 13 13 13 13 13 8 NCLM 0 1 4 6 8 10 12 14 MS for XBR DATA IND No Name ATSC DTT ATSC Lower No Name MS for XBR DATA ADD STILL 1080i 480i ...

Page 39: ...0 0 0 8 BNRM 0 0 0 0 0 0 0 0 Vivid Standard Pro Mild Vivid Standard Pro Mild 0 BNRL 0 0 0 0 0 0 0 0 8 BNRM 0 0 0 0 0 0 0 0 Vivid Standard Pro Mild Vivid Standard Pro Mild 0 BNRL 0 0 0 0 0 0 0 0 8 BNRM 0 0 0 0 0 0 0 0 Vivid Standard Pro Mild Vivid Standard Pro Mild 0 BNRL 0 0 0 0 0 0 0 0 8 BNRM 0 0 0 0 0 0 0 0 Vivid Standard Pro Mild Vivid Standard Pro Mild 0 BNRL 0 0 0 0 0 0 0 0 8 BNRM 0 0 0 0 0 0...

Page 40: ...2 2 2 2 2 2 2 LFL 2 2 2 2 2 2 2 2 3 DCT 2 2 2 2 2 2 2 2 4 BLEV 0 1 2 3 4 5 6 7 5 DNE 1 1 1 1 1 1 1 1 6 MRON 0 0 0 0 0 0 0 0 7 FMOD 0 0 0 0 0 0 0 0 MS for XBR DATA IND No Name MS for XBR DATA ADD STILL 1080i 480i MOVIE CONT PANEL OTHER No Name MOVIE LQ 480i M OVIE HQ OTHER CH SET No Name 0 PKNO 1 1 CHNL 1 2 HOFS 1 3 PACK 1 Standards 1 No Name PKNO 0 PKNO 1 PKNO 2 PKNO 3 PKNO 4 PKNO 5 PKNO 6 PKNO 7 ...

Page 41: ... Reserved 0 SHPC 0 0 0 0 0 0 0 0 1 FUP2 0 0 0 0 0 0 0 0 2 YNR 0 0 0 0 0 0 0 0 3 CNR 0 0 0 0 0 0 0 0 4 SSHP 7 7 7 7 7 7 7 7 5 YEQ 3 3 3 3 3 3 3 3 6 SHF0 1 1 1 1 1 1 1 1 Vivid Standard Pro Reserved Vivid Standard Pro Mild 0 SHPC 0 0 0 0 0 0 0 0 1 FUP2 0 0 0 0 0 0 0 0 2 YNR 0 0 0 0 0 0 0 0 3 CNR 0 0 0 0 0 0 0 0 4 SSHP 7 7 7 7 7 7 7 7 5 YEQ 3 3 3 3 3 3 3 3 6 SHF0 1 1 1 1 1 1 1 1 Standards 2 No Name UV...

Page 42: ... UV Video BS ANALOG DTT ANALOG 11 SHUE 12 6 7 7 12 CEQ 3 0 0 0 13 CBPF 3 0 0 0 14 CBPA 0 1 1 1 15 KILV 2 2 2 2 16 APGA 0 1 0 0 17 NCOM 1 0 0 0 MOVIE LQ MOVIE HQ No Name STILL 1080i MOVIE CONT PANEL UV Video BS ANALOG DTT ANALOG MS for WE MS CNM CCPS 2 No Name 0 SHPC 1 Standards 1 No Name UV Video1 Video2 Video3 Video4 BS DTT 0 PACK 0 4 4 4 4 14 15 Data Rremarks Functionality ...

Page 43: ...S 1080i 50 Vivid Standard BLK Correction Off BLK Correction L BLK Correction M BLK Correction Off BLK Correction L BLK Correction M BLK Correction H BLK Correction M BLK Correction H Reserved No Name AD1E 1 Or MULTI TWIN FAVORITES 576p Vivid Standard Pro Reserved No Name AD1E 1 Or MULTI TWIN FAVORITES 576i Vivid Standard Pro BLK Correction Off BLK Correction L BLK Correction Off BLK Correction L B...

Page 44: ...480i Video6 480i COMPONE NT2 480i i LINK ATSC for XBR 480i AVM YCbCr 480i 11 AWOF 0 0 0 0 0 0 0 0 12 UPAR 0 0 0 0 0 0 0 0 13 UPTH 0 0 0 0 0 0 0 0 14 X149 0 0 0 0 0 0 0 0 15 DMST 1 1 1 1 1 1 1 1 16 INST 0 0 0 0 0 0 0 0 17 UPRL 1 1 1 1 1 1 1 1 18 OFSL 0 0 0 0 0 0 0 0 19 SLOF 0 0 0 0 0 0 0 0 20 FR43 2 2 2 2 2 2 2 2 21 FRWI 2 2 2 2 2 2 2 2 22 FRTI 2 2 2 2 2 2 2 2 23 LPFL 1 1 1 1 1 1 1 1 24 4CNT 1 1 1 ...

Page 45: ...0 0 0 0 0 0 49 8 PIX2 0 0 0 0 0 0 0 0 0 0 15 9 VLN1 0 0 0 0 0 0 0 0 0 0 2 10 VLN2 0 0 0 0 0 0 0 0 0 0 13 11 SYSC 1 1 1 1 1 1 1 0 0 0 0 12 DSPC 3 3 3 3 3 3 3 1 1 1 1 13 PLLD 0 0 0 0 0 0 0 0 0 0 0 14 PLLR 1 1 1 1 1 1 1 1 1 1 1 15 DCLP 2 2 2 2 2 2 2 2 2 2 2 16 DCON 0 0 0 0 0 0 0 0 0 0 0 17 CO2P 0 0 0 0 0 0 0 0 0 0 0 18 CONV 0 0 0 0 0 0 0 0 0 0 0 19 HO2O 1 1 1 1 1 1 1 0 0 0 0 20 BLKM 1 1 1 1 1 1 1 1 1...

Page 46: ... 2 2 2 2 16 DCON 0 0 0 0 0 0 17 CO2P 0 0 0 0 0 0 18 CONV 0 0 0 0 0 0 19 HO2O 0 0 0 0 0 0 20 BLKM 1 1 1 1 1 1 21 OSDL 3 3 3 3 3 3 22 OSDR 1 1 1 1 1 1 23 CO2O 0 0 0 0 0 0 24 COLS 0 0 0 0 0 0 25 VFRQ 3 3 3 3 3 3 26 PLLS 0 0 0 0 0 0 27 PIFW 0 0 0 0 0 0 28 PIBW 0 0 0 0 0 0 29 PLL4 0 0 0 0 0 0 30 CDAD 0 0 0 0 0 0 31 CDAS 0 0 0 0 0 0 32 PLD1 0 0 0 0 0 0 33 PLTS 0 0 0 0 0 0 34 PLOL 0 0 0 0 0 0 35 YRND 1 1...

Page 47: ...15 16 MO2 3 3 17 MNNR 1 1 18 DTH 2 2 19 DTV 2 2 20 DT2D 2 2 21 DTHP 3 3 22 DTCR 4 4 23 D2FC 3 3 24 D2F 9 9 25 D2F2 1 1 26 D2FL 0 0 27 DC 0 0 28 CVFT 3 3 29 HC2F 1 1 30 MNSW 0 0 31 MDYB 0 0 32 LCBP 2 2 33 BPSE 1 1 34 CR2H 0 0 35 IMPR 3 3 36 IMPS 1 1 37 IMPL 0 0 38 PLPL 1 1 39 MDYE 3 3 40 PLCL 1 1 41 BPL2 1 1 42 HPL 1 1 43 CVFP 0 0 44 BPL3 7 7 45 D2F3 2 2 46 LPSW 1 1 47 LCR 1 1 48 F2CR 1 1 49 YIR 1 ...

Page 48: ...PAL3 0 Functionality Remarks Data CCPS 8 No Name 0 VECR 1 1 VECL 1 2 VECN 1 3 VEGA 1 Standards 1 Vivid Standard Pro Reserved Vivid Standard Pro Reserved 0 VECR 0 0 0 0 0 0 0 0 1 VECL 0 0 0 0 0 0 0 0 2 VECN 2 2 2 2 2 2 2 2 3 VEGA 0 0 0 0 0 0 0 0 Vivid Standard Pro Reserved Vivid Standard Pro Reserved 0 VECR 0 0 0 0 0 0 0 0 1 VECL 0 0 0 0 0 0 0 0 2 VECN 2 2 2 2 2 2 2 2 3 VEGA 0 0 0 0 0 0 0 0 Functio...

Page 49: ...ild Vivid Standard Pro Mild 0 BNRL 0 0 0 0 0 0 0 0 8 BNRM 0 0 0 0 0 0 0 0 Vivid Standard Pro Mild Vivid Standard Pro Mild 0 BNRL 0 0 0 0 0 0 0 0 8 BNRM 0 0 0 0 0 0 0 0 Standards 2 No Name BNRL 0 BNRL 1 BNRL 2 BNRL 3 BNRL 4 BNRL 5 BNRL 6 BNRL 7 1 EDL 2 2 2 2 2 2 2 2 2 LFL 2 2 2 2 2 2 2 2 3 DCT 2 2 2 2 2 2 2 2 4 BLEV 0 1 2 3 4 5 6 7 5 DNE 1 1 1 1 1 1 1 1 6 MRON 0 0 0 0 0 0 0 0 7 FMOD 0 0 0 0 0 0 0 0...

Page 50: ...TCOF 0 16 CINT 0 17 RN8C 1 18 DMTR 0 19 MTRX 1 20 OSDE 1 21 MUX 1 22 EXMT 1 23 EXOF 0 24 GON 1 25 BON 1 26 RON 1 27 BKOF 0 28 AGIW 0 29 AGIB 0 30 HFIN 0 31 VFIN 0 32 CFDM 0 33 CFCP 0 34 YFOF 0 35 CFOF 0 36 CFIP 0 37 R8CF 0 38 MATF 1 39 GLMT 15 40 WBSW 0 41 OENG 0 42 RFRM 1 43 GHPL 1 44 GVPL 1 45 GBPL 0 Standards 1 14 OFST 0 0 0 0 Functionality Data Remarks Others Standby No Name MS MPEG 4 CNM not ...

Page 51: ...4 MP1L 64 35 MS1H 2 36 MS1L 171 37 FP1H 2 38 FP1L 195 39 FS1H 3 40 FS1L 150 Functionality Data Rremarks 22 DCP BLK No Name 0 PSCL 1 1 LHBH 1 2 RHBH 1 3 LHBL 1 4 RHBL 1 5 UVBH 0 6 LVBH 3 7 UVBL 22 8 LVBL 22 9 LHPH 1 10 RHPH 1 11 LHPL 1 12 RHPL 1 13 UVPH 0 14 LVPH 2 15 UVPL 75 16 LVPL 126 17 LHKH 1 18 RHKL 1 19 LHKL 1 20 RHKH 1 21 UVKH 0 22 LVKH 3 23 UVKL 8 24 LVKL 36 Standards 1 No Name Normal Wide...

Page 52: ...8 124 124 124 1 CROF 129 128 125 124 122 2 SCON 175 185 185 185 185 11 SCOL 170 185 185 185 185 iLINK BS CS d BS CS d 480i Except DV iLINK Data iLINK Lower 0 CBOF 128 128 128 128 128 128 1 CROF 128 128 128 128 128 128 2 SCON 175 185 185 185 185 185 11 SCOL 170 185 185 185 176 176 Memory Stick Memory Stick MS CNM Memory Stick Twin Freeze Still Movie Console MOVIE HQ Movie Lower INDEX FAVORITE 0 CBO...

Page 53: ...0 0 16 MIDE 18 18 16 16 22 22 20 20 17 APCD 0 0 2 2 0 0 2 2 18 NRLV 5 7 0 0 5 7 0 0 STANDARD STANDARD PRO PRO STANDARD STANDARD PRO PRO MILD OFF MILD ON MILD OFF MILD ON MILD OFF MILD ON MILD OFF MILD ON 0 SHOF 31 20 31 20 31 20 31 20 1 SHF0 15 15 15 15 1 5 15 15 15 2 SHPC 0 0 0 0 0 0 0 0 3 PROV 8 8 8 8 8 8 8 8 4 HFBT 0 0 0 0 0 0 0 0 5 ULTI 0 0 0 0 0 0 0 0 11 UCTI 0 0 0 0 0 0 0 0 16 MIDE 26 26 24 ...

Page 54: ... APCD 2 2 2 2 0 0 2 2 18 NRLV 6 6 6 6 5 5 5 5 STANDARD STANDARD PRO PRO STANDARD STANDARD PRO PRO MILD OFF MILD ON MILD OFF MILD ON MILD OFF MILD ON MILD OFF MILD ON 0 SHOF 31 31 31 31 31 20 31 31 1 SHF0 15 15 15 15 1 5 15 15 15 2 SHPC 0 0 0 0 0 0 0 0 3 PROV 8 8 8 8 8 8 8 8 4 HFBT 15 15 15 15 15 15 15 15 5 ULTI 0 0 0 0 0 0 0 0 11 UCTI 6 6 6 6 0 0 6 6 16 MIDE 31 31 31 31 12 12 31 31 17 APCD 2 2 2 2...

Page 55: ...8 8 8 8 8 8 8 8 4 HFBT 0 0 0 0 0 0 0 0 5 ULTI 0 0 0 0 0 0 0 0 11 UCTI 6 0 0 0 6 0 0 0 16 MIDE 66 66 64 64 70 70 68 68 17 APCD 0 0 2 2 0 0 2 2 18 NRLV 5 7 0 0 5 7 0 0 STANDARD STANDARD PRO PRO STANDARD STANDARD PRO PRO MILD OFF MILD ON MILD OFF MILD ON MILD OFF MILD ON MILD OFF MILD ON 0 SHOF 31 20 31 20 31 20 31 20 1 SHF0 15 15 15 15 1 5 15 15 15 2 SHPC 0 0 0 0 0 0 0 0 3 PROV 8 8 8 8 8 8 8 8 4 HFB...

Page 56: ...8 17 APCD 2 1 2 2 2 2 2 1 2 2 2 2 18 NRLV 6 6 0 0 0 0 6 6 5 7 0 0 STANDARD STANDARD PRO PRO STANDARD STANDARD PRO PRO 60 70 MILD OFF MILD ON MILD OFF MILD ON 60 70 MILD OFF MILD ON MILD OFF MILD ON 0 SHOF 31 31 31 20 20 10 41 41 41 20 31 10 1 SHF0 14 14 14 14 14 14 13 13 13 13 13 13 2 SHPC 0 0 0 0 0 0 0 0 0 0 0 0 3 PROV 8 8 8 8 8 8 8 8 8 8 8 8 4 HFBT 15 15 15 0 0 0 15 15 15 0 0 0 5 ULTI 1 1 0 0 0 ...

Page 57: ... 0 0 16 MIDE 43 43 42 42 40 40 47 47 46 46 44 44 17 APCD 2 1 2 2 2 2 2 1 2 2 2 2 18 NRLV 5 5 5 6 0 0 5 5 5 6 0 0 STANDARD STANDARD PRO PRO STANDARD STANDARD PRO PRO MILD OFF MILD ON MILD OFF MILD ON 60 70 MILD OFF MILD ON MILD OFF MILD ON 0 SHOF 31 20 31 31 31 31 31 20 20 10 1 SHF0 15 15 15 15 14 14 14 14 14 14 2 SHPC 0 0 0 0 0 0 0 0 0 0 3 PROV 8 8 8 8 8 8 8 8 8 8 4 HFBT 0 0 15 15 15 15 15 15 15 1...

Page 58: ...TI 0 0 0 0 0 0 0 0 0 0 0 0 16 MIDE 59 59 58 58 56 56 63 63 62 62 60 60 17 APCD 2 1 2 2 2 2 2 1 2 2 2 2 18 NRLV 5 5 5 6 0 0 5 5 5 6 0 0 STANDARD STANDARD PRO PRO STANDARD STANDARD PRO PRO 60 70 MILD OFF MILD ON MILD OFF MILD ON 60 70 MILD OFF MILD ON MILD OFF MILD ON 0 SHOF 31 31 31 20 20 10 41 41 41 20 31 10 1 SHF0 14 14 14 14 14 14 13 13 13 13 13 13 2 SHPC 0 0 0 0 0 0 0 0 0 0 0 0 3 PROV 8 8 8 8 8...

Page 59: ... PROV 8 8 8 8 8 8 8 8 8 8 4 HFBT 0 0 0 0 0 0 0 0 0 0 5 ULTI 0 0 0 0 0 0 0 0 0 0 11 UCTI 0 0 0 0 0 0 0 0 0 0 16 MIDE 84 84 91 90 96 96 96 96 96 96 17 APCD 2 2 2 2 2 1 2 2 2 2 18 NRLV 5 6 5 5 5 5 5 6 0 0 STANDARD STANDARD PRO PRO STANDARD STANDARD PRO PRO 60 70 MILD OFF MILD ON MILD OFF MILD ON 60 70 MILD OFF MILD ON MILD OFF MILD ON 0 SHOF 31 31 31 20 31 20 31 31 31 20 31 20 1 SHF0 14 14 14 14 14 1...

Page 60: ...LV 3 1 2 3 3 3 8 LTDL 14 14 14 14 14 14 9 LTMD 0 1 1 1 0 0 10 LTCR 0 0 0 0 0 0 No Name UCTI 1 UCTI 2 UCTI 3 UCTI 4 UCTI 6 UCTI 7 12 CTLV 1 2 3 4 6 7 13 CTDL 6 6 6 6 6 6 14 CTMD 0 0 0 0 0 0 15 CTCR 0 0 0 0 0 0 No Name UCTI 8 UCTI 9 UCTI 10 UCTI 11 UCTI 12 UCTI 14 UCTI 15 12 CTLV 9 10 11 12 14 15 13 CTDL 6 8 6 6 6 6 6 6 14 CTMD 0 0 0 0 0 0 0 15 CTCR 0 0 0 0 0 0 0 0 UCTI 13 13 6 0 5 6 0 0 14 0 0 UCTI...

Page 61: ... 31 5 UTMP 2 1 1 3 2 1 1 3 6 UDCL 0 0 0 0 0 0 0 0 7 UNRT 1 2 0 0 1 2 0 0 8 UBNR 0 0 0 0 0 0 0 0 9 UDRC 2 3 1 0 2 3 1 0 10 UBLT 0 0 0 0 0 0 0 0 Standards 2 Vivid Standard Pro Reserved Vivid Standard Pro Reserved 11 UPOF 31 31 31 31 31 31 31 31 12 UBOF 55 37 29 47 55 37 29 47 13 UCOF 31 32 31 34 31 32 31 34 14 UHOF 31 31 31 31 31 31 31 31 15 AXIS 0 0 0 2 0 0 0 2 20 UGAM 6 3 0 5 6 3 0 5 24 UDCT 8 8 0...

Page 62: ... 24 UDCT 8 8 0 8 8 8 0 8 28 UAPD 6 3 0 5 6 3 0 5 34 LSCL 60 60 60 60 60 60 60 60 35 UDCI 0 0 0 0 0 0 0 0 Vivid Standard Pro Reserved Vivid Standard Pro Reserved 11 UPOF 31 31 31 31 31 31 31 31 12 UBOF 31 47 35 47 55 37 29 41 13 UCOF 31 31 31 31 31 32 31 34 14 UHOF 31 31 31 31 31 31 31 31 15 AXIS 2 2 2 2 0 0 0 2 20 UGAM 8 7 0 7 6 3 0 5 24 UDCT 8 8 0 8 8 8 0 8 28 UAPD 10 5 0 5 8 4 0 6 34 LSCL 60 60 ...

Page 63: ...BOF 31 31 35 47 31 31 35 47 13 UCOF 31 31 31 31 31 31 31 31 14 UHOF 31 31 31 31 31 31 31 31 15 AXIS 2 2 2 2 2 2 2 2 20 UGAM 10 8 0 7 10 8 0 7 24 UDCT 8 8 0 8 8 8 0 8 28 UAPD 6 3 0 5 6 3 0 5 34 LSCL 60 60 60 60 60 60 60 60 35 UDCI 0 0 0 0 0 0 0 0 Vivid Standard Pro Reserved 11 UPOF 31 31 31 31 12 UBOF 55 37 29 41 13 UCOF 31 32 31 34 14 UHOF 31 31 31 31 15 AXIS 0 0 0 2 20 UGAM 6 3 0 5 24 UDCT 8 8 0 ...

Page 64: ...o Name UDCT 0 UDCT 1 UDCT 2 UDCT 3 UDCT 4 UDCT 5 UDCT 6 UDCT 7 25 DCTR 0 1 2 3 4 5 6 7 26 DCT1 0 0 0 0 0 0 0 0 27 DCT2 2 2 2 2 2 2 2 2 No Name UDCT 8 UDCT 9 UDCT 10 UDCT 11 UDCT 12 UDCT 13 UDCT 14 UDCT 15 25 DCTR 8 9 10 11 12 13 14 15 26 DCT1 0 0 0 0 0 0 0 0 27 DCT2 2 2 2 2 2 2 2 2 Standards 6 No Name UAPD 0 UAPD 1 UAPD 2 UAPD 3 UAPD 4 UAPD 5 UAPD 6 UAPD 7 29 APDL 0 1 2 3 4 5 6 7 30 APDK 0 16 16 1...

Page 65: ...AAXI 3 Standards 4 Off UNRT 0 Low UNRT 1 Middle UNRT 2 High UNRT 3 5 UNRL 4 5 6 7 Standards 5 Off UBNR 0 Low UBNR 1 Middle UBNR 2 High UBNR 3 6 BNRL 0 1 2 3 User NR Level No Name User BNR Level No Name No Name No Name Gamma Correction No Name Dark Correction Functionality Data Remarks USR NR No Name 1 NRLV 1 2 RNRP 1 Standards 1 No Name UNRL 0 UNRL 1 UNRL 2 UNRL 3 UNRL 4 UNRL 5 UNRL 6 UNRL 7 1 NRL...

Page 66: ... No Name VIDEO5 VIDEO6 Functionality VIDEO5 VIDEO6 No No Name Name ATSC DVI Data AP No Name 0 SVOL 1 1 STRE 1 2 SBAS 1 3 BBE 1 4 BBEL 1 5 BBEH 1 6 MOD1 0 7 MOD2 1 8 MOD3 0 9 AGCL 0 Standards 1 UV ATSC Others UV ATSC Others UV ATSC Others UV ATSC Others 0 SVOL 0 2 2 0 4 4 0 5 5 0 5 5 1 STRE 2 9 9 2 9 9 2 9 9 2 9 9 2 SBAS 2 9 9 2 9 9 2 9 9 2 9 9 3 BBE 1 1 1 1 1 1 1 1 1 1 1 1 4 BBEL 0 3 3 0 3 3 0 3 3...

Page 67: ...NNR1 SNNR2 SNNR3 2 YNLV 30 60 80 3 HIST 4 4 4 4 PSCH 0 0 1 1 5 PFUP 0 0 1 2 6 PSHP 0 0 0 1 7 PYNR 0 0 0 1 8 PCNR 0 0 0 1 9 PVGA 0 0 0 0 10 PRNR 1 1 1 1 11 DSHP 0 1 2 3 12 DSF0 0 0 1 1 13 DLTI 0 0 1 1 14 DCTI 0 3 7 15 15 DHFB 0 3 7 15 16 MINR 0 1 2 3 17 VRAO 0 3 7 15 18 VRBO 0 0 1 3 Functionality Data Remarks SNSS No Name 0 SNSS 0 1 SSFX 0 2 YNLV 1 3 HIST 1 4 PSYF 1 5 PAFG 1 6 PLOG 1 7 PHSL 1 8 PVS...

Page 68: ... 72 0 72 72 72 72 3 NOCT 155 128 141 128 128 128 128 iLINK Except DV 2 RESO 190 190 95 190 190 190 190 3 NOCT 155 128 141 128 128 128 128 iLINK Except DV 2 RESO 63 128 89 128 128 128 128 3 NOCT 218 128 201 128 128 128 128 iLINK Except DV 2 RESO 190 190 190 190 190 190 190 3 NOCT 218 190 201 190 190 190 190 Standards 3 Vivid Standard Pro Reserved Vivid Home Pro Reserved 9 LMLV 2 2 2 2 2 2 2 2 Stand...

Page 69: ...O 1 18 LIND 2 19 MSPR 0 20 CR68 2 21 INCH 0 22 ILLU 1 23 OSVL 2 24 OBIT 1 25 OSMV 48 26 OSFV 30 27 VLNO 0 28 FHIP 15 Standards 1 VIDEO4 VIDEO5 DVI 480i 480i 480i 17 AFSO 1 1 1 1 1 1 1 Standards 2 VIDEO4 VIDEO5 DVI 480i 480i 480i 18 LIND 0 0 0 0 0 0 0 VIDEO4 VIDEO5 DVI 480i 480i 480i 18 LIND 0 0 0 0 0 0 0 VIDEO4 VIDEO5 DVI 480i 480i 480i 18 LIND 0 0 0 0 0 0 0 VIDEO4 VIDEO5 DVI 480i 480i 480i 18 LIN...

Page 70: ...5 3 255 255 Standards 2 Analog 480i Analog other Digital 480i Digital other 6 DYCD 0 0 0 0 6 DYCD 0 0 0 0 Standards 3 YSDLY 0 YSDLY 1 YSDLY 2 YSDLY 3 7 DYSD 8 7 4 4 8 DYST 9 10 6 8 YSDLY 4 YSDLY 5 YSDLY 6 YSDLY 7 7 DYSD 2 0 0 0 8 DYST 5 3 0 0 YSDLY 8 YSDLY 9 YSDLY 10 YSDLY 11 7 DYSD 0 0 0 0 8 DYST 0 0 0 0 YSDLY 12 YSDLY 13 YSDLY 14 YSDLY 15 7 DYSD 0 0 0 0 8 DYST 0 0 0 0 YSDLY 0 YSDLY 1 YSDLY 2 YSD...

Page 71: ...5 19 255 9 11 MDHS 36 255 35 36 255 229 12 MDHO 46 255 30 46 255 46 SidePanel Window SidePanel Twin Center Favorite Index other 9 MDHP 105 15 19 9 11 MDHS 12 MDHO SidePanel Window SidePanel Twin Center Favorite Index other 9 MDHP 255 255 255 255 255 255 11 MDHS 255 255 255 255 255 255 12 MDHO 255 255 255 255 255 255 SidePanel Window SidePanel Twin Center Favorite Index other 9 MDHP 255 255 255 255...

Page 72: ...DT 255 255 255 255 255 255 255 255 16 MLRA 255 255 255 255 255 255 255 255 TWIN MEMO Favorite Index MS TWIN MEMO Favorite Index MS 15 MLDT 7 10 255 32 255 255 255 255 16 MLRA 72 98 255 54 255 255 255 255 TWIN MEMO Favorite Index MS TWIN MEMO Favorite Index MS 15 MLDT 32 16 MLRA 0 TWIN MEMO Favorite Index MS 15 MLDT 255 255 255 255 16 MLRA 255 255 255 255 Standards 7 SidePanel other 17 DBCY 4 4 16 ...

Page 73: ... 255 255 255 255 3 RVSL 255 255 255 255 255 SidePanel Full Widezoom Zoom Caption 0 RHPL 255 255 255 255 255 1 RHSL 255 255 255 255 255 2 RVPL 255 255 255 255 255 3 RVSL 255 255 255 255 255 SidePanel Full Widezoom Zoom Caption 0 RHPL 157 143 143 143 255 1 RHSL 164 171 171 171 255 2 RVPL 48 48 70 106 255 3 RVSL 115 115 104 86 255 0 RHPL 143 136 143 143 255 255 141 1 RHSL 167 168 167 167 255 255 168 ...

Page 74: ... 255 255 165 2 RVPL 48 48 50 255 255 255 49 3 RVSL 115 115 115 255 255 255 115 4 RHPR 255 255 255 255 255 255 5 RHSR 255 255 255 255 255 255 6 RVPR 255 255 255 255 255 255 7 RVSR 255 255 255 255 255 255 No Name Favorite Component 480i Composite 480i DVI 480i AVM 480i YCbCr Digital 480i Digital 480i Side Panel ATSC 480i INDEX No Name Composite 480i Digital 480i ...

Page 75: ...55 255 255 255 2 VVPL 255 255 255 255 3 VVSL 255 255 255 255 4 VHPR 255 255 255 255 5 VHSR 255 255 255 255 6 VVPR 255 255 255 255 7 VVSR 255 255 255 255 Digital 480p SP Component 1035i AVM 1035i RGB AVM 1035i YCbCr 0 VHPL 255 255 255 255 1 VHSL 255 255 255 255 2 VVPL 255 255 255 255 3 VVSL 255 255 255 255 4 VHPR 255 255 255 255 5 VHSR 255 255 255 255 6 VVPR 255 255 255 255 7 VVSR 255 255 255 255 C...

Page 76: ... AVM 480i RGB AVM 480i YCbCr Analog DTT 480i 8 VCPO 0 0 0 0 0 9 VCWD 0 0 0 0 0 10 VYCD 0 0 0 0 0 11 VSTP 0 0 0 0 0 12 VSTT 0 0 0 0 0 13 VFRV 0 0 0 0 0 No Name Component 720p AVM 720p RGB AVM 720p YCbCr Digital 720p 8 VCPO 0 0 0 0 9 VCWD 0 0 0 0 10 VYCD 0 0 0 0 11 VSTP 0 0 0 0 12 VSTT 0 0 0 0 13 VFRV 0 0 0 0 No Name Component 1035i AVM 1035i RGB AVM 1035i YCbCr Digital 1035i 8 VCPO 0 0 0 0 9 VCWD 0...

Page 77: ...5 255 255 255 255 255 3 DVSL 255 255 255 255 255 255 255 SidePanel Full Widezoom Zoom Caption SidePanel Full Widezoom Zoom Caption 0 DHPL 210 191 191 191 255 196 179 179 179 255 1 DHSL 217 227 227 227 255 220 229 229 229 255 2 DVPL 45 45 69 105 255 35 35 59 95 255 3 DVSL 116 116 104 86 255 120 120 108 90 255 SidePanel Full Widezoom Zoom Caption SidePanel Full Widezoom Zoom Caption 0 DHPL 255 255 2...

Page 78: ...Component 1035i AVM 1035i RGB AVM 1035i YCbCr Digital 1035i Full Full Full Full SidePanel 0 DHPL 255 255 255 255 1 DHSL 255 255 255 255 2 DVPL 255 255 255 255 3 DVSL 255 255 255 255 Component 1080i DVI 1080i RGB AVM 1080i YCbCr Digital 1080i Full Digital 1080i SidePan el Component 720p DVI 720p AVM 720p YCbCr Digital 720p Full Digital 720p SidePane l 0 DHPL 135 135 255 255 255 162 162 255 255 255 ...

Page 79: ...255 255 255 255 255 255 1 DHSL 222 222 255 255 255 255 255 255 255 255 2 DVPL 43 43 255 255 255 255 255 255 255 255 3 DVSL 124 124 255 255 255 255 255 255 255 255 Component 720p DVI 720p RGB AVM 720p YCbCr Digital 720p other Digital 720p SidePane l Component 480p DVI 480p AVM 480p YCbCr Digital 480p Full Digital 480p SidePane l 0 DHPL 173 172 255 255 255 200 198 255 255 255 1 DHSL 148 148 255 255 ...

Page 80: ... 12 DSTT 0 0 0 0 0 0 0 0 13 DFRV 0 0 0 0 0 0 0 0 No Name Component 480i Composite 480i AVM 480i RGB AVM 480i YCbCr Digital 480i Digital 240p Digital 120p VGA 8 DCPO 0 0 0 0 0 0 0 0 9 DCWD 0 0 0 0 0 0 0 0 10 DYCD 0 0 0 0 0 0 0 0 11 DSTP 0 0 0 0 0 0 0 0 12 DSTT 0 0 0 0 0 0 0 0 13 DFRV 0 0 0 0 0 0 0 0 No Name ATSC 1080i ATSC 720p ATSC 480p ATSC 480i ATSC MS 8 DCPO 0 0 0 0 0 9 DCWD 0 0 0 0 0 10 DYCD 0...

Page 81: ...FM 3 3 3 3 3 3 3 3 3 MVLS 0 0 0 0 1 1 0 0 4 MHLC 1 1 1 1 3 3 3 3 5 MVLC 0 0 0 0 3 4 2 2 6 MVEC 0 0 0 0 1 1 1 1 7 MXCO 0 0 0 0 1 1 1 1 8 MXHI 0 0 0 0 0 0 0 0 9 MXMO 1 1 1 1 0 0 0 0 10 MXCR 2 2 2 2 2 2 2 2 11 MXCL 3 3 3 3 3 3 3 3 12 MXEN 0 3 5 7 2 4 6 7 13 MXLT 2 2 2 2 3 3 3 3 14 MYCO 0 0 0 0 5 5 5 5 15 MYHI 0 0 0 0 0 0 0 0 16 MYMO 1 1 1 1 0 0 0 0 17 MYCR 2 2 2 2 2 2 2 2 18 MYCL 3 3 3 3 3 3 3 3 19 M...

Page 82: ...MXMO 1 1 1 1 1 1 1 1 10 MXCR 1 1 1 1 1 1 1 1 11 MXCL 2 2 2 2 2 2 2 2 12 MXEN 2 4 6 7 2 4 6 7 13 MXLT 2 2 2 2 2 2 2 2 14 MYCO 0 0 0 0 0 0 0 0 15 MYHI 0 0 0 0 0 0 0 0 16 MYMO 1 1 1 1 1 1 1 1 17 MYCR 1 1 1 1 1 1 1 1 18 MYCL 2 2 2 2 2 2 2 2 19 MYEN 2 4 6 7 2 4 6 7 20 MYLT 2 2 2 2 2 2 2 2 21 MKMO 0 0 1 1 0 0 1 1 22 MKCO 0 0 1 1 0 0 1 1 23 MKCL 0 0 3 3 0 0 3 3 24 MKEN 0 0 7 7 0 0 7 7 25 MKLT 0 0 3 3 0 0...

Page 83: ...1 1 1 1 1 1 10 MXCR 1 1 1 1 1 1 1 1 11 MXCL 2 2 2 2 2 2 2 2 12 MXEN 2 4 6 7 2 4 6 7 13 MXLT 3 3 3 3 3 3 3 3 14 MYCO 0 0 0 0 0 0 0 0 15 MYHI 0 0 0 0 0 0 0 0 16 MYMO 1 1 1 1 1 1 1 1 17 MYCR 1 1 1 1 1 1 1 1 18 MYCL 2 2 2 2 2 2 2 2 19 MYEN 2 2 4 7 2 2 4 7 20 MYLT 3 3 3 3 3 3 3 3 21 MKMO 0 0 1 1 0 0 1 1 22 MKCO 0 0 1 1 0 0 1 1 23 MKCL 0 0 2 2 0 0 2 2 24 MKEN 0 2 4 7 0 2 4 7 25 MKLT 0 0 3 3 0 0 3 3 26 M...

Page 84: ...1 1 1 1 1 1 1 1 10 MXCR 1 1 1 1 1 1 1 1 11 MXCL 2 2 2 2 2 2 2 2 12 MXEN 2 4 6 7 2 4 6 7 13 MXLT 2 2 2 2 2 2 2 2 14 MYCO 0 0 0 0 0 0 0 0 15 MYHI 0 0 0 0 0 0 0 0 16 MYMO 1 1 1 1 1 1 1 1 17 MYCR 1 1 1 1 1 1 1 1 18 MYCL 2 2 2 2 2 2 2 2 19 MYEN 2 4 6 7 2 4 6 7 20 MYLT 2 2 2 2 2 2 2 2 21 MKMO 0 0 1 1 0 0 1 1 22 MKCO 0 0 1 1 0 0 1 1 23 MKCL 0 0 3 3 0 0 3 3 24 MKEN 0 0 7 7 0 0 7 7 25 MKLT 0 0 3 3 0 0 3 3 ...

Page 85: ... 1 1 1 0 0 0 0 11 MXCL 0 2 2 2 0 0 0 0 12 MXEN 0 1 2 3 0 0 0 0 13 MXLT 0 3 3 3 0 0 0 0 14 MYCO 0 0 0 0 0 0 0 0 15 MYHI 0 0 0 0 0 0 0 0 16 MYMO 0 1 1 1 0 0 0 0 17 MYCR 0 1 1 1 0 0 0 0 18 MYCL 0 2 2 2 0 0 0 0 19 MYEN 0 1 2 3 0 0 0 0 20 MYLT 0 3 3 3 0 0 0 0 21 MKMO 0 0 0 0 0 0 0 0 22 MKCO 0 0 0 0 0 0 0 0 23 MKCL 0 0 0 0 0 0 0 0 24 MKEN 0 0 0 0 0 0 0 0 25 MKLT 0 0 0 0 0 0 0 0 26 MKTH 0 0 0 0 0 0 0 0 2...

Page 86: ... 0 0 0 0 0 0 0 0 9 MXMO 0 0 0 0 0 0 0 0 10 MXCR 0 0 0 0 0 0 0 0 11 MXCL 0 0 0 0 0 0 0 0 12 MXEN 0 0 0 0 0 0 0 0 13 MXLT 0 0 0 0 0 0 0 0 14 MYCO 0 0 0 0 0 0 0 0 15 MYHI 0 0 0 0 0 0 0 0 16 MYMO 0 0 0 0 0 0 0 0 17 MYCR 0 0 0 0 0 0 0 0 18 MYCL 0 0 0 0 0 0 0 0 19 MYEN 0 0 0 0 0 0 0 0 20 MYLT 0 0 0 0 0 0 0 0 21 MKMO 0 0 0 0 0 0 0 0 22 MKCO 0 0 0 0 0 0 0 0 23 MKCL 0 0 0 0 0 0 0 0 24 MKEN 0 0 0 0 0 0 0 0 ...

Page 87: ...2 2 7 MNGR 1 2 3 3 0 2 3 3 8 MNLR 1 0 1 0 0 1 3 0 9 MNCR 0 0 0 0 0 0 0 0 10 MNCC 0 0 0 0 0 0 0 0 11 MNFL 0 0 0 0 0 0 0 0 12 MNCO 0 0 0 0 0 0 0 0 13 MNMV 0 0 0 0 0 0 0 0 NRTBL 0 NRTBL 1 NRTBL 2 NRTBL 3 NRTBL 4 NRTBL 5 NRTBL 6 NRTBL 7 1 MBT1 5 5 5 5 5 5 5 5 2 MNHF 0 0 0 0 0 0 0 0 3 MNON 1 1 1 1 1 1 1 1 4 MNOF 1 1 1 1 1 1 1 1 5 MNMO 0 0 0 0 0 0 0 0 6 MNFB 1 2 2 2 0 1 2 2 7 MNGR 1 2 3 3 0 2 3 3 8 MNLR...

Page 88: ...1 1 1 2 MIMO 0 0 0 0 0 0 0 3 MSTA 0 0 0 0 0 0 0 4 MF22 0 0 0 0 0 0 0 5 MFPH 0 0 0 0 0 0 0 6 MIBM 1 1 1 1 1 1 1 7 MIUP 1 1 1 1 1 1 1 8 MSTP 1 1 1 1 1 1 1 9 MSOF 4 4 4 4 4 4 4 10 MSTY 4 4 4 4 4 4 4 11 MSTC 4 4 4 4 4 4 4 12 MIFL 0 0 0 0 0 0 0 13 MIHC 4 4 4 4 4 4 4 14 MISO 1 1 1 1 1 1 1 15 MIMX 3 3 3 3 3 3 3 16 MILC 2 2 2 2 2 2 2 17 MIRA 3 3 3 3 3 3 3 18 MIOR 1 1 1 1 1 1 1 19 MIFB 2 2 2 2 2 2 2 20 MIV...

Page 89: ...4 PAR0 0 15 PAR1 0 16 PAT1 41 17 PAT2 81 18 PAT3 106 19 PAT5 120 Functionality Data Rremarks D9671 1 No Name 0 I2CSCAL 49 1 LUTPERM 1 2 COPYENAB 1 3 REFPERM 1 4 REFLENGT 0 5 SLAVE 87 6 INSWAP 5 7 RINBSWAP 1 8 GINBSWAP 1 9 BINBSWAP 1 10 OUTSWAP 5 11 ROUTBSWAP 1 12 GOUTBSWAP 1 13 BOUTBSWAP 0 14 OSDTHRU 0 15 MUTE 0 16 3DGSW 1 17 LUTTHRU 0 18 DOTLINE 9 19 CSCMODE 0 20 PWIDTHH 86 21 PWIDTHL 9 22 PHEIGH...

Page 90: ...OF 3 30 GBIASOF 3 31 BBIASOF 3 Standards 1 No Name APCMODE 0 APCMODE 1 APCMODE 2 APCMODE 3 1 APCSW 0 1 1 1 2 APCGAIN 0 50 40 45 3 APCCORE 0 30 63 10 4 APCLIMT 0 63 30 30 No Name APCMODE 4 APCMODE 5 APCMODE 6 APCMODE 7 1 APCSW 0 0 0 0 2 APCGAIN 64 64 64 64 3 APCCORE 127 127 127 127 4 APCLIMT 64 64 64 64 Standards 2 No Name normal wide 15 BLK LEFH 0 0 16 BLK LEFL 0 0 17 BLK RIH 0 0 18 BLK RIL 0 0 St...

Page 91: ...CURLVL 31 36 GCURLVLH 3 37 GCURLVLL 7 38 BCURLVL 31 39 RSMPSW 0 40 RSMPHPH 0 41 RSMPHPL 0 42 RSMPVPH 0 43 RSMPVPL 0 44 RSMPSIZE 0 45 RSMPRIM 0 46 RSMPCYCL 0 47 RSMPRILV 0 48 RSMPHLVR 0 49 RSMPHLVG 0 50 RSMPHLVB 0 51 RSMPLLVR 0 52 RSMPLLVG 0 53 RSMPLLVB 0 Functionality Data Rremarks D9671TG1 No Name 0 MSB STPH 0 1 STAPOSH 216 2 STAPOSV 16 3 TGOFF 0 4 HSTPOL 0 5 VSTPOL 0 6 HCKPOL 0 7 VCKPOL 0 8 BLKP...

Page 92: ...COM 43 7 RSIDLVL 8 8 S RGAINA 204 9 S RGAINB 0 10 S ROFSETA 165 11 S ROFSETB 0 Functionality Data Rremarks A7001G No Name 0 GGAINA 191 1 GGAINB 32 2 GOFSETA 144 3 GOFSETB 32 4 GCALLVL 12 5 SHPOS 2 6 GVCOM 43 7 GSIDLVL 8 8 S GGAINA 191 9 S GGAINB 0 10 S GOFSETA 144 11 S GOFSETB 0 Functionality Data Rremarks A7001B No Name 0 BGAINA 191 1 BGAINB 32 2 BOFSETA 144 3 BOFSETB 32 4 BCALLVL 12 5 SHPOS 2 6 ...

Page 93: ...TEMP 11 5 OFFSET 113 113 113 113 No Name TEMP 12 TEMP 13 TEMP 14 TEMP 15 5 OFFSET 113 113 113 113 No Name TEMP 16 TEMP 17 TEMP 18 TEMP 19 5 OFFSET 113 113 113 113 No Name TEMP 20 TEMP 21 TEMP 22 TEMP 23 5 OFFSET 113 113 113 113 No Name TEMP 24 TEMP 25 TEMP 26 TEMP 27 5 OFFSET 113 113 113 114 No Name TEMP 28 TEMP 29 TEMP 30 TEMP 31 5 OFFSET 115 115 116 117 No Name TEMP 32 TEMP 33 TEMP 34 TEMP 35 5 ...

Page 94: ...73 12 FAN12 START 30 13 FAN12 END 35 14 FAN12 VMAX 186 15 FAN12 VMIN 73 16 FAN13 START 30 17 FAN13 END 35 18 FAN13 VMAX 186 19 FAN13 VMIN 73 20 FAN20 START 30 21 FAN20 END 35 22 FAN20 VMAX 113 23 FAN20 VMIN 16 24 FAN21 START 30 25 FAN21 END 35 26 FAN21 VMAX 129 27 FAN21 VMIN 16 28 FAN22 START 30 29 FAN22 END 35 30 FAN22 VMAX 113 31 FAN22 VMIN 16 32 FAN23 START 30 33 FAN23 END 35 34 FAN23 VMAX 113 ...

Page 95: ... 94 KDF 60XBR950 70XBR950 K RM Y914 RM Y914 MEMO ...

Page 96: ... OUT L OUT B46 9V 9V A49 I_MAIN_Y CV A47 I_ MAIN_C CB A45 I _MAIN_CR B44 B42 2 5V 2 5V B40 2 5V A43 A41 I_SUB Y CV B38 I_SUB C CB B28 B30 I_BOARD_RESET A25 B_I2C_SDA_5V B_I2C_SCL_5V O_MS AU_R_OUT O_MS AU_L_OUT A27 A23 B17 MS3 3V MS3 3V 3 3V 3 3V B20 A21 I_MS CNM_RESET I_MS CNM_AC DET B18 B22 A17 B12 B8 A13 NC NC NC NC NC NC SET 9V B_MS CNM_USB D B_MS CNM_USB D I_MICOM_VP A19 A15 I_BINT B10 1 8V 1 ...

Page 97: ... PROT FAN3 POW FAN3 PROT FAN4 POW FAN4 PROT 5 4 7 8 11 10 FAN CTL SDA E SCL E FAN1 CTL FAN2 CTL FAN3 CTL FAN PROT 14 15 3 5 IC8010 DATA DECODER IC8006 FAN CONTROL IC8002 FAN CONTROL IC8009 FAN CONTROL Q8046 8049 BUFFER 4 4 1 3 4 1 3 Q8045 8048 BUFFER Q8044 8047 BUFFER 4 1 3 IC8005 FAN CONTROL 4 2 1 3 IC8011 9V REG IC8007 3 3V REG SET 11V 1 3 IC8501 DOLBY 72 42 IC8008 5V REG 4 5 CN8027 11V 10 9 8 2...

Page 98: ...ONE D8505 D8509 SP MUTE D8508 K A 3 3 AUDIO AMP TO G1 BOARD CN1624 2 TO A 2 3 BOARD 64 62 63 61 60 58 57 22 23 59 BBE TONE BUFFER BUFFER C DC PROT SP MUTE 11V DET SCL SDA 18 IC8505 POWER AMP Q8501 8502 MUTE Q8511 17V AU W SET 11V D4705 SPEED UP CN8501 WF OUT WOOFER SPEAKER WF OUT 1 3 Q8505 CN8029 2 1 7 AU 17V AU 17V AU 17V AU 17V 8 34 Q4711 LPF Q8510 INITIAL MUTE Q8513 BUFFER Q8512 MUTE 7 11 5 4 2...

Page 99: ... 3 2 A 1 I O I O K R IC6902 5V REG I O IC6901 XX IC6900 SWITCHING REGULATOR K R A F AC FILTER G1 POWER SUPPLY G2 POWER SUPPLY TO LAMP DRIVER TO C1 BOARD 9 CN1620 8 5V 5V 7 5V 4V 1 4V 2 8 CN1624 7 AU 17V SU 17V 2 AU 17V AU 17V 1 10 CN1622 9 11V 11V 8 11V D6 5V 1 D6 5V 2 2 CN1617 4 33V SUB 7V 6 POWER CTL 17V DET 8 MAIN ON 7 1 CN1618 2 AC RLY AC OFF DET 3 AC RLY TO A BOARD CN8029 K TO A BOARD CN8028 ...

Page 100: ...1 TO A BOARD TO A 2 3 BOARD CN8041 CN3903 12 10 8 6 4 V2 SW V2 S2 1 2 L CN9400 TO U BOARD V2 C V2 Y V2 V V2 L V2 R OUT S3701 3 4 2 1 IC3701 POWER IC3951 TEMP SENSOR VCC SDA SCL S3912 MENU S3906 S3908 UP DOWN LEFT RIGHT ENTER i LINK S3905 TV VIDEO S3904 S3903 S3902 S3901 VOL CH CH VOL CN3901 KEY2 KEY 2 1 B CN8001 TO A BOARD 8 1 2 CN3951 4 3 5V 1 2 F SDA E SCL E LAMP DOOR SWITCH T CN8001 S8001 LAMP ...

Page 101: ...L OUT MAIN R OUT 44 53 49 56 58 47 8 11 COMP Y 9 COMP CB COMP CR 8 1 15 22 16 18 34 33 MAIN YV OUT SUB V OUT YIN SUB Y OUT SUB C OUT MAIN C OUT RF MAIN V MTU V Y CB CR STU V MTU L MTU R SUB LR RF SUB V RF MAIN L RF MAIN R 23 25 RF SUB L RF SUB R SDA SCL 1 2 3 4 5 7 8 9 10 11 33 34 35 41 42 43 44 45 46 47 20 IC9402 COMPONENT INTERFACE IC9405 AUDIO BUFFER IC9405 LINE AMP IN3 1 IN3 2 IN3 3 IN3 H IN3 ...

Page 102: ...DA SCL RESETN 59 94 95 58 RXC RXC AIN 6 IT7 PB6 61 62 36 35 32 31 33 DVI HDTV IN7 VIDEO 6 5 1 3 7 2 IC7008 LIMITER IC7009 LIMITER IC7005 NNLTR IC7006 EEPROM IC7003 2 5V REG IC7002 3 3V REG IC7001 EEPROM 3 3V D7001 5V 5V DIV_SCL DIV_SDA 6 5 2 3 7 1 3 3V AIN7 IT8 PB7 WP VCC RESET VGA MUTE VCC WP 2 6 1 3 5 6 7 7 5 DIV_SCL DIV_SDA DIV_SCL DIV_SDA SCK SI 11 10 8 18 21 28 24 19 2 3 CN7005 3 VOA 4 MUTE 2...

Page 103: ...9P WHT VH 3P WHT VH 64P B TO B 2P WHT VH 13P WHT L S MICRO 3P BLK L S MICRO 8P S MICRO 10PBUSCON 8P 32P 32P 32P 7P 20P FI E14S 14P FI E14S 14P FI E14S 14P FI E14S 14P FI E14S 10P WHT S MICRO 10P 7P 10P B TO B 96P B TO B 96P 4P WHT L S MICRO 6P WHT L S MICRO 64P 8PWHT S MICRO 3PWHT S MICRO 5P RED S MICRO 4P WHT VH 0P TAB CONTACT 4P WHT VH 5PRED S MICRO 13P WHT L S MICRO 0P TAB CONTACT 2PWHT PW CN 0...

Page 104: ...M and U boards are divided into several pieces Information to where the line is to be connected is printed at the end of each line For example TO A1 3 A2 3_1 means the line is connected to Ref No 1 of A 1 3 and A 2 3 schematic diagrams TO A1 3 A2 3_1 Ref No Name of divided schematic diagram G D S B1 E1 C2 B2 C1 E2 2 3 4 5 6 7 8 9 0 qa qs qf qh qj qk 1 G D S B2 E2 C1 B1 C2 E1 B2 E2 C1 B1 C2 E1 B2 E...

Page 105: ... 1608 0 0022 B 1608 0 0022 B 1608 25V CHIP 0 1µF 0 047 16V B CHIP 1 10V F 1608 330p 50V B CHIP 100p 50V CH CHIP 0 047 16V B CHIP 1 10V F CHIP 33k 1 10W CHIP 10k 1 10W 1608 0 1 10W 1608 3 3k CHIP 33k 1 10W CHIP 2 2k 1 10W CHIP 0 1608 100 1 10W CHIP 100 1 10W CHIP 22k 1 10W CHIP 0 1 10W 1608 1k 1 16W CHIP 22k 1 10W CHIP 150k 1 10W CHIP 150k 1 10W CHIP 2 2k 1 10W 10k 1 10W 2 2k 1 10W CHIP 0 1 10W 160...

Page 106: ...16V B 1608 MA111 TX 47 25V 47 25V 47 25V 1 10W RN CP PQ20WZ1UJ00H FAN2 REG PQ20WZ1UJ00H FAN1 REG PQ20WZ1UJ00H FAN3 REG 0 1 10W CHIP 0 1 10W CHIP 6 8k 1 10W RN CP PQ20WZ1UJ00H FAN4 REG 3 3k 1 10W RN CP 1 10W RN CP FAN6 SW 1 10W CHIP 1 10W 1608 1 10W 1608 10k 1 10W 1608 10k 1 10W 1608 1 10W CHIP 10k 1 10W 1608 4P YEL S MICRO 7P YEL S MICRO 8P YEL S MICRO 5P WHT S MICRO 3P YEL S MICRO 0 CHIP 2PD601AR...

Page 107: ... 2PD601AR 2PB709AR 2PD601AR 2PD601AR INV 2PD601AR INV 1 10W CHIP 1 10W CHIP 1 10W CHIP 0 1 10W CHIP 10k 1 10W CHIP 10k 1 10W CHIP 1608 1608 1 10W CHIP LAV35 100µH 1608 PROTECT 0 1608 0 1608 0 1608 0 1608 0 1608 47k 1 10W CHIP 100 1 10W CHIP 0 1 25V F 1608 100 16V MA111 MA111 LB2016 2PB709AR 10k 1 10W CHIP 100k 1 10W CHIP 1608 1608 1P 1P 1P 1P 1P 2SA1576A T106 QR BUFF 2PB709AR 2PB709AR 56 1 10W CHI...

Page 108: ...2 25V B 1608 0 022 25V B 1608 0 01 25V B 1608 680p B 1608 0 0033 B 1608 0 01 25V B 1608 0 01 25V B 1608 0 01 25V B 1608 0 01 25V B 1608 0 1 16V B 1608 0 01 25V B 1608 0 22 16V B 1608 0 0047 B 1608 0 22 16V B 1608 0 01 25V B 1608 0 0047 B 1608 0 0047 B 1608 0 022 25V B 1608 0 22 16V B 1608 0 33 10V B 1608 0 1 16V B CHIP 0 1608 15k 1 16W CHIP 8 2k 1 16W CHIP 8 2k 1 16W CHIP 15k 1 16W CHIP 15k 1 16W ...

Page 109: ...R DC DET 50V 0 47 50V 0 47 50V MM3Z9V1ST PROTECT 2PD601AR DC DET 50V 50V 2 2k 1 10W CHIP 10k 1 10W CHIP 0 1 10W 1608 2 2k 1 10W CHIP 10k 1 10W CHIP 47k 1 10W CHIP 47k 1 10W CHIP 0 1608 0 1 10W 1608 47k 1 10W CHIP 1 10W 1608 47k 1 10W CHIP 1k 1 10W CHIP 1k 1 10W CHIP 47k 1 10W CHIP 47k 1 10W CHIP 12k 1 10W CHIP 100k 1 10W CHIP 1608 10k 1 10W CHIP 0 1 10W 1608 1k 1 10W CHIP 0 1 25V F CHIP 0 1 25V F ...

Page 110: ...NTACT 4P WHT VH 47 25V LHL08 330 25V D1NS4 SUB7V RECT SBT 470k SURGE ERA22 08 SNUBBER 4 7 FPRD 10 250V MA111 PROT 22 FPRD 22 FPRD ERA15 02 AC DET ERA15 02 AC DET ERA15 02 AC DET ERA15 02 AC DET 0 0047 250V F D2SB60A F04 STBY RECT 0 0047 250V F 2SK2663 CONVERTER 22M 1 2W 6 8 1 2W FPRD RD18SB2 OVP MA111 PROT MA111 OCP MA111 OCP RD6 8SB2 REG D1N20R RECT 22 470p B 1608 0 047 25V F 1608 0 001 B 1608 0 ...

Page 111: ...RS LHL08 LHL08 2 5A ICP N70 2 5A ICP N70 MA111 PROT D1NL20U 33V RECT D1NL20U 33V RECT 10 100V 500V HR 500V HR 500V HR 500V HR UF4005PKG23 BOOT 3P BLK VH MA111 PROT 100 25V PQ30RV31 5V REG MA111 PROT PQ30RV11 4V REG 100 25V 1000 10V MA111 PROT MA111 PROT MA111 PROT MA111 PROT 2200 10V 47 47 2200 25V ZL 2200 25V ZL 820 25V ZL 820 25V ZL 820 25V ZL 820 25V ZL 330 10V PXA PROT PROT PROT PROT RD18SB2 1...

Page 112: ...0 CN6901 R6944 PC123Y22 MAIN CONTROL 10 FPRD 10 FPRD 0 1 MPS B 47 25V 0 001 PP 10 100 47 10 FPRD 10 FPRD 100 0 33 2W RS 1000 10V 470 16V JW 5 D2S4M PTZ TE25 13A TL1431CZ AP PQ05RD1B JW 5 2SK2876 CONVERTER 2SK2876 CONVERTER JW 5 JW 5 JW 5 LHL08 LHL08 0 47 1 2W RF MCZ3001DA DRIVER MM3Z15VT1 MM3Z15VT1 PROTECT MM3Z15VT1 MM3Z15VT1 MM3Z15VT1 2P VH 0 001 B 1608 0 01 B 1608 0 01 25V B 1608 0 01 25V B CHIP...

Page 113: ...08 C3910 R3916 VD3903 R3918 VD3904 0 1 25V F CHIP 0 01 50V F CHIP 0 1 25V F CHIP 47 1 10W CHIP 10 16V CHIP 0 1608 1 10W CHIP 5P WHT L S MICRO SBX1971 51P IR REC PUSH SWICH 10k 1 10W 1608 10k 1 10W 1608 0 1 10W 1608 22 1 10W 1608 22 1 10W 1608 LM75CIMX 5 4P BLK S MICRO 0 1 25V F 1608 10pF CH 1608 2 2k 1 10W RN CP 1k 1 10W RN CP 680 1 10W RN CP 470 1 10W RN CP 4 7k 1 10W RN CP 2 2k 1 10W RN CP 1k 1 ...

Page 114: ...CHIP USB SERIES B 1k 1 16W CHIP 100 1k 1 16W CHIP 100 1 16W CHIP 100 1 16W CHIP 1k 1 16W CHIP 4 7k 1 16W CHIP 4 7k 1 16W CHIP 0 01 25V B CHIP XC6204B332MR 3 3V LDO 1 5k 1 16W CHIP 0 1 25V F CHIP 0 1 25V F CHIP 0 1 25V F CHIP 0 1 25V F CHIP 0 01 25V B CHIP 4 7 6 3V B CHIP 1 6 3V B CHIP 0 01 25V B CHIP M24128 BWMN6T 90C36LC1B LF MS USB 1 6 3V B CHIP 10P MEMORY STICK 33 1 16W CHIP 33 1 16W CHIP 1k 1 ...

Page 115: ... PCI_AD 27 252 W13 PCI_AD 28 191 R12 PCI_AD 29 233 V12 PCI_AD 30 175 P12 PCI_AD 31 251 W12 PCI_GNTZ 174 P11 PCI_REQZ 232 V11 PCI_CLK 213 U11 PCI_INTAZ 173 P10 RESET_HOSTZ 189 R10 MCIF_A 17 250 W11 M68K_IF_SEL 231 V10 22 RB608 1 2 3 4 5 6 7 8 JL604 0uH FB602 2 2uH L601 0uH FB601 2012 6 3V 10 B C621 1 2 1 8VDD 2 5VDD 6 3V TA 47 C605 1608 25V 0 1 F C617 1608 25V 0 1 F C602 6 3V TA 47 C603 2012 6 3V 1...

Page 116: ...7 A18 A19 A20 A21 A22 A23 A24 B2 B3 B4 B5 B6 B7 B8 B9 B10 B11 B12 B13 B14 B15 B16 B17 B18 B19 B20 B21 B22 B23 B24 48P CN701 1 HSDI_2_CLK 2 HSDI_2_SYNC 3 HSDI_2_ERR 4 NC 5 NC 6 HSDI_1_VAL 7 HSDI_1_SYNC 8 RESETARM 9 GPIO_O 1 10 I2S_WS_IN 11 I2S_SCK_IN 12 HSDI_0_ERR 13 HSDI_0_SYNC 14 DV656_D1 15 DV656_D3 16 DV656_D5 17 DV656_D7 18 DV656_CLK 19 NC 20 NC 21 GND 22 GND 23 GND 24 GND 31 RESET_ICES 32 GPI...

Page 117: ...29 28 24 23 22 21 20 IC42S16101 IC807 VCC DQ0 DQ1 VSSQ DQ2 DQ3 VCCQ DQ4 DQ5 VSSQ DQ6 DQ7 VCCQ DQML WE CAS RAS CS BA A10 AP A0 A1 A2 A3 VCC VSS A4 A5 A6 A7 A8 A9 NC1 CKE CLK DQMU NC2 VCCQ DQ8 DQ9 VSSQ DQ10 DQ11 VCCQ Q12 Q13 VSSQ DQ14 Q15 VSS 100 RB832 1 2 3 4 5 6 7 8 1608 50V 100p CH C833 100 RB838 1 2 3 4 5 6 7 8 3 3VDD 10k RB803 1 2 3 4 5 6 7 8 3 3VDD 10k RB801 1 2 3 4 5 6 7 8 JL806 1608 25V 0 1 ...

Page 118: ...P 1 16V F CHIP 0 01 25V B CHIP 0 01 25V B CHIP 470p B CHIP 470p B CHIP 22k 1 16W CHIP 27k 1 16W CHIP MBRS140T3 MBRS140T3 100 1 16W CHIP 4 7 1 16W CHIP 1 25V B CHIP 1 25V B CHIP 4 7 1 16W CHIP 455MA CHIP TC7SZ08FU BUFFER TC7SZ08FU BUFFER 22 16V B CHIP 215H25AKA13G XILLEON 225 571 BGA 215H25AKA13G XILLEON 225 571 BGA 215H25AKA13G XILLEON 225 571 BGA 215H25AKA13G XILLEON 225 571 BGA 215H25AKA13G XILL...

Page 119: ...253 254 255 256 234 235 237 236 215 216 217 196 218 198 197 504 533 562 445 474 503 532 444 561 473 502 531 560 472 501 530 559 471 500 470 558 529 499 528 557 498 527 54 72 81 63 177 176 189 188 187 475 563 199 186 FLXCE0A FLXCE0B FLXCE1A FLXCE1B FLXCE3A FLXCE4A FLXCE5A FLXRDA FLXWEA FLXAD0A FLXAD1A FLXAD2A FLXAD3A FLXAD5A FLXAD6A FLXAD7A FLXAD8A FLXAD9A FLXAD10A FLXAD11A FLXAD13A FLXAD14A FLXAD1...

Page 120: ...152 153 154 155 162 44 73 102 WE CAS RAS CS0 CKE A14 A13 A11 A10 A9 A8 A7 A6 A5 A4 A3 A2 D16 D17 D18 D19 D20 D21 D22 D23 D24 D25 D26 D27 D28 D29 D30 D31 D4 D5 D6 D7 D8 D9 D10 D11 D12 D13 D14 D15 A2 A3 A4 A5 A6 A7 A8 A9 A10 A11 A13 A14 CKE CS0 RAS CAS WE D16 D17 D18 D19 D20 D21 D22 D23 D24 D25 D26 D27 D28 D29 D30 D31 D4 D5 D6 D7 D8 D9 D10 D11 D12 D13 D14 D15 A1 A0 A1 A0 DM2 DM1 DM0 DM2 DM1 DM0 D8 D...

Page 121: ...10 PCI_AD11 PCI_AD12 PCI_AD13 PCI_AD14 PCI_AD15 PCI_AD16 PCI_AD17 PCI_AD18 PCI_AD19 PCI_AD20 PCI_AD21 PCI_AD22 PCI_AD23 PCI_AD24 PCI_AD25 PCI_AD26 PCI_AD27 PCI_AD28 PCI_AD29 PCI_AD30 PCI_AD31 PCI_REQ2 _SLOT PCI_GNT2 _SLOT PCI_CLKOUT3_SLOT PCI_INTC _SLOT PCI_C BE0 PCI_C BE1 PCI_C BE2 PCI_C BE3 PCI_PAR PCI_SERR PCI_PERR PCI_STOP PCI_DEVSEL PCI_TRDY PCI_IRDY PCI_FRAME PCI_IDSEL PCI_AD2 PCI_AD0 PCI _I...

Page 122: ...5 571 BGA 215H25AKA13G XILLEON 225 571 BGA 4 7k 1 16W RN CP 4 7k 1 16W RN CP 0 1 16W CHIP 0 1 16W CHIP 0 1 16W CHIP 0 1 16W CHIP 0 1 16W CHIP 0 1 16W CHIP 0 1 16W CHIP 0 1 16W CHIP 0 1 16W CHIP CS4335 KSZR AUDIO DAC 0 1 16W CHIP 0 1 16W CHIP ACM2012 201 2P DVI EARTH PLATE 10P WHT PHD L 0 1 16W CHIP 100 1 16W CHIP 100 1 16W CHIP 2 2k 1 16W CHIP D3 3V TS_TO_ICES DAC_REF1 8V DAC_D1 8V D3 3V A5V DAC_A...

Page 123: ...P CHIP CHIP SML 210VTT86 RED 0 1 25V F CHIP SML 210MT T86 GREEN MA2S111 TX HS 220 22 1A 1608 0 1 25V F CHIP 10 6 3V B CHIP 100 1 16W CHIP 100 1 16W CHIP 0 1 25V F CHIP 0 1 25V F CHIP 0 1 25V F CHIP 0 1 25V F CHIP 470 1 16W CHIP 47k 1 16W CHIP 0 1 25V F CHIP 470 1 16W CHIP 470 1 16W CHIP 4 7k 1 16W CHIP 0 1 25V F CHIP 22 1 16W CHIP 22 1 16W CHIP 0 1 25V F CHIP 22 1 16W CHIP 0 1 25V F CHIP 1 2mH EL ...

Page 124: ...4 D9 1 Q8045 C 8 1 Q8046 B 9 1 Q8047 D 8 1 Q8048 C 8 1 Q8049 B 8 1 Q8050 A 7 2 Q8051 C 3 1 Q8052 D 2 1 Q8500 J 8 1 Q8501 H 2 2 Q8502 H 2 2 Q8505 H 7 1 Q8506 G 2 2 Q8507 G 6 1 Q8508 H 7 1 Q8509 H 7 1 Q8510 H 3 2 Q8511 G 3 2 Q8512 F 10 1 Q8513 I 7 1 Refer to Terminal name of semiconductors in silk screen printed circuit see page 103 TUNER FAN CONTROL AUDIO AMP 4 5 PRINTED WIRING BOARDS DIODE Side A ...

Page 125: ... 124 KDF 60XBR950 70XBR950 K RM Y914 RM Y914 A BOARD B Side A TUNER FAN CONTROL AUDIO AMP 2 3 4 5 6 7 8 9 10 A 1 B C D E F G H I J ...

Page 126: ... 125 KDF 60XBR950 70XBR950 K RM Y914 RM Y914 F AC FILTER F BOARD A Side F BOARD B Side ...

Page 127: ...Q1603 D 6 1 Q1604 D 6 1 Q1605 D 6 1 Q1606 G 2 H 5 Q1607 F 3 F 4 Q1608 F 1 2 Q1609 F 1 2 Q1610 E 1 2 DIODE Side A Side B D1602 I 5 I 2 D1607 G 3 G 4 D1608 F 6 F 2 D1612 C 3 D1613 D 4 D 3 D1618 D 4 3 D1619 D 4 3 D1620 D 3 9 D1621 B 3 9 D1622 D 4 D 3 D1623 C 5 C 2 D1624 D 6 D 2 D1625 D 5 D 2 D1626 D 2 3 D1628 B 3 3 D1631 H 1 3 D1632 B 3 3 D1633 J 3 J 4 D1634 I 4 I 3 D1635 A 4 3 D1638 B 3 3 D1639 B 3 ...

Page 128: ... 127 KDF 60XBR950 70XBR950 K RM Y914 RM Y914 G1 BOARD B Side G1 POWER SUPPLY 2 3 4 5 6 A 1 B C D E F G H I J ...

Page 129: ... 128 KDF 60XBR950 70XBR950 K RM Y914 RM Y914 G2 POWER SUPPLY ...

Page 130: ... 129 KDF 60XBR950 70XBR950 K RM Y914 RM Y914 H1 POWER SWITCH SIRCS H1 BOARD A Side H1 BOARD B Side ...

Page 131: ... 130 KDF 60XBR950 70XBR950 K RM Y914 RM Y914 H3 VIDEO 2 INPUT KEY INPUT H3 BOARD A Side H3 BOARD B Side ...

Page 132: ... 131 KDF 60XBR950 70XBR950 K RM Y914 RM Y914 H4 EEPROM H4 BOARD A Side H4 BOARD B Side ...

Page 133: ... 132 KDF 60XBR950 70XBR950 K RM Y914 RM Y914 T LAMP DOOR SWITCH T BOARD A Side T BOARD B Side ...

Page 134: ...9403 F 6 1 Q9404 E 2 2 Q9405 F 2 2 Q9406 F 2 2 Q9407 F 2 2 Q9408 E 3 2 Q9409 E 5 1 Q9410 E 5 1 Q9411 F 3 2 Q9412 E 2 2 Q9413 G 3 2 Q9414 D 3 2 Q9415 E 7 2 Q9416 E 1 1 Q9417 E 7 2 Q9418 E 1 1 Q9419 B 3 1 Q9420 F 5 2 Q9421 F 6 2 Q9422 C 2 1 Q9423 C 2 1 Q9424 F 6 2 Q9425 F 5 2 Q9426 C 2 1 Q9427 F 2 1 Q9428 C 2 1 DIODE Side A Side B D9400 E 2 3 D9401 F 4 3 D9416 B 6 3 D9425 B 6 3 D9430 E 7 3 D9431 E 7...

Page 135: ... 134 KDF 60XBR950 70XBR950 K RM Y914 RM Y914 U BOARD B Side U VIDEO INPUT 2 3 4 5 6 7 A 1 B C D E F ...

Page 136: ...ICONDUCTOR LOCATION Refer to Terminal name of semiconductors in silk screen printed circuit see page 103 IC Side A Side B IC7001 C 4 IC7002 A 5 IC7003 A 4 IC7004 B 2 IC7005 B 5 IC7006 B 4 IC7007 C 2 IC7008 C 3 IC7009 C 3 DIODE Side A Side B D7001 C 4 9 D7002 C 3 3 D7003 C 3 3 D7004 C 4 3 D7006 C 4 3 UD BOARD B Side ...

Page 137: ...7209 C7214 C7210 C7202 CN7203 CN7202 CN7201 D7207 D7210 D7208 D7203 D7204 D7205 D7206 D7201 D7202 D7209 Q7201 R7206 R7225 R7201 R7204 R7222 R7203 R7219 IC720 3 R720 7 R7 208 R721 3 C7208 FB7202 R7223 R7218 R7217 R7221 R7216 C7 215 C7 216 FB7203 R7224 3 4 1 2 CO NF TRIAL 1 688 351 11 1 722 658 11 QH BOARD A Side QH BOARD B Side Due to the complexity of this board performing component level fi eld r...

Page 138: ...306 X301 RB313 RB312 RB310 RB308 C310 C311 C333 C325 C331 C326 R319 26 9 16 IC308 JL305 JL304 JL303 C338 C332 R323 R316 R315 JL309 JL307 RB330 C315 164 A 1 A B C 2 3 4 1 A B C 2 3 4 D202 D201 C227 R223 R214 CN203 C240 R219 R218 R231 R230 R226 CN204 C241 C249 C247 R221 R220 R215 R233 RB111 R116 R111 R110 R114 C104 1 CN104 14 8 EP GW IC303 C337 R324 5 A20 R313 R312 R125 CN201 B20 CN202 A46 A40 C103 ...

Page 139: ...1 D7311 D7312 FL7300 R7522 R7523 CN7311 C7545 USB FB7315 33 34 C7432 C7450 C7433 C7431 RB7338 R7419 C7435 C7434 1 RB7344 RB7343 RB7337 C7448 66 R7413 C7447 C7437 C7436 C7364 R7402 R7401 R7400 FB7306 C7371 C7430 C7398 C7392 C7397 C7391 C7366 C7417 C7418 C7394 C7388 C7356 C7354 C7350 C7348 C7419 C7415 C7411 C7372 FB7311 FB7308 C7386 C7376 C7361 C7352 C7406 C7399 R7517 R7516 R7515 FB7310 C7368 C7508 ...

Page 140: ... JL7312 JL7313 IC7330 C7500 R7468 R7466 IC7327 C7503 R7486 R7484 R7559 Q7301 JL7321 C7504 C7502 C7499 R7483 R7476 Q7302 JL7348 JL7346 JL7347 JL7357 JL7358 JL7359 34 33 IC7324 C7459 C7465 C7458 R7415 R7414 C7469 C7462 C7461 C7460 RB7342 RB7339 C7463 12 13 14 15 66 1 RB7341 RB7340 RB7328 RB7327 RB7326 R7406 JL7315 C7466 C7464 B20 B1 A1 A20 R7380 R7367 JL7341 HS CMP OUT YOUT SD 4 1 R7560 GND GND VS 8...

Page 141: ... C7912 C7917 C792 4 C7906 C791 6 C791 4 C7929 C7909 C7904 FB79 01 FB79 00 L7902 L7903 R7928 R793 5 R7905 R792 7 R7908 R7909 R7931 R7932 R7930 TU 79 00 R794 2 JL7908 JL7902 JL7951 JL7950 JL7910 R7940 C7933 R7947 R7938 R7945 R7946 IC7904 CN790 3 R7943 R7944 R7941 C792 6 R7948 CN7902 JL791 7 R795 0 JL7916 R794 9 CN7900 JL791 2 JL791 3 JL7909 JL7901 Q7901 Q7900 JL7915 JL7911 JL7914 R7906 R 7907 C7913 ...

Page 142: ...CL IN1_1 IN1_2 IN1_3 IN1_H L1 IN1_V L2 IN1_L3 IN1_SW IN2_1 IN2_2 IN2_3 IN2_H L1 IN2_V L2 IN2_L3 IN2_SW IN3_1 IN3_2 IN3_3 IN3_H IN3_V IN4_1 IN4_2 IN4_3 IN4_H IN4_V SDA ADDRESS 15 YG_OUT 16 YG_IN 13 H_PH 14 V_PH 26 SELCB_OUT 27 SELY_OUT 25 SELCR_OUT 20 EXTCLK XTAL 22 SELH_OUT 6 GND3 12 VCC3 24 GND2 28 VCC2 48 GND1 40 VCC1 18 IREF 23 SELV_OUT INPUT_SEL TV V1 V2 V3 V4 V5 V6 8 15 30 22 60 63 1 53 6dB 6...

Page 143: ...G125DCKR 1 5Pin TDA7265 MARKING SIDE VIEW 1 11Pin TDA7296 1 15 UPC1093J 1 T 1 2 3 2SA1162 G 2SA1576A T106 R 2SA1611 M5M6 2SC1623 L5L6 2SC4081 R 2SD601A Q DTA114EKA T146 DTC114EK DTC114EU DTC143EKA T146 DTC144EKA DTC144EUA T146 E B C 2SK2663 B C E C D10SC6M 1 2 3 123 D1N20R D1NS4 RD12SB2 RD18SB2 RD3 3SB2 CATHODE ANODE D1NL20J TR CATHODE ANODE D2SB60A F04 D4SBL40 D4SBS6 F D6SB60L DAP202K M1MA152WK T...

Page 144: ...mbly 1 1 1 2 1 1 1 Les composants identifies par une trame et une marque sont critiques pour la securite Ne les remplacer que par une piece portant le numero specifie The components identified by shading and mark are critical for safety Replace only with part number specified 1 X 4042 246 1 DOOR ASSY LAMP 2 3 650 537 00 WASHER 3 X 4042 247 1 DOOR ASSY CONTROL 4 X 4042 245 1 COVER ASSY REAR 5 4 097...

Page 145: ...al for safety Replace only with part number specified 53 54 55 56 58 51 51 57 2 2 1 1 1 A block 1 1 2 2 4 4 3 52 51 4 302 404 03 SCREW WASHER HEAD P 4X16 52 1 787 081 11 FAN DC 53 A 1302 364 A F BOARD COMPLETE 54 1 500 824 11 FERRITE CORE 55 0 1 791 192 13 CORD NOISE FILTER WITH POWER 56 4 314 843 02 SCREW TAPPING 4X12 57 1 787 057 11 D C FAN 58 A 1302 365 A G1 BOARD COMPLETE 1 7 685 663 79 SCREW ...

Page 146: ...DESTAL LOCK 109 4 302 404 03 SCREW WASHER HEAD P 4X16 110 A 1606 087 A PEDESTAL BLOCK ASSY 111 4 098 574 01 PLATE FR PEDESTAL LOCK 112 4 097 517 01 HANG 113 4 098 573 01 SPRING 2 114 4 097 516 01 SUPPORT PEDESTAL LOCK 115 4 097 515 01 CASE PEDESTAL LOCK SUPPORT 116 A 1405 689 A T BOARD COMPLETE 117 1 418 257 11 FAN UNIT DC 118 4 099 086 01 PEDSTAL LOCK BRACKET 119 4 100 288 01 GUIDE SPRING 120 4 0...

Page 147: ...56 4 385 948 41 HOLDER PWB 157 A 1410 465 A G2 BOARD COMPLETE 158 A 1302 270 A U BOARD COMPLETE 159 A 1604 652 A UD BLOCK 160 4 097 480 01 TERMINAL BOARD 161 4 097 369 01 LABEL TERMINAL 162 4 097 370 01 LABEL DIGITAL TERMINAL 163 4 382 854 01 SCREW M3X8 P SW 164 3 682 691 00 NUT WASHER HEXAGON 165 1 786 183 13 SWITCH ANTENNA 166 1 557 056 31 CABLE P P 2 7 685 648 79 SCREW BVTP 3X12 TYPE2 IT 3 If i...

Page 148: ...02 202 202 204 205 201 2 2 C2 block Included in No 107 203 201 A 1410 240 A H4 BOARD COMPLETE 202 4 029 432 01 SCREW 3X12 BVWHTP 203 A 1605 991 A DIC BLOCK COMPLASSY 70XBR950 203 A 1606 015 A DIC BLOCK COMPLASSY 60XBR950 204 A 1302 366 A A BOARD COMPLETE 205 1 469 241 11 CORE FERRITE RFC 8 BK 2 7 685 648 79 SCREW BVTP 3X12 TYPE2 IT 3 ...

Page 149: ... 098 589 01 MIRROR 60XBR 265 X 4042 242 1 COVER 70 ASSY MIRROR 70XBR950 265 X 4042 258 1 COVER 60 ASSY MIRROR 60XBR950 266 4 302 404 11 SCREW WASHER HEAD P 4X16 267 4 097 505 01 COVER 70 MS 70XBR950 267 4 097 506 01 COVER 60 MS 60XBR950 268 4 097 502 01 FILTER REMOTE 269 4 098 537 01 HOLDER SIDE SCREEN 270 4 098 532 01 SCREEN FRAME BUSH 271 4 098 531 01 WASHER 4X25 272 4 098 535 01 HOLDER TOP L SC...

Page 150: ...CERAMIC CHIP 0 0022µF 10 50V C8042 1 126 933 11 ELECT 100µF 20 16V C8047 1 126 947 11 ELECT 47µF 20 35V C8048 1 126 947 11 ELECT 47µF 20 35V C8049 1 164 156 11 CERAMIC CHIP 0 1µF 25V C8050 1 126 947 11 ELECT 47µF 20 35V C8051 1 164 156 11 CERAMIC CHIP 0 1µF 25V C8052 1 164 156 11 CERAMIC CHIP 0 1µF 25V C8053 1 165 176 11 CERAMIC CHIP 0 047µF 10 16V C8054 1 115 156 11 CERAMIC CHIP 1µF 10V C8055 1 1...

Page 151: ...4 1 164 227 11 CERAMIC CHIP 0 022µF 10 25V C8595 1 126 965 91 ELECT 22µF 20 50V C8596 1 130 477 00 MYLAR 0 0033µF 20 50V C8597 1 115 339 11 CERAMIC CHIP 0 1µF 10 50V C8598 1 126 960 11 ELECT 1µF 20 50V C8599 1 136 153 00 FILM 0 01µF 5 50V C8600 1 130 477 00 MYLAR 0 0033µF 5 50V C8601 1 136 155 00 FILM 0 015µF 5 50V C8602 1 127 734 51 ELECT 4700µF 20 35V C8603 1 164 156 11 CERAMIC CHIP 0 1µF 25V C8...

Page 152: ...1 IC PQ20WZ1UJ00H IC8006 6 705 025 01 IC PQ20WZ1UJ00H IC8007 6 705 025 01 IC PQ20WZ1UJ00H IC8008 8 759 663 29 IC MM1476AF TP IC8009 6 705 025 01 IC PQ20WZ1UJ00H IC8010 8 752 072 94 IC CXA1875AM T4 IC8011 8 759 520 49 IC PQ30RV21 IC8501 6 700 393 01 IC NJW1106FC2 IC8502 8 759 578 49 IC NJM2370U10 TE2 IC8503 6 702 716 01 IC NJW1149 IC8504 8 759 584 38 IC TDA7296 IC8505 8 759 190 89 IC TDA7265 IC8507...

Page 153: ...00 0 5 1 10W R8081 1 216 847 11 METAL CHIP 150K 5 1 10W R8082 1 216 833 11 METAL CHIP 10K 5 1 10W R8083 1 216 820 11 METAL CHIP 820 5 1 10W R8084 1 216 864 11 SHORT CHIP 0 R8085 1 216 864 11 SHORT CHIP 0 R8086 1 216 864 11 SHORT CHIP 0 R8087 1 216 864 11 SHORT CHIP 0 R8088 1 216 829 11 METAL CHIP 4 7K 5 1 10W R8089 1 216 833 11 METAL CHIP 10K 5 1 10W R8091 1 216 825 11 METAL CHIP 2 2K 5 1 10W R809...

Page 154: ... METAL CHIP 120K 0 5 1 10W R8504 1 216 864 11 SHORT CHIP 0 R8505 1 216 864 11 SHORT CHIP 0 R8506 1 216 835 11 METAL CHIP 15K 5 1 10W R8507 1 216 832 11 METAL CHIP 8 2K 5 1 10W R8508 1 218 726 11 METAL CHIP 27K 0 5 1 10W R8509 1 216 832 11 METAL CHIP 8 2K 5 1 10W R8510 1 216 833 11 METAL CHIP 10K 5 1 10W R8511 1 216 845 11 METAL CHIP 100K 5 1 10W R8512 1 216 841 11 METAL CHIP 47K 5 1 10W R8513 1 21...

Page 155: ...1 216 839 11 METAL CHIP 33K 5 1 10W R8676 1 216 357 00 METAL OXIDE 4 7 5 1W R8677 1 216 837 11 METAL CHIP 22K 5 1 10W R8678 1 216 834 11 METAL CHIP 12K 5 1 10W R8679 1 216 825 11 METAL CHIP 2 2K 5 1 10W TUNER TU8001 8 598 594 10 TUNER FSS BTF FA421 TU8002 8 598 593 20 TUNER FSS BTF WA421 VIBRATOR X8500 1 577 358 21 VIBRATOR CERAMIC A 1302 364 A F BOARD COMPLETE 1 533 223 11 FUSE HOLDER 4 374 846 0...

Page 156: ... 162 970 11 CERAMIC CHIP 0 01µF 10 25V C1618 1 136 165 00 FILM 0 1µF 5 50V C1620 1 126 960 11 ELECT 1µF 20 50V C1621 1 162 970 11 CERAMIC CHIP 0 01µF 10 25V C1622 1 126 961 11 ELECT 2 2µF 20 50V C1623 1 136 479 11 FILM 0 001µF 2 100V C1624 1 126 962 11 ELECT 3 3µF 20 50V C1625 1 164 156 11 CERAMIC CHIP 0 1µF 25V C1626 1 100 309 21 ELECT CHIP 22µF 20 25V C1627 1 125 969 91 CERAMIC 680pF 10 1KV C162...

Page 157: ...RITE BEAD FB1601 1 469 869 21 FERRITE 0µH FB1602 1 469 869 21 FERRITE 0µH IC IC1601 6 703 355 01 IC MCZ3001DA IC1602 8 759 198 31 IC µPC1093J 1 T IC1603 6 704 852 01 IC MD3222N IC1604 6 704 852 01 IC MD3222N IC1606 8 759 284 06 IC PQ30RV31 IC1607 8 759 098 24 IC PQ30RV11 COIL L1605 1 412 537 31 INDUCTOR 100µH L1606 1 424 789 41 INDUCTOR 10µH L1607 1 412 525 31 INDUCTOR 10µH L1608 1 412 525 31 INDU...

Page 158: ...L CHIP 100K 5 1 10W R1690 1 216 837 11 METAL CHIP 22K 5 1 10W R1691 1 216 821 11 METAL CHIP 1K 5 1 10W R1692 1 216 295 91 SHORT CHIP 0 R1693 1 216 295 91 SHORT CHIP 0 R1694 1 216 295 91 SHORT CHIP 0 R1695 1 216 295 91 SHORT CHIP 0 R1696 1 216 864 11 SHORT CHIP 0 R1698 1 216 864 11 SHORT CHIP 0 RELAY 0RY16011 755 407 11 RELAY AC POWER TRANSFORMER 0 T1603 1 443 102 11 CONVERTER TRANSFORMER PIT A 141...

Page 159: ... 5 1 10W R6932 1 218 867 11 METAL CHIP 6 8K 0 5 1 10W R6936 1 216 821 11 METAL CHIP 1K 5 1 10W R6937 1 216 849 11 METAL CHIP 220K 5 1 10W R6941 1 216 841 11 METAL CHIP 47K 5 1 10W R6942 1 216 841 11 METAL CHIP 47K 5 1 10W R6943 1 216 809 11 METAL CHIP 100 5 1 10W R6944 1 219 759 11 METAL 1M 5 1 2W TRANSFORMER T6900 1 439 879 11 TRANSFORMER CONVERTER PIT A 1405 691 A H1 BOARD COMPLETE CAPACITOR C37...

Page 160: ...10W R3953 1 216 864 11 SHORT CHIP 0 R3954 1 216 833 11 METAL CHIP 10K 5 1 10W R3955 1 216 833 11 METAL CHIP 10K 5 1 10W Due to the complexity of this board performing component level field repairs is not recommended If service is required complete board replacement is the preferred repair method Data is provided for reference only A 1302 165 A QH BOARD COMPLETE CAPACITOR C7203 1 162 910 11 CERAMIC...

Page 161: ... 25V C703 1 164 156 11 CERAMIC CHIP 0 1µF 25V C704 1 164 156 11 CERAMIC CHIP 0 1µF 25V C705 1 164 156 11 CERAMIC CHIP 0 1µF 25V C706 1 164 156 11 CERAMIC CHIP 0 1µF 25V C707 1 164 156 11 CERAMIC CHIP 0 1µF 25V C708 1 164 156 11 CERAMIC CHIP 0 1µF 25V C709 1 162 915 11 CERAMIC CHIP 10pF 0 50pF50V C710 1 162 915 11 CERAMIC CHIP 10pF 0 50pF50V C711 1 162 915 11 CERAMIC CHIP 10pF 0 50pF50V C712 1 162 ...

Page 162: ...T CHIP 0 L703 1 781 667 22 INDUCTOR 0µH L704 1 781 667 22 INDUCTOR 0µH L705 1 781 667 22 INDUCTOR 0µH L706 1 781 667 22 INDUCTOR 0µH L707 1 781 667 22 INDUCTOR 0µH L708 1 781 667 22 INDUCTOR 0µH L801 1 414 394 11 INDUCTOR 2 2µH RESISTOR R601 1 216 801 11 METAL CHIP 22 5 1 10W R602 1 216 801 11 METAL CHIP 22 5 1 10W R603 1 216 801 11 METAL CHIP 22 5 1 10W R604 1 216 801 11 METAL CHIP 22 5 1 10W R60...

Page 163: ...X4 1005 RB713 1 234 378 21 RES NETWORK 10KX4 1005 RB714 1 234 378 21 RES NETWORK 10KX4 1005 RB715 1 234 378 21 RES NETWORK 10KX4 1005 RB716 1 234 378 21 RES NETWORK 10KX4 1005 RB801 1 234 378 21 RES NETWORK 10KX4 1005 RB802 1 234 378 21 RES NETWORK 10KX4 1005 RB803 1 234 378 21 RES NETWORK 10KX4 1005 RB804 1 234 378 21 RES NETWORK 10KX4 1005 RB814 1 234 378 21 RES NETWORK 10KX4 1005 RB815 1 234 37...

Page 164: ...56 11 CERAMIC CHIP 0 1µF 25V C7377 1 164 156 11 CERAMIC CHIP 0 1µF 25V C7378 1 164 156 11 CERAMIC CHIP 0 1µF 25V C7379 1 125 837 91 CERAMIC CHIP 1µF 10 6 3V C7380 1 164 156 11 CERAMIC CHIP 0 1µF 25V C7381 1 164 156 11 CERAMIC CHIP 0 1µF 25V C7382 1 164 156 11 CERAMIC CHIP 0 1µF 25V C7383 1 164 156 11 CERAMIC CHIP 0 1µF 25V C7384 1 125 837 91 CERAMIC CHIP 1µF 10 6 3V C7385 1 125 837 91 CERAMIC CHIP...

Page 165: ...AMIC CHIP 0 0015µF 10 50V C7496 1 162 965 11 CERAMIC CHIP 0 0015µF 10 50V C7497 1 162 965 11 CERAMIC CHIP 0 0015µF 10 50V C7498 1 164 156 11 CERAMIC CHIP 0 1µF 25V C7499 1 164 156 11 CERAMIC CHIP 0 1µF 25V C7501 1 126 395 11 ELECT CHIP 22µF 20 16V C7502 1 164 156 11 CERAMIC CHIP 0 1µF 25V C7503 1 164 156 11 CERAMIC CHIP 0 1µF 25V C7504 1 164 156 11 CERAMIC CHIP 0 1µF 25V C7506 1 117 681 11 ELECT C...

Page 166: ...3 11 METAL CHIP 10K 5 1 10W R7312 1 218 704 11 METAL CHIP 3 3K 0 5 1 10W R7313 1 218 704 11 METAL CHIP 3 3K 0 5 1 10W R7314 1 218 692 11 METAL CHIP 1K 0 5 1 10W R7315 1 216 864 11 SHORT CHIP 0 R7316 1 216 864 11 SHORT CHIP 0 R7317 1 216 809 11 METAL CHIP 100 5 1 10W R7318 1 216 837 11 METAL CHIP 22K 5 1 10W R7319 1 216 838 11 METAL CHIP 27K 5 1 10W R7320 1 216 864 11 SHORT CHIP 0 R7321 1 216 809 1...

Page 167: ...ETAL CHIP 22 5 1 10W R7460 1 216 821 11 METAL CHIP 1K 5 1 10W R7461 1 216 845 11 METAL CHIP 100K 5 1 10W R7462 1 218 690 11 METAL CHIP 820 0 5 1 10W R7463 1 218 690 11 METAL CHIP 820 0 5 1 10W R7464 1 218 708 11 METAL CHIP 4 7K 0 5 1 10W R7465 1 218 708 11 METAL CHIP 4 7K 0 5 1 10W R7466 1 216 833 11 METAL CHIP 10K 5 1 10W R7468 1 216 833 11 METAL CHIP 10K 5 1 10W R7469 1 216 837 11 METAL CHIP 22K...

Page 168: ...1005 RB7346 1 234 370 21 RES NETWORK 22X4 1005 RB7347 1 234 370 21 RES NETWORK 22X4 1005 RB7348 1 234 370 21 RES NETWORK 22X4 1005 RB7349 1 234 370 21 RES NETWORK 22X4 1005 RB7350 1 234 370 21 RES NETWORK 22X4 1005 RB7351 1 234 370 21 RES NETWORK 22X4 1005 RB7352 1 234 370 21 RES NETWORK 22X4 1005 RB7353 1 234 370 21 RES NETWORK 22X4 1005 RB7354 1 234 370 21 RES NETWORK 22X4 1005 RB7355 1 234 370 ...

Page 169: ...216 817 11 METAL CHIP 470 5 1 10W R7939 1 216 829 11 METAL CHIP 4 7K 5 1 10W R7940 1 216 817 11 METAL CHIP 470 5 1 10W R7941 1 216 805 11 METAL CHIP 47 5 1 10W R7943 1 216 805 11 METAL CHIP 47 5 1 10W R7944 1 216 805 11 METAL CHIP 47 5 1 10W R7945 1 216 809 11 METAL CHIP 100 5 1 10W R7947 1 216 864 11 SHORT CHIP 0 R7948 1 216 864 11 SHORT CHIP 0 R7949 1 216 864 11 SHORT CHIP 0 R7950 1 216 864 11 S...

Page 170: ... 964 11 ELECT 10µF 20 50V C9524 1 125 891 11 CERAMIC CHIP 0 47µF 10 10V C9525 1 125 891 11 CERAMIC CHIP 0 47µF 10 10V C9526 1 109 982 11 CERAMIC CHIP 1µF 10 10V C9527 1 126 935 11 ELECT 470µF 20 16V C9528 1 164 156 11 CERAMIC CHIP 0 1µF 25V C9529 1 125 891 11 CERAMIC CHIP 0 47µF 10 10V C9530 1 125 891 11 CERAMIC CHIP 0 47µF 10 10V C9531 1 126 964 11 ELECT 10µF 20 50V C9532 1 125 891 11 CERAMIC CHI...

Page 171: ...10W R9408 1 216 805 11 METAL CHIP 47 5 1 10W R9409 1 216 805 11 METAL CHIP 47 5 1 10W R9410 1 218 692 11 METAL CHIP 1K 0 5 1 10W R9411 1 218 692 11 METAL CHIP 1K 0 5 1 10W R9412 1 216 825 11 METAL CHIP 2 2K 5 1 10W R9413 1 216 825 11 METAL CHIP 2 2K 5 1 10W R9414 1 218 695 11 METAL CHIP 1 3K 0 5 1 10W R9415 1 216 821 11 METAL CHIP 1K 5 1 10W R9416 1 218 695 11 METAL CHIP 1 3K 0 5 1 10W R9417 1 216...

Page 172: ...5 1 10W R9525 1 216 801 11 METAL CHIP 22 5 1 10W R9526 1 216 853 11 METAL CHIP 470K 5 1 10W R9527 1 216 853 11 METAL CHIP 470K 5 1 10W R9528 1 216 801 11 METAL CHIP 22 5 1 10W R9529 1 216 821 11 METAL CHIP 1K 5 1 10W R9530 1 218 685 11 METAL CHIP 510 0 5 1 10W R9531 1 216 825 11 METAL CHIP 2 2K 5 1 10W R9532 1 216 825 11 METAL CHIP 2 2K 5 1 10W R9533 1 218 684 11 METAL CHIP 470 0 5 1 10W R9534 1 2...

Page 173: ...1 218 285 11 METAL CHIP 75 5 1 10W R9660 1 218 285 11 METAL CHIP 75 5 1 10W R9661 1 218 867 11 METAL CHIP 6 8K 0 5 1 10W R9662 1 216 827 11 METAL CHIP 3 3K 5 1 10W R9663 1 218 271 11 METAL CHIP 2K 5 1 10W R9664 1 218 271 11 METAL CHIP 2K 5 1 10W R9665 1 216 828 11 METAL CHIP 3 9K 5 1 10W R9666 1 216 828 11 METAL CHIP 3 9K 5 1 10W R9667 1 216 825 11 METAL CHIP 2 2K 5 1 10W R9668 1 218 867 11 METAL ...

Page 174: ...1µF 25V C7051 1 164 156 11 CERAMIC CHIP 0 1µF 25V C7052 1 164 156 11 CERAMIC CHIP 0 1µF 25V C7053 1 164 156 11 CERAMIC CHIP 0 1µF 25V C7056 1 126 395 11 ELECT CHIP 22µF 20 16V C7057 1 162 921 11 CERAMIC CHIP 33pF 5 50V C7058 1 164 156 11 CERAMIC CHIP 0 1µF 25V C7059 1 164 156 11 CERAMIC CHIP 0 1µF 25V C7060 1 164 156 11 CERAMIC CHIP 0 1µF 25V C7061 1 164 156 11 CERAMIC CHIP 0 1µF 25V C7062 1 164 1...

Page 175: ...0W R7111 1 216 864 11 SHORT CHIP 0 R7112 1 216 864 11 SHORT CHIP 0 R7113 1 216 864 11 SHORT CHIP 0 R7114 1 218 700 11 METAL CHIP 2 2K 0 5 1 10W R7115 1 218 700 11 METAL CHIP 2 2K 0 5 1 10W R7116 1 218 700 11 METAL CHIP 2 2K 0 5 1 10W R7117 1 218 668 11 METAL CHIP 100 0 5 1 10W R7119 1 218 668 11 METAL CHIP 100 0 5 1 10W R7121 1 216 864 11 SHORT CHIP 0 R7123 1 218 704 11 METAL CHIP 3 3K 0 5 1 10W R...

Page 176: ...KDF 60XBR950 70XBR950 K RM Y914 RM Y914 9 965 384 02 English 2005BR02 1 2005 2 Sony EMCS Corporation Ichinomiya TEC ...

Page 177: ... 2003 Sony Corporation KDF 60XBR950 KDF 70XBR950 LCD Projection TV HD Monitor Operating Instructions 4 097 520 11 2 LCD Projection TV KDF 60XBR950 KDF 70XBR950 ...

Page 178: ...panies or satellite for the use of the general public may require authorization from the broadcaster cable company and or program owner NOTIFICATION This equipment has been tested and found to comply with the limits for a Class B digital device pursuant to Part 15 of the FCC Rules These limits are designed to provide reasonable protection against harmful interference in a residential installation ...

Page 179: ... changes suddenly the picture may be blurred or show poor color In this case please wait a few hours to let the moisture evaporate before turning on the LCD Projection TV To obtain the best picture do not expose the screen to direct illumination or direct sunlight It is recommended to use spot lighting directed down from the ceiling or to cover the windows that face the screen with opaque drapery ...

Page 180: ...rmally or has been dropped 15 Apparatus shall not be exposed to dripping or splashing and no objects filled with liquids such as vases shall be placed on the apparatus Important Safeguards For your protection please read these instructions completely and keep this manual for future reference Carefully observe and comply with all warnings cautions and instructions placed on the set or described in ...

Page 181: ...ice personnel On contamination on the screen surface The screen surface has a special coating to reduce a picture displayed by reflecting If you clean the screen surface in the wrong way the screen may be damaged To clean the screen do as follows Clean the screen with a soft cloth such as the supplied cleaning cloth or a glass cleaning cloth To remove hard contamination use the supplied cleaning c...

Page 182: ...ion to grounding electrodes and requirements for the grounding electrode Antenna Grounding According to the NEC Refer to section 54 300 of Canadian Electrical Code for Antenna Grounding Lightning For added protection for this television receiver during a lightning storm or when it is left unattended and unused for long periods of time unplug it from the wall outlet and disconnect the antenna This ...

Page 183: ... with high precision technology black dots may appear or bright points of light red blue or green may appear constantly on the LCD screen This is a structural property of the LCD panel and is not a malfunction Installation If direct sunlight or other strong illumination shines on the screen part of the screen may appear white due to reflections from behind the screen This is a structural property ...

Page 184: ...Optical IN Connector 43 Using the CONTROL S Feature 44 Setting Up the LCD Projection TV Automatically 45 Using the Features Using the Remote Control 46 Programming the Remote Control 48 Using Other Equipment with Your LCD Projection TV Remote Control 50 Watching the TV 52 Using Favorite Channels 54 Using Twin View 55 Using the Freeze Function 58 Using Wide Screen Mode 59 Using the Digital Program ...

Page 185: ...ou to obtain a smooth picture movement when playing back movies or other video sources on film Twin View Using Multi Image Driver MID X Twin View allows you to watch two programs side by side with the ability to zoom in on one picture and listen to the program in the selected window You can watch pictures from two different sources 1080i 720p 480p or 480i simultaneously Memory Stick Viewer Allows ...

Page 186: ...6 9 aspect ratio Auto Wide Allows you to select the wide screen mode automatically Using This Manual We recommend that you carefully review the contents of the following three sections in the order shown to ensure that you fully understand the operation of your new LCD projection TV 1 Installing and Connecting the LCD Projection TV This section guides you through your initial setup It shows you ho...

Page 187: ...jection lamp as its light source Note the following After turning on your LCD projection TV it may take a while before the picture appears 1 minute or less When the projection lamp wears out the screen image becomes dark Replace the lamp with a new Sony XL 2100U replacement lamp not supplied Be sure to attach the lamp cover securely otherwise your LCD projection TV will not turn on For details on ...

Page 188: ...C plug if idle for more than 7 days When turning off the power Be sure to turn off the power switch on the main unit or on the remote control After turning off the power the fan will continue to blow for about two minutes Be sure to wait for several minutes after turning the power off when unplugging from the outlet or switching the breaker off When carrying the LCD Projection TV Before carrying u...

Page 189: ...ce of the lamp remains extremely hot for at least 30 minutes after the power has been turned off Do not leave the removed lamp near flammable materials or within the reach of children Do not pour water onto the removed lamp or put any object inside the lamp Doing so may cause the lamp to burst Do not put flammable materials and metal objects inside the lamp receptacle of the LCD projection TV afte...

Page 190: ... off the main power Wait at least 30 minutes to allow the lamp to cool down before replacing it Take the new lamp out of the box 3 Remove the control panel cover Do not touch the front glass of a new lamp or the glass of the lamp receptacle This may reduce picture quality or lamp life Loosen the screw in the right underneath with a coin or similar object and remove the control panel cover Push and...

Page 191: ... the surrounding parts 6 Mount the new lamp Be sure to attach the new lamp securely After it has cooled place the removed lamp into the empty box of the replacement lamp Never put the removed lamp into a plastic bag Loosen the two screws as shown in the illustration using the hex key supplied with the lamp Hold the handle and pull straight out Mount the new lamp securely into the lamp receptacle T...

Page 192: ...WER STANDBY indicator flashes for three times Consult your Sony dealer for a Sony XL 2100U replacement lamp Take great care when replacing the lamp or plugging in unplugging the connecting cords If you handle them roughly the LCD projection TV may fall or be moved and the TV stand or floor surfaces may be scratched Match the projections of the underneath of the lamp cover with the holes of the uni...

Page 193: ...plete the hookup properly Inserting Batteries into the Remote Control Insert two size AA R6 batteries supplied by matching the and on the batteries to the diagram inside the battery compartment Remove the batteries to avoid damage from possible battery leakage whenever you anticipate that the remote control will not be used for an extended period Handle the remote control with care Avoid dropping ...

Page 194: ...Do not grasp the pedestal or the front panel of the LCD projection TV otherwise these parts might break off When moving the LCD projection TV support the screen bottom with one hand while grasping the top part with the other hand as shown in the illustration below A A B A B B Do not grasp the pedestal or the front panel of the LCD projection TV ...

Page 195: ...ojection TV from Falling Down Pay special attention to children around the LCD projection TV If children should climb onto or push the LCD projection TV or its stand SU GW3 not supplied it may fall down When Installing Your LCD Projection TV Against a Wall Keep your LCD projection TV at least 10 cm 4 inches from the wall ...

Page 196: ...or KDF 70XBR950 away from your LCD projection TV and within 60 of the vertical viewing area and 130 of the horizontal viewing area Horizontal Viewing Area 65 65 65 65 65 65 min X X m approx X ft min X X m approx X ft 70 70 min X X m approx X ft min X X m approx X ft 60 60 min 2 6 m approx 8 ft 70 min 2 2 m approx 7 ft 60 30 60 60 70 70 min min X X X X m approx m approx X ft ft min X X m approx X f...

Page 197: ... controls allow access to the on screen menus without using the remote control Pressing MENU brings up the on screen menus The arrow buttons move the on screen cursor in the menus and by pressing the button selects the menu item How to open and close the front panel MENU TV VIDEO S VIDEO VIDEO MONO L AUDIO R i LINK VOL CH VIDEO 2 IN POWER PRO To open To close Push and release Continued ...

Page 198: ...ory Stick slot Memory Stick insertion slot For details see Inserting and Removing a Memory Stick on page 66 2 Memory Stick indicator When lit indicates that the Memory Stick is being read Do not remove the Memory Stick when the indicator is lit 3 POWER Press to turn on and off the LCD projection TV Rear of LCD projection TV ...

Page 199: ...to i LINK compatible devices These terminals are not intended for connection with personal computers 4 S VIDEO Front and rear Connects to the S VIDEO OUT jack of your VCR or other S VIDEO equipped video component Provides better picture quality than the VHF UHF jacks or the Video IN jack 5 VIDEO L R AUDIO Front and rear Connects to the audio and video OUT jacks on your VCR or other video component...

Page 200: ...e LCD projection TV with a remote control for another Sony product connect the CONTROL S OUT jack of the equipment to the CONTROL S IN jack on the LCD projection TV with the CONTROL S cable 9 AUDIO OUT VAR FIX L R Connects to the left and right audio inputs of your audio or video component 0 DVI HDTV VIDEO AUDIO L R VIDEO 7 IN Can accommodate a copy protected digital connection HDCP to other devic...

Page 201: ...ng on how your home receives a signal cable cable box antenna and whether or not you plan to connect a VCR If you are connecting a VCR See the connections described on pages 32 and 33 If You Are Connecting See Page Cable or Antenna Only No cable box or VCR 26 Cable Box and Cable Only Cable box unscrambles only some channels usually premium channels No VCR 28 Cable Box Only Cable box unscrambles al...

Page 202: ... ohm coaxial cable usually found in newer homes Cable Type Connect As Shown VHF Only or combined VHF UHF Cable 300 ohm twin lead cable usually found in older homes Cable Type Connect As Shown VHF Only or UHF Only or combined VHF UHF 75 ohm coaxial and 300 ohm twin lead cable found in some homes Cable Type Connect As Shown VHF and UHF 75 ohm coaxial cable Rear of LCD projection TV VHF UHF 75 ohm co...

Page 203: ...between the TV s VHF UHF and CABLE inputs It is highly recommended to connect the antenna using a 75 ohm coaxial cable to get optimum picture quality A 300 ohm twin lead cable can be easily affected by radio noise and the like resulting in signal deterioration If you use a 300 ohm twin lead cable keep it away as far as possible from the LCD projection TV Do not use an indoor antenna because it is ...

Page 204: ...on TV s CABLE input The LCD projection TV s tuner provides a better signal than the cable box Notes on Using This Connection About Using This Connection with Dual Picture Twin View etc Features With this connection you can use all the dual picture features for unscrambled channels coming directly into the LCD projection TV s CABLE input jack To Do This Do This Use the cable box Tune the LCD projec...

Page 205: ... TV to stay on the channel the cable box is set to usually channel 3 or 4 You can use the LCD projection TV s Channel Fix feature to lock in a specific channel For details see Using the Channel Menu on page 96 Switch the LCD projection TV s input between the cable box and cable Press ANT to switch back and forth between the LCD projection TV s VHF UHF scrambled channels and CABLE unscrambled input...

Page 206: ...escribed in Setting Up the LCD Projection TV Automatically on page 45 Notes on Using This Connection About Using This Connection with Dual Picture Twin View etc Features With this connection all channels come into the LCD projection TV through your cable box and only one unscrambled signal is sent to the LCD projection TV so you cannot use the dual picture features If some of your channels are scr...

Page 207: ...ION repeatedly until the SAT CABLE indicator lights up Prevent the accidental switching of TV channels When using the cable box you need the LCD projection TV to stay on the channel the cable box is set to usually channel 3 or 4 You can use the LCD projection TV s Channel Fix feature to lock in a specific channel For details see Using the Channel Menu on page 96 ...

Page 208: ...g a coaxial cable connect the VCR s OUT jack to the LCD projection TV s CABLE jack 3 Using AUDIO and S VIDEO cables connect the VCR s Audio and S Video OUT jacks to the LCD projection TV s AUDIO and S VIDEO IN jacks Coaxial cable Rear of LCD projection TV VIDEO yellow AUDIO L white AUDIO R red Cable VCR VC 810S 820S 830S not supplied S VIDEO S video cable not supplied If your VCR is not equipped w...

Page 209: ...n all channels are routed through your cable box only one signal is sent to the LCD projection TV so you cannot use the Twin View feature Disconnect all power sources before making any connections 1 Connect the CATV cable to the single input jack of the splitter 2 Use a coaxial cable to connect one of the splitter s two output jacks to the TV s CABLE jack 3 Use a coaxial cable to connect the split...

Page 210: ...ial bi directional splitter designed to work with your cable box Coaxial cable Splitter If your VCR is not equipped with S VIDEO use a VIDEO cable yellow instead of the S VIDEO cable You will not be able to change channels on the VCR Set your LCD projection TV and VCR to channel 3 or 4 depending on your cable box channel output Pressing ANT on the remote control switches between the channels comin...

Page 211: ... Rear of LCD projection TV VCR playback VCR recording VC 810S 820S 830S not supplied AUDIO R red AUDIO L white VIDEO yellow VC 810S 820S 830S not supplied To perform tape editing set the LCD projection TV to the video input intended for playback by pressing TV VIDEO on the remote control You may need to change the video input on your VCR Consult your VCR s operating manual for instructions If your...

Page 212: ...ver s AUDIO and S VIDEO OUT jacks to the LCD projection TV s AUDIO and S VIDEO IN jacks 3 Connect a coaxial cable from your cable or antenna to the LCD projection TV s VHF UHF or CABLE jack If your satellite receiver is not equipped with S VIDEO use a VIDEO cable yellow instead of the S VIDEO cable Coaxial cable Satellite receiver VC 810S 820S 830S not supplied Rear of LCD projection TV VIDEO yell...

Page 213: ...HF OUT jack to the LCD projection TV s CABLE jack 4 Using AUDIO and S VIDEO cables connect the satellite receiver s AUDIO and S VIDEO OUT jacks to the VCR s AUDIO and S VIDEO IN jacks 5 Using AUDIO and S VIDEO cables connect the VCR s AUDIO and S VIDEO OUT jacks to the LCD projection TV s AUDIO and S VIDEO IN jacks Coaxial cable Rear of LCD projection TV S VIDEO AUDIO R red AUDIO L white VIDEO yel...

Page 214: ...rectly Consult your VCR s operating manual for instructions Use TV VIDEO to select VIDEO 1 to watch satellite TV or the VCR your VCR must be turned on VHF UHF to watch cable TV If your VCR or satellite receiver is not equipped with S VIDEO use a VIDEO cable yellow instead of the S VIDEO cable ...

Page 215: ...Connecting an Audio Receiver Disconnect all power sources before making any connections Using audio cables connect the LCD projection TV s AUDIO OUT VAR FIX jacks to the audio receiver s audio LINE IN jacks Rear of LCD projection TV AUDIO L white AUDIO R red RK C310 C320 C330 not supplied Line input ...

Page 216: ...s 2 Using an audio cable connect the DVD player s Audio OUT jacks to the LCD projection TV s AUDIO IN jacks Be sure to use the same row of inputs that you used for the video connection HD DVD IN 5 or 6 The Y B Y and R Y jacks on your DVD player are sometimes labeled Y CB and CR or Y PB and PR If so connect the cables to like colors VMC 10 not supplied Rear of LCD projection TV RK C310 C320 C330 no...

Page 217: ...he LCD projection TV s S VIDEO jack If your DVD player has video component output connectors for best picture quality use the connection described on page 40 Rear of LCD projection TV S video cable not supplied DVD player RK C310 C320 C330 not supplied AUDIO R red AUDIO L white S VIDEO To take advantage of the Wide Screen modes set the TV s aspect ratio to 16 9 on your DVD player For details refer...

Page 218: ...g AUDIO and S VIDEO cables connect the camcorder s Audio and S VIDEO OUT jacks to the LCD projection TV s AUDIO and S VIDEO IN jacks If you have a mono camcorder connect its left audio output to the LCD projection TV s AUDIO L MONO jack If your camcorder is not equipped with S VIDEO use a VIDEO cable yellow instead of the S VIDEO cable MENU S VIDEO VIDEO MONO L AUDIO R VIDEO 2 IN VIDEO yellow A V ...

Page 219: ...UT jack to connect a digital audio device that is PCM Dolby digital compatible such as an audio amplifier Using an optical cable connect the device s OPTICAL IN jack to the LCD Projection TV s DIGITAL AUDIO OPTICAL OUT jack OPTICAL IN LINE OUT L AUDIO R LINE IN Optical cable Rear of LCD projection TV Audio amplifier The DIGITAL AUDIO OPTICAL OUT jack is available only when a digital TV channel is ...

Page 220: ...her Sony equipment with one remote control In addition to allowing you to control multiple devices with one remote control the CONTROL S feature allows you to always point your remote control at your LCD projection TV instead of having to point it at the other equipment which might be hidden or out of direct line of sight Rear of LCD projection TV ...

Page 221: ...D projection TV to turn on the LCD projection TV The Initial Setup screen appears 2 Move the arrow button up or down to select the desired on screen display language and press the button Start auto program now appears 3 Move the arrow button up or down to select Yes and press the button Auto Program automatically creates a list of receivable channels The Auto Setup feature does not apply for insta...

Page 222: ...ff To cancel Sleep Timer press SLEEP repeatedly until SLEEP OFF appears 5 GUIDE Press to display the digital program guide If FUNCTION is switched on SAT CABLE Press to display the program guide of your satellite program provider 6 Use with 0 9 and ENTER buttons to select digital channels for example 2 1 For details on selecting digital channels see page 60 7 PICTURE Press repeatedly to step throu...

Page 223: ...ge 104 for details on setting the time qk JUMP Press to jump back and forth between two channels The LCD projection TV alternates between the current channel and the last channel that was selected ql 0 9 and ENTER Press 0 9 to select a channel the channel changes after 3 seconds Press ENTER to select immediately w FAVORITES Displays the Favorite Channels list For details see Using Favorite Channel...

Page 224: ...aim the LCD projection TV s remote control at the equipment and press POWER that corresponds with that equipment If it responds you are done If not try using another code listed for that manufacturer Notes If more than one code number is listed try entering them one by one until you come to the correct code for your equipment If you enter a new code number the code number you previously entered at...

Page 225: ...09 306 RCA PROSCAN 304 305 308 309 311 312 313 310 329 Realistic 309 330 328 335 324 338 Sansui 314 Samsung 322 313 321 Sanyo 330 335 Scott 312 313 321 335 323 324 325 326 Sharp 327 328 Signature 2000 M Ward 338 327 SV2000 338 Sylvania 308 309 338 310 Symphonic 338 Tashiro 332 Tatung 314 336 337 Teac 314 336 338 337 Technics 309 308 Toshiba 312 311 Wards 327 328 335 331 332 Yamaha 314 330 336 337 ...

Page 226: ...mote Control on page 48 To Do This Press Activate the remote control to operate the VCR FUNCTION repeatedly until the DVD VCR indicator lights up Turn on off SAT CABLE Change channels CH Record z REC Play Stop x Fast forward M Rewind the tape m Pause X Search the picture forward or backward M or m during playback release to resume normal playback To Do This Press Activate the remote control to ope...

Page 227: ...FUNCTION repeatedly until the DVD VCR indicator lights up Turn on off SAT CABLE Play Stop x Pause X Step through different tracks of the disc M to step forward or m to step backward Step through different chapters of a video disc CH to step forward or CH to step backward To Do This Press Activate the remote control to operate the MDP FUNCTION repeatedly until the indicator of the position you prog...

Page 228: ... channel selection Press 0 9 to select an analog channel for example to select channel 10 press 1 and 0 The channel will change after 3 seconds or you can press ENTER for immediate selection For digital subchannels press 0 9 press 0 9 again and then ENTER You can also select digital channels using the digital program guide See page 60 for details 5 CH Press to scan through the channels up or down ...

Page 229: ...Skip as a Video Label in the Setup menu your LCD projection TV will skip the video input you selected see Video Label on page 103 qd DISPLAY Press to display the channel number current time and channel label if set To turn the display off press DISPLAY again qf PICTURE Press PICTURE repeatedly to directly choose one of three different video modes that best suits the program you are watching Vivid ...

Page 230: ...ites list repeat steps 4 5 To clear a Favorite Channel press V or v to highlight the channel you want to clear Press and then press RESET 7 Press MENU to exit the Menu For details on using the Channel Menu see page 96 Displaying a List of Favorite Channels 1 Press FAVORITES The Favorite Channel options appear 2 Press V or v to highlight the channel you want to watch The program of that channel app...

Page 231: ...a working channel 2 Press To cancel twin pictures Press again or press Activating the Picture Although two pictures appear on the screen at the same time only one picture is active Change the picture size by using the V or v button For an active picture you can Change channels Adjust the volume Switch the input sources from VHF UHF to cable by pressing ANT or TV VIDEO to switch the video input To ...

Page 232: ...side by side the 4 3 source appears larger Twin View does not display channels that are blocked by parental settings see page 98 Hookups that affect your ability to use Twin View If you are viewing all channels through the cable box the Twin View feature will not work The cable box only unscrambles one signal at a time so the right picture will be the same as the left picture You can watch a scram...

Page 233: ...picture if not already activated 2 Press V to enlarge the picture and v to reduce the picture To enlarge the right picture reduce the left 1 Press b to activate the right picture if not already activated 2 Press V to enlarge the picture and v to reduce the picture When you adjust the twin screen sizes the LCD projection TV memorizes the change The next time you use the Twin View function the memor...

Page 234: ...When the program information you want to capture is displayed press FREEZE 2 The LCD projection TV switches to Twin View mode and displays the frozen picture on the right while the current program continues on the left 3 To cancel and return to normal viewing press FREEZE Freeze feature is not available if you are already in Favorite Channel see page 54 or Twin View see page 55 mode Freeze Current...

Page 235: ...en keeping the original image as much as possible Normal returns the 4 3 picture to its original size Full Mode stretches the 4 3 picture horizontally only to fill the 16 9 screen Zoom Mode enlarges the 4 3 picture horizontally and vertically to an equal aspect ratio that fills the 16 9 screen Useful for watching Letterbox movies When you change channels or inputs the Screen Mode settings revert t...

Page 236: ...de 1 Tune your LCD projection TV to a digital channel by using the 0 9 and ENTER buttons 2 Press GUIDE on the LCD projection TV s remote control The digital program guide appears with the currently selected program showing in the background Analog channels are not available in this guide Program information in the guide is provided by the broadcasters As a result it may sometimes include only the ...

Page 237: ... customize the settings of the program on the currently tuned channel Digital Program Menu See Page Using the Guide Menu 61 Using the Program Options Menu 61 Using the Caption Vision Menu 62 Using the Digital Setup Menu 62 Subchannels are additional channels of programming broadcast simultaneously For example channel 4 might include three subchannels 4 1 4 2 4 3 that are showing programs at the sa...

Page 238: ...ZZ 5 XXX YYY ZZZ 6 XXX YYY ZZZ The Caption Vision menu only affects digital channels For closed captioning on analog channels see Using the Setup Menu on page 102 Option Description Add Digital Channels This option allows you to add new digital channels for the currently active antenna mode Cable or VHF UHF This option is useful if the number of digital channels that your LCD projection TV is able...

Page 239: ...stics of your LCD projection TV s digital closed captioning A preview window displays a sample as you scroll through each option Indicates factory default setting Option Description Character Size Small Standard Large Character Style Style 1 7 Style 4 Character Color None Color 1 8 White Edge Type None Raised Depressed Outline Left Shadow Right Shadow Edge Color Color 1 8 Black Background Color No...

Page 240: ...age The Memory Stick Viewer on your LCD projection TV allows you to view files that are stored on Memory Stick media You can view Digital photos JPEG files Movies MPEG1 files You can also play slide show background music using MP3 files stored on your Memory Stick For more information about handling Memory Stick media see Notes on Using Memory Stick Media on page 78 Features With the Memory Stick ...

Page 241: ... support up to 1 GB media capacity and does not support high speed transfer MagicGate copyright protection technology or access control security features File Compatibility The Memory Stick Viewer is compatible with JPEG images taken with Sony digital still cameras and MPEG1 movies taken with Sony digital cameras and camcorders In order to be viewable in the Memory Stick Viewer the files must have...

Page 242: ...ck slot as illustrated below When inserted properly it should slide in with little resistance and click into place To remove the Memory Stick see Removing a Memory Stick on page 68 Be sure to insert the Memory Stick in the correct direction If the Memory Stick is forced in the wrong way it may become damaged Insert only Memory Stick media into the Memory Stick slot Attempting to insert other objec...

Page 243: ...er as shown below To remove the Memory Stick Duo see Removing a Memory Stick on page 68 CAUTION Inserting the Memory Stick Duo incorrectly may result in permanent damage to the Memory Stick Duo and the LCD projection TV CAUTION Inserting the Memory Stick Duo into the Memory Stick slot without the adapter may result in permanent damage to the Memory Stick Duo and the LCD projection TV CAUTION Inser...

Page 244: ...ry Stick completely out of the slot Removing the Memory Stick while a file is being accessed when the Memory Stick indicator on the LCD projection TV s front panel is lit may damage the Memory Stick or its contents To protect small children from injury from Memory Stick Media remove all Memory Stick media from the LCD projection TV s Memory Stick slot and store it in a safe location when it is not...

Page 245: ...images of the files stored on the Memory Stick About the Lock and Movie Icons on the Thumbnail Images If the Memory Stick Index does not appear press the MEMORY STICK button on the remote control Thumbnails of photos and movies Memory Stick menu bar Information about the highlighted photo or movie Highlighted thumbnail Indicates the thumbnail is a movie MPEG1 file instead of a photo JPEG file Indi...

Page 246: ...page of thumbnails 1 Press v to select V 2 Press B to select 3 To go to the previous page press V To go to the next page press v Use the Memory Stick menu bar to access additional options 1 Press v to select V 2 Press B or b to select Slide Show Folder or Memory Stick 3 Press V or v to select the option you want to change For details on these options see Memory Stick Index Menu Bar Options on page...

Page 247: ...ection TV To Do This Do This Display the next or previous file on the Memory Stick Press V or v to highlight the Previous Next button Then press B to go to the previous file or b to go to the next file Hide the Photo menu bar displaying only the photo With the highlight in the Photo menu bar press v Display the hidden Photo menu bar Press V Display the Memory Stick Index again Press B or b to high...

Page 248: ...enu Options on page 76 View Zoom Pan Allows you to magnify and pan across the photo For details see Using Zoom and Pan on page 73 Rotate Allows you to rotate the photo in 90 degree increments clockwise or counterclockwise For details see Using Rotate on page 73 File Information Allows you to turn on or off the display of file information Select On or Off Protect Allows you to protect the JPEG file...

Page 249: ...ise and press To rotate counterclockwise press V or v to highlight Counterclockwise and press The photo is rotated 90 degrees each time you press To Do This Do This Zoom in increase magnification or out decrease magnification Press B or b to highlight Zoom and press Then press V to zoom in or v to zoom out To stop using Zoom press Pan left right up down You can use Pan only when the photo is magni...

Page 250: ...V or v to highlight B Play and then press Pause the movie While the movie is playing the B button changes X pause button Press V or v to highlight X Pause and then press Display the previous or next file on the Memory Stick Press V or v to highlight the Previous Next button Then press B to go to the previous file or b to go to the next file Hide the Movie menu bar displaying only the movie With th...

Page 251: ...mbnail of the currently displayed movie Slide Show Displays the Slide Show menu For details see Slide Show Menu Options on page 76 File Information Determines whether file information is displayed Select On or Off Protect Allows you to protect the MPEG1 file from any changes When an MPEG1 file is protected it cannot be deleted Select On or Off Delete Deletes the MPEG1 file from the Memory Stick Yo...

Page 252: ...List Displays a list of all available MP3 files The list is sorted in alphabetical order grouped by folder Transition Effect Allows you to select an effect to be used when advancing to the next file in the Slide Show Off Uses a quick change or cut Fade Uses a cross fade Wipe b Wipe B Wipe V Wipe v Uses a linear sweep that moves across the screen revealing the next image while covering the previous...

Page 253: ...tect Allows you to protect files from any changes When a file is protected it cannot be rotated or deleted The Protect options affect files currently shown in the Memory Stick Index Protect All Protects all files Protect None Unprotects all files File Order Allows you to change the order in which the Memory Stick files are displayed Date Order Displays files in chronological order by modification ...

Page 254: ...es If you selected the Digital Camera Folders option as described on page 77 you might want to have your digital camera s instruction manual handy in order to check how files and directories are organized for your specific model of digital camera DCF stands for Design Rules for Camera File Systems which are specifications established by the Japan Electronics and Information Technology Industries A...

Page 255: ...tal object Do not drop bend or submit Memory Stick media to external shock Do not disassemble or modify Memory Stick media Avoid getting liquid on Memory Stick media Apply labels only within the designated label area To avoid permanent damage to still image data do not use or store Memory Stick media in a location subject to High temperature such as near a heater or inside a hot car High humidity ...

Page 256: ...these devices and your digital television i LINK is a trademark of Sony Corporation and used only to designate that a product contains an IEEE 1394 connector All products with an i LINK connector may not communicate with each other Using i LINK Cables This LCD projection TV has three S400 i LINK terminals one in the front panel and two in the back panel You can use the following i LINK cables with...

Page 257: ...o either of the LCD projection TV s i LINK jacks 2 Using an A V cable connect the i LINK device s A V output jacks to the LCD projection TV s VIDEO 3 A V input jacks Before connecting this unit to i LINK compatible equipment read the instruction manual of the i LINK device to be connected Only one i LINK cable should connect the LCD projection TV and any given i LINK device Cables are often color ...

Page 258: ...ult in malfunctions To Do This Do This Set up a digital i LINK device For digital i LINK devices devices that require only the i LINK connection no setup is necessary The LCD projection TV automatically recognizes the device as soon as the connection is made Set up an i LINK device that supports an EIA 775A analog connection Connect analog A V cables to the VIDEO 3 input see page 81 Use the i LINK...

Page 259: ...n i LINK Control Panel For these devices use the remote control supplied with the device 3 Press V or v to navigate among the i LINK connected devices 4 Press to select the desired device and display the device s i LINK Control Panel Use the i LINK Control Panel to operate the selected device For details see page 84 For instructions on connecting i LINK devices see page 81 i LINK devices can be co...

Page 260: ...ess to select a desired option 4 Press EXIT to exit the Control Panel and view the i LINK device full screen The i LINK Control Panel displays the signal from the LCD projection TV to the left if available and the signal from the currently selected device to the right If i LINK is pressed while the LCD projection TV is displaying an analog or digital channel not the i LINK device then the Device L...

Page 261: ...ress V v B b to highlight and press Stop a recording from the selected i LINK digital VCR Press V v B b to highlight and press Turn the selected device power on and off Press V v B b to highlight Power and press Setup the selected device Press V v B b to highlight Setup and press For more details on Setup see page 86 Notes About Controlling i LINK Devices You can control the functions of the selec...

Page 262: ...analog signal from a selected set top box The set top box must be EIA 775A compliant and must be connected to the LCD projection TV s VIDEO 3 input To associate the device with the LCD projection TV s analog VIDEO 3 input press V or v to select to Analog Video and press All EIA 775A compliant devices will be shown in the list Select the desired device from the list and press Notes on i LINK The LC...

Page 263: ...Menu Icon Description Page Allows you to make adjustments to your picture settings It also allows you to customize the Picture Mode based on the type of program you are viewing 88 Offers enhanced audio options such as listening to second audio programming SAP or customizing the Effect of the sound on your LCD projection TV 92 Allows you to set the wide screen mode adjust the vertical center and ve...

Page 264: ...ome entertainment Pro Select to display a picture with minimum enhancements You can alter the Video menu settings Picture Brightness Color etc for each Mode You may set up a Picture Mode Vivid Standard Pro independently for each Video input Video 1 Video 7 including the Antenna input Your Picture Mode settings will automatically be saved after each selection This will enable you to customize the P...

Page 265: ...ow Off Mild Mode On Select for a natural soft picture Off Select to turn off Mild Mode Advanced Video Select Program to choose among the options described below DRC Mode Creates a high resolution picture with 4 density for high quality sources i e DVD player satellite receiver High Dens Recommended for moving pictures Progressive Recommended for still images and text CineMotion Provides an optimiz...

Page 266: ...tal video encoding and decoding process It is especially effective for watching a DVD or digital TV picture Select from High Medium Low and Off An image may not be corrected due to the connected equipment Clear White Select to emphasize the white colors Select On or Off Detail Enhancer Select to sharpen picture definition Select from High Medium Low and Off Color Corrector Select to emphasize the ...

Page 267: ...ensity by changing the red green and blue levels You can adjust these levels by selecting R Gain G Gain B Gain R Bias G Bias or B Bias To restore the factory default setting of White Balance select Initial Set Cinema Black Select to enhance the black level Select On or Off Option Description ...

Page 268: ...following options Option Description Treble Adjust to increase or decrease higher pitched sounds Bass Adjust to increase or decrease lower pitched sounds Balance Adjust to emphasize left or right speaker balance Steady Sound Auto Select to stabilize the volume Off Select to turn off Steady Sound Effect Virtual Dolby Select for Virtual Dolby surround sound for stereo programs only TruSurround Selec...

Page 269: ...n TV speakers Off Select to turn off the LCD projection TV speakers and listen to the LCD projection TV s sound only through your external audio system speakers Audio Out Easy control of volume adjustments Variable This option can be set only when the Speaker option is set to Off The LCD projection TV s speakers are turned off but the audio output from your audio system can still be controlled by ...

Page 270: ...r use WIDE MODE on the remote control Option Description Wide Mode Select a Screen Mode to use for 4 3 sources Wide Zoom Select to enlarge the 4 3 picture to fill the 16 9 screen keeping the original image as much as possible Normal Select to return the 4 3 picture to normal mode Full Select to enlarge the 4 3 picture horizontally only to fill the wide screen Zoom Select to enlarge the 4 3 picture...

Page 271: ...you to move the position of the picture up and down in the window Available only in Wide Zoom and Zoom modes Press V or v and press to choose a position between 25 and 25 ZOOM mode and 10 and 10 Wide Zoom mode Vertical Size Adjust Allows you to adjust the vertical size of the picture Available only in Wide Zoom and Zoom modes Press V or v and press to choose a correction between 7 and 7 Option Des...

Page 272: ...rite channels For details see Using Favorite Channels on page 54 Channel Fix Useful when you have a cable box or satellite receiver connected Off Turns off Channel Fix 2 6 Fix your LCD projection TV s channel setting to 2 6 and use the cable box VCR or satellite receiver to change channels Select one of these settings if you have connected the device to the VHF UHF jack C 2 6 Same as 2 6 except yo...

Page 273: ... such as station call letters to channel numbers You can label up to 40 channels 1 Press V v B b to highlight Channel and press 2 Press V or v to scroll through the channel numbers 1 125 Then press to select the channel number that you want to assign a label 3 Press V v B b to highlight Label and press 4 Press V or v to scroll through the label characters A Z 0 9 etc Then press to select the highl...

Page 274: ... the changed setting 6 Press MENU to exit the Menu Selecting Parent Options The Parent Menu includes the following options You need your password for any future access into the Parent Menu If you lose your password see Lost password on page 113 Option Description Parental Lock Turn ratings on off and select a rating system Off Parental lock is off No programs are blocked from viewing Child Maximum...

Page 275: ...m by entering the password 1 Press ENTER when tuned to a blocked program 2 Enter your password using the 0 9 buttons Parental Control will be canceled temporarily until you turn your LCD projection TV off Change Password For changing your password Select Country U S A Select to use USA ratings see page 100 Canada Select to use Canadian ratings see page 101 Option Description If you are not familia...

Page 276: ... 14 Parents Strongly cautioned TV MA Mature Audience only Content Based Options FV Fantasy Violence D Suggestive Dialogue L Strong Language S Sexual situations V Violence Unrated Block programs or movies that are broadcastwithout a rating Block Blocks all programs and movies that are broadcast without a rating Allow Allows programs and movies that are broadcast without a rating The content ratings...

Page 277: ...0 Option Description English Rating C All children C8 Children 8 years and older G General programming PG Parental Guidance 14 Viewers 14 and older 18 Adult programming French Rating G General programming 8 ans Not recommended for young children 13 ans Not recommended for ages under 13 16 ans Not recommended for ages under 16 18 ans Programming restricted to adults U S A Rating See TV Rating on pa...

Page 278: ...tion modes for programs that are broadcast with closed captioning Off Turns off Caption Vision CC1 CC2 CC3 CC4 Displays a printed version of the dialog or sound effects of a program Should be set to CC1 for most programs Text1 Text2 Text3 Text4 Displays network station information presented using either half or the whole screen if available For closed captioning set to CC1 Info Displays the progra...

Page 279: ...ot have a component connected to a particular set of input jacks Video 1 2 3 4 VHS DVD Receiver Satellite Cable Box 8mm DTV Game LD Web Beta Skip Video 5 6 7 DVD Satellite Cable Box DTV HD Game Skip If you select Skip your LCD projection TV skips this connection when you press TV VIDEO Game Picture Adjust Allows you to move the position of the picture left and right in the window Available for the...

Page 280: ...llowing options then press Program Select to set the Timer by day time duration and channel Off Select to turn off the Timer Your previous settings are saved 3 If you selected Program in step 2 press V and v to set the day s hour minute duration and channel number Press or press b to confirm each setting and move to the next setting Press B to go back to the previous setting 4 Press MENU to exit t...

Page 281: ...rned off The front panel i STANDBY i LINK standby LED lights in red The LCD projection TV uses more standby power than when this option is set to Off Off Does not allow the i LINK signal to pass through to connected i LINK devices when the LCD projection TV is turned off The front panel i STANDBY i LINK Standby LED turns off The LCD projection TV uses less standby power than when this option is se...

Page 282: ... Overview This chapter includes the following topics Topic Page Glossary 107 Contacting Sony 108 Troubleshooting 108 Flashing Indicators on the Front of the Monitor 114 Specifications 115 Optional Accessories 116 Index 117 ...

Page 283: ...ion standards in the United States such as NTSC Color the standard used in this LCD projection TV RF Radio Frequency That part of the frequency spectrum that is used to transmit TV and radio signals S VIDEO S VIDEO requires a single cable which carries the brightness luminance and color chrominance signals of the picture separately S VIDEO provides better resolution than composite video which carr...

Page 284: ... the left Twin View window but not in the right There is no Twin View window or it is just static Be sure the Twin View window is set to a video input or channel that has a signal airing You might be tuned to a video input with nothing connected to it Try cycling through the video inputs by pressing TV VIDEO Twin View cannot display anything but TV channels Try cycling through the video inputs by ...

Page 285: ... properly see page 66 Check the Filter option setting see page 77 Check the Select Contents setting see page 77 and ensure that files are either in DCF directories if Digital Camera Folders is selected see page 77 or in the currently selected folder if Select a Folder is selected see page 77 The maximum number of files the Memory Stick Viewer can display is 1 024 JPEG image displays undesirable mo...

Page 286: ...r MP3 files are played in alphabetical order according to the folder in which they are stored If you want to change the playlist order rename your files alphabetically in the order in which you want them to play Cannot see MP3 list to play music MP3 files on your Memory Stick only can be played as background music during a Slide Show see page 76 Error message is displayed No Memory Stick There is ...

Page 287: ... default setting is Auto If doubled images appear with Auto select the best value from 1 to 4 see page 105 Black box on screen You have selected a text option in the Setup Menu and no text is available See page 102 to reset Setup selections To turn off this feature set the Caption Vision option to Off If you were trying to select closed captioning select CC1 instead of Text 1 4 Black bands appear ...

Page 288: ...al speakers If the Speaker option is set to Off and the Audio Out option is set to Fixed in order to output the sound to your audio system use your audio receiver to adjust the sound see page 93 Or to use the LCD projection TV remote control set the Audio Out option to Variable To turn on the LCD projection TV speakers set the Speaker option to On see page 93 Problem Possible Remedies Cannot recei...

Page 289: ...not operate Menu If a menu option appears in gray this indicates that the menu option is not available Lost password In the password screen see page 98 enter the following master password 4357 The master password clears your previous password it cannot be used to temporarily unblock channels The i LINK STANDBY LED blinks when the signal from an i LINK device is being shown The signal from a select...

Page 290: ...t source is ready to turn on The POWER STANDBY red indicator flashes three times The lamp cover is not attached securely When you correct the POWER STANDBY indicator lights in red and the LCD projection TV enters the standby mode see page 16 The LAMP indicator flashes The lamp for the light source burns out Replace it with new one see page 13 If the LCD projection TV is not recovered after correct...

Page 291: ... EIA 861 standard and is not intended for use with personal computers Video IN 4 1 Vp p 75 ohms unbalanced sync negative S Video IN 4 Y 1 Vp p 75 ohms unbalanced sync negative C 0 286 Vp p Burst signal 75 ohms Audio IN 6 500 mVrms 100 modulation Impedance 47 kiloohms AUDIO VAR FIX OUT 1 500 mVrms at the maximum volume setting Variable 500 mVrms Fixed Impedance output 2 kiloohms CONTROL S IN 1 mini...

Page 292: ...In Use 250 W In Standby Under 1 W In i LINK Standby Under 20 W Supplied Accessories Remote Control RM Y914 AA R6 Batteries 2 supplied for remote control Cleaning Cloth 1 Optional Accessories TV Stand SU GW3 Lamp XL 2100U AV Cable VC 810S 820S 830S Component Video Cable VMC 10 30 i LINK cables VMC IL4415 4 pin to 4 pin 1 5 meters VMC IL4435 4 pin to 4 pin 3 5 meters ...

Page 293: ...d 97 Channels Auto Program 96 creating labels 97 setting up 45 Cinema Black 91 CineMotion 89 Cleaning Cloth 12 Clear White 90 Clock Timers 104 Closed caption modes 102 Color Corrector 90 Color temperature adjusting 89 Color adjusting 88 Connecting Audio receiver 39 Cable box 32 34 Cable or antenna 25 Camcorder 42 DVD player 40 41 Satellite receiver 36 38 VCR 32 35 37 Contents of box 17 CONTROL S 4...

Page 294: ... zooming photos 73 MEMORY STICK button 47 MENU button 47 Menus Audio 87 92 Channel 87 96 Parent 87 98 Screen 87 94 Setup 87 102 Video 87 88 Mild Mode 89 MODE Pro 53 88 Standard 53 88 Vivid 53 88 MTS SAP 93 Muting using 52 N NR 89 P Parental control described 9 Password changing 99 PICTURE button 46 Picture contrast adjusting 88 Picture size adjusting in Twin View 57 POWER buttons GREEN 47 POWER ST...

Page 295: ...er set current 104 Timer setting 104 Treble adjusting 92 troubleshooting 108 113 TV function button 46 TV power button 47 TV VIDEO button 47 Twin View activating a picture 55 described 9 using 55 V VCR using with TV remote control 50 with cable box connecting 33 with cable connecting 32 with satellite receiver connecting 37 Video inputs labeling 103 Video menu 87 88 Video Modes selecting 88 Viewin...

Page 296: ...Printed in U S A ...

Reviews: