Using i.LINK
81
U
s
in
g
i.
L
IN
K
Connecting i.LINK
Devices
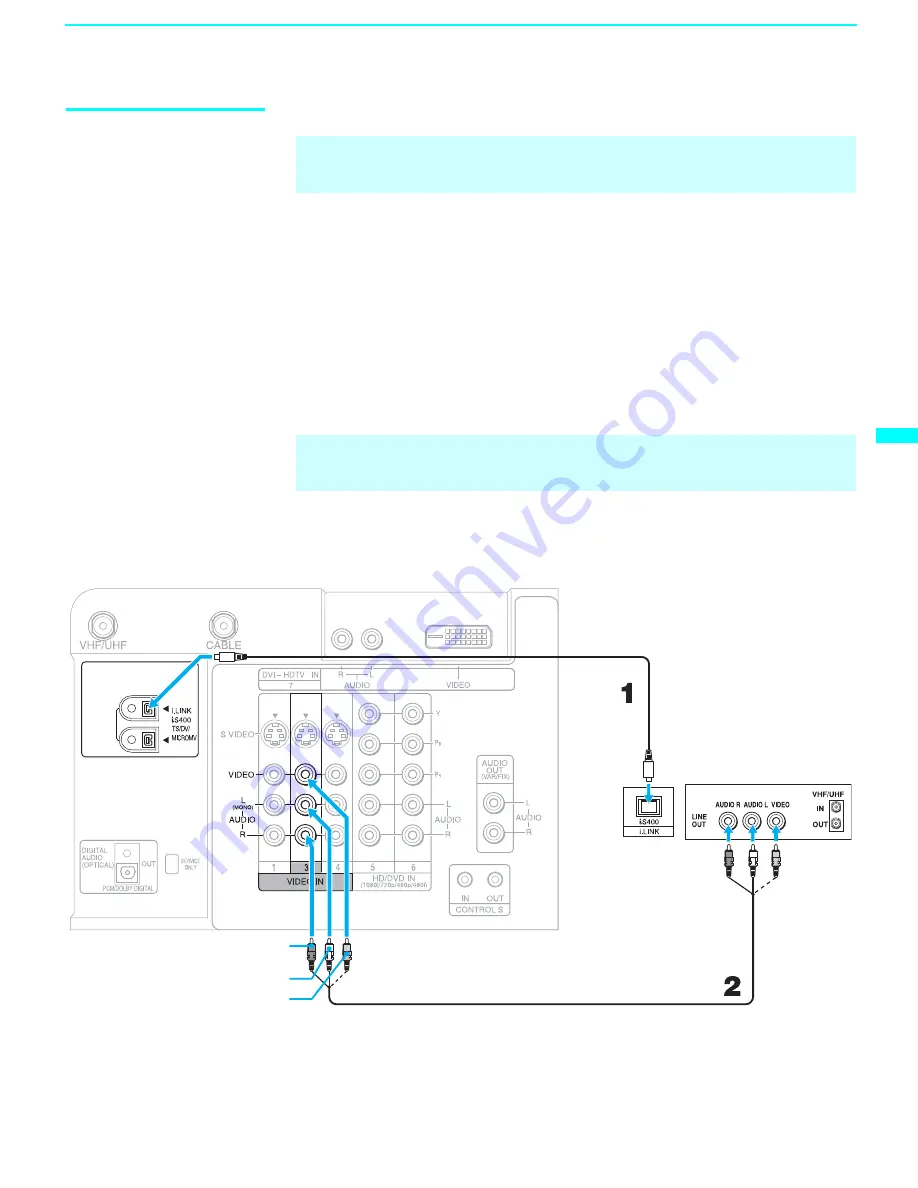
To connect a digital i.LINK device (using only a digital signal)
1
Using an i.LINK cable (see page 80), connect the device’s i.LINK jack
to either of the LCD projection TV’s i.LINK jacks.
To connect an i.LINK device that supports an EIA-775A connection
1
Using an i.LINK cable (see page 80), connect the device’s i.LINK jack
to either of the LCD projection TV’s i.LINK jacks.
2
Using an A/V cable, connect the i.LINK device's A/V output jacks to
the LCD projection TV's VIDEO 3 A/V input jacks.
✍
Before connecting this unit to i.LINK-compatible equipment, read the
instruction manual of the i.LINK device to be connected.
✍
Only one i.LINK cable should connect the LCD projection TV and any
given i.LINK device.
Cables are often
color-coded to
connectors.
Connect red to
red, white to
white.
Rear of the LCD projection TV
A/V cable (not supplied)
i.LINK
cable
i.LINK-equipped Device
VIDEO
AUDIO R
AUDIO L
(Continued)
Summary of Contents for KDF-60XBR950 - 60" Rear Projection TV
Page 23: ... 22 KDF 60XBR950 70XBR950 K RM Y914 RM Y914 MEMO ...
Page 95: ... 94 KDF 60XBR950 70XBR950 K RM Y914 RM Y914 MEMO ...
Page 126: ... 125 KDF 60XBR950 70XBR950 K RM Y914 RM Y914 F AC FILTER F BOARD A Side F BOARD B Side ...
Page 129: ... 128 KDF 60XBR950 70XBR950 K RM Y914 RM Y914 G2 POWER SUPPLY ...
Page 132: ... 131 KDF 60XBR950 70XBR950 K RM Y914 RM Y914 H4 EEPROM H4 BOARD A Side H4 BOARD B Side ...
Page 133: ... 132 KDF 60XBR950 70XBR950 K RM Y914 RM Y914 T LAMP DOOR SWITCH T BOARD A Side T BOARD B Side ...
Page 296: ...Printed in U S A ...


