25
Ge
tt
in
g
S
ta
rte
d
Step 5: Making setting adjustments before
recording
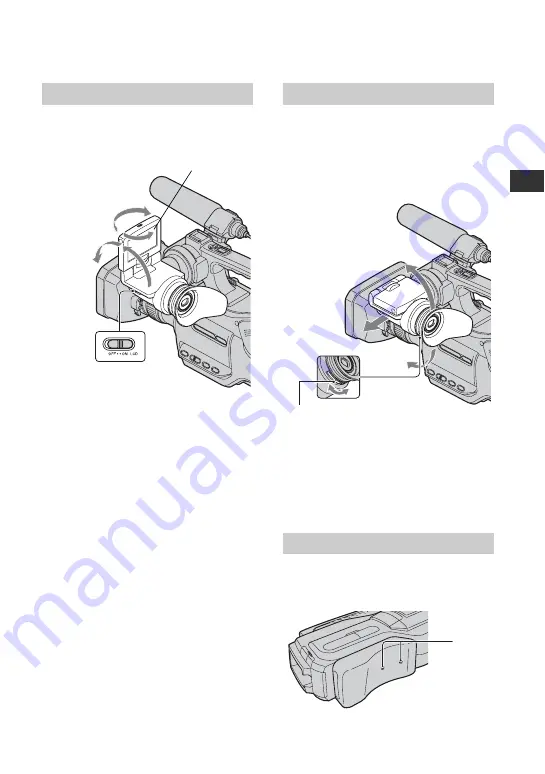
Open the LCD panel (
1
), then rotate it to
the best angle to record or play (
2
).
To turn off the LCD screen
Set the LCD ON/OFF switch to OFF. This
helps to make the battery last longer. The
recorded picture will not be affected by the
setting. To turn on the LCD screen, set the
LCD ON/OFF switch to ON.
b
Notes
• When the LCD ON/OFF switch is set to OFF,
you cannot operate the touch panel.
z
Tips
• If you rotate the LCD panel 180 degrees to the
lens side, you can close the LCD panel with the
LCD screen facing out. This is convenient
during playback operations.
• See [LCD/VF SET] - [LCD BRIGHT] (p. 61) to
adjust the brightness of the LCD screen.
• Press DISPLAY/BATT INFO to toggle the
screen indicators (such as Battery Info) on or
off.
Pull out the LCD panel block to adjust the
position (
1
), and rotate the viewfinder to
the best angle (
2
).
You can view pictures using the viewfinder
to avoid wearing down the battery, or when
the picture seen on the LCD screen is poor.
z
Tips
• You can adjust the brightness of the viewfinder
backlight by selecting [LCD/VF SET] - [VF
B.LIGHT] (p. 61).
You can adjust the position of the shoulder
pad by loosen the screws illustrated below.
Tighten the screws again after adjustment.
The LCD panel
180 degrees
(max.)
180 degrees
(max.)
1
2
90 degrees
(max.)
The viewfinder
The shoulder pad
Viewfinder lens
adjustment lever
Move it until the
picture is clear.
1
2
Screws
Summary of Contents for HD1000P
Page 116: ...116 X X V COLOR 51 100 Z ZEBRA 50 Zoom 30 Index Continued ...
Page 117: ......
Page 118: ......
Page 119: ......


