background image

Giga Pocket Personal Video Recorder

30

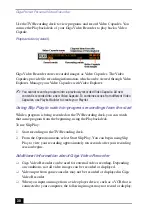
Use the TV/Recording deck to view programs and record Video Capsules. You 
can use the Playback deck of your Giga Video Recorder to play back a Video 
Capsule.

Giga Video Recorder stores recorded images as Video Capsules. The Video 
Capsules provide file recording information, which can be viewed through Video 
Explorer. Manage your Video Capsules with Video Explorer.

Using Slip Play to watch in-progress recordings from the start

While a program is being recorded on the TV/Recording deck, you can watch 
that same program from the beginning, using the Playback deck.

To use Slip Play:

1

Start recording on the TV/Recording deck.

2

From the Operation menu, select Start Slip Play. You can begin using Slip 
Play to view your recording approximately ten seconds after your recording 
session begins.

Additional information about Giga Video Recorder

Giga Video Recorder can be used for external video recording. Depending 
on conditions, not all video images can be recorded or displayed.

Video input from game consoles may not be recorded or displayed in Giga 
Video Recorder.

When you input an image from a video player device, such as a VCR that is 
connected to your computer, the following images may not record or display:

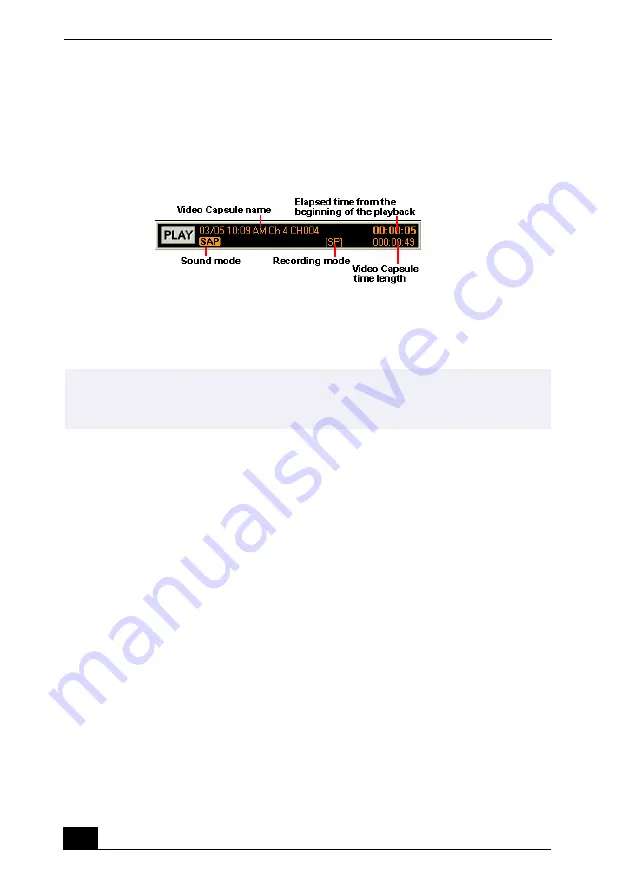
Playback deck (detail)

You cannot record a program into a previously recorded Video Capsule. All new 
content is recorded into a new Video Capsule. To combine scenes from different Video 
Capsules, use Playlist Builder to create your Playlist.

Summary of Contents for Giga Pocket

Page 1: ...Giga Pocket Personal Video Recorder Getting Started Guide ...

Page 2: ...ay infect your computer equipment or other property on account of your access to use of or browsing in any described Web site or your downloading of any materials data text images video or audio from any described Web site Web site information is obtained from various sources and may be inaccurate Copies of copyrighted information may only be made for legally permissible purposes Sony VAIO and Gig...

Page 3: ...ol Overview 12 Setting Up 15 To Set Up TV Connections 15 To Set Up Additional Equipment 21 Setting Up Giga Pocket for TV Viewing 27 Setting Up TV Viewing 27 Giga Video Recorder 29 Timer Recording Manager 32 Timer Recording Wizard 35 Video Explorer 37 Playlist Builder 40 PicoPlayer 42 CLIÉ Converter 45 Simple DVD Maker 48 Troubleshooting 51 Topics 51 Notes On Use 54 Glossary 56 Index 59 ...

Page 4: ...Giga Pocket Personal Video Recorder 4 ...

Page 5: ...aily weekly timer recording schedules Managing Video Capsules recorded video contents on your computer Recording personal video content from a videotape Playing your Video Capsules on other computers Creating custom Playlists Operating Giga Pocket functions with a remote control device remote commander Sharing Giga Pocket features and functions with other computers on a network system Accessing th...

Page 6: ... Playlists by selecting various cuts scenes from multiple recorded Video Capsules and arranging them in any desired sequences for playback PicoPlayer This optional Video Capsule player application can be attached to Video Capsules that are exported with Video Explorer You can play a Giga Pocket Video Capsule on computer systems that do not have Giga Pocket installed if such systems support PicoPla...

Page 7: ...s USB and i LINK ports to connect compatible peripheral devices i LINK is a trademark of Sony used only to designate that a product contains an IEEE1394 connection The i LINK connection may vary depending on the software applications operating system and compatible i LINK devices All products with an i LINK connection may not communicate with each other Please refer to the documentation that came ...

Page 8: ... drive access indicator light Lights in green while reading and writing data from and to a floppy disk 5 Optical drive access indicator light Lights in amber while reading and writing data from and to the optical drives 6 Hard disk drive access indicator light Lights in amber while reading and writing data from and to the hard disk 7 Power switch and indicator light Turns the computer on and off T...

Page 9: ...ive 2 11 Memory Stick media slot Reads and writes data from and to a Memory Stick media 12 Floppy disk eject button Ejects a floppy disk from the floppy disk drive 13 Universal Serial Bus USB ports 2 Connections for compatible USB devices 14 i LINK 4 pin port IEEE1394 Connection for a compatible digital device For your convenience your computer includes Giga Pocket USB and i LINK ports and jacks o...

Page 10: ...omputer Back panel 1 Mouse port Connection for a PS 2 mouse 2 Keyboard port Connection for a PS 2 Keyboard 3 Ethernet port 10Base T 100Base TX Fast Ethernet interface The port marked with Network is for LAN connections only 4 3 2 1 LINE VIDEO OUTPUT S VIDEO VIDEO AUDIO VHF UHF VIDEO 1 INPUT S VIDEO VIDEO AUDIO MONITOR KEYBOARD MOUSE PRINTER HEADPHONES MIC LINE IN USB NETWORK ACT LINK SERIAL i LINK...

Page 11: ...plied speakers or optional headphones 10 Line In jack Connection for an audio device 11 Microphone jack Connection for a microphone optional 12 Monitor port Connection for a standard CRT display 13 Audio Out jack Connection for an audio cable supplied Video S video Out port Connection for a video cable adapter supplied or an S video cable optional 14 Audio In jack Connection for an audio cable sup...

Page 12: ...a Pocket Personal Video Recorder system are controlled with the remote control supplied The remote control can start and stop video recording and playback select channels and set viewing preferences This section describes the basic functions of your remote control Remote Control Features ...

Page 13: ...he DVD player software instructions for more information SIZE button Press to view Giga Video Recorder in full screen size Press again to return the view to its original size DISPLAY button Press to display the TV Recording deck and playback deck screens Press again to hide these views 6 REW and FF buttons Press to rewind or fast forward video content while playing back video capsules PREV and NEX...

Page 14: ...AY and PAUSE buttons Press to stop playback play and pause playback of video capsules on the playback deck 15 VIDEO CAPSULE SEL DVD MENU button Press to display the Select Video Capsules window Press again to minimize the window 16 Direction and ENTER buttons Press a direction arrow to select a cabinet or video capsule in the Select Video Capsule window Press ENTER or the right direction arrow to ...

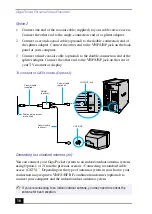
Page 15: ...nnect one end of the coaxial cable supplied to your cable service access 2 Connect the other end of the coaxial cable to the VHF UHF jack on the back panel of your computer Your VAIO Computer is supplied with certain audio and video cables Depending on your in home cable access you may require extra cables adapters or connection equipment not supplied with your computer To connect in CATV mode Opt...

Page 16: ...ing to a standard antenna air You can connect your Giga Pocket system to an indoor outdoor antenna system using Option 1 or 2 from the previous section Connecting to standard cable access CATV Depending on the type of antenna system in your home your connection may require a VHF UHF RF combiner transformer optional to connect your computer and the indoor outdoor antenna system To connect in CATV m...

Page 17: ...axial cable optional from the combiner transformer to the VHF UHF jack on the back panel of your computer To connect in standard antenna mode air Your VAIO Computer is supplied with certain audio and video cables Depending on your in home cable access you may require extra cables adapters or connection equipment not supplied with your computer 4 3 2 1 LINE TELEPHONE VIDEO OUTPUT S VIDEO VIDEO AUDI...

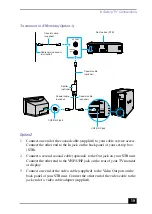
Page 18: ...k panel of your set top box STB 2 Connect a second coaxial cable optional to the Out jack on your STB Connect the other end to the single connection end of a splitter adapter optional 3 Connect a third coaxial cable optional to the double connection end of the splitter adapter Connect the other end to the VHF UHF jack on the back panel of your computer 4 Connect a fourth coaxial cable optional to ...

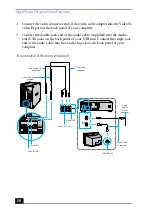
Page 19: ...play 3 Connect one end of the video cable supplied to the Video Out port on the back panel of your STB unit Connect the other end of the video cable to the jack end of a video cable adapter supplied To connect in STB mode Option 1 VHF UHF IN VHF UHF OUT 4 3 2 1 LINE TELEPHONE VIDEO OUTPUT S VIDEO VIDEO AUDIO VHF UHF VIDEO 1 INPUT S VIDEO VIDEO AUDIO MONITOR DVI Cable service access wall outlet Coa...

Page 20: ...ur STB unit Connect the single jack end of the audio cable into the Audio In jack on the back panel of your computer To connect in STB mode Option 2 VHF UHF IN VHF UHF OUT Video cable supplied Audio cable L R supplied Coaxial cable 1 supplied MIC 4 3 2 1 LINE TELEPHONE VIDEO OUTPUT S VIDEO VIDEO AUDIO VHF UHF VIDEO 1 INPUT S VIDEO VIDEO AUDIO MONITOR DVI VHF UHF jack Video cable adapter supplied A...

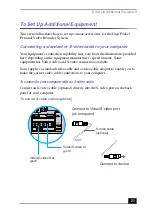
Page 21: ...video and S video connection available Sony supplies a standard video cable and a video cable adapter to enable you to make the correct video cable connections to your computer To connect to your computer with an S video cable Connect an S video cable optional directly into the S video port on the back panel of your computer To use an S video cable optional MIC 4 3 2 1 LINE TELEPHONE VIDEO OUTPUT ...

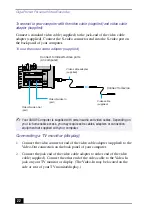
Page 22: ...apter to either end of the video cable supplied Connect the other end of the video cable to the Video In jack on your TV monitor or display The Video In may be located on the side or rear of your TV monitor display To use the video cable adapter supplied Your VAIO Computer is supplied with certain audio and video cables Depending on your in home cable access you may require extra cables adapters o...

Page 23: ...corder Your VAIO computer has both audio and video connection capability behind the bottom panel on the front of the system unit You can connect a VCR or camcorder using the audio jacks and video ports To connect an audio cable 1 Connect a dual audio cable optional to the L and R audio jacks located on the front panel of your computer 2 Connect the other ends of the dual audio cable to your VCR or...

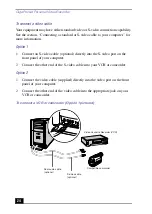
Page 24: ...rectly into the S video port on the front panel of your computer 2 Connect the other end of the S video cable into your VCR or camcorder Option 2 1 Connect the video cable supplied directly into the video port on the front panel of your computer 2 Connect the other end of the video cable into the appropriate jack on your VCR or camcorder To connect a VCR or camcorder Option 1 pictured Compatible c...

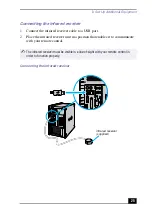
Page 25: ...he infrared receiver unit in a position that enables it to communicate with your remote control The infrared receiver must be visible in a line of sight with your remote control in order to function properly Connecting the infrared receiver KEYBOARD MOUSE PRINTER USB NETWORK ACT LINK SERIAL i LINK S400 infrared receiver supplied ...

Page 26: ...n the illustration Inserting batteries into the remote control Under normal use the AA batteries may last up to six months If your remote control does not operate properly the batteries may need to be replaced If your remote is not being used for extended periods of time remove the batteries to avoid possible damage from battery leakage ...

Page 27: ...pted to set the video input source for watching TV or cable TV CATV programs on your computer Starting Giga Pocket for TV Setup 1 Verify that the computer time and date settings as displayed in the taskbar are correct To adjust these settings right click with your mouse on the time display and a dialog box will appear 2 Click Start in the Windows taskbar select All Programs then click Giga Pocket ...

Page 28: ...r STB Ch 3 Ch 4 and so on matches the Input channel listed in the Giga Pocket TV Setup dialog box 5 Click OK The Giga Pocket TV Setup dialog box closes and you can now tune into TV programs with Giga Video Recorder Setting up your display monitor When using Giga Pocket Personal Video Recorder set your display settings as follows Colors Use the default factory settings 32 bit Screen area Set your v...

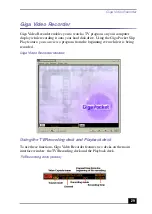
Page 29: ...disk drive Using the Giga Pocket Slip Play feature you can view a program from the beginning even while it is being recorded Using the TV Recording deck and Playback deck To use these functions Giga Video Recorder features two decks on the main interface window the TV Recording deck and the Playback deck Giga Video Recorder window TV Recording deck detail ...

Page 30: ...he TV Recording deck 2 From the Operation menu select Start Slip Play You can begin using Slip Play to view your recording approximately ten seconds after your recording session begins Additional information about Giga Video Recorder Giga Video Recorder can be used for external video recording Depending on conditions not all video images can be recorded or displayed Video input from game consoles ...

Page 31: ...resources for the timer recording event If this occurs wait until the Giga Pocket finishes recording before playing the Video Capsule The timer recording may fail due to an Event buffer of audio overflow error in the following circumstances The input cable coaxial or video cable is disconnected after recording starts You record a TV channel that has no broadcast content You record video content fr...

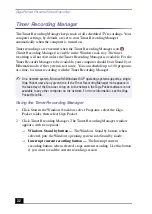
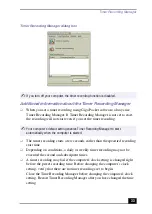
Page 32: ...ng Manager Using the Timer Recording Manager 1 Click Start in the Windows taskbar select Programs select the Giga Pocket folder then select Giga Pocket 2 Click Timer Recording Manager The Timer Recording Manager window appears with two options Windows Stand by button The Windows Stand by button when selected puts the Windows operating system into Stand by mode Interrupt current recording button Th...

Page 33: ...ng may not be executed the second and subsequent times A timer recording may fail if the computer s clock setting is changed right before the preset recording time Before changing the computer s clock setting verify that there are no timer recordings set to begin Close the Time Recording Manager before changing the computer s clock setting Restart Timer Recording Manager after you have changed the...

Page 34: ...rst computer user to log on after starting Windows XP Only the first user is able to use Giga Pocket Accessing the Giga Pocket Help file For more information about the Timer Recording Manager feature follow these steps to access the Giga Pocket Help file 1 Click Start in the Windows taskbar and select All Programs 2 Select Giga Pocket and then click Giga Pocket Help ...

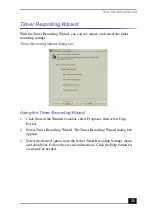
Page 35: ...g Wizard 1 Click Start in the Windows taskbar select Programs then select Giga Pocket 2 Select Timer Recording Wizard The Timer Recording Wizard dialog box appears 3 Select the desired option from the Select Timer Recording Settings menu and click Next Follow the on screen directions Click the Help button for assistance as needed Timer Recording Wizard dialog box ...

Page 36: ... seconds sooner than the set stop time Scheduled daily or weekly timer recording sessions do not occur if your hard disk drive does not have sufficient space Giga Pocket does not allow a new Video Capsule to be created if there is less than 50 MB of free space on the hard disk drive These scheduled events resume at their scheduled time as hard disk drive space becomes available Approximately three...

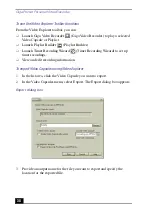
Page 37: ...using Giga Video Recorder and to play back a Playlist created using Playlist Builder You can also import AVI or MPEG files and export Video Capsules as AVI or MPEG files Using Video Explorer 1 Click Start in the Windows taskbar select Programs then select Giga Pocket 2 Click Video Explorer The Video Explorer window appears 3 Click My Cabinet to view a list of saved Video Capsules and Playlists Vid...

Page 38: ...er Playlist Builder Launch Timer Recording Wizard Timer Recording Wizard to set up timer recordings View and edit recording information To export Video Capsules using Video Explorer 1 In the list area click the Video Capsule you want to export 2 In the Video Capsules menu select Export The Export dialog box appears 3 Provide an output name for the file you want to export and specify the location f...

Page 39: ...ode can be converted and exported as MPEG1 or MPEG2 files MPEG2 files need a specific system environment for playback A VAIO computer that has Giga Pocket Personal Video Recorder installed A VAIO computer that has a DVD ROM or DVD RW drive If you wish to play your Video Capsule in a different system environment you can convert and export your Video Capsule using MPEG1 format Video capsules that ar...

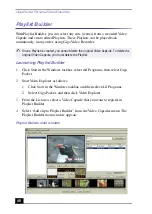
Page 40: ...then select Giga Pocket 2 Start Video Explorer as follows 1 Click Start in the Windows taskbar and then select All Programs 2 Select Giga Pocket and then click Video Explorer 3 From the List area select a Video Capsule that you want to register in Playlist Builder 4 Select Add clip to Playlist Builder from the Video Capsules menu The Playlist Builder main window appears Once a Playlist is created ...

Page 41: ...n this area film images are displayed as a roll while the clips are played back on the preview monitor Accessing the Giga Pocket Help file For more information about the Playlist Builder feature follow these steps to access the Giga Pocket Help file 1 Click Start in the Windows taskbar and select All Programs 2 Select Giga Pocket and then click Giga Pocket Help Playlist Builder does not operate pr...

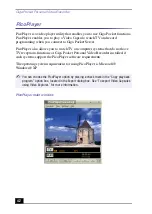
Page 42: ...atch TV on computer systems that do not have TV receptions functions or Giga Pocket Personal Video Recorder installed if such systems support the PicoPlayer software requirements The operating system requirement for using PicoPlayer is Microsoft Windows XP You can choose the PicoPlayer option by placing a check mark in the Copy playback program option box located in the Export dialog box See To ex...

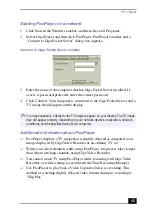
Page 43: ...ghtly delayed as compared to an image displayed by Giga Video Recorder or an ordinary TV set When you switch channels while using PicoPlayer the process takes longer than when switching channels using Giga Video Recorder You cannot watch TV using PicoPlayer while recording with Giga Video Recorder or while waiting to record with the Time Recording Manager Use PicoPlayer to play back a Video Capsul...

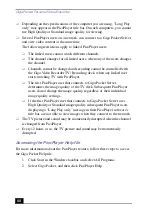
Page 44: ...first PicoPlayer user that connects to Giga Pocket Server determines the image quality of the TV deck Subsequent PicoPlayer users do not change the image quality regardless of their individual image quality settings If the first PicoPlayer user that connects to Giga Pocket Server uses High Quality or Standard image quality subsequent PicoPlayer users displaying a Long Play only message in their Pi...

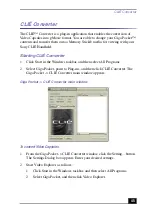
Page 45: ...n the Windows taskbar and then select All Programs 2 Select Giga Pocket point to Plug ins and then click CLIÉ Converter The Giga Pocket CLIÉ Converter main window appears To convert Video Capsules 1 From the Giga Pocket CLIÉ Converter window click the Setting button The Settings Dialog box appears Enter your desired settings 2 Start Video Explorer as follows 1 Click Start in the Windows taskbar an...

Page 46: ... The Send To dialog box appears 4 Select Using Memory Stick as the transfer destination Click OK During transfer the Forwarding dialog box appears displaying the transfer status When transfer is complete the dialog box closes Your converted video files can be played back on CLIÉ Handhelds that support the use of a Memory Stick media To convert multiple Video Capsules hold down the Ctrl key while s...

Page 47: ...then select All Programs 2 Select Giga Pocket point to Plug ins and then click CLIÉ Converter Help About the SONY CLIÉ Handheld The Sony CLIÉ Handheld personal entertainment organizers provide a rich and compelling handheld computing experience Powered by the Palm operating system the CLIÉ is ready to deliver music and video with amazing clarity For more information on this exciting device go to t...

Page 48: ... 2 Select Giga Pocket point to Plug ins and then click Simple DVD Maker The Simple DVD Maker main window appears You can quickly launch Simple DVD Maker by following these steps 1 Click Start in the Windows taskbar and then select All Programs 2 Select Giga Pocket and then click Video Explorer The Video Explorer window appears 3 Right click on the Video Capsules or Playlists you want to write to a...

Page 49: ...tes your video contents to the DVD R DVD RW media The DVD RW drive tray opens automatically when writing is complete 5 When the finish message is displayed click OK and then remove the disc Accessing the Simple DVD Maker Help file For more information about using the Simple DVD Maker application see the Simple DVD Maker Help file Follow these steps to access the Help file 1 Click Start in the Wind...

Page 50: ...Giga Pocket Personal Video Recorder 50 ...

Page 51: ...layer device The end of the film roll being played back using the scroll bar Video output from a video game console Giga Pocket cannot record or display all video images from this source Topic Why does my Giga Pocket viewing window or the images played back from a Video Capsule appear distorted or corrupted There are some situations where screen or image distortion may occur such as When you chang...

Page 52: ...it in rare instances If this should occur switch the TV Recording deck and the playback deck or try switching the channel Your timer recording continues even if the on screen display has shifted or split Topic Why did my Giga Pocket stop allowing me to create new Video Capsules You cannot create a new Video Capsule when the remaining free space on your hard disk drive reaches approximately 50 MB D...

Page 53: ...layer or Giga Video Recorder you cannot control the Giga Video Recorder TV Recording deck because it is connected to Giga Pocket Server If this is your situation You cannot change channels or control recording with Giga Video Recorder Your image quality is determined by the settings being used by the first PicoPlayer user that connects to Giga Pocket Server ...

Page 54: ...nning or your system may operate improperly Hard disk drive When the available free space on your hard disk approaches 50 MB you are not able to create a new Video Capsule Delete unnecessary Video Capsules or files in order to increase available space on your hard disk drive If you directly delete move or rename a file in the D Giga Pocket folder Giga Pocket Personal Video Recorder features may no...

Page 55: ...nnels cannot be changed and recording cannot be controlled with the Giga Video Recorder TV Recording deck when any linked user starts watching TV with PicoPlayer The first PicoPlayer user that connects to Giga Pocket Server determines the image quality of the TV deck Subsequent PicoPlayer users do not change the image quality regardless of their individual image quality settings If the first PicoP...

Page 56: ...e A single GOP is approximately 0 5 to 1 second in length Management information Management information contains the creation date of Video Capsules and their thumbnails information that is required for preview MPEG file A file that contains compressed moving pictures using the MPEG standard with mpg as the file name extension Playlist A Playlist is a collection of cuts that you can select from re...

Page 57: ... in calendar view or in the Video Explorer list area Timer recording A timer recording is a preset video recording event Video Capsule A Video Capsule is a virtual container that holds the video images recorded with Giga Pocket Recorder A Video Capsule is created on your computer hard disk drive and managed with Video Explorer For detailed information about Giga Pocket terms see the Giga Pocket He...

Page 58: ...Giga Pocket Personal Video Recorder 58 ...

Page 59: ...ial cable port 11 CRT display port location 11 Cut 56 Cut name area 41 E ethernet port location 10 Expiration date 56 F Film roll 56 Film roll area 41 floppy disk drive location 8 Front Panel 7 G Giga Pocket display settings 28 32 Giga Pocket Server 6 Giga Pocket TV setup 27 Giga Pocket multiple recording sessions 36 Giga Video Recorder 6 29 GOP 56 Group of Pictures 56 H High Quality 39 HQ 39 I i ...

Page 60: ...tion 8 printer port location 11 R Remote Control 12 S S P DIF optical out port location 11 Safety Tab 56 Serial port 11 Set top box 28 57 Simple DVD Maker 48 writing to DVD R DVD RW 49 Slip Play 30 56 Snapshot 56 SP 39 Stand by mode 56 Standard antenna 28 Standard CATV 28 Standard Play 39 STB 28 57 S video In port 9 11 S video Out port 11 T Thumbnail 57 Timer recording 57 Timer Recording Manager 6...

Page 61: ......

Page 62: ......

Page 63: ......

Page 64: ...4 658 848 11 2001 Sony Electronics Inc Printed in USA ...

Reviews: