background image

23

R

e

co

rd

in

g/

Pl

ay
bac

k

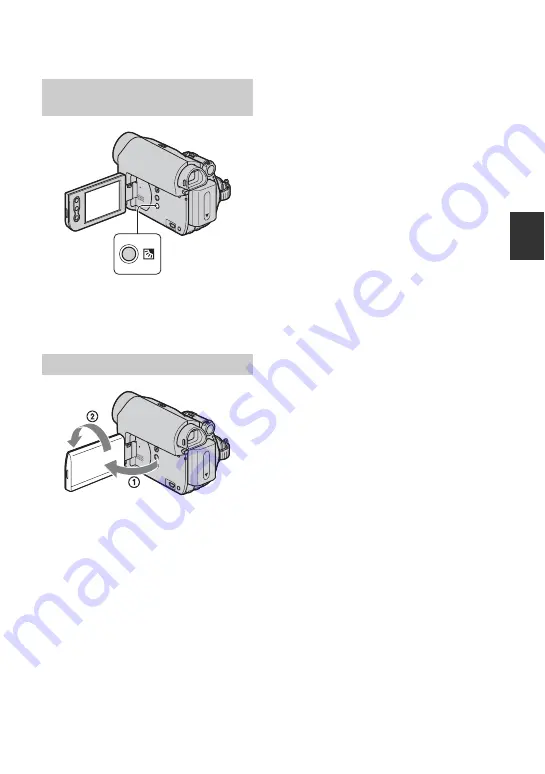
To adjust the exposure for backlit subjects, 
press 

.

 (back light) to display 

.

. To 

cancel the backlight function, press 

(back light) again.

Open the LCD panel 90 degrees to the 
camcorder (

1

), then rotate it 180 degrees 

to the lens side (

2

).

z

Tips

• A mirror-image of the subject appears on the 

LCD screen, but the image will be normal when 
recorded.

Adjusting the exposure for 
backlit subjects

Recording in mirror mode

Summary of Contents for DCR-HC52

Page 1: ...Camera Recorder Operating Guide DCR HC52 HC54 Getting Started 11 Recording Playback 19 Using the Menu 29 Dubbing Editing 44 Using a Computer 48 Troubleshooting 52 Additional Information 59 Quick Reference 69 Spanish Quick Guide Guía rápida en español 78 ...

Page 2: ... is intended to alert the user to the presence of uninsulated dangerous voltage within the product s enclosure that may be of sufficient magnitude to constitute a risk of electric shock to persons This symbol is intended to alert the user to the presence of important operating and maintenance servicing instructions in the literature accompanying the appliance WARNING ...

Page 3: ... spill liquid of any kind on the set Attachments Do not use attachments not recommended by the manufacturer as they may cause hazards Cleaning Unplug the set from the wall outlet wall socket before cleaning or polishing it Do not use liquid cleaners or aerosol cleaners Use a cloth lightly dampened with water for cleaning the exterior of the set Water and Moisture Do not use power line operated set...

Page 4: ...ls that are specified in the operating instructions Improper adjustment of other controls may result in damage and will often require extensive work by a qualified technician to restore the set to normal operation When the set exhibits a distinct change in performance this indicates a need for service Servicing Do not attempt to service the set yourself as opening or removing covers may expose you...

Page 5: ...ealer regarding this product CAUTION For customers in the U S A and CANADA Model No DCR HC52 HC54 Serial No Model No AC Serial No If you have any questions about this product you may call Sony Customer Information Center 1 800 222 SONY 7669 The number below is for the FCC related matters only Regulatory Information For customers in the U S A Declaration of Conformity Trade Name SONY Model No DCR H...

Page 6: ...nd receiver Connect the equipment into an outlet on a circuit different from that to which the receiver is connected Consult the dealer or an experienced radio TV technician for help The supplied interface cable must be used with the equipment in order to comply with the limits for a digital device pursuant to Subpart B of Part 15 of FCC Rules For the State of California USA only Perchlorate Mater...

Page 7: ...f necessary p 16 On recording Before starting to record test the recording function to make sure the picture and sound are recorded without any problems Compensation for the contents of recordings cannot be provided even if recording or playback is not possible due to a malfunction of the camcorder storage media etc TV color systems differ depending on the country region To view your recordings on...

Page 8: ...cameras and offers a quality typical of a Carl Zeiss lens MTF stands for Modulation Transfer Function The number value indicates the amount of light from a subject coming into the lens Read thid first Continued ...

Page 9: ...g END SEARCH 26 Searching manually EDIT SEARCH 26 Reviewing the most recently recorded scenes Rec review 26 Playing the picture on a TV 28 Using the menu items 29 Operation button items 30 Menu items 37 MANUAL SET menu 38 P EFFECT CAMERA SET menu 39 D ZOOM WIDE SEL STEADYSHOT etc VCR SET menu 40 AUDIO MIX LCD VF SET menu 41 LCD B L LCD COLOR VF B L etc TAPE SET menu 42 REC MODE AUDIO MODE REMAIN S...

Page 10: ...the InfoLITHIUM battery pack 61 About i LINK 62 On using your camcorder 63 Specifications 66 Identifying parts and controls 69 Indicators displayed during recording playback 72 Index 75 Additional Information Quick Reference Spanish Quick Guide Guía rápida en español 78 Table of Contents Continued ...

Page 11: ...h your camcorder The number in the parentheses indicates the number of that item supplied AC Adaptor 1 p 12 Power cord Mains lead 1 p 12 A V connecting cable 1 p 28 44 USB cable 1 DCR HC54 p 70 Rechargeable battery pack NP FH30 1 p 12 61 CD ROM Handycam Application Software 1 DCR HC54 p 48 Operating Guide This manual 1 ...

Page 12: ...efault setting 3 With the v mark on the DC plug facing down connect the AC Adaptor to the DC IN jack on your camcorder 4 Connect the power cord mains lead to the AC Adaptor and the wall outlet wall socket The CHG charge lamp lights up and charging starts The CHG charge lamp turns off when the battery is fully charged Disconnect the AC Adaptor from the DC IN jack b Notes Disconnect the AC Adaptor f...

Page 13: ...ile the approximate recordable time and battery information appear for about 7 seconds You can view the battery information for up to 20 seconds by pressing DISP BATT INFO again while the information is displayed You can check the remaining battery charge on the LCD screen Charging time Approximate time min required when you fully charge a fully discharged battery pack 2 1 POWER switch PUSH Indica...

Page 14: ...ing playback time Times measured with the camcorder at 25 C 77 F 10 C to 30 C 50 F to 86 F is recommended The recording and playback time will be shorter when you use your camcorder in low temperatures The recording and playback time will be shorter depending on the conditions under which you use your camcorder On the AC Adaptor Use the nearby wall outlet wall socket when using the AC Adaptor Disc...

Page 15: ... power Slide the POWER switch to OFF CHG To reset the date and time You can set the desired date and time by touching t PAGE2 t CLOCK SET p 29 b Notes If you do not use your camcorder for about 3 months the built in rechargeable battery gets discharged and the date and time settings may be cleared from the memory In that case charge the rechargeable battery and then set the date and time again p 6...

Page 16: ... screen displays to show messages in a specified language Touch t MENU t SETUP MENU t LANGUAGE then select the desired language Changing the language setting Step 3 Turning the power on and setting the date and time Continued ...

Page 17: ... This is convenient during playback operations See LCD BRT p 34 to adjust the brightness of the LCD screen Press DISP BATT INFO to toggle the screen indicators such as Battery Info on or off You can view pictures using the viewfinder to avoid wearing down the battery or when the picture seen on the LCD screen is poor z Tips You can adjust the brightness of the viewfinder backlight by selecting LCD...

Page 18: ... cassette compartment automatically slides back in b Notes Do not force the cassette compartment closed by pressing the portion marked while it is sliding in It may cause a malfunction 3 Close the lid To eject the cassette Open the lid following the same procedure as described in step 1 and remove the cassette z Tips The recordable time varies depending on REC MODE p 42 OPEN EJECT lever Lid Window...

Page 19: ... switch A in the direction of the arrow repeatedly to turn on the CAMERA lamp 2 Press EASY C 3 Press REC START STOP B or E to start recording During Easy Handycam operation you can only record in the SP mode Recording A B E D C Open the lens cover p 17 If the POWER switch A is set to OFF CHG slide it while pressing the green button EASY appears on the screen D A 0 00 00 REC FN GUIDE 60min The indi...

Page 20: ...r defaults automatically p 37 Cancel Easy Handycam operation if you want to add any effects or settings to the images x Unavailable button during Easy Handycam During Easy Handycam operation the back light button p 23 is unavailable Invalid during Easy Handycam operation appears if an attempted operation is not available in Easy Handycam mode Playback A C B D A GUIDE p 25 B Stop C Play Pause toggl...

Page 21: ...repeatedly to turn on the CAMERA lamp Press REC START STOP A or B To stop recording press REC START STOP A or B again Open the lens cover p 17 REC START STOP B POWER switch REC START STOP A If the POWER switch is set to OFF CHG slide it while pressing the green button STBY REC Continued ...

Page 22: ...le distance between camcorder and subject while maintaining sharp focus is about 1 cm about 13 32 in for wide angle and about 80 cm about 2 5 8 feet for telephoto z Tips You can set D ZOOM p 39 if you want to zoom to a level greater than 40 Set the NIGHTSHOT PLUS switch to ON and NIGHTSHOT PLUS appear b Notes The NightShot plus function uses infrared light Therefore do not cover the infrared port ...

Page 23: ...acklight function press back light again Open the LCD panel 90 degrees to the camcorder 1 then rotate it 180 degrees to the lens side 2 z Tips A mirror image of the subject appears on the LCD screen but the image will be normal when recorded Adjusting the exposure for backlit subjects Recording in mirror mode ...

Page 24: ...is engaged for more than 3 minutes To adjust the volume Touch t PAGE1 t VOL then to adjust the volume To search for a scene during playback Touch and hold during playback Picture Search or while fast forwarding or rewinding the tape Skip Scan z Tips You can play back in various modes V SPD PLAY p 34 If the POWER switch is set to OFF CHG slide it while pressing the green button Stop Play Pause togg...

Page 25: ...ppears Adjust the settings according to your purpose Unavailable settings during Easy Handycam During Easy Handycam operation some items are unavailable If an attempted setting is not available but still desired touch SET to display an on screen instruction Follow the instruction to cancel Easy Handycam operation and then select the setting z Tips If SET is not displayed in step 3 follow the instr...

Page 26: ...t recording while viewing the pictures on the screen The sound is not played back during the search 1 Touch t PAGE1 t MENU 2 Select CAMERA SET with then touch EXEC 3 Select EDITSEARCH with then touch EXEC 4 Select ON with then touch EXEC t 5 Touch and hold to go backward to go forward and release it at the point where you want the recording to start You can view about 2 seconds of the scene record...

Page 27: ...lect EDITSEARCH with then touch EXEC 4 Select ON with then touch EXEC t 5 Touch The last 2 seconds approx of the most recently recorded scene are played back Then your camcorder is set to standby 0 00 00 STBY 60min EDIT FN GUIDE ...

Page 28: ... white and red plugs left right audio and S VIDEO plug S VIDEO channel of an A V connecting cable In this case the yellow standard video plug connection is not necessary S VIDEO connection only will not output audio z Tips You can display the time code on the TV screen by setting DISP OUT to V OUT LCD p 43 When connecting your camcorder to a TV through a VCR Connect your camcorder to the LINE IN i...

Page 29: ...d setting then touch t Close b Notes With some settings you do not have to touch x To use menu items For details of the items see page 37 1 Touch t MENU on PAGE1 The menu index screen appears 2 Select the desired menu Touch to select the item then touch EXEC The process in step 3 and 4 is the same as that in step 2 3 Select the desired item 4 Customize the item After finishing the settings touch c...

Page 30: ...CUS 0 00 00 STBY 60min END 1 2 You can adjust the focus manually You can select this function also when you want to focus on a certain subject intentionally 1 Touch MANUAL 9 appears 2 Touch focusing on close subjects focusing on distant subjects to sharpen the focus appears when the focus cannot be adjusted any closer and appears when the focus cannot be adjusted farther away 3 Touch To adjust the...

Page 31: ... automatically record pictures effectively without the SCENE SEL function TWILIGHT Select to maintain the darkening atmosphere of the distant surroundings in twilight scenes SUNRSSUNST Sunrise Sunset Select to maintain the atmosphere of situations such as sunsets and sunrises LANDSCAPE Select to shoot distant subjects clearly This setting also prevents your camcorder from focusing on glass or meta...

Page 32: ...appears 2 Adjust the exposure by touching To return the setting to automatic exposure touch AUTO PAGE2 You can add the following effects to currently recording pictures 1 Select the desired effect in standby mode to fade in or recording mode to fade out then touch t 2 Press REC START STOP The fader indicator stops flashing and disappears when the fade is complete To cancel FADER before starting th...

Page 33: ...ons as you will shoot the subject 3 Touch flashes quickly When the white balance has been adjusted and stored in the memory the indicator stops flashing b Notes Set WHT BAL to AUTO or ONE PUSH under white or cool white fluorescent lamps When you select ONE PUSH keep framing white object while is flashing quickly flashes slowly if ONE PUSH could not be set When ONE PUSH was selected if keeps flashi...

Page 34: ... off BExposure CWhite balance DGain EShutter speed FAperture value b Notes In the DATE TIME data display the date and time are displayed in the same area If you record a picture without setting the clock and will appear During Easy Handycam operation you can set DATE TIME only See page 33 See page 15 PAGE3 You can play back in various modes while viewing movies 1 Touch the following buttons during...

Page 35: ...rate when you dub audio on a tape recorded on other camcorders including other DCR HC52 HC54 camcorders Recording sound Insert a recorded cassette into your camcorder beforehand 1 Slide the POWER switch repeatedly to turn on the PLAY EDIT lamp 2 Touch Play Pause to play back the tape then touch it again at the point where you want to start recording the sound 3 Touch t PAGE3 t A DUB CTRL t AUDIO D...

Page 36: ...T then touch to select AUDIO MIX then touch EXEC 4 Touch to adjust the balance of the original sound ST1 and the new sound ST2 then touch EXEC b Notes The original sound ST1 is output at the default setting See page 46 See page 34 REC CTRL Recording control LCD BRT LCD bright ST1 ST2 VCR SET AUDIO MIX EXEC RET Operation button items Continued ...

Page 37: ...am MANUAL SET menu p 38 P EFFECT z z OFF CAMERA SET menu p 39 D ZOOM z OFF WIDE SEL z 4 3 STEADYSHOT z ON EDITSEARCH z OFF N S LIGHT z ON VCR SET menu p 40 AUDIO MIX z LCD VF SET menu p 41 LCD B L z z BRT NORMAL LCD COLOR z z VF B L z z BRT NORMAL WIDE DISP z z TAPE SET menu p 42 REC MODE z z SP AUDIO MODE z 12BIT REMAIN z z AUTO SETUP MENU menu p 42 USB STREAM DCR HC54 z z OFF LANGUAGE z z z DEMO...

Page 38: ...ictures appear in sepia B W Pictures appear in black and white SOLARIZE Pictures appear as an illustration with strong contrast PASTEL Pictures appear as a pale pastel drawing P EFFECT Picture effect MOSAIC Pictures appear mosaic patterned b Notes Effects added to the playback pictures are not output via the DV Interface i LINK Only the original pictures can be output You cannot add effects to ext...

Page 39: ... TV for details D ZOOM Digital zoom WIDE SEL Wide select The right side of the bar shows the digital zooming factor The zooming zone appears when you select the zooming level B 4 3 Standard setting to record pictures to be played back on a 4 3 TV 16 9 WIDE Records pictures to be played back on a 16 9 wide TV in full screen mode When viewed on the LCD screen viewfinder with 16 9 WIDE selected You c...

Page 40: ...ort with your fingers or other objects p 69 Remove the conversion lens optional if it is attached The maximum shooting distance using N S LIGHT is about 3 m 10 feet z Tips If you record subjects in dark places such as night scenes or in moonlight set N S LIGHT to OFF You can make the image color deeper this way N S LIGHT NightShot Light VCR SET menu AUDIO MIX See page 36 AUDIO MIX CAMERA SET menu ...

Page 41: ...You can adjust the brightness of the viewfinder The recorded picture will not be affected by this operation B BRT NORMAL Standard brightness BRIGHT Brightens the viewfinder screen LCD B L LCD back light LCD COLOR VF B L Viewfinder back light Low intensity High intensity b Notes When you connect your camcorder to outside power sources BRIGHT is automatically selected for the setting When you select...

Page 42: ... PLAY EDIT or CAMERA with a cassette inserted When you touch Play Pause ON Always displays the remaining tape indicator SETUP MENU menu USB STREAM LANGUAGE etc See page 29 for details on selecting menu items You can view the pictures displayed on the screen of your camcorder on your computer USB Streaming via the USB cable See First Step Guide in the supplied CD ROM for details p 51 You can select...

Page 43: ...VER The camcorder is not automatically turned off b Notes When you connect your camcorder to a wall outlet wall socket A SHUT OFF is automatically set to NEVER B LCD Shows displays such as the time code on the LCD screen and in the viewfinder V OUT LCD Shows displays such as the time code on the TV screen LCD screen and in the viewfinder WORLD TIME A SHUT OFF Auto shut off DISP OUT Display output ...

Page 44: ...via the S VIDEO jack by using the A V connecting cable with an S VIDEO cable pictures can be reproduced more faithfully than with the supplied A V cable connection Connect the white and red plugs left right audio and S VIDEO plug S VIDEO channel of an A V connecting cable In this case the yellow standard video plug connection is not necessary S VIDEO connection only will not output audio C i LINK ...

Page 45: ...ith the A V connecting cable supplied 1 an A V connecting cable with S VIDEO optional 2 or an i LINK cable optional 3 Connect your camcorder to the input jacks of the recording device 4 Start playback on the camcorder and recording on the recording device Refer to the operating instructions supplied with your recording device for details 5 When dubbing is complete stop your camcorder and the recor...

Page 46: ...ted When connecting your camcorder to another device using an i LINK cable the video and audio signals are transmitted digitally producing high quality pictures and sound Note that you cannot output picture and sound separately 1 Connect your VCR etc to your camcorder with an i LINK cable 2 Insert a cassette into the VCR 3 Slide the POWER switch repeatedly to turn on the PLAY EDIT lamp 4 Set your ...

Page 47: ...ars on the LCD screen of your camcorder 6 Touch REC START at the point you want to start recording 7 Stop recording Touch Stop or REC PAUSE 8 Touch RET t b Notes The indicator appears when you connect your camcorder and other devices via an i LINK cable This indicator may also appear on the connected device ...

Page 48: ...p of your camcorder and computer and making settings to general operation the first time you use the software Picture Motion Browser stored on the CD ROM supplied Referring to Installing the First Step Guide p 49 start the First Step Guide then follow the instructions The Help guide explains all the functions of all the software applications Refer to the Help guide for further detailed operations ...

Page 49: ...roperly due to the power saving function of the PC Installing the First Step Guide and software DCR HC54 You need to install the First Step Guide and software to your Windows computer before connecting your camcorder to the computer The installation is required only for the first time Contents to be installed and procedures may differ depending on your OS 1 Confirm that your camcorder is not conne...

Page 50: ... 4 Check your country region then click Next 5 Read License Agreement select I accept the terms of the license agreement when you agree then click Next 6 Follow the on screen instructions to install the software Depending on the computer you may need to install third party software shown below If the installation screen appears follow the instructions to install the required software x Microsoft D...

Page 51: ... Picture Utility t FirstStepGuide t Your camcorder s folder t First Step Guide in HTML To view First Step Guide in HTML without installing copy the desired language folder from the FirstStepGuide folder on the CD ROM and then double click Index html Refer to the First Step Guide in PDF in the following cases When printing the desired topics of First Step Guide When First Step Guide is not displaye...

Page 52: ...do not work During Easy Handycam operation not all buttons are functional p 20 Settings change during Easy Handycam operation During Easy Handycam operation the settings of the functions that are not displayed on the screen return to their defaults p 19 37 The menu item settings have changed unexpectedly The following settings return to the default settings automatically when you set the POWER swi...

Page 53: ...tery pack has not been charged enough This is not a malfunction Fully charge the battery again If the problem persists the battery may be worn out Replace it with a new one p 12 61 A rippling effect appears on the LCD screen when you touch it This is not a malfunction Do not press hard on the LCD screen The buttons do not appear on the touch panel Touch the LCD screen lightly Press DISP BATT INFO ...

Page 54: ...t Perform END SCH p 26 Do not remove the cassette The picture will be recorded continuously without a break even when you turn the power off Do not record pictures in SP mode and LP mode on the same tape Avoid stopping then recording a movie in the LP mode END SCH does not work Do not eject the cassette after recording p 26 There is nothing recorded on the cassette There is a blank section between...

Page 55: ...o not appear Clean the head using the cleaning cassette optional p 64 No sound or only a low sound is heard Turn up the volume p 24 Adjust AUDIO MIX until the sound is heard appropriately p 36 If you are using an S VIDEO plug make sure the red and white plugs of the A V connecting cable are also connected p 28 The sound breaks off Clean the head using the cleaning cassette optional p 64 is display...

Page 56: ...ait for a while Disconnect USB devices other than the keyboard the mouse and the camcorder from the USB jack on the computer Disconnect the cable from the computer and camcorder restart the computer then connect them again correctly You cannot install the supplied software Picture Motion Browser on a Macintosh computer You can install Picture Motion Browser only on a Windows computer Depending on ...

Page 57: ...Remove the power source Reconnect it and operate your camcorder again Change the cassette Press RESET p 70 and operate your camcorder again E 61 ss E 62 ss Contact your Sony dealer or local authorized Sony service facility Inform them of the 5 digit code which starts from E E Battery level warning The battery pack is nearly used up Depending on the operating environment or battery conditions E may...

Page 58: ... Moisture condensation Eject the cassette p 63 Moisture condensation Turn off for 1H p 63 Z Reinsert the cassette p 18 Check if the cassette is damaged QZ The tape is locked check the tab p 60 Examples of warning messages Warning indicators and messages Continued ...

Page 59: ...n easily set the clock to the local time abroad by entering the time difference between where you live and where you are Select WORLD TIME in the OTHERS menu then set the time difference p 43 System Used in NTSC Bahama Islands Bolivia Canada Central America Chile Colombia Ecuador Guyana Jamaica Japan Korea Mexico Peru Surinam Taiwan the Philippines the U S A Venezuela etc PAL Australia Austria Bel...

Page 60: ...es not record copyright control signals on the tape when it records Notes on use x When not using your camcorder for a long time Remove the cassette and store it x To prevent accidental erasure Slide the write protect tab on the cassette to set it to SAVE x When labeling the cassette Be sure to place the label only on the locations shown in the following illustration so as not to cause a malfuncti...

Page 61: ...equent use of the LCD screen or a frequent playback fast forward or rewind operation wears out the battery pack faster We recommend using a large capacity battery pack NP FH70 FH100 optional Be sure to set the POWER switch to OFF CHG when not recording or playing back on your camcorder The battery pack is also consumed when your camcorder is in recording standby or playback pause Have spare batter...

Page 62: ... Sony and is a trademark approved by many corporations IEEE 1394 is an international standard standardized by the Institute of Electrical and Electronics Engineers About the i LINK Baud rate i LINK s maximum baud rate varies according to the device There are 3 types S100 approx 100Mbps S200 approx 200Mbps S400 approx 400Mbps The baud rate is listed under Specifications in the operating instruction...

Page 63: ... by a Sony dealer before operating it any further Avoid rough handling disassembling modifying physical shock or impact such as hammering dropping or stepping on the product Be particularly careful of the lens Keep the POWER switch setting to OFF CHG when you are not using your camcorder Do not wrap your camcorder with a towel for example and operate it Doing so might cause heat to build up inside...

Page 64: ...ny DVM 12CLD cleaning cassette optional Mosaic pattern noise appears on the playback picture or the screen is displayed in blue Playback pictures do not move Playback pictures do not appear or the sound breaks off x Dirty video head Use a cleaning cassette appears on the screen during recording playback The video heads will wear after long use If you cannot obtain a clear image even after using a ...

Page 65: ...e of the lens Wipe the surface of the lens clean with a soft cloth in the following instances When there are fingerprints on the lens surface In hot or humid locations When the lens is exposed to salty air such as at the seaside Store in a well ventilated location subject to little dirt or dust To prevent mold periodically clean the lens as described above It is recommended that you operate your c...

Page 66: ...e date x Procedures Connect your camcorder to a wall outlet wall socket using the supplied AC Adaptor and leave it with the POWER switch set to OFF CHG for more than 24 hours Specifications System Video recording system 2 rotary heads Helical scanning system Audio recording system Rotary heads PCM system Quantization 12 bits Fs 32 kHz stereo 1 stereo 2 16 bits Fs 48 kHz stereo Video signal NTSC co...

Page 67: ...uring camera recording using the LCD 2 1 W Operating temperature 0 C to 40 C 32 F to 104 F Storage temperature 20 C to 60 C 4 F to 140 F Dimensions approx 63 85 114 mm 2 1 2 3 3 8 4 1 2 in w h d including the projecting parts 63 85 115 mm 2 1 2 3 3 8 4 5 8 in w h d including the projecting parts with supplied battery pack NP FH30 attached Mass approx 380g 13oz main unit only 440g 15oz including th...

Page 68: ...Windows Vista and DirectX are either registered trademarks or trademarks of Microsoft Corporation in the United States and or other countries Macintosh and Mac OS are registered trademarks of Apple Inc in the U S and other countries Intel Intel Core and Pentium are trademarks or registered trademarks of Intel Corporation or its subsidiaries in the United States and other countries Adobe the Adobe ...

Page 69: ... in are reference pages A NIGHTSHOT PLUS switch 22 B Power zoom lever 22 C OPEN EJECT lever 18 D Hooks for a shoulder belt Attach a shoulder belt optional E Grip belt 17 F Lens Carl Zeiss Lens 7 G LENS COVER switch 17 H Internal stereo microphone 35 I Infrared port 22 Continued ...

Page 70: ... and time D LCD screen touch panel 17 72 E Zoom buttons 22 F REC START STOP button 19 21 G Speaker Playback sounds comes out from the speaker For how to adjust the volume see page 24 H BATT battery release PUSH button 13 I CHG charge lamp 12 J For DCR HC54 USB jack K back light button 23 Identifying parts and controls Continued ...

Page 71: ...stment lever 17 E DV interface 44 46 F DC IN jack 12 G A V Remote Connector 28 44 H CAMERA PLAY EDIT lamp 15 I REC START STOP button 19 21 J Tripod receptacle Attach the tripod optional the length of the screw must be less than 5 5 mm 7 32 in to the tripod receptacle using a tripod screw ...

Page 72: ...ding status STBY standby or REC recording D Recording Tape counter hour minute second Playback Time code hour minute second frame E Recording capacity of the tape approx 42 F Function button 29 G Guide button 25 H Tape transport indicator I Video operation buttons 24 Recording Viewing 1 2 3 4 5 6 7 1 2 8 4 5 6 7 9 ...

Page 73: ...ppears on the LCD screen 1 Touch GUIDE t DISP GUIDE 2 Touch the area including the indicator that you want to check The meanings of the indicators in the area are listed on the screen If you cannot find the indicator you want to check touch PAGE r PAGE R to toggle Indicators when you made changes Indicator Meaning AUDIO MODE 42 Indicator Meaning DV input 46 Indicator Meaning NightShot plus 22 Z Wa...

Page 74: ...74 To finish the operation touch END z Tips You can also operate by touching t DISP GUIDE Indicators displayed during recording playback Continued ...

Page 75: ...FADER 32 First Step Guide 48 51 Flexible spot meter 31 FOCUS 30 54 Frame by frame Playback 35 G Getting started 11 GUIDEFRAME 43 I INDOOR 33 InfoLITHIUM battery pack 61 Install 49 i LINK 62 i LINK cable 44 46 L LANDSCAPE 31 LANGUAGE 42 LCD 43 LCD BRT LCD bright 34 LCD B L LCD back light 41 LCD COLOR 41 LCD screen 17 LCD VF SET menu 41 LETTER BOX 41 LP Long Play 42 M MANUAL SET menu 38 Menu 29 37 M...

Page 76: ...EEZE 41 STEADYSHOT 39 54 SUNRSSUNST Sunrise Sunset 31 T Tape counter 72 TAPE SET menu 42 Time code 72 Tripod 71 TV 28 TV color systems 59 TWILIGHT 31 U USAGE GUIDE 25 USB STREAM 42 Using abroad 59 V V SPD PLAY Various speed playback 34 VCR SET menu 40 VF B L Viewfinder back light 41 VOL Volume 24 V OUT LCD 43 W Warning indicators 57 Warning messages 58 WHITE 32 WHT BAL White balance 33 WIDE DISP W...

Page 77: ...77 Quick Reference ...

Page 78: ...ideocámara contiene los siguientes elementos El número entre paréntesis indica la cantidad del elemento Adaptador de alimentación de ca 1 Cable de alimentación 1 Cable de conexión de A V 1 Cable USB 1 DCR HC54 Batería recargable NP FH30 1 CD ROM Handycam Application Software 1 DCR HC54 Guía de operaciones este manual 1 ...

Page 79: ... lugar 2 2 Deslice el interruptor POWER en la dirección de la flecha hasta la posición OFF CHG ajuste predeterminado 3 Conecte el adaptador de alimentación de ca en la toma de entrada de cc de la videocámara con la marca v de la clavija de cc hacia abajo 4 Conecte el cable de alimentación al adaptador de alimentación de ca y al tomacorriente de pared 1 2 4 3 1 2 Batería Toma de entrada de cc Al to...

Page 80: ...ue completamente la batería antes de guardarla durante un período prolongado Para comprobar la carga restante de la batería información sobre la batería Ajuste el interruptor POWER en la posición OFF CHG y a continuación presione DISP BATT INFO Transcurridos unos instantes se mostrará el tiempo de grabación aproximado y la información de la batería durante aproximadamente 7 s segundo Puede ver la ...

Page 81: ...ientes situaciones La batería no está correctamente conectada La batería está dañada La batería está completamente gastada sólo para la información sobre la batería No se suministrará energía de la batería mientras el adaptador de alimentación de ca esté conectado a la toma de entrada de cc de la videocámara incluso cuando el cable de alimentación esté desconectado del tomacorriente de pared Acerc...

Page 82: ...aptador de alimentación de ca corriente doméstica mientras esté conectada a la toma de pared mediante el adaptador de alimentación de ca Paso 3 Activación de la alimentación y ajuste de la fecha y hora Ajuste la fecha y la hora cuando use la videocámara por primera vez De lo contrario la pantalla AJ RELOJ aparecerá cada vez que encienda la videocámara o cambie la posición del interruptor POWER 1 D...

Page 83: ...ustes de la fecha y la hora se borren de la memoria En ese caso cargue la batería recargable y ajuste la fecha y la hora nuevamente Con el fin de ahorrar energía de la batería cuando se adquiere la videocámara ésta viene ajustada para apagarse automáticamente si se deja encendida sin realizar ninguna operación durante unos 5 min minuto APAG AUTO z Sugerencias Durante la grabación no se visualizará...

Page 84: ...conveniente durante operaciones de reproducción Consulte BRIL LCD para ajustar el brillo de la pantalla LCD Presione DISP BATT INFO para activar o desactivar los indicadores que aparecen en pantalla como la información de la batería Puede ver imágenes utilizando el visor para evitar el desgaste de la batería o cuando la imagen en la pantalla LCD es mala z Sugerencias Para ajustar el brillo de la l...

Page 85: ...rtimiento del videocasete se desliza automáticamente hacia adentro b Notas No fuerce el compartimiento del videocasete presionando la parte con la marca mientras se desliza hacia adentro Podría provocar una falla de funcionamiento 3 Cierre la tapa Para expulsar el videocasete Siga el mismo procedimiento descrito en el paso 1 para abrir la tapa y a continuación extraiga el videocasete z Sugerencias...

Page 86: ...r CAMERA Presione REC START STOP A o B Para detener la grabación presione REC START STOP A o B nuevamente Abra la cubierta del objetivo REC START STOP B Interruptor POWER REC START STOP A Si el interruptor POWER está en la posición OFF CHG deslícelo mientras presiona el botón verde GUÍA GUÍA ESPERA GRAB ESPERA GRAB ...

Page 87: ...ante más de 3 min minuto Para ajustar el volumen Toque t PÁG 1 t VOL y a continuación para ajustar el volumen Para buscar una escena durante la reproducción Mantenga presionado durante la reproducción búsqueda de imágenes o mientras avanza rápidamente o rebobina la cinta exploración con salto z Sugerencias Puede reproducir en diversos modos REP VEL V Si el interruptor POWER está en la posición OFF...

Page 88: ...http www sony net Printed in Japan Additional information on this product and answers to frequently asked questions can be found at our Customer Support Website US ...

Reviews: