background image

5

 GB

Start-up Guide

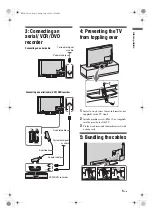
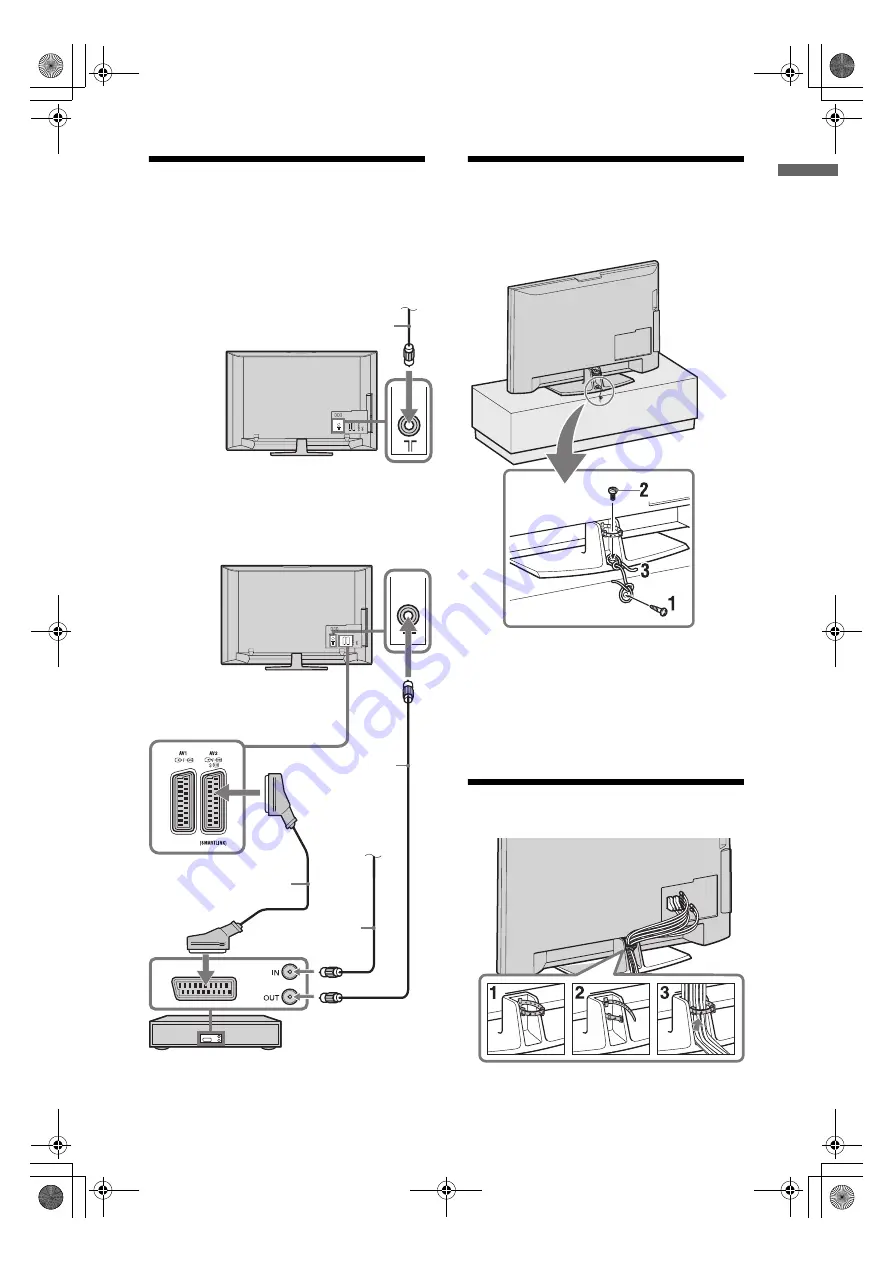
3: Connecting an 
aerial/ VCR/ DVD 
recorder

4: Preventing the TV 

from toppling over

1

Install a wood screw (4 mm in diameter, not 
supplied) in the TV stand.

2

Install a machine screw (M6 x 12, not supplied) 
into the screw hole of the TV.

3

Tie the wood screw and the machine screw with 
a strong cord.

5: Bundling the cables

Connecting an aerial/cable

Connecting an aerial/ cable/ VCR/ DVD recorder

Coaxial cable

Scart lead

VCR/ DVD recorder

Coaxial cable

Coaxial cable

Terrestrial signal

or cable

Terrestrial signal

or cable

010COV.book  Page 5  Friday, July 4, 2008  12:56 PM

Summary of Contents for BRAVIA 4-114-592-11(1)

Page 1: ...poration 4 114 592 11 1 U LCD Digital Colour TV Operating Instructions KDL 37S40xx KDL 32S40xx KDL 26S40xx KDL 37U40xx KDL 32U40xx KDL 26U40xx KDL 37V40xx KDL 37V42xx KDL 32V40xx KDL 32V42xx KDL 26V40xx KDL 26V42xx 000COV_0mm 110 m indd 1 000COV_0mm 110 m indd 1 03 07 2008 11 39 29 03 07 2008 11 39 29 ...

Page 2: ...ttery this battery should be replaced by qualified service staff only To ensure that the battery will be treated properly hand over the product at end of life to the applicable collection point for the recycling of electrical and electronic equipment For all other batteries please view the section on how to remove the battery from the product safely Hand the battery over to the applicable collecti...

Page 3: ... connected equipment 17 Using Control for HDMI 18 Navigating through menus 19 Picture Adjustment menu 20 Sound Adjustment menu 21 Features menu 22 Set up menu 23 Digital Set up menu 26 Specifications 28 Troubleshooting 30 Start up Guide 4 Watching TV Using Optional Equipment Using MENU Functions Additional Information GB for digital channels only Before operating the TV please read the Safety info...

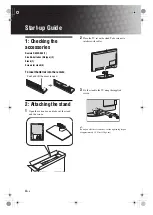
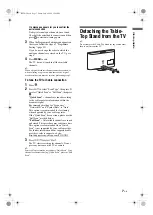
Page 4: ...g the stand 1 Open the carton box and take out the stand and the screws 2 Place the TV set on the stand Take care not to interfere with cables 3 Fix the stand to the TV using the supplied screws If using an electric screwdriver set the tightening torque at approximately 1 5 N m 15 kgf cm Push and lift the cover to open 010COV book Page 4 Friday July 4 2008 12 56 PM ...

Page 5: ...e screw M6 x 12 not supplied into the screw hole of the TV 3 Tie the wood screw and the machine screw with a strong cord 5 Bundling the cables Connecting an aerial cable Connecting an aerial cable VCR DVD recorder Coaxial cable Scart lead VCR DVD recorder Coaxial cable Coaxial cable Terrestrial signal or cable Terrestrial signal or cable 010COV book Page 5 Friday July 4 2008 12 56 PM ...

Page 6: ...e for power saving This option selects the initial picture mode appropiate for the typical lighting condition in these enviroments 7 Auto tuning the TV 1 Press 2 Press F f to select Antenna or Cable then press If you select Cable the screen for selecting the scan type appears See To tune the TV for Cable connection page 7 The TV starts searching for all available digital channels followed by all a...

Page 7: ...nnels are tuned according to the cable operator information within the broadcast signal Recommended setting for Frequency Network ID and Symbol Rate is Auto This option is recommended for fast tuning when supported by your cable operator If the Quick Scan does not tune please use the Full Scan method below Full Scan All available channels are tuned and stored This procedure may take some time This...

Page 8: ...V set for repair or when moving pack it using the original carton and packing material Ventilation s Never cover the ventilation holes or insert anything in the cabinet s Leave space around the TV set as shown below s It is strongly recommended that you use a Sony wall mount bracket in order to provide adequate air circulation Installed on the wall Installed with stand s To ensure proper ventilati...

Page 9: ... or during long period of time strains your eyes s When using headphones adjust the volume so as to avoid excessive levels as hearing damage may result LCD Screen s Although the LCD screen is made with high precision technology and 99 99 or more of the pixels are effective black dots may appear or bright points of light red blue or green may appear constantly on the LCD screen This is a structural...

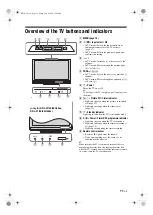
Page 10: ...he three digit page number to select the page 0 Previous channel Returns to the previous channel watched for more than five seconds qa PROG In TV mode Selects the next or previous channel In Text mode page 12 Selects the next or previous page qs Mute the sound qd 2 Volume qf Text page 12 qg DIGITAL Digital mode page 12 qh ANALOG Analogue mode page 12 qj RETURN Returns to the previous screen of any...

Page 11: ...en when the picture is switched off page 22 Lights up in orange when the timer is set page 23 7 1 Standby indicator Lights up in red when the TV is in standby mode 8 Power Timer REC programme indicator Lights up in green when the TV is turned on Lights up in orange when the timer recording is set page 14 Lights up in red during the timer recording 9 Remote control sensor Receives IR signals from t...

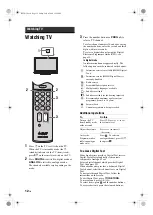
Page 12: ...el which provides Digital Text then press When a broadcaster provides a dedicated Digital Text channel select this channel to access Digital Text To navigate through Digital Text follow the instructions on the screen To exit Digital Text press RETURN To move around press F f G g To select items press and the number buttons To access shortcuts press the coloured buttons Watching TV 3 2 2 3 Interact...

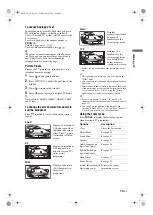
Page 13: ...ot be visible in Smart mode In such a case you can select V Size using the Screen menu and adjust vertical size to make it visible z When Auto Format is set to On the TV will automatically select the best mode to suit the broadcast page 22 You can adjust the position of the picture when selecting Smart 50Hz 14 9 or Zoom Press F f to move up or down e g to read subtitles Using the Tools menu Press ...

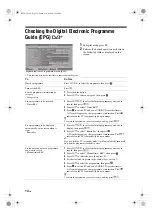
Page 14: ...mme you are currently watching press Set a programme to be displayed automatically on the screen when it starts Reminder 1 Press F f G g to select the future programme you want to display then press 2 Press F f to select Reminder then press A c symbol appears by that programme s information The indicator on the TV front panel lights up in orange If you switch the TV to standby mode it will automat...

Page 15: ...ou want to cancel then press 4 Press F f to select Cancel Timer then press A display appears to confirm that you want to cancel the programme 5 Press G g to select Yes then press to confirm To Do this Favourites 1 Favourites 2 Favourite Set up Enter Programme number TV3 33 3 24 K3 300 TVE 1 TVE 2 24H TVE CLAN TVE TELEDEPORTE VEO 011 012 013 014 015 016 017 018 019 020 SETenVEO Tienda en VEO NET TV...

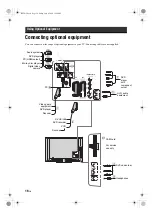
Page 16: ...nt 1 2 3 COMPONENT IN AV1 AV2 AV3 MONO S For service use only DVC camcorder Headphones DVD player with component output DVD recorder Decoder VCR Video game equipment DVD player Decoder PC Hi Fi audio equipment CAM card Audio system Digital video camera DVD player S VHS Hi8 Blu ray disc player PC HDMI output 010COV book Page 16 Friday July 4 2008 12 56 PM ...

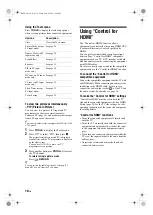
Page 17: ... audio in HDMI IN socket page 24 Be sure to use only an authorized HDMI cable bearing the HDMI logo We recommend that you use a Sony HDMI cable When Control for HDMI compatible equipment is connected communication with the connected equipment is supported Refer to page 18 to set up this communication Symbol on the screen Description COMP To see the equipment connected to 7 PC To see the equipment ...

Page 18: ...d set the compatible equipment to use the Control for HDMI function To connect the Control for HDMI compatible equipment Connect the compatible equipment and the TV with an HDMI cable When connecting an audio system in addition to the HDMI cable be sure to also connect the audio output socket of the TV and the audio system For details see page 16 To make the Control for HDMI settings Control for H...

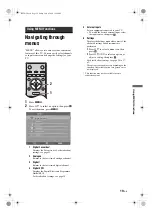
Page 19: ...gramme Guide EPG For details about settings see page 14 5 External Inputs Selects equipment connected to your TV To watch the desired external input select the input source then press 6 Settings Displays the Settings menu where most of the advanced settings and adjustments are performed 1 Press F f to select a menu icon then press 2 Press F f G g to select an option or adjust a setting then press ...

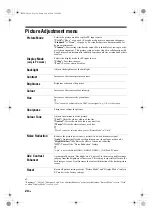
Page 20: ... Hue Increases or decreases the green tones z Hue can only be adjusted for an NTSC colour signal e g U S A video tapes Sharpness Sharpens or softens the picture Colour Tone Adjusts the whiteness of the picture Cool Gives the white colours a blue tint Neutral Gives the white colours a neutral tint Warm Gives the white colours a red tint z Warm can not be selected when you set Picture Mode to Vivid ...

Page 21: ... are connected Sound Effect changes to Off Treble Adjusts higher pitched sounds Bass Adjusts lower pitched sounds Balance Emphasizes left or right speaker balance Reset Resets all the sound settings to the factory settings Dual Sound Selects the sound from the speaker for a stereo or bilingual broadcast Stereo Mono For a stereo broadcast A B Mono For a bilingual broadcast select A for sound channe...

Page 22: ... you connect a VCR DVD recorder to the AV2 socket you can then record from the equipment connected to other sockets of the TV TV Outputs a broadcast Auto Outputs whatever is being viewed on the screen Not available for HDMI 1 HDMI 2 HDMI 3 COMP and PC RGB Centre Adjusts the horizontal picture position so that the picture is in the middle of the screen z ThisoptionisonlyavailableifanRGBsourcehasbee...

Page 23: ...tion menu to select the language country region and location and tune in all available digital and analogue channels Usually you do not need to do this operation because the language and country region will have been selected and channels already tuned when the TV was first installed page 6 However this option allows you to repeat the process e g to retune the TV after moving house or to search fo...

Page 24: ...e performed However power consumption in standby mode is higher than usual Auto Devices Off When this is set to On the Control for HDMI compatible equipment turn on and off interlocked with the TV Auto TV On When this is set to On and if the connected Control for HDMI compatible equipment is turned on the TV automatically turns on and the displays the HDMI input from the connected equipment Device...

Page 25: ...ed programme number manually if you feel that a slight tuning adjustment will improve the picture quality Audio Filter Improves the sound for individual channels in the case of distortion in mono broadcasts Sometimes a non standard broadcast signal can cause sound distortion or intermittent sound muting when watching mono programmes If you do not experience any sound distortion we recommend that y...

Page 26: ...ly tune then press F f to tune the channel 2 When the available channels are found press F f to select the channel you want to store then press 3 Press F f to select the programme number where you want to store the new channel then press Repeat the above procedure to manually tune other channels Digital Set up Subtitle Set up Subtitle Setting When For Hard Of Hearing is selected some visual aids m...

Page 27: ...ns to enter the new PIN code 3 Press RETURN z PIN code 9999 is always accepted Technical Set up Auto Service Update Enables the TV to detect and store new digital services as they become available Software Download Enables the TV to automatically receive software updates free through your existing aerial when issued Sony recommends that this option is set to On at all times If you do not want your...

Page 28: ...rox 20 5 kg with stand Approx 17 5 kg without stand KDL 32S4xxx KDL 32U4xxx KDL 32V4xxx Approx 15 5 kg with stand Approx 13 0 kg without stand KDL 26S4xxx KDL 26U4xxx KDL 26V4xxx Approx 12 5 kg with stand Approx 10 0 kg without stand Panel System LCD Liquid Crystal Display Panel TV System Analogue Depending on your country region selection B G H D K L I Digital DVB T DVB C Colour Video System Anal...

Page 29: ...s not support interlaced signals This TV s PC input supports signals in the above chart with a 60 Hz vertical frequency For other signals you will see the message NO SYNC PC Input Signal Reference Chart for HDMI IN 1 2 3 Signals Horizontal Pixel Vertical Line Horizontal frequency kHz Vertical frequency Hz Standard VGA 640 480 31 5 60 VGA SVGA 800 600 37 9 60 VESA Guidelines XGA 1024 768 48 4 60 VE...

Page 30: ...l bar is red no signal or amber low signal check the aerial cable connection Remove the connected USB device It can be damaged or not supported by the TV Check the website below for updated information about compatible USB devices http support sony europe com TV compatibility Sound No sound but good picture Press 2 or Mute Check if the Speaker is set to TV Speaker page 21 Channels The desired chan...

Page 31: ...010COV book Page 31 Friday July 4 2008 12 56 PM ...

Reviews: