

Model WLTP100 / Modèle WLTP100
Custom English TouchPad / TouchPad anglais personnalisé
Installation and Setup Guide / Guide d’installation et de configuration
GENERAL INFORMATION
The WLTP100 is a wireless alpha touchpad that is used in conjunction with
the ADTHYBWL and ADT7AIO Control Panel.
Up to a total of eight (8) Touchpads can be used on the system
.
RENSEIGNEMENTS GÉNÉRAUX
Le WLTP100 est un écran tactile sans fil qui est utilisé en conjonction avec
le panneau de contrôle ADTHYBWL et ADT7AIO.
Le système peut prendre en charge jusqu’à huit (8) touchpads.
KEY FUNCTIONS
P OW E R
S TAT U S
CANCEL
PA N I C
O F F
C O D E
C H I M E
I N S TA N T
R E A DY
T E S T
B Y PA S S
M A X
STAY
AWAY
T R O U B L E
WLTP100-023-V0
1
7
2
3
5
6
8
9
0
#
4
QUICK
ARMING
BYPASSING
ZONES
CHIME MODE
PERSONAL
ARMING
KEYS
(NO DELAY)
CHECKING
ZONES
TESTING
THE SYSTEM
ADDING
SECURITY
CODES
DISARM KEY
FIRE
ARMING
KEYS
DISPLAY
WINDOW
POLICE
FONCTIONS PRINCIPALES
P OW E R
S TAT U S
CANCEL
PA N I C
O F F
C O D E
C H I M E
I N S TA N T
R E A DY
T E S T
B Y PA S S
M A X
STAY
AWAY
T R O U B L E
1
7
2
3
5
6
8
9
0
#
4
WLTP100-023FC-V0
ARMEMENT
RAPIDE
ZONES DE
CONTOURNEMENT
MODE CARILLON
PERSONNELLE
TOUCHES
ARMEMENT
(SANS DÉLAI)
VÉRIFICATION
DE ZONES
TEST DU SYSTÈME
AJOUT
DE CODES
DE SÉCURITÉ
TOUCHE
DÉSARMEMENT
INCENDIE
TOUCHES
ARMEMENT
FENÊTRE
D’AFFICHAGE
POLICE
OPERATING THE TOUCHPAD
For operating instructions, see the User Guide for the control panel used with
this touchpad
.
UTILISATION DU TOUCHPAD
Pour les directives d’utilisation, consultez le guide de l'utilisateur du panneau de
commande utilisé avec ce touchpad.
LEDs / DEL
Off / Arrêt
Red / Rouge
Amber /
Ambre
Green /
Vert
Flashing Green
/ Vert clignotant
Flashing Amber /
Ambre clignotant
Flashing Red /
Rouge clignotant
POWER /
ALIMENTATION
Low Battery (no
AC) /
Batterie faible
(pas CA)
Charging /
Rechargement
AC / CA
On Battery –
Normal (no AC) /
Sur batterie –
normal (pas CA)
Low Battery (no AC) /
Batterie faible (pas
CA)
TROUBLE /
ANOMALIE
In Programming,
No Trouble /
En programmation,
pas d’anomalie
System Trouble /
Anomalie de
système
Device Trouble /
Appareil de
périphérique
STATUS /
ÉTAT
Not Ready to Arm /
Pas prêt à armer
Armed / Armé
Ready to Arm /
Prêt à armer
Alarm/Alarm Memory /
Alarme/mémoire
d’alarme
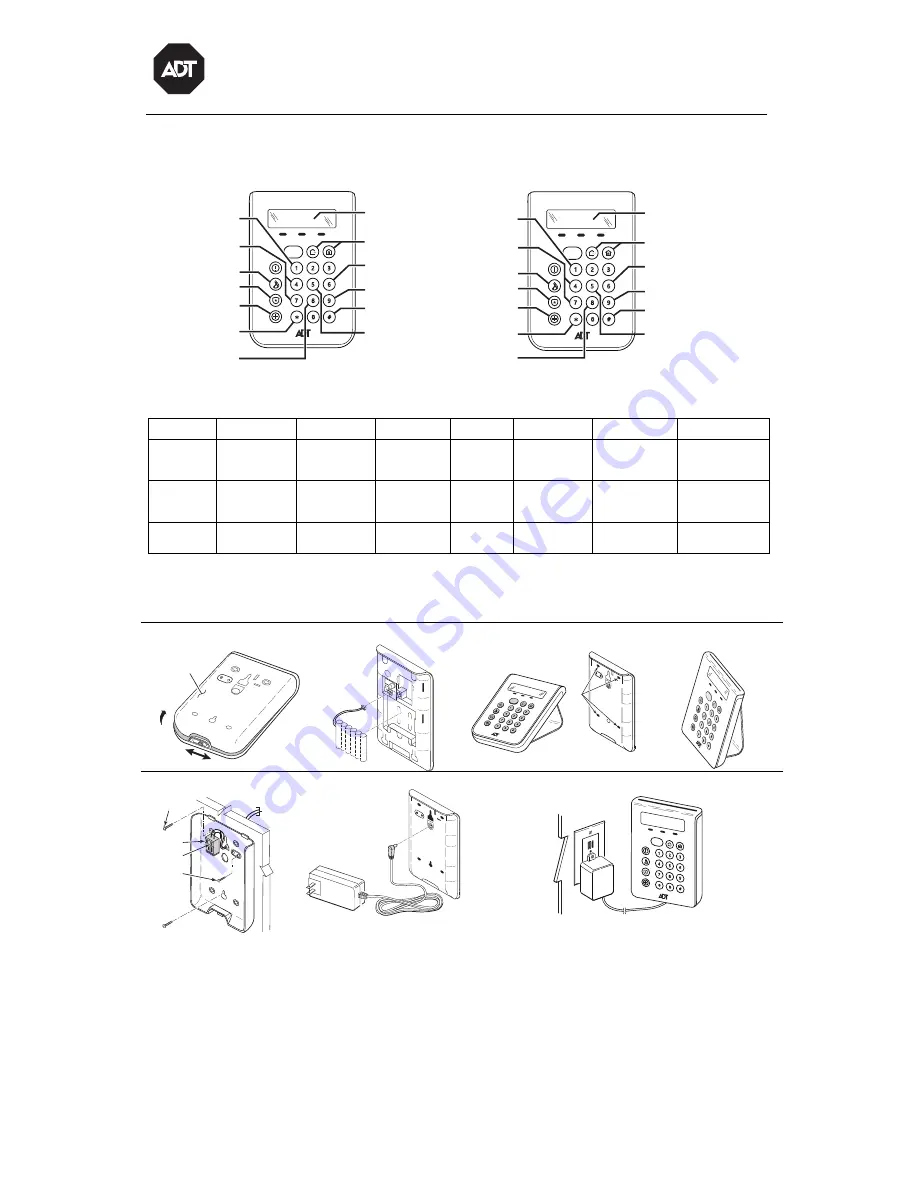
REMOVE CASE BACK AND INSTALL THE BATTERY
1.
Slide the tab at the bottom of the touchpad and pull up to remove the case
back.
2.
Plug battery connector into the receptacle as shown, and snap the battery
pack in place.
RETIREZ L'ARRIÈRE DU BOÎTIER ET INSTALLEZ LA BATTERIE
1.
Tirez sur l’onglet au bas du touchpad, puis tirez vers le haut pour retirer
l'arrière du boîtier.
2.
Branchez le connecteur de la batterie dans le réceptacle, comme illustré,
puis encliquetez le bloc-batterie.
Remove Case Back /
Retirez l’arrière du boîtier
Install Battery /
Installez la batterie
Attach Desk Stand (Optional) /
Installation du support de table (facultatif)
gr
ip
-0
31
-V
0
LIFT UP COVER /
SOULEVER LE
COUVERCLE
CLOSED /
FERMÉ
OPEN /
OUVERT
SLIDE SWITCH /
SÉLECTEUR
COVER /
COUVERCLE
grip-031-V0
grip
-0
39-V0
P OW
E R
S TAT
U S
PANIC
T RO
U BLE
CANC
EL
O FF
C OD
E
C HIM
E
I N ST
A NT
R EA
DY
T EST
B YPA
S S
M AX
STAY
AWAY
2
3
1
5
6
4
8
9
7
0
#
SLOTS
FOR
STAND
(4)
PA
N
IC
O
FF
C
H
IM
E
IN
ST
AN
T
R
EA
DY
BY
PA
SS
M
AX
ST
AY
6
9
#
3
C
O
D
E
TE
ST
AW
AY
0
8
5
2
1
7
4
C
A
N
C
E
L
A
L
A
R
M
S
T
A
T
U
S
T
R
O
U
B
L
E
grip-010-V0
Wall Mount /
Montage mural
Desk Mount /
Installation sur table
Enroll the Touchpad /
Enregistrer le Touchpad
g
ri
p
-0
1
0
-V0
GND/
TERRE
9V
FROM
PWR. ADAPTER /
DEPUIS ALIM.
ADAPTATEUR
MOUNTING
SCREWS /
VIS DE MONTAGE
(3-TYP)
TAMPER
SCREW/
VIS
ANTISABOTAGE
grip-031-V0
g
rip-022-
V0
P OWER
S TATU
S
T ROUB
L E
Pairing
with System
CANCE
L
PA NIC
O F F
C O DE
C H IME
I N S TAN
T
R E ADY
T E ST
B Y PA
S S
M A X
STAY
AWAY
2
3
1
5
6
4
8
9
7
0
#
TOUCHPAD MOUNTING
The touchpads can be surface mounted directly to a wall or desk mounted.
Wall Mounting
1. With the case back removed, and battery pack installed, route the 2 wires
from the external power supply plug through the opening in the case back.
2. Mount the case back to a wall, using the screws provided. Insert the tamper
screw as shown.
3. Connect the 2 wires to the touchpad terminal block. Observe polarity. See
Wire Table.
4. Reattach the touchpad
to its case back.
5. Slide tab to lock the case back.
Desk Mounting with Optional Desk Stand
1. After installing battery, plug in the barrel connector from the power adapter as
shown.
2. The desk stand, DESKMT-WLTP, can be positioned at a 60° or 30° angle.
Choose the desired angle and align the tabs on the desk stand with the slots
in the case back and snap into place.
MONTAGE DU TOUCHPAD
Les touchpads peuvent être montés sur une surface, directement sur une cloison sèche
ou une table.
Support mural
1. Alors que l’arrière du boîtier est retiré et le bloc-batterie installé, faites passer les
2 fils depuis la prise du bloc d'alimentation externe par l’ouverture au dos du boîtier.
2. À l'aide des vis fournies, montez l’arrière du boîtier à un mur. Insérez la vis
antisabotage, comme illustré.
3. Raccordez les 2 fils au bornier du touchpad. Respectez la polarité. Voir Tableau
de câblage.
4. Fixez de nouveau le touchpad à l’arrière du boîtier.
5. Faites glisser l’onglet pour verrouiller le dos du boîtier.
Installation sur table avec support facultatif
1. Après l’installation de la batterie, branchez le connecteur du tambour depuis
l’adaptateur d'alimentation, comme illustré.
2. Le support de table, DESKMT-WLTP, peut être orienté à un angle de 60° ou 30°.
Choisissez l'angle adéquat et alignez les onglets du support de table avec les
fentes à l'arrière du boîtier, puis encliquetez.


