


1-16
BKM-B30NW
30
(GB)
Operations from a Computer
qg
DISPLAY buttons
Select ON to display the input signal information for
about five seconds at the top of the Display screen
when the power is turned on or when switching the
input signal.
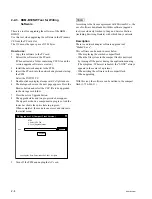
CONFIG window
qh
POWER SAVING
Sets the power saving mode.
After setting, click APPLY.
qj
ON/OFF TIMER
Sets the on-timer.
After setting, click APPLY.
qk
PIC INVERSION
Sets the picture inversion mode.
After setting, click APPLY.
ql
PIC ORBITING
Sets the display position.
After setting, click APPLY.
STATUS window
w;
MODEL NAME
Indicates the model name.
wa
SERIAL No.
Indicates the serial number.
ws
OPERATION
Indicates the total number of hours of operation.
wd
PFM SOFTWARE
Indicates the system software version.
wf
TEMPERATURE
Indicates whether the internal temperature of the
Display is normal.
wg
FAN
Indicates whether the cooling fans work properly.
31
(GB)
Operations from the Display
Preparations
Before starting
Before turning on the PFM-42B1, connect the mouse
(supplied). When you use a keyboard, connect the
keyboard (not supplied) before turning on the PFM-
42B1.
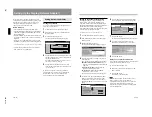
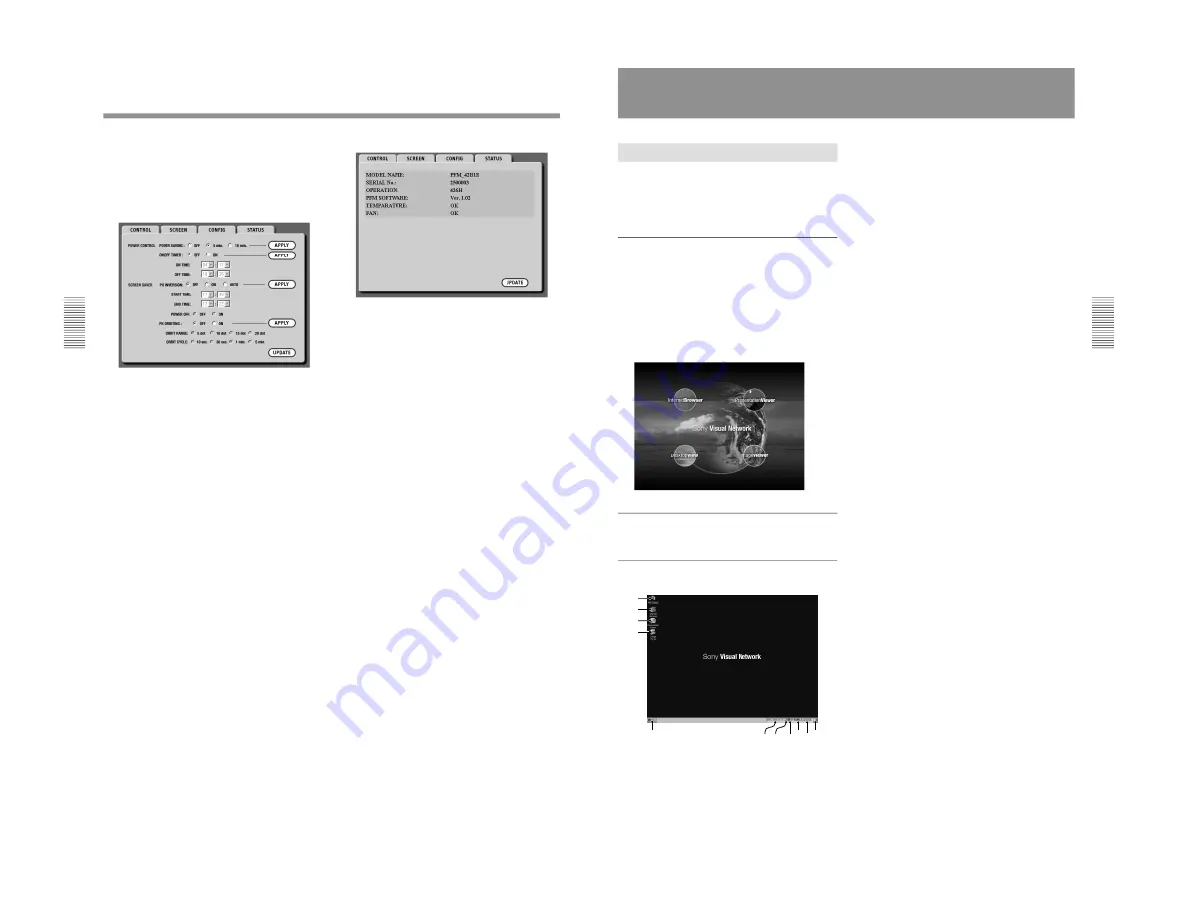
Opening the Start up window
To perform networking operations without connecting
to a computer, display the Start up window on the
Display.
1
Turn on the Display.
2
Press the OPTION key on the Remote Commander
to set the input to INPUT 3 PC. After displaying
the SONY mark, the Start up window is opened.
Opening the Desktop window
Click Desktop View.
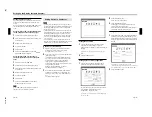
Names and functions of the Desktop
window
1
My Display icon
Browses the folders in the Display.
Double-clicking the icon shows the Memory card icon,
etc.
2
Internet Browser icon
Double-clicking the icon connects to the Internet.
3
Presentation Viewer icon
Select when you want to run a presentation using the
file created with PowerPoint or you want to display an
Excel file on the Display.
4
Image Viewer icon
Double-clicking the icon starts Image Viewer for
running a slide show using image files stored in the
Display (Network Adaptor) or memory card.
5
Start menu
6
IP address
Shows the IP address of the Display (Network
Adaptor). You can verify it when you are accessing the
Display from a computer.
7
Reception level indicator icon
When the Display (Network Adaptor) correctly
recognizes the wireless LAN PC card you insert into
the PC card slot, the icon appears on the task bar.
Double-clicking the icon opens the window indicating
the connection status between the Display and the
access point.
8
Start up icon
Returns to the Start up window display.
9
Screen keyboard icon
Clicking the icon displays the screen keyboard on the
Display screen. You can operate the Display for setups
or enter a URL by using the mouse. The screen
keyboard has two pages. Clicking the Shift key
changes the page.
q;
Clock
qa
Desktop icon
5
8
q;
9
qa
1
2
3
4
7
6


