background image

37

2. This is mostly an automated process. But there are situations in which user entries are 

required.

attempts to establish a connection through a wireless network (WLAN) (network search 
1-28).

4. If a wireless network is found, the network name (SSID) is shown on the display. If several 

wireless networks are found, they appear one after the other in a list. In order to select a par-
ticular wireless network, mark the desired network name with the UP or DOWN button and 

follow the instructions below under item 8.

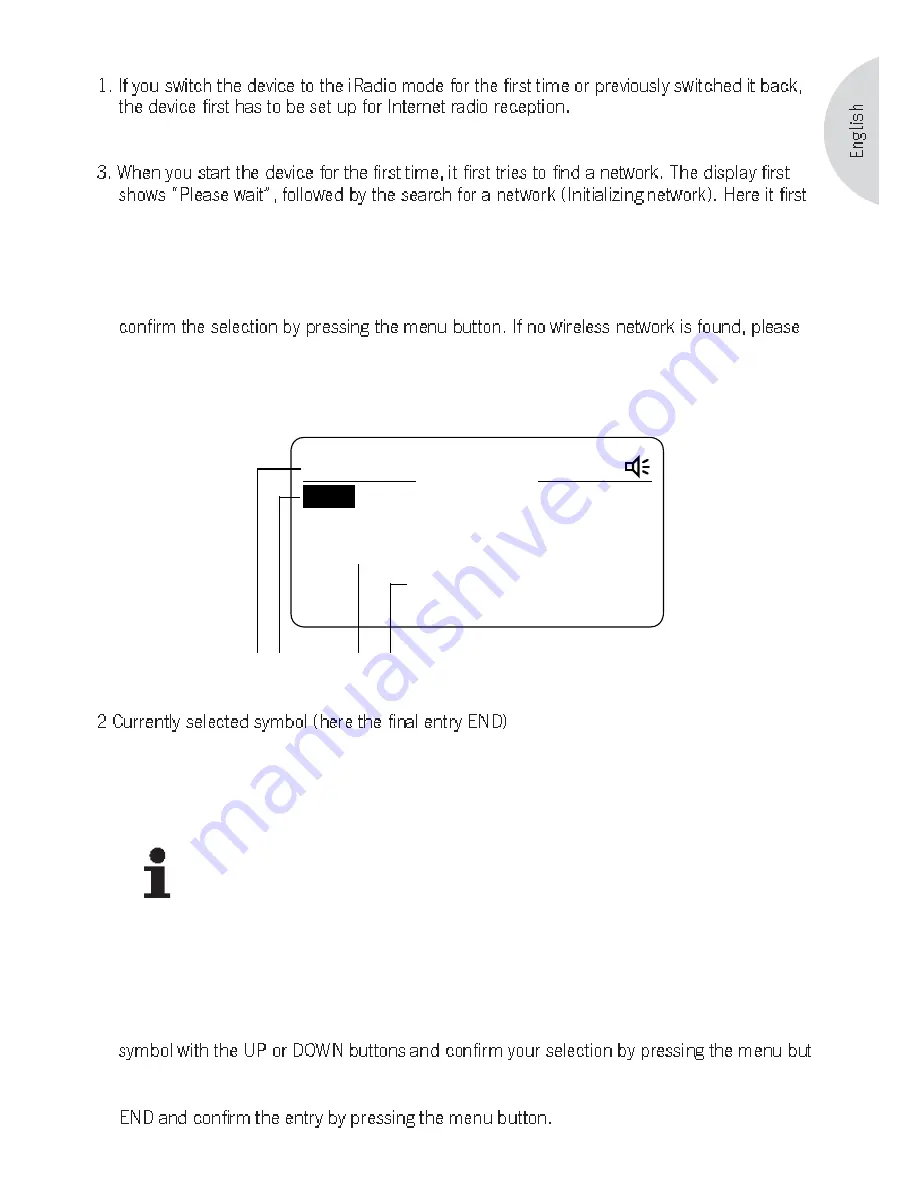
5. If the wireless network is encrypted, the message “Enter WPA key” appears after selecting 

the wireless network (if using access with WPA encryption) and “Enter WEP key” (if using 
access with WEP encryption).

ABC_

12:00

iRadio

<   )~        END   <>AB              >

END

3

1 2

4

1 Currently set mode (here iRadio)

3 Line with symbols that precede or follow the current selection. The symbol that is at the cen-

ter can be selected by pressing the menu button.

4 Already selected symbols. These represent the key that has to be entered.

NOTE

The following symbols are available for the entry of a network key: 
ABCDEFGHIJKLMNOPQRSTUVWXYZ
abcdefghijklmnopqrstuvwxyz
0123456789<|=>+ -_!?@#$%^&*:;`´“.,\ /[]{}()~ END
END completes the entry of the key.
Please observe the lower and upper cases of the letters!

6. Below you have the option of entering the key for the selected network.  Select the desired 

-

ton. You can change incorrect entries by pressing the BACK button. You can see the current 
symbol in the top left corner below the iRadio lettering. Complete your entry by selecting 

Summary of Contents for elements W AU4101BL

Page 1: ...Instruction Manual...

Page 2: ...therefore possible at any time For this reason no claims can be made based on the statements illustrations and descriptions inclu ded in this instruction manual The reprinting copying or translation i...

Page 3: ...ng the antenna 12 5 5 Preparing the remote control 13 5 6 Preparing the iPod eDock 13 5 7 Connecting the headphones 14 6 Control elements and connections 15 7 Setting the basic functions 21 7 1 Settin...

Page 4: ...radio 38 12 2 1 Location 38 12 2 2 Genre 39 12 2 3 Search 40 12 2 4 Storing a station 40 12 2 5 Storing a station with the remote control 41 12 2 6 Accessing stored stations on the device 41 12 2 7 Ac...

Page 5: ...the instruction manual Non compliance with these instructions may result in serious injuries and damages to the device We do not assume any liability for damages resulting from the non compliance wit...

Page 6: ...Audio playback from an iPod loading function for an iPod connecting adapter optionally available Audio playback for external devices that are connected through AUX Any other use is considered to be i...

Page 7: ...troy the device you are not using the device for a longer time period To do this pull the power plug from the power socket 2 5 Batteries Remove the batteries from the battery compartment as soon as th...

Page 8: ...vice Never install remove the provided battery pack in an environment that poses a risk of explo sions e g tank areas fuel transfer points fuel storage areas areas where the air contains which you are...

Page 9: ...n authorized specialized dealer 2 12 Cleaning Always turn off the device before cleaning it Only clean the device on the outside with the provided cloth or another dry soft cloth Never use any harsh o...

Page 10: ...nganese size Mignon LR06 AA Cloth Gloves Instruction manual 4 Supported formats and iPod devices Streaming format RTSP Real Time Streaming Prototcol Internet radio MMS Microsoft Media Streaming Protoc...

Page 11: ...on with the optionally available Docking Station eDock iPod model Adapter T2 A Adapter T2 B Adapter from the iPod scope of delivery 10GB 15GB 40GB 20GB 30GB 4GB 6GB 40GB 20GB 20GB 60GB 30GB 40GB 30GB...

Page 12: ...parts of the device are delivered in a box 1 Unpack the device and all accessories and check the contents for completeness and intact ness NOTE If you notice any damage from the transportation contac...

Page 13: ...of an electric shock Make sure that the power adapter and universal adapter are always tightly connected to each other Pull the power adapter with the universal adapter from the power socket in a stra...

Page 14: ...g from the battery compartment at the lower section of the remote control It is not necessary to open the battery compartment 5 6 Preparing the iPod eDock Two universal adapter shells are included in...

Page 15: ...in such a way that you can continue to perceive external sounds you should never set the volume so high that you are unable to still perceive your environment 1 Before you connect your headphones redu...

Page 16: ...n about the active mode 3 UP Navigation to the top During radio operation station search for the station at the next higher frequency 4 BACK back button returns to the previous menu item 5 MODE Switch...

Page 17: ...s for a longer time open the alarm settings menu to select the alarm functions 3 FAVOR Station memory 4 repeating of the alarm snooze Press for a longer time Open the snooze settings menu to set the s...

Page 18: ...Connector socket to connect the elements W with external audio devices 6 iPod Connector socket for iPod eDock 7 Battery compartment Two batteries 1 5 V AA ensure that the clock continues to function i...

Page 19: ...menu 3 BACK iRadio Access the iRadio menu back button returns to the previous menu item 4 MODE Switch to the next playback mode 5 DOWN FM Station scanning in the next lower frequency range iPod menu n...

Page 20: ...epeatedly switch to the next higher navigation level 13 STAND BY Turn the device on off 14 on off Press for a long time open the sleep timer menu to set the time after which the device should be autom...

Page 21: ...e iPod Please don t touch 5 Connection cable Please protect from damage Never use a damaged cable This might lead to the damage or destruction of the connec ted devices 6 Connector plug Connector plug...

Page 22: ...s 5 To change to the next higher menu or leave the setup menu press the BACK button NOTE If you stop adjusting the settings for about 10 seconds the setup menu closes and the display will return to it...

Page 23: ...tness Middle 2 To set the brightness of the display select display by pressing the UP or DOWN button To set the brightness of the ring backlight select the light item also in the dimmer menu by pressi...

Page 24: ...of the elements W or the remote control for a long time until the setup menu appears the menu button You will now see a split display with an actual and a desired value The actual one shows the time...

Page 25: ...u the option of automatically updating the time of day through the Internet Select YES to update the time through the Internet and NO if you do not want to use this function The time is now set accord...

Page 26: ...onds until the device automatically returns to the start menu Deactivating the sleep timer of the device Select the time interval as in items 1 3 above and set the value for the time interval to 0 wit...

Page 27: ...2 Open the factory settings item by pressing the menu button Factory Reset RESTORING No Yes 3 To restore the factory settings select the menu item factory settings with the UP or DOWN 4 In the followi...

Page 28: ...on in the setup menu All alarm functions can also be set in the stand by mode of the device Set Alarm On Off Set Time Source Volume 8 1 Setting the alarm 1 Press the ALARM button on the top of the dev...

Page 29: ...the alarm with a classic alarm sound NOTE If you have selected the iPod playback as a source for the alarm but no iPod is connected you will hear the beep sound If the device is in playback mode when...

Page 30: ...rol The alarm symbol will be shown on the display remote control The alarm symbol will be removed Alternatively you can turn the ALARM on and off through the menu 1 Press the ALARM button at the top o...

Page 31: ...snooze time press the SNOOZE button until the snooze setting appears Snooze Setting Min 5 2 To extend or reduce the snooze time press the buttons UP or DOWN NOTE You can also set the length of the sn...

Page 32: ...avings OFF The iRadio function is quickly available during the start and when switching from other modes such as iPod and Aux not FM device continues the data connection even in a switched off mode If...

Page 33: ...tton Depending on the playback mode that you are currently in the remaining playback modes are available to you in the following sequence FM iPod AUX iRadio FM 12 00 FM AUX FM iRadio 12 00 FM iRadio i...

Page 34: ...n the program memory 3 Station name if the station transmits RDS text 4 RDS text of the station if the station transmits RDS text Shown as scrolling text 5 Speaker symbol 6 Alarm symbol Appears if the...

Page 35: ...button on the device until the program memory is opened 3 The display will show SAVE FAVORITE followed by a number 1 10 By pressing the UP or DOWN button you can select the desired memory preset If t...

Page 36: ...sets 1 5 can be accessed with the remote control Acces sing the program presets 6 10 is done exclusively through the FAVOR button on the device 2 Press the UP button repeatedly until you have reached...

Page 37: ...io mode the display shows the following information 1 Mode iRadio 2 Station name of the current station 3 Information about the data stream and format 4 Additional text information of the current stat...

Page 38: ...and Enter WEP key if using access with WEP encryption ABC_ 12 00 iRadio END AB END 3 1 2 4 1 Currently set mode here iRadio 3 Line with symbols that precede or follow the current selection The symbol...

Page 39: ...his menu item only appears once the registration and setup on mysonoro podcasts etc that are provided through mysonoro com Media player Makes it possible for the user to perform settings to access dat...

Page 40: ...st with categories for which radio stations have been stored 60s Comedy Jazz Rock 70s Contemporary Jungle Soft Rock 80s Country Kids Spanish 90s Dance Latin hits Sports Adult Discussion New Age Talk A...

Page 41: ...The following symbols are available for the entry of a name ABCDEFGHIJKLMNOPQRSTUVWXYZ abcdefghijklmnopqrstuvwxyz 0123456789 _ END END completes the entry of the key Please observe the lower and upper...

Page 42: ...ith the remote control NOTE Only the program presets 1 5 can be stored with the remote control Accessing the program presets 6 10 is done exclusively through the FAVOR button on the device 1 Set the s...

Page 43: ...the network or PCs on the elements W There are various options for doing this which are explained below 12 4 1 Sharing The submenu item Search for PCs starts a network search for PCs that have network...

Page 44: ...ory containing the folder you would like to share and click with the right mouse button on the respective folder icon When the context menu opens select Properties Select the Sharing tab and then sele...

Page 45: ...n may not be supported by Operating system Microsoft Windows XP HOME Access the directory containing the folder you would like to share here music and click with the right mouse button on the respecti...

Page 46: ...t in the network share If this display looks different on your system please just continue with the following item The following window can also appear directly after the selection of the context menu...

Page 47: ...at you would like to be displayed on your elements W has changed It shows that a share has been activated for this folder Your elements W should If no folder is found although you have set up a share...

Page 48: ...ble network PC through Windows Media Player The Windows Media Player version 11 or higher is required for a successful connection along Sharing button device sharing has to be enabled for a successful...

Page 49: ...now begin to search for a PC with Windows Media Player sharing If a PC with Windows Media Player sharing is found the available directories will appear Navigate to the respective folder through the b...

Page 50: ...ctivated sleep function 9 Time display 12 4 3 Playback options menu button Turning the repeat function on and off When accessed a query appears about whether to turn this on Select YES to turn on the...

Page 51: ...o DHCP This function enables the automatic assignment of an IP address through a DHCP server Select YES to leave this function with the setting of an automatic IP assignment Now your elements W will t...

Page 52: ...eless networks To start a new search press the menu button Enter name of network This option gives you the possibility of entering the network name SSID of a wireless network sing the menu button You...

Page 53: ...e Radio restoring the factory settings Restores the factory settings to the Radio Please note that this will cause all of the settings stored in the Radio to be erased The folder My stuff will be acce...

Page 54: ...od the UP and DOWN buttons func tion as navigation buttons NOTE When the device is switched into another mode the iPod playback is paused When you return to the iPod mode the playback at the most rece...

Page 55: ...OWN Pause continue playback Start pause Menu button Menu button End playback Start pause Stop 14 AUX playback You can connect and play additional audio devices such as MP3 players to the sonoro ele me...

Page 56: ...od into the iPod docking sta tion at the top of the device see chapter iPod playback The type of iPod is not supported Check if your iPod is compatible with the device see chapter Supported formats Th...

Page 57: ...ctor is not plugged in Plug the network connector into the LAN socket of the device The device is set to WLAN only Set the device to AUTO The network cable is defec tive Replace the network cable and...

Page 58: ...0 7 A Output 12 V 2 A Batteries for the clock 2 alkaline manganese batteries 1 5 V type LR06 AA Mignon Batteries for the remote control 1 Lithium battery 3 V type CR2025 round cell Power consumption i...

Page 59: ...ust accept any interference received including interference that may cause undesired operation Radio and television interference This device has been tested pursuant to part 15 of the FCC regulations...

Page 60: ...This transmitter must not be co located or operationg in conjunction with any other antenna or tansmitter...

Page 61: ...to our preference either by repairing or replacing the device card and cashier s receipt to the service address No new guarantee period is started if the device is repaired or replaced The guarantee...

Reviews: