background image

SonicWALL Quick Start Guide Page 7

Configuring Your Management Station

Your SonicWALL is configured with the default IP address of 192.168.168.168. This IP address is used to initially 
access the Management interface of the SonicWALL and launch the Installation Wizard. To access the 
Management Station for the first time, you must configure your computer with an IP address in the same 
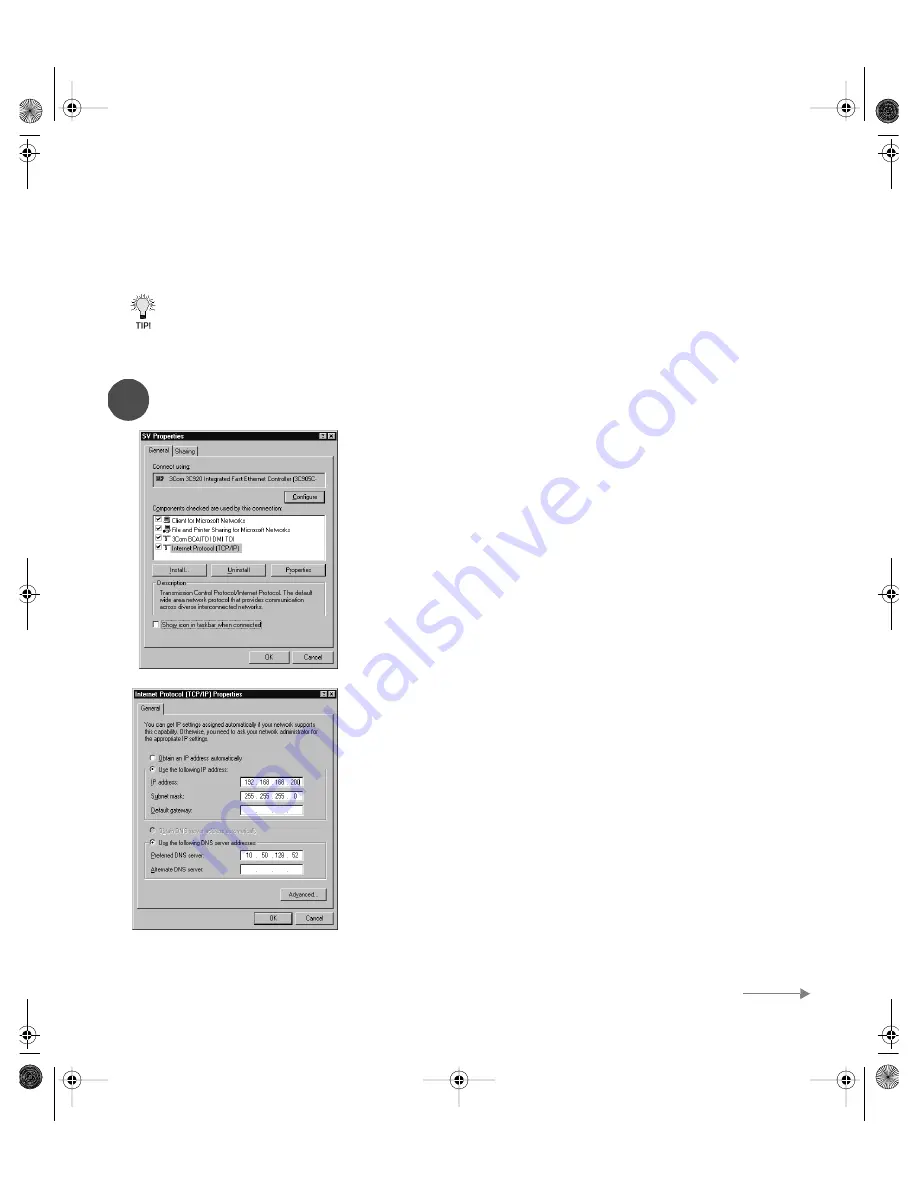
network range as the SonicWALL. Follow the instructions below:

If you are using an operating system other than Windows 2000, consult your SonicWALL Internet 
Security Appliance Administrator’s Guide, Appendix E, Configuring TCP/IP Settings, for step by step 
instructions. The Administrator’s Guide is located on your product CD and requires Acrobat Reader to 
view it. Acrobat Reader is also provided on your product CD. 

Windows 2000

1.  From your Windows task bar, click Start. 

2. Then click Settings. 

3. Click Network and Dial-up Connections. 

4. Double-click the network icon to open the connection window. 

5. Click Properties. 

6. Highlight Internet Protocol (TCP/IP) and click Properties. 

7. Select Use the following IP address.

8. Enter 192.168.168.200 in the IP address field. 

9. Enter 255.255.255.0 in the Subnet field. 

10. If you have a DNS Server IP address from your ISP, enter it in the 
Preferred DNS Server field. 

11. Restart your computer if you are using Windows 95, 98, or NT. 
Windows 2000 does not require the computer to be restarted. 

4

Setup Continues

qsg_6400.fm Page 7 Wednesday, November 20, 2002 2:55 PM

Summary of Contents for Internet Security

Page 1: ...COMPREHENSIVE INTERNET SECURITY SonicWALL Internet Security Appliances QUICK START GUIDE ...

Page 2: ...ntents One SonicWALL Internet security appliance One SonicWALL Quick Start Guide One SonicWALL Firmware and Documentation CD One Ethernet cable One Crossover cable labeled Crossover One 5 Volt DC power supply not pictured One Power cord If any items are missing from your package contact SonicWALL Inc Web http www sonicwall com support Phone 888 777 1476 Product CD Ethernet Cable gray Crossover Cab...

Page 3: ...tions above step by step installation instructions for additional networking methods are found in Chapter 2 Configuring the Network Mode on the SonicWALL of your Administrator s Guide The Administrator s Guide is located on your product CD and requires Acrobat Reader to view it Acrobat Reader is also provided on your product CD If you are unfamiliar with network terminology review the glossary bel...

Page 4: ...the power adapter into the SonicWALL and plug the other end into a power outlet If you are installing a PRO 200 300 PRO 230 PRO 330 or GX series attach the power cable to the power input of the SonicWALL and the other end into an AC outlet Use the power switch to turn on the SonicWALL The Power light turns green when power is applied to the SonicWALL Also the Reset light remains lit for approximat...

Page 5: ...d Crossover cable to the LAN port of your SonicWALL The link LED lights indicating an active connection If the link LED does not light up and a gray Ethernet cable was used to make the connection completely disconnect the gray Ethernet cable and connect the red Crossover cable If a red Cross over cable was used for the connection completely disconnect the red Crossover cable and connect the gray E...

Page 6: ...ep instructions The Administrator s Guide is located on your product CD and requires Acrobat Reader to view it Acrobat Reader is also provided on your product CD Windows 2000 1 From your Windows task bar click Start 2 Then click Settings 3 Click Network and Dial up Connections 4 Double click the network icon to open the connection window 5 Click Properties 6 Highlight Internet Protocol TCP IP and ...

Page 7: ...8 in the Location or Address field Your Web browser must support JAVA and HTTP uploads in order to fully manage the SonicWALL appliance Internet Explorer 5 0 or higher as well as Netscape Navigator 4 0 or higher are recommended 3 The SonicWALL Installation Wizard launches and guides you through the configuration and setup of your SonicWALL If you cannot connect to the SonicWALL check the following...

Page 8: ...e SonicWALL Be sure to register your SonicWALL at http www mysonicwall com to take advantage of a free 30 day trial subscription to the Content Filter List feature Also by registering your SonicWALL you have access to technical support services Once you have completed the Installation Wizard and restarted the SonicWALL you can manage the SonicWALL by entering the LAN IP address into a Web browser ...

Page 9: ...al up Connections 3 Right click on the network icon 4 Click Properties 5 Click Internet Protocol TCP IP and then click Properties 6 Select Obtain IP address automatically 7 You can select Obtain DNS server address automatically 8 If you have DNS server address es you can enter the IP addresses 9 Click OK then OK again to close the Properties window If you are not using Windows 2000 as your operati...

Page 10: ...ed in your Restart screen 8 Enter the Subnet Mask in the Subnet Mask field 9 Enter the SonicWALL LAN IP address in the Default Gateway field 10 Enter the DNS server IP address es provided by your ISP in the DNS fields 11 Click OK then OK again to close the Properties window If you are not using Windows 2000 as your operating system consult the SonicWALL Internet Security Appliance Administrator s ...

Page 11: ...ames mentioned herein may be trademarks and or registered trademarks of their respective companies Specifications and descriptions subject to change with out notice T 408 745 9600 F 408 745 9300 www sonicwall com SonicWALL Inc 1143 Borregas Avenue Sunnyvale CA 94089 1306 P N 232 000335 00 Rev A 11 02 ...

Reviews: