background image

34

Troubleshooting

Troubleshooting

7.2 Routine Maintenance

The EV-Charger do not need any maintenance or correction in most condition. To 
ensure that the EV-Charger can operate properly for a long term, you are advised
to perform routine maintenance on it. 
Only trained and authorized professional personnel who are familiar with the 
requirements of safety was allowed to perform servicing and maintenance work.

► 

Safety checks

Safety checks should be performed at least every 12 months by manufacturer's 
qualified person who has adequate training, knowledge, and practical experience 
to perform these tests. The data should be recorded in an equipment log. If the 
device is not functioning properly or fails any of the tests, the device has to be 
repaired. For safety check details, refer to section 2 Safety instruction in this 
manual.

Maintain periodically

Only qualified person may perform the following works.
During the process of using the EV-Charger, the manage person shall examine 
and maintain the machine regularly. The concrete operations are as follows.
1)Check that if the indicators of the EV-Charger are in normal state, check if the 
buttons of the EV-Charger are in normal state, check if the display of the EV-
Charger is normal. This check should be performed at least every 6 months.
2)  Check that if the input cable and the connector are damaged or aged. This 
check should be performed at least every 6 months.
3) Check whether the ground terminal and ground cable are securely connected 
every 12 months.
4) You should get the outer shell of the EV-Charger cleaned and their security 
checked at least every 6 months.

35

Contact SolaX Customer Service for further assistance. Please be prepared to 
describe details of your system installation and provide model and serial number 
of the unit.

Global Service Center: +86 (571) 56260033 ext 749       
General Enquiry: +86 (571) 56260011                               
Sales Enquiry: +86 (571) 56260008                                      
E-Mail: [email protected]                                             
Fax: +86 (571) 56075753

● 

If your EV-Charger's information panel is not displaying a Fault light, check the 

following list to make sure that the present state of the installation allows proper 
operation of the unit.

— Is the EV-Charger located in a clean, dry, adequately ventilated place?
— Are the specification and length of the cables suitable?
— Are the input connections and wiring in good condition?
— Are the configuration settings correct for your particular installation?
— Are the display panel and the communication cable properly connected 
      and undamaged?

Summary of Contents for X1-EVC-7.2K

Page 1: ... or individual should not plagiarize partially or fully copy it including software etc and no reproduction or distribution of it in any form or by any means shall be allowed All rights reserved SolaX Power Network Technology Zhejiang Co Ltd reserves the right of final interpretation ADD No 288 Shizhu Road Tonglu Economic Development Zone Tonglu City Zhejiang Province China TEL 86 571 56260011 E ma...

Page 2: ...n 4 Technical Specification 4 1 General Data 4 2 Security Protection 5 Installation 5 1 Check for Transport Damage 5 2 Packing Lists 5 3 Installation Precaution 5 4 Installation Steps 5 5 CT Connection 5 6 Run the EV Charger 6 Operation Method 6 1 Control Indicators 6 2 Status 6 3 GREEN Mode 6 4 ECO Mode 6 5 FAST Mode 6 6 Smart Boost 6 7 Timer Boost 03 03 03 03 04 04 06 07 08 08 09 11 11 12 13 13 ...

Page 3: ...shooting 7 1 Troubleshooting 7 2 Routine Maintenance 8 App Setting 9 Decommissioning 9 1 Dismantling the Inverter 9 2 Packaging 9 3 Storage and Transportation 9 4 Disposing of the EV Charger 10 Disclaimer Warranty Registration Form Contents 32 32 34 36 42 42 42 42 42 43 X1 EVC 7 2K X3 EVC 11K X3 EVC 22K Note X1 means single phase X3 means three phase EVC means EV Charger 7 2K means 7 2 kW 11K mean...

Page 4: ... AC supply 05 04 Safety Safety Apply for X1 EVC 7 2K Single phase Apply for X3 EVC 11K 22K Three phase Electrical grid other home Load PV array Electricity meter bidirectional Three phase Inverter L1 N L2 L3 AC breaker PE Electrical grid other home Load PV array AC breaker Single phase Inverter CT Electricity meter bidirectional L N PE ...

Page 5: ...device to your dealer or obtain information regarding a local authorised collection and disposal system The EV Charger can be recycled 2 2 Important Safety Instructions CAUTION Danger of burn injuries due to hot enclosure parts During operation the EV Charger may become hot CAUTION Incorrect operation or misuse may result in Injury or death to the operator or third parties Damage to the device and...

Page 6: ...selectable Ÿ Built in 30 mA type A RCD and 6 mA DC protection Ÿ Integrated with PEN protection and no earth rod Ÿ Encrypted communication based on TLS Ÿ Indoor and outdoor easy installation Ÿ Export Power Control with SolaX system Ÿ Capable with 100 green energy generated from your solar generation Ÿ Multiple work modes to fit different situations Ÿ Integrated RFID function Ÿ Remote setting and mo...

Page 7: ... Method Wall mount Bracket Cable Length Operating Temperature Working Humidity YES Wall mount Plastic Metal 6 5 Meters 30 50 Working Altitude Degree of Protection Application Site Cooling Method 0 100 2000 m IP65 Indoor Outdoor Natural cooling Protection Class Class I 10 11 Type P 3 phase L1 L2 L3 N PE 50 Hz 60 Hz 50 Hz 60 Hz Charging Outlet Charging Cable with Connector Type 2 Socket Outlet Dimen...

Page 8: ...afety Standard Built in PEN fault technology Warranty IEC61851 1 IEC62196 2 YES 3 years G J G Over Under voltage protection Model X1 EVC 7 2K X3 EVC 11K X3 EVC 22K Multiple Protection Overload protection Short circuit protection Current leakage protection Grounding protection Surge protection Over Under temperature protection YES YES YES YES YES YES YES I H 1 1 RJ 45 terminal adapter Cable hook fo...

Page 9: ...e Size Installation Installation The wall on which the EV charger will be installed should meet the conditions below 1 Solid brick concrete or strength equivalent mounting surface 2 EV charger must be supported or strengthened if the wall s strength isn t enough such as wooden wall the wall covered by thick layer of decoration 300 mm 300 mm 200 mm 1 2 1 5 m 14 5 4 Installation Steps STEP 1 Remove ...

Page 10: ...holes and screw the self tapping screws with the cross screwdriver Installation Installation STEP 3 Hang the EV Charger on the wall for trial then estimate the required length of input cable and communication cable After that take the EV Charger down STEP 4 Unscrew the EV Charger s rear cover with the cross screwdriver and take it down Then undo the fastening heads and take the waterproof material...

Page 11: ...tion terminal crimping tool RJ45 1 White with orange stripes 2 Orange 3 White with green stripes 4 Blue 5 White with blue stripes 6 Green 7 White with brown stripes 8 Brown strip length STEP 7 Strip the outer sheath of the input cable for a length of 70 mm ensuring all the wires can reach the terminal blocks with a little excessive length Use the stripping pliers to strip approx 12 mm of insulatio...

Page 12: ...cks then block the terminal with the s traight screwdriver 20 21 Installation Installation STEP 10 Press the spring upward and push the base plate of communication board in Then screw the countersunk screw 4 mm torque 1 1 2 N m torque 0 8 1 5 N m ...

Page 13: ...e cross screwdriver Then tighten the waterproof fastening head STEP 12 Hang the EV Charger up carefully and steady the EV Charger with the self tapping screw and the cross screwdriver torque 2 2 5 N m Installation torque 2 2 5 N m 22 23 For type P connect the charging gun with the EV Charger and hang the connecting cable on the hook ...

Page 14: ...nd the terminal of CT on each side of the adapter Installation Installation Do not place the CT on the N Wire or the PE wire Do not place the CT on the N and L wire simultaneously Do not place the CT on the non insulated wires When using the three phase CT please clip the CT clamps on the corresponding phases NOTE Electrical grid other home Load PV array Electricity meter bidirectional Three phase...

Page 15: ...electrical connections must be carried out by quali ed personnel in accordance with legislation in force in the country concerned Equipment only to be used for the purpose outlined by SolaX 6 Operation Method 6 1 Control Indicators D E F G H A B C Object A Emergency Stop Mode selection Charging connection base Fault B C D E F G H Description Card swiping position Complete Operating status indicato...

Page 16: ...Charger is charging The Complete light and the STOP light are on at the same time The EV Charger has completed charging and the operating button is invalid GREEN ECO FAST short press short press 28 29 GREEN ECO FAST STOP Long press Short press short press Operation Method Operation Method Fault Unavailable The Fault light is on The EV Charger is in fault status The four charging mode lights are on...

Page 17: ...h as possible and minimize the use of grid power E g The user needs to charge the EV to 40kWh before 10 00 AM then the Charging power is depended on the surplus power generated by the inverter When using ECO or GREEN charging modes the EV Charger can be programmed to boost the current charge in a certain period In timer boost mode the charging rate is set to maximum just like FAST mode regardless ...

Page 18: ...at all the cables and wires are intact 4 Contact installers for help Contact installers for help Same as ErrorCode 3 Same as ErrorCode 2 Same as ErrorCode 3 Ev_ElecLock_Fault Contact installers for help 1 Unplug the connector from the EV 2 If the Fault indicator is off re plug in and try charging EV again 3 If not set the value of Overcurrent Limit to a proper range the buzzer will beep after the v...

Page 19: ...he buttons of the EV Charger are in normal state check if the display of the EV Charger is normal This check should be performed at least every 6 months 2 Check that if the input cable and the connector are damaged or aged This check should be performed at least every 6 months 3 Check whether the ground terminal and ground cable are securely connected every 12 months 4 You should get the outer she...

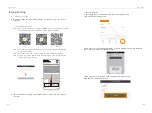
Page 20: ... Registration No of the EV Charger Then touch Next and agree to join the network of the EV Charger Registration No example Step 4 Type in your home Wi Fi SSID and password then Setting 5GHz Wi Fi is unavailable for now If you don t have the app or SolaX Cloud s account yet you can operate If you already have the app and SolaX Cloud s account you can operate as below as below 8 App Setting 36 37 Ap...

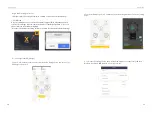
Page 21: ...ode in the Monitoring App Visit the local password setting instruction on www solaxcloud com wi Setting App Setting Ø Settings for the EV Charger 1 Select Site at the bottom and then touch the EV Charger icon and select your EV Charger on the list 3 Select Mode Settings and a drop down list will appear Set the levels of Green Mode 2 levels and ECO Mode 5 levels as you want 2 Touch the EV Charger i...

Page 22: ...c load balance App Setting 40 41 App Setting 6 Select Advanced Settings and a drop down list will appear 1 Set and save the value of Overvoltage Limit Undervoltage Limit Overcurrent Limit Overheating Limit and Leakage Current Limit 2 Touch Grid Data Source to select the source 3 Touch RFID Function to enable or disable the function 4 The default setting can be restored and the EV Charger can be re...

Page 23: ...ed on hardware or software without authority from SolaX Obtain the communication protocol from other illegal channels Build monitoring control system without authority from SolaX SolaX will keep right to explain all the contents in this user manual Disclaimer 42 9 Decommissioning 9 1 Dismantling the EV Charger Disconnect the EV Charger from the inverter and the grid Wait for 5 minutes for de energ...

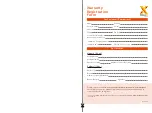
Page 24: ... Module Brand Module Size W Number of String Number of Panel Per String Battery Type Brand Number of Battery Attached Battery If Any Module If Any Date of Delivery Signature Please visit our warranty website https www solaxcloud com warranty to complete the online warranty registration or use your mobile phone to scan the QR code to register For more detailed warranty terms please visit SolaX offici...

Page 25: ... YOUR INVERTER ONLINE WIN SOLAX POINTS Open your camera app and point your device at the QR code Wait for the camera to recognize the QR code Click banner or notification when it appears on the screen Warranty registration page will be loaded automatically 1 2 3 4 Notification Click the notification banner OK ...

Reviews: