background image


Installation Steps 

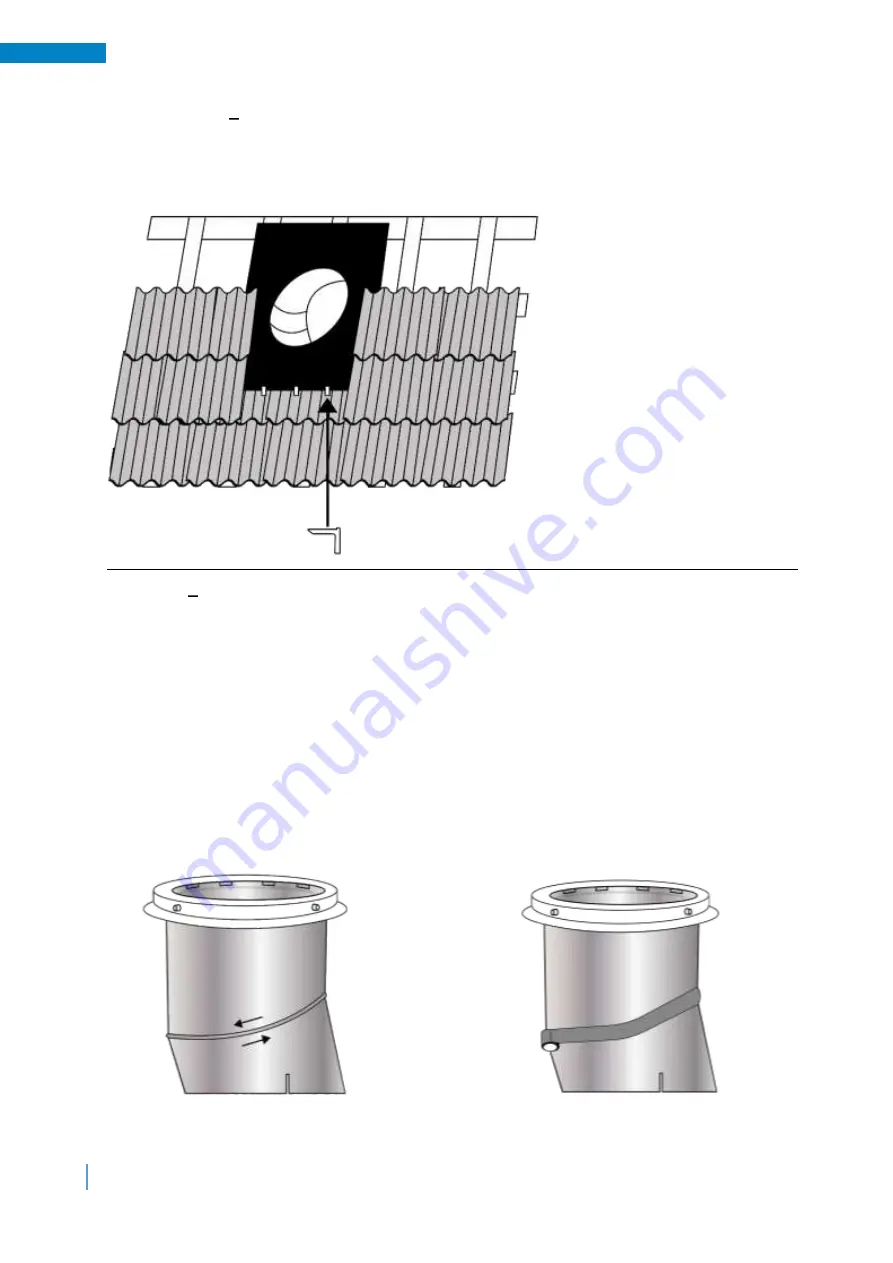
2.2.3 Step 2.2.3   Attach roof flashing tile clips 

The three tile clips provided are also used to secure the bottom skirt of the flashing down 
onto the roof. Clamp the short "leg" of the clips between two tiles beneath the edge of the 
flashing and bend the long "leg" back over the edge of the flashing to clamp it in place. 


2.3 Step 3   Adjust top tube angle (if required) 

If required, the integral angle within the top tube assembly can be rotated to create an 
angle from 0 to 30 degrees to compensate for the pitch of the roof. 
 

How to adjust the integral angle: 

Carefully peel back the protective film inside the tube 

from along the angle seam. 
 
Grasp the top tube with two hands, just below the adjustable angle seam (diagonal). 
Use your thumbs and index fingers to rotate the angle section as required. 
Adjust the angle so that the top tube assembly aligns with the bottom tube assembly. 
Once the angle is correctly set, carefully apply tape to the outside of the tube over the tube 
seams and around the angle.  


Now remove the transparent protective film from the inside of the top tube assembly.

2


Summary of Contents for Ubiflex flashing

Page 1: ...Installation Instructions Solatube 35 cm round pitched roof Ubiflex flashing...

Page 2: ...nders flex 9 2 7 Step 7 Fit the roof dome 10 2 8 Step 8 Attach the brush seal 10 2 9 Step 9 Install the bottom tube assembly 11 2 10 Step 10 Fit the Natural Effect Lens 12 Version 20 08 2020 Safety In...

Page 3: ...itional expense arising as a result of condensation or any water damage resulting from condensation installation not in the control of Techcomlight Limited Techcomlight cannot be held liable for damag...

Page 4: ...tube assembly 3 Bottom tube assembly 4 5 x roof dome screws 5 Brush seal 6 High tack sealant 7 LightTracker flex 8 2 x Raybenders flex 9 Natural Effect Lens 10 Ubiflex pitched roof flashing 11 3 x ro...

Page 5: ...w the flashing to fit down onto the tile battens as shown below Determine the ideal position so that the flashing can be installed beneath the tiles above to the sides and down onto the tiles below On...

Page 6: ...om skirt of the flashing down onto the profile of the tiles below 2 2 2 Step 2 2 2 High Tack sealant Secure the lower skirt of the flashing down onto the tiles below with the High tack adhesive sealan...

Page 7: ...rotated to create an angle from 0 to 30 degrees to compensate for the pitch of the roof How to adjust the integral angle Carefully peel back the protective film inside the tube from along the angle se...

Page 8: ...e flashing as shown below Fix the dome ring onto the roof flashing using the dome screws provided screwed through the four grey spacers from the outside in The screws will pierce through the flashing...

Page 9: ...Tracker flex downwards to secure it in place Note If the sunlight from the south is blocked do not mount the LightTracker flex in the dome 2 6 Step 6 Install RayBenders flex Fit the two RayBenders fle...

Page 10: ...ry it off one by one from below 2 8 Step 8 Attach the brush seal Stick the brush seal strip around the outside of the bottom tube assembly or uppermost extension tube just below the top of the tube as...

Page 11: ...y until the ceiling ring is flush with the ceiling Tip they fit through the ceiling opening Tighten the four fixings screws within the ceiling ring which will engage the mounting clips tightening them...

Page 12: ...ar plastic tab facing downwards securely into the recess between the reflective tube and the plastic ceiling ring The Natural Effect Lens can be easily removed if required by carefully pulling down on...

Page 13: ......

Reviews: