19
Section 4 - ADJUSTMENTS & REPAIR
WARNING
Before attempting any adjustments or repairs, STOP
the engine, remove the key, remove the spark plug
wire(s) from the spark plug(s) and secure wire(s)
away from plug(s). Never use a cutting blade that
shows signs of excessive wear or damage on the
YARD CRUISER. Refer to Figure 4.14.
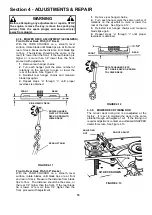
4.3.10. WHEEL BRAKE ADJUSTMENT
Adjust the wheel brake if wheels turn when parking
brake is engaged. Adjust the wheel brake by turning
wheel brake adjusting nut clockwise to increase
braking action or counter clockwise to decrease
braking action. See Figure 4.14.
FIGURE 4.14
4.4 MOWER BLADE REPAIR/REPLACEMENT
4.4.1. BLADE WEAR LIMITS
1. Inspect blade frequently for signs of excessive wear
or damage. See Figure 4.15.
FIGURE 4.15
4.4.2. BLADE
SHARPENING
1. Make sure fuel cap is on tight. Turn fuel shut
off valve (If equipped) to the “CLOSED”
position. Start engine and allow it to run until
engine runs out of fuel. Close vent on fuel filler
cap. See Figure 2.3, Page 6.
2. Remove key from ignition switch.
3. Remove spark plug wire(s) and secure away from
spark plug(s).
4. Carefully stand YARD CRUISER on rear bumper.
5. Remove blade(s). See Figure 4.15.
6. Inspect condition of blade. Refer to Figure 4.14.
7. If blade is in good condition, sharpen at 22 to 28
degrees. DO NOT sharpen beyond existing cutting
edge. See Figure 4.17.
8.
Check blade balance after sharpening. If
necessary, correct blade balance by grinding the heavy
end of blade.
9. Reinstall blade. See Figure 4.16. Torque blade
mounting bolts to recommended range of:
33” Deck - 30 to 40 ft. lbs.
38” Deck - 80 to 90 ft. lbs.
FIGURE 4.16
FIGURE 4.17
UNDERSIDE VIEW OF MACHINE
ADJUST
COUNTER-
CLOCKWISE TO
DECREASE
BRAKE
ADJUST
CLOCKWISE
TO INCREASE
BRAKE
WHEEL BRAKE
ROD
ELECTRIC
CLUTCH
NEW BLADE
WEAR LIMIT
(NOTCH STARTS)
DANGEROUS CONDITION!
DO NOT USE ON MOWER!
REPLACE WITH NEW BLADE.
33” DECK
38” DECK
DO NOT SHARPEN
BEYOND ORIGINAL
CUTTING EDGE
BLADE TIP
ORIGINAL CUTTING EDGE
22º TO 28º
Summary of Contents for YARD CRUISER YZ13331BE
Page 26: ...26 PRIMARY MAINTENANCE...
Page 27: ...27 PRIMARY MAINTENANCE...
Page 28: ...28 PRIMARY MAINTENANCE...
Page 29: ...29 PRIMARY MAINTENANCE...

