Snapper YARD CRUISER YZ13331BE Safety Instructions And Operator'S Manual Download Page 6


Section 2 - OPERATING INSTRUCTIONS 

 
2.1  PRE-START CHECK LIST 

Make the following checks and perform the service 
required before each start-up. 
2.1.1.  Check tires and add or release air as needed 
to bring pressure to 12 psi in front and 12 psi in rear 
tires. 
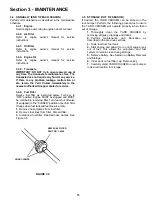
2.1.2.  Check guards, deflectors and covers to make 
sure all are in place and securely tightened. 
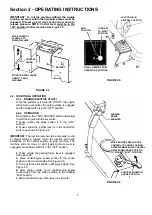
2.1.3.  Check engine oil and add oil as needed to 
bring level up to the FULL mark. Refer to engine 
owner’s manual for oil specifications. See Figure 2.1.  


FIGURE 2.1 


2.1.4.  Check Blade switch to insure it works freely. 
Switch is pulled “OUT” into the “ON” position for 
blade engagement or pushed back “IN” into the 
“OFF” position for blade disengagement. See 
Figure 2.2. IMPORTANT: Disengagement stops the 
blades rotation. 


FIGURE 2.2 


2.1.5.  Clean exterior surfaces of cutting deck and 
engine of any accumulation of dirt, grass, oil, etc.  
Keep engine air intake screen and cooling fins clear 
at all times. 
2.1.6.  Add fuel to tank of the YARD CRUISER 
outside where fumes can safely dissipate. Make 
sure fuel filler cap is tight and vent is open after 
refueling. See Figure 2.3. Refer to engine owner’s 
manual for fuel specifications. 


FIGURE 2.3 

 
IMPORTANT: This YARD CRUISER is equipped with 
hydrostatic drive. The forward, rearward and steering 
movement of the machine is controlled by a joystick 
lever. Joystick operations should be performed only 
from the operator’s position in the seat. A small 
movement of the joystick can cause the machine to 
move instantly. Move joystick very carefully and slowly.
  
 
1.  Always move the joystick to the center position to 
“STOP” machine. IMPORTANT: To stop machine 
always return the joystick with hand assistance to the 
neutral position. Always engage parking brake when 
leaving operator’s seat. 
2. Move the joystick forward to propel the machine 
forward.  
3. Move the joystick rearward to propel the machine 
backward. 
4.  Move the joystick to the right to rotate the front of 
the machine in circular motion to the right, as in turning 
around to go in a different direction. 
5.  Move the joystick to the left to rotate the front of the 
machine in circular motion to the left, as in turning 
around to go in a different direction. 


PULL “OUT” TO 
ENGAGE 

PUSH “IN” TO 
DISENGAGE 

BLADE 
SWITCH 

SAFE LEVEL 
AREA 

ENGINE OIL DIPSTICK 

FUEL 
FILLER 
CAP 

OPEN 
VENT 

FUEL 
TANK 

Summary of Contents for YARD CRUISER YZ13331BE

Page 1: ...33 33 Cutting Deck 38 38 Cutting Deck 1 Series Designation 2 Series Designation B Briggs Engine E Electric Start Thank you for buying a SNAPPER Product Before operating your YARD CRUISER read this ma...

Page 2: ...result in severe injury or death All slopes require extra CAUTION If you cannot back up the slope or if you feel uneasy on it DO NOT mow it Use extra care with grass catchers or other attachments thes...

Page 3: ...0 Watch out for traffic when near or crossing roadways 11 STOP engine immediately after striking an obstruction Inspect machine and repair damage before resuming operation OPERATION Continued From Pre...

Page 4: ...el Pivot Shaft Lubrication 12 Parking Brake Pivot Bushing Lubrication 12 Annually End of Each Season 13 Engine 13 Air Filter 13 Oil Filter 13 Engine Oil 13 Transaxle 13 Fuel Filter 13 Storage Out of S...

Page 5: ...1 2 NOMENCLATURE The nomenclature drawing above Figure 1 1 shows the essential parts of the SNAPPER YARD CRUISER It is recommended that all operator s of this equipment become thoroughly familiar wit...

Page 6: ...tight and vent is open after refueling See Figure 2 3 Refer to engine owner s manual for fuel specifications FIGURE 2 3 IMPORTANT This YARD CRUISER is equipped with hydrostatic drive The forward rearw...

Page 7: ...chine Always return the joystick with hand assistance to the neutral position to stop machine The machine will only crank or start if parking brake lever is engaged and the blade switch is in the OFF...

Page 8: ...ding mower by moving joystick to neutral N position Refer to Figure 2 8 2 3 3 MOWER BLADE 1 Push the blade switch in to OFF position to disengage or stop the mower blades Refer to Figure 2 7 WARNING O...

Page 9: ...to pull up on the release lever at the same time Use the release lever when moving deck cutting height to a lower cutting position 1 Grasp both handles together to disengage latch 2 Raise or lower han...

Page 10: ...Refer to your engine owner s manual for service instructions 8 Fill engine crankcase with new oil Refer to your engine owner s manual for oil specifications 3 2 2 CHECK MOWER BLADE 1 Make sure fuel ca...

Page 11: ...specifications 3 Oil Filter Change engine oil filter Refer to engine owner s manual for filter specifications 4 Air Filter Refer to engine owner s manual for service instructions 5 Fuel Filter Refer...

Page 12: ...an be accessed through a hole at the rear of the front structure Lubricate pivot shaft with three shots of general purpose grease from grease gun See Figure 3 6 FIGURE 3 6 3 Parking Brake Pivot Bushin...

Page 13: ...moving filter Turn fuel shut off valve If equipped to the CLOSED position or perform filter change when fuel tank and fuel line are empty 1 Remove hose clamps from fuel filter 2 Remove fuel lines from...

Page 14: ...ockwise in a 1 8 increment then retighten lower nut to secure cable Check tracking of mower Repeat this adjustment if necessary See Figure 4 1 FIGURE 4 1 4 2 ENGINE ADJUSTMENTS REPAIR Refer to the eng...

Page 15: ...m See Figure 4 4 Tighten bolt securely 6 Reinstall front frame cover BELT REPLACEMENTS Engine to Hydro Pumps All Models Part No 4 1823 Engine to Electric Clutch All Models Part No 2 9117 Electric Clut...

Page 16: ...urement between the blade tip and deck lip should be 3 8 See Figure 4 5 9 Repeat step 8 with blade tip B 10 If measurement between blade tips and deck are different and there is more than 1 16 differe...

Page 17: ...ow center rear of deck to rest on angle iron 5 Measure the distance from blade tips to floor If the measurement is within 1 8 from side to side the deck levelness is satisfactory If the difference fro...

Page 18: ...With the YARD CRUISER on a smooth level surface rotate blades until blade tips are at front and rear of deck Measure the distance from blade tips to floor The distance should be the same or the rear...

Page 19: ...rt engine and allow it to run until engine runs out of fuel Close vent on fuel filler cap See Figure 2 3 Page 6 2 Remove key from ignition switch 3 Remove spark plug wire s and secure away from spark...

Page 20: ...re 4 18 FIGURE 4 18 WARNING The electrolyte acid produces a highly explosive gas Keep all sparks flame and fire away from area when charging battery or when handling electrolyte or battery Electrolyte...

Page 21: ...ery charger to battery terminals RED to positive and BLACK to negative terminal WARNING DO NOT OVERFILL Never attempt to charge battery while installed on the Yard Cruiser Never use BOOST chargers on...

Page 22: ...gaged 2 Engage park brake 3 Fuel tank empty or fuel shut off valve closed 3 Fill fuel tank with fresh fuel open fuel valve 4 Engine needs choking 4 Move choke control to CHOKE position 5 Blown Fuse 5...

Page 23: ...e 1 Bring to proper pressure Improperly 2 Cutting height too low or high 2 Adjust cutting height 3 Engine speed too slow 3 Move throttle control to FAST position 4 Forward speed too fast 4 Move joysti...

Page 24: ...age 14 15 X X X Mower Blades Check For Wear Damage Replacement Pages 19 20 X Mower Deck Clean Debris Accumulation Page 11 X Mower Deck Clean Outside and Underside Page 11 X Lubrication Points Grease o...

Page 25: ...ginal purchase date SNAPPER will not be responsible for any installation cost incurred The battery warranty only covers original equipment batteries and does not cover damage to the battery or machine...

Page 26: ...26 PRIMARY MAINTENANCE...

Page 27: ...27 PRIMARY MAINTENANCE...

Page 28: ...28 PRIMARY MAINTENANCE...

Page 29: ...29 PRIMARY MAINTENANCE...

Page 30: ..._____________________________ ______________________________________________________________________________ ______________________________________________________________________________ ____________...

Page 31: ..._____________________________ ______________________________________________________________________________ ______________________________________________________________________________ ____________...

Page 32: ...R HYDRO DRIVE SERIES 1 2 WARNING The engine exhaust from this product contains chemicals known to the State of California to cause cancer birth defects or other reproductive harm COPYRIGHT 1999 SNAPPE...

Reviews: