SMC Networks Barricade SMC7004ABR User Manual Download Page 58

S

ETTING

 TCP/IP 

TO

 W

ORK


WITH


THE

 B

ARRICADE

5-6

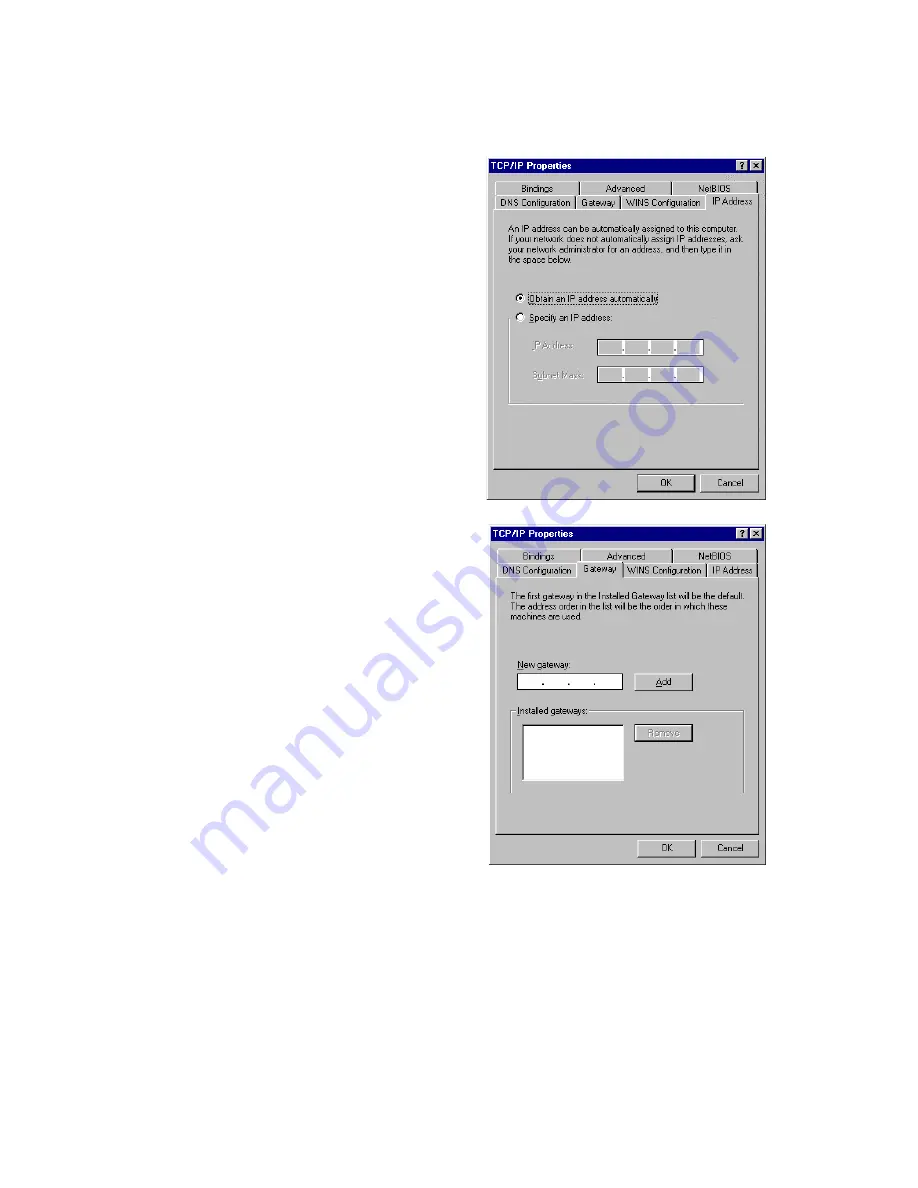
4. Select the "IP Address" tab.

If "Obtain an IP address 
automatically" is already 
selected, your computer is 
already configured for DHCP. 
Click "Cancel" to close each 
window, and skip to Step 2 
"Disable HTTP Proxy."

5. Locate your IP address and 

Subnet Mask. Record them 
in the spaces provided 
below.

6. Click the "Gateway" tab and 

record the numbers listed 
under "Installed gateways." 


Summary of Contents for Barricade SMC7004ABR

Page 1: ...ion to ISDN PSTN modem Home networking via Four Eight 10 100 Mbps Ethernet switch ports Built in Print Server Automatic IP configuration with DHCP Firewall client privileges hacker prevention NAT Multi user access up to 253 single user account Virtual server with network address translation Virtual Private Network using PPTP L2TP IPSec User Guide SMC7004ABR ...

Page 2: ......

Page 3: ...38 Tesla Irvine CA 92618 Phone 949 679 8000 Barricade Broadband Router User Guide From SMC s Barricade line of Broadband Routers February 2002 Revision Number R02 ...

Page 4: ...No license is granted by implication or otherwise under any patent or patent rights of SMC SMC reserves the right to change specifications at any time without notice Copyright 2002 by SMC Networks Inc 38 Tesla Irvine CA 92618 All rights reserved Printed in Taiwan Trademarks SMC is a registered trademark and Barricade is a trademark of SMC Networks Inc Other product and company names are trademarks...

Page 5: ...ncorporates these newer technologies At that point the obsolete product is discontinued and is no longer an Active SMC product A list of discontinued products with their respective dates of discontinuance can be found at http www smc com index cfm action customer_service_warranty All products that are replaced become the property of SMC Replacement products may be either new or reconditioned Any r...

Page 6: ...CIDENT FIRE LIGHTNING OR OTHER HAZARD LIMITATION OF LIABILITY IN NO EVENT WHETHER BASED IN CONTRACT OR TORT INCLUDING NEGLIGENCE SHALL SMC BE LIABLE FOR INCIDENTAL CONSEQUENTIAL INDIRECT SPECIAL OR PUNITIVE DAMAGES OF ANY KIND OR FOR LOSS OF REVENUE LOSS OF BUSINESS OR OTHER FINANCIAL LOSS ARISING OUT OF OR IN CONNECTION WITH THE SALE INSTALLATION MAINTENANCE USE PERFORMANCE FAILURE OR INTERRUPTIO...

Page 7: ...t and receiver Connect the equipment into an outlet on a circuit different from that to which the receiver is connected Consult the dealer or an experienced radio TV technician for help EC Conformance Declaration Class B SMC contact for these products in Europe is SMC Networks Europe Edificio Conata II Calle Fructuós Gelabert 6 8 2o 4a 08970 Sant Joan Despí Barcelona Spain This information technol...

Page 8: ...e 61 2 94160437 Fax 61 2 94160474 Electrostatic Discharge according to EN 61000 4 2 1995 Contact Discharge 4 kV Air Discharge 8 kV Radio frequency electromagnetic field according to EN 61000 4 3 1996 80 1000MHz with 1kHz AM 80 Modulation 3V m Electrical fast transient burst according to EN 61000 4 4 1995 AC DC power supply 1kV Data Signal lines 0 5kV Surge immunity test according to EN 61000 4 5 1...

Page 9: ...eicht zugänglich sein 5 Das Gerät ist vor Feuchtigkeit zu schützen 6 Bei der Aufstellung des Gerätes ist auf sicheren Stand zu achten Ein Kippen oder Fallen könnte Beschädigungen hervorrufen 7 Die Belüftungsöffnungen dienen der Luftzirkulation die das Gerät vor Überhit zung schützt Sorgen Sie dafür daß diese Öffnungen nicht abgedeckt werden 8 Beachten Sie beim Anschluß an das Stromnetz die Anschlu...

Page 10: ...ualifizierten Servicestelle zu überprüfen a Netzkabel oder Netzstecker sind beschädigt b Flüssigkeit ist in das Gerät eingedrungen c Das Gerät war Feuchtigkeit ausgesetzt d Wenn das Gerät nicht der Bedienungsanleitung entsprechend funktioniert oder Sie mit Hilfe dieser Anleitung keine Verbesserung erzielen e Das Gerät ist gefallen und oder das Gehäuse ist beschädigt f Wenn das Gerät deutliche Anze...

Page 11: ...ling 2 7 Attach the Barricade to the Internet 2 8 Connect a Printer 2 9 Connecting the Power Adapter 2 9 Verify Port Status 2 10 3 Configuring Client PCs 3 1 TCP IP Configuration 3 1 Printer Client Installation 3 2 4 Configuring the Barricade 4 1 Navigating the Web Browser Interface 4 2 Setting a Password 4 2 Making Configuration Changes 4 3 Main Menu 4 4 Networking and Client Services 4 6 Change ...

Page 12: ... Configure TCP IP Settings 5 4 Step 2 Disable HTTP Proxy 5 7 Step 3 Obtain IP Settings from Your Barricade 5 9 Configuring Your Computer with Windows 2000 5 11 Step 1 Configure TCP IP Settings 5 11 Step 2 Disable HTTP Proxy 5 14 Step 3 Obtain IP Settings From Your Barricade 5 16 Configuring Your Computer with Windows NT 4 0 5 18 Step 1 Configure TCP IP Settings 5 18 Step 2 Disable HTTP Proxy 5 21 ...

Page 13: ...8 A Troubleshooting A 1 B Cables B 1 Ethernet Cable B 1 Specifications B 1 Twisted pair Cable B 1 Straight through Cable B 2 Crossover Cable B 2 RJ 45 Port Pin Assignments B 3 Serial Port Pin Assignments B 4 DB 9 Port Pin Assignments B 4 Serial Port to 9 Pin COM Port on PC B 5 Serial Port to 25 Pin DCE Port on Modem B 5 Serial Port to 25 Pin DTE Port on PC B 5 Printer Port Pin Assignments B 6 DB 2...

Page 14: ...TABLE OF CONTENTS xiv ...

Page 15: ...e which allows you to connect to an xDSL or Cable modem ISDN TA or PSTN analog modem The Barricade provides extensive firewall protection and Virtual Private Network VPN services It also provides print services for any client attached to a LAN port The Barricade supports dial on demand for ISDN PSTN service automatically connecting to the Internet when there are requests and terminating the connec...

Page 16: ...leges hacker prevention and NAT NAT also enables multi user access with a single user account and virtual server functionality providing protected access to Internet services such as Web FTP mail and Telnet Virtual Private Network support using PPTP L2TP or IPSec pass through User definable application sensing tunnel supports applications requiring multiple connections Supports CHAP authentication...

Page 17: ... Address The Barricade provides Internet access for up to 253 users with a shared IP address Using only one ISP account multiple users on your network can browse the Web at the same time Virtual Server If you have a fixed IP address you can set up the Barricade to act as a virtual host for network address translation Remote users access various services at your site using a constant IP address The...

Page 18: ... users or filter all requests for specific services the administrator does not want to serve The Barricade s firewall can also block common hacker attacks including IP Spoofing Land Attack Ping of Death IP with zero length Smurf Attack UDP port loopback Snork Attack TCP null scan and TCP SYN flooding Virtual Private Network The Barricade supports three of the most commonly used VPN protocols PPTP ...

Page 19: ...call origination and flow control required by ISPs Layer Two Tunneling Protocol Includes most of the features provided by PPTP but has less overhead and is more suited for managed networks IP Security Provides IP network layer encryption IPSec can support large encryption networks such as the Internet by using digital certificates for device authentication ...

Page 20: ...APPLICATIONS 1 6 ...

Page 21: ... in Chapter 4 for information on configuring the router Package Contents After unpacking the Barricade Broadband Router check the contents of the box to be sure you ve received the following components Barricade Broadband Router Power adapter One CAT 5 Ethernet cable Four rubber feet Installation CD with complete user guide Quick Installation Guide SMC Warranty Registration Card Immediately inform...

Page 22: ...5 Mbps downstream and 512 Kbps upstream Cable modems can provide up to 36 Mbps downstream and 2 Mbps upstream ISDN can provide up to 128 Kbps when using two bearer channels And PSTN analog connections can now run up to 56 Kbps However you should note that the actual rate provided by specific service providers may vary dramatically from these upper limits Although access speed to the Internet is de...

Page 23: ... a server equipped with an Ethernet network interface card or to a networking device such as an Ethernet hub or switch One RJ 45 port for connection to an xDSL or Cable modem This port is fixed at 10 100 Mbps full duplex This port only supports MDI X pin signals so you will have to use either straight through or crossover cable depending on the port type used on the modem One RS 232 serial port to...

Page 24: ...es on your local area network to these ports such as a PC hub or switch Printer Port Parallel port 25 pins D type female Connect the shared printer to this port WAN Port WAN port RJ 45 Connect your Cable modem xDSL modem or an Ethernet router to this port COM Port Serial port 9 pins D type male Connect your ISDN TA or 56K analog modem to this port Power Inlet Connect the included power adapter to ...

Page 25: ...ovider A computer equipped with a 10 Mbps 100 Mbps or 10 100 Mbps Fast Ethernet card or a USB to Ethernet converter TCP IP network protocol installed on each PC that needs to access the Internet A Java enabled Web browser such as Microsoft Internet Explorer 5 0 or above or Netscape Communicator 4 0 or above installed on one PC at your site for configuring the Barricade Connect the System The Barri...

Page 26: ... to another network device 2 Connect the WAN Prepare an Ethernet cable for connecting the Barricade to a Cable xDSL modem or Ethernet router Prepare a serial cable for connecting the Barricade to an ISDN TA or PSTN modem 3 Connect your printer Use standard parallel printer cable to connect your printer to the printer port on the Barricade 4 Power on Connect the power adapter to the Barricade Figur...

Page 27: ...e Barricade to an Ethernet adapter on your PC Otherwise you can cascade any of LAN ports on the Barricade to an Ethernet hub or switch and then connect your PC or other network equipment to the hub or switch When inserting an RJ 45 plug be sure the tab on the plug clicks into position to ensure that it is properly seated Warning Do not plug a phone jack connector into any RJ 45 port This may damag...

Page 28: ...or greater with RJ 45 plugs to connect the broadband modem directly to the WAN port on the Barricade Use either straight through or crossover cable depending on the port type provided by the modem see Appendix B For ISDN or PSTN service attach the access device to the RS 232 serial port on the Barricade Figure 2 4 Making WAN Connections SMC7004ABR Reset Power WAN 10 100 Link Act 1 2 3 4 LAN 1 2 3 ...

Page 29: ...nected to your LAN can have access to this printer Connect a standard parallel printer cable to the Printer port on the Barricade and configure the printer server as described on page 6 1 Connecting the Power Adapter Plug the power adapter into the power socket on the Barricade and the other end into a power outlet Check the indicator marked Power on the front panel to be sure it is on If the Powe...

Page 30: ... The WAN port has established a valid network connection Flashing The WAN port is transmitting or receiving traffic Link Act Green On The indicated LAN port has established a valid network connection Flashing The indicated LAN port is transmitting or receiving traffic 10 100 Amber On The indicated LAN port is operating at 100 Mbps Off The indicated LAN port is operating at 10 Mbps ...

Page 31: ...bed in Chapter 5 to access the Barricade s Web configuration interface See Chapter 4 for information on configuring the Barricade If you have not previously configured TCP IP for your computer refer to Installing TCP IP Protocol in Your PC on page 5 1 All PCs connected to the Barricade must be set to the same IP subnet as the Barricade The default subnet address of the Barricade is 192 168 2 X whe...

Page 32: ...attached to the Barricade then install the Port Monitor program from the Barricade CD for Windows 95 98 ME NT 2000 and configure the Barricade s print server on each network station The Barricade printer server supports Windows 95 98 ME NT 2000 and Unix platforms Refer to Chapter 6 Configuring Printer Services ...

Page 33: ...cs to monitor network activity To access the Barricade s management interface enter the IP address of the Barricade in your Web browser http 192 168 2 1 Then login the Barricade system with no password by default there is no password Note For some browsers it may be necessary to include 88 after the management IP address For example http 192 168 2 1 88 The home page displays the Main Menu on the l...

Page 34: ...gure the LAN and WAN interface as well as other advanced functions While the Tools menu is used to reset the Barricade restore the factory settings or upgrade firmware Setting a Password If this is your first time to access the Barricade you should define a new password record it and put it in a safe place From the Main Menu select Setup and click on Change Password and follow the instructions on ...

Page 35: ...e sure to click the Enter button at the bottom of the page to confirm the new setting Note To ensure proper screen refresh after a command entry be sure that Internet Explorer 5 0 is configured as follows Under the menu Tools Internet Options General Temporary Internet Files Settings the setting for Check for newer versions of stored pages should be Every visit to the page ...

Page 36: ...iguration 2 fixed IP and gateway address 3 PPPoE configuration or 4 dial up modem DNS Specifies DNS servers to use for domain name resolution Advanced Settings Configures a variety of packet filtering and specialized functions including Firewall Virtual Server Special Application Client Filtering Misc Status Menu Displays WAN LAN connection status as well as firmware and hardware version numbers I...

Page 37: ...Reset Barricade Reboots the system and retains all of your configuration settings Restore Factory Settings Restores all configuration settings to the factory defaults Update Firmware Upgrades the system with the latest firmware obtained from SMC s website at www smc com Help Menu Contains information for product support troubleshooting and network terminology Logout Button Exit the Barricade syste...

Page 38: ...ay address DHCP address pool for dynamic client address allocation the WAN connection options DNS domain name mapping and other advanced services You can use the Setup Wizard by clicking the Enter button at the bottom of the page and changing the required settings or you can select the specific items you need to change from the Setup menu on the left side of the screen ...

Page 39: ... by the Setup and Tools menus By default there is no password so please assign a password to the Barricade as soon as possible and store it in a safe place Passwords can contain from 3 12 alphanumeric characters and are not case sensitive Note If your password is lost or you cannot gain access to the management interface press the Reset button on the front panel holding it down for at least five s...

Page 40: ... the IP address for client PCs enable the DHCP Server set the lease time and then specify the address range Also remember to configure all of your client PCs for dynamic address allocation Valid IP addresses consist of four numbers and are separated by periods The first three fields are the network portion and can be from 0 255 while the last field is the host portion and can be from 1 254 However...

Page 41: ...tion type Specify one of the first three options to configure a WAN connection through the RJ 45 port i e a connection to an xDSL modem or Cable modem Specify the Dial up on Demand option to configure a WAN connection through the serial port i e a connection to an ISDN TA or PSTN modem Note If WAN connections are configured for both the RJ 45 and serial port the serial port will be used as a backu...

Page 42: ...or Internet service and do not change it unless required by your ISP You can use the Clone MAC Address button to copy the MAC address of the Ethernet Card installed by your ISP in your PC and replace the WAN MAC address with this MAC address Static IP Address Fixed IP If your Internet Service Provider has assigned a fixed address enter the assigned address and subnet mask for the Barricade then en...

Page 43: ...a fixed address if you want to provide Internet services such as a Web server or FTP server PPP over Ethernet PPPoE Enter the PPPoE user name and password assigned by your ISP The Service Name is normally optional but may be required by some providers ...

Page 44: ...cribed below Check if you only use a dial up modem to connect to the Internet If the serial port is used for primary Internet access then mark this item If not marked then this connection will only be used for backup access if the primary WAN link fails Dial Up Service Phone Number Enter the phone number your service provider has given to you for Internet access Dial Up Account Information Enter y...

Page 45: ...Service Provider given you an IP address If you are assigned a dynamic IP address every time you dial up mark No for this item However if your ISP has assigned a fixed IP address for you to use mark Yes for this item and enter the IP address and subnet mask Note If your ISP has given you a secondary phone number or if you have a secondary Internet service account then fill in the relevant fields u...

Page 46: ...functions using the Setup Wizard by clicking Enter at the bottom of the Advanced Settings screen or by selecting specific items from the menu on the left of the screen Firewall Protection The Barricade s firewall can block common hacker attacks including IP Spoofing Land Attack Ping of Death IP with zero length Smurf Attack UDP port loopback Snork Attack TCP null scan and TCP SYN flooding The fire...

Page 47: ...o local servers configured with private IP addresses In other words depending on the requested service TCP UDP port number the Barricade redirects the external service request to the appropriate server located at another internal IP address The WAN interface must have a fixed IP address to utilize this function For example if you set Type Public Port to TCP 80 HTTP or Web and the Private IP Port t...

Page 48: ...he more common TCP service ports include HTTP 80 FTP 21 Telnet 23 and POP3 110 Enabling Special Applications Some applications require multiple connections such as Internet gaming videoconferencing Internet telephony and others These applications may not work when Network Address Translation NAT is enabled If you need to run applications that require multiple connections use the following screen t...

Page 49: ... multiple ports via the Special Application screen you may have to open the client PC for full Internet access using the DMZ Host option Client Filtering You can filter Internet access for local clients based on IP address application type i e HTTP port and time of day For example this screen shows that clients in the address range 192 168 2 50 99 are permanently restricted from using FTP Port 21 ...

Page 50: ...a remote host by adding the IP address of an administrator to this screen Note If you specify an IP address of 0 0 0 0 any host can manage the Barricade Virtual DMZ Host If you have a client PC that cannot run an Internet application properly from behind the firewall or after configuring the Special Applications function then you can open the client up to unrestricted two way Internet access Enter...

Page 51: ...e following items are included in this screen Field Description INTERNET Displays WAN connection type and status GATEWAY Displays system IP settings as well as DHCP NAT Firewall and Printer status INFORMATION Displays the number of attached clients the firmware versions the physical MAC address for each media interface as well as the hardware version and serial number Security Log Displays any ill...

Page 52: ...C You can then click on the Restore Settings button to restore the saved backup configuration file Note If you use the Reset button on the front panel the Barricade performs a power reset and restores the factory settings Clear Click on this button to delete the access log DHCP Client Log Displays information on all DHCP clients on your network Release Click on this button to confirm DHCP settings...

Page 53: ...TCP IP address on a PC refer to Setting TCP IP to Work with the Barricade on page 5 3 Installing TCP IP Protocol in Your PC 1 Click the Start button and choose Settings then click Control Panel 2 Double click the Network icon and select the Configuration tab in the Network window 3 Click the Add button to add the network component to your PC 4 Double click Protocol to add the TCP IP protocol ...

Page 54: ...in the manufacturers list And choose TCP IP in the Network Protocols Click the OK button to return to the Network window 6 The TCP IP protocol will be listed in the Network window Click OK to complete the install procedure and restart your PC to enable the TCP IP protocol ...

Page 55: ...that has been assigned to your network card in the Configuration tab of the Network window 3 Click the Properties button to set the TCP IP protocol for the Barricade 4 You can dynamically assign TCP IP address settings to a client or you can manually configure a client with address settings to meet your specific network requirements Note that the default IP address of the Barricade is 192 168 2 1 ...

Page 56: ... the hardware setup by connecting your devices you need to configure your computer to connect to your Barricade You need to determine how your ISP issues your IP address Many ISPs issue these numbers automatically using a networking technology known as Dynamic Host Control Protocol or DHCP Other ISPs will specify your IP address and associated numbers which you must enter manually This is also kno...

Page 57: ...CONFIGURING CLIENT TCP IP 5 5 2 From Control Panel double click the Network icon 3 In the Network window under the Configuration tab double click the TCP IP entry that is listed with your network card ...

Page 58: ...tically is already selected your computer is already configured for DHCP Click Cancel to close each window and skip to Step 2 Disable HTTP Proxy 5 Locate your IP address and Subnet Mask Record them in the spaces provided below 6 Click the Gateway tab and record the numbers listed under Installed gateways ...

Page 59: ...pt you to restart your system Click Yes and your computer will shut down and restart Step 2 Disable HTTP Proxy You will need to verify that the HTTP Proxy feature of your Web browser is disabled This is so that your Web browser will be able to view the configuration pages inside your Barricade The following steps are for Internet Explorer and for Netscape Determine which browser you use and follow...

Page 60: ... Internet Explorer and click the stop button Click Tools then Internet Options 2 In the Internet Options window click the Connections tab Next click the LAN Settings button 3 Clear all the checkboxes 4 Click OK and then click OK again to close the Internet Options window ...

Page 61: ...n to the Internet Click OK 3 Repeat these steps for each Windows 95 98 Me computer connected to your Barricade Step 3 Obtain IP Settings from Your Barricade Now that you have configured your computer to connect to your Barricade it needs to obtain new network settings By releasing any old IP settings and renewing them with settings from your Barricade you will also verify that you have configured ...

Page 62: ...P Configuration window to appear 3 From the drop down menu select your network card Click Release and then Renew Verify that your IP address is now 192 168 2 xxx your Subnet Mask is 255 255 255 0 and your Default Gateway is 192 168 2 1 These values confirm that your Barricade is functioning Click OK to close the IP Configuration window ...

Page 63: ...your IP address Many ISPs issue these numbers automatically using a networking technology known as Dynamic Host Control Protocol or DHCP Other ISPs will specify your IP address and associated numbers which you must enter manually This is also known as a static IP address How your ISP assigns your IP address determines how you will configure your computer Here is what to do 1 From the Windows deskt...

Page 64: ...SETTING TCP IP TO WORK WITH THE BARRICADE 5 12 2 Double click the Network Dial Up Connections icon 3 Double click the icon that corresponds to the connection to your Barricade 4 Click Properties ...

Page 65: ...o record the information If Obtain an IP address automatically and Obtain DNS server address automatically are already selected your computer is already configured for DHCP Click Cancel to close each window and skip to Step 2 Disable HTTP Proxy 7 Select Obtain an IP address automatically and then select Obtain DNS server address automatically Then click OK Click OK or Close to close each window ...

Page 66: ...Barricade The following steps are for Internet Explorer and for Netscape Determine which browser you use and follow the appropriate steps Internet Explorer 1 Open Internet Explorer and click the stop button Click Tools then Internet Options TCP IP Configuration Setting IP Address ____ ____ ____ ____ Subnet Mask ____ ____ ____ ____ Primary DNS Server ____ ____ ____ ____ Secondary DNS Server ____ __...

Page 67: ...ons window click the Connections tab Next click the LAN Settings button 3 Clear all the checkboxes 4 Click OK and then click OK again to close the Internet Options window Netscape 1 Open Netscape and click the stop button Click Edit then click Preferences ...

Page 68: ...tings From Your Barricade Now that you have configured your computer to connect to your Barricade it needs to obtain new network settings By releasing any old IP settings and renewing them with settings from your Barricade you will also verify that you have configured your computer correctly 1 From the Windows desktop click the Start button then Programs then Accessories and then click Command Pro...

Page 69: ...TER key 3 Type IPCONFIG RENEW and press the ENTER key Verify that your IP address is now 192 168 2 xxx 2 255 your Subnet Mask is 255 255 255 0 and your Default Gateway is 192 168 2 1 These values confirm that your Barricade is functioning 4 Type EXIT and press ENTER to close the Command Prompt window ...

Page 70: ...r IP address Many ISPs issue these numbers automatically using a networking technology known as Dynamic Host Control Protocol or DHCP Other ISPs will specify your IP address and associated numbers which you must enter manually This is also known as a static IP address How your ISP assigns your IP address determines how you will configure your computer Here is what to do 1 From the Windows desktop ...

Page 71: ...otocol 5 Select the IP Address tab 6 In the Adapter drop down list be sure your Ethernet adapter is selected If Obtain an IP address automatically is already selected your computer is already configured for DHCP Click Cancel to close each window and skip to Step 2 Disable HTTP Proxy ...

Page 72: ...iate spaces below 9 After writing down your IP settings click the IP address tab Select Obtain IP address automatically and click OK Click OK again to close the Network window 10 Windows may copy some files and will then prompt you to restart your system Click Yes and your computer will shut down and restart TCP IP Configuration Setting IP Address ____ ____ ____ ____ Subnet Mask ____ ____ ____ ___...

Page 73: ...able to view the configuration pages inside your Barricade The following steps are for Internet Explorer and for Netscape Determine which browser you use and follow the appropriate steps Internet Explorer 1 Open Internet Explorer and click the stop button Click Tools then Internet Options 2 In the Internet Options window click the Connections tab Next click the LAN Settings button ...

Page 74: ... OK and then click OK again to close the Internet Options window Netscape 1 Open Netscape and click the stop button Click Edit then click Preferences 2 In the Preferences window under Category double click Advanced then click Proxies Select Direct connection to the Internet Click OK ...

Page 75: ... to obtain new network settings By releasing any old IP settings and renewing them with settings from your Barricade you will also verify that you have configured your computer correctly 1 From the Windows desktop click the Start button then Programs and then select Command Prompt 2 In the Command Prompt window type IPCONFIG RELEASE and press the ENTER key ...

Page 76: ...ps and screenshots were created using Mac OS 8 5 Mac OS 7 x and above are all very similar but may not be identical to Mac OS 8 5 Step 1 Configure TCP IP Settings After you have completed the hardware setup you need to configure your computer to connect to your Barricade You need to determine how your ISP issues your IP address Many ISPs issue these numbers automatically using a networking technol...

Page 77: ...ONFIGURING CLIENT TCP IP 5 25 Here is what to do 1 Pull down the Apple Menu Click Control Panels and select TCP IP 2 In the TCP IP dialog box make sure that Ethernet is selected in the Connect Via field ...

Page 78: ...onfigure field and close the window 5 Another box will appear asking whether you want to save your TCP IP settings Click Save Step 2 Disable HTTP Proxy You will need to verify that the HTTP Proxy feature of your Web browser is disabled This is so that your Web browser will be able to view the configuration pages inside your Barricade The following steps are for Internet Explorer and for Netscape D...

Page 79: ...xplorer and click the stop button Click Edit and select Preferences 2 In the Internet Explorer Preference s window under Network select Proxies 3 Uncheck all checkboxe s and click OK Netscape 1 Open Netscape and click the stop button Click Edit and select Preferences ...

Page 80: ...oxies 3 Select Direct Connection to the Internet and click OK Step 3 Obtain IP Settings From Your Barricade Now that you have configured your computer to connect to your Barricade it needs to obtain new network settings By releasing any old IP settings and renewing them with settings from your Barricade you will also verify that you have configured your computer correctly ...

Page 81: ...Control Panels and select TCP IP 2 In the TCP IP window your new settings will be shown Verify that your IP address is now 192 168 2 xxx your Subnet Mask is 255 255 255 0 and your Default Gateway is 192 168 2 1 These values confirm that your Barricade is functioning ...

Page 82: ... a DHCP Server Select Obtain an IP address automatically in the IP Address tab Do not input any values under the Gateway tab and choose Disable DNS in the DNS Configuration tab These settings will be automatically configured by the DHCP server Click OK and reboot your system to implement the changes ...

Page 83: ... use 255 255 255 0 for the subnet mask 2 In the Gateway tab add the IP address of the Barricade default 192 168 2 1 in the New gateway field and click Add 3 In the DNS Configuration tab add the IP address for the Barricade and click Add This automatically relays DNS requests to the DNS server s provided by your ISP Otherwise add specific DNS servers into the DNS Server Search Order field and click...

Page 84: ...llowing messages appear Pinging 192 168 2 1 with 32 bytes of data Reply from 192 168 2 1 bytes 32 time 2ms TTL 64 a communication link between your computer and the Barricade has been successfully established Otherwise if you get the following messages Pinging 192 168 2 1 with 32 bytes of data Request timed out there may be something wrong in your installation procedure Check the following items i...

Page 85: ...CONFIGURING CLIENT TCP IP 5 33 If you can successfully Ping the Barricade then you are now ready to connect to the Internet ...

Page 86: ...SETTING TCP IP TO WORK WITH THE BARRICADE 5 34 ...

Page 87: ... or Unix see Configure the Print Server on page 6 4 Install the Printer Port Monitor Skip this section if you are using Unix For Windows 95 98 ME NT 2000 clients you need to install the port monitor program as described in this section 1 Insert the installation CD ROM into your CD ROM drive Under the PrintSvr directory run the setup exe program The SMC Port Monitor installation program advises you...

Page 88: ...creen indicates that the print client uses TCP IP network protocol to monitor print requests Click Next 3 Select the destination folder and click on the Next button The setup program will then begin to install the programs into the destination folder ...

Page 89: ...ext 5 Enter the printer port name that will be used to identify the port monitor in your system and press Next 6 When the setup program finishes installing the port monitor select the item to restart your computer and then click OK 7 After rebooting your computer add the Barricade print server to your system as described in the following section ...

Page 90: ...2000 first install the port monitor as described in the previous section before adding the Barricade s print server to your operating system Configure the Network Printer in Windows 95 98 ME 2000 1 On a Windows 95 98 ME 2000 platform open the Printers window in the My Computer menu and double click the Add Printer icon 2 Follow the prompts to add a Local printer to your system ...

Page 91: ...lt port name is SMC100 and then click the Configure Port button 5 Enter the IP address of the Barricade and click OK and then click Next in the Add Printer Wizard dialog box 6 Continue following the prompts to finish installing the Barricade print server The printer type you specified will now be added to your Printers menu ...

Page 92: ...VER 6 6 Configure the Network Printer in Windows NT 1 On a Windows NT platform open the Printers window in the My Computer menu and double click the Add Printer icon 2 Follow the prompts to add a local printer to your system ...

Page 93: ...t button 4 Enter the IP address of the Barricade and click OK and then click Next in the Add Printer Wizard dialog box 5 Specify the printer type attached to the Barricade 6 Continue following the prompts to finish installing the Barricade print server The printer type you specified will now be added to your Printers menu ...

Page 94: ...ONFIGURE THE PRINT SERVER 6 8 Configure the Network Printer in Unix Systems Follow the traditional configuration procedure on Unix platforms to set up the Barricade print server The printer name is lpt1 ...

Page 95: ...Power LED is Off External power supply has failed or is disconnected Check connections between the Barricade the external power supply and the wall outlet If the power indicator does not turn on when the power cord is plugged in you may have a problem with the power outlet power cord or external power supply However if the unit powers off after running for a while check for loose power connections...

Page 96: ...ny defective adapter or cable if necessary Network Connection Problems Cannot Ping the Barricade from the attached LAN or the Barricade cannot Ping any device on the attached LAN Verify that the IP addresses are properly configured For most applications you should use the Barricade s DHCP function to dynamically assign IP addresses to any host on the attached LAN However if you manually configure ...

Page 97: ...ort you are using has not been disabled Check the network cabling between the management station and the Barricade Forgot or lost the password Press the Reset button on the front panel holding it down for at least five seconds to restore the factory defaults Printer Server The printer cannot print or prints garbage Make sure the parallel cable between the Barricade and printer is connected and is ...

Page 98: ...TROUBLESHOOTING A 4 ...

Page 99: ...ther red with white stripes Also an RJ 45 connector must be attached to both ends of the cable All RJ 45 ports except for the WAN port support automatic MDI MDI X configuration This means that you can use straight through cable to attach the LAN ports to any network device However when connecting the WAN port to a broadband modem you will need to use either straight through or crossover cable depe...

Page 100: ...hing the wires to the pins Figure B 1 RJ 45 Connector Pin Numbers Straight through Cable Crossover Cable Straight Through RJ 45 Pin Assignments End 1 End 2 1 TD 1 TD 2 TD 2 TD 3 RD 3 RD 6 RD 6 RD Pins 4 5 7 and 8 are not connected Crossover RJ 45 Pin Assignments End 1 End 2 1 TD 3 RD 2 TD 6 RD 3 RD 1 TD 6 RD 2 TD Pins 4 5 7 and 8 are not connected ...

Page 101: ...ort is operating in MDI or MDI X mode However the WAN port is configured only for MDI X mode Pin MDI Signal Name MDI X Signal Name 1 Transmit Data TD Receive Data RD 2 Transmit Data TD Receive Data RD 3 Receive Data RD Transmit Data TD 6 Receive Data RD Transmit Data RD Pins 4 5 7 and 8 are not connected The and signs represent the polarity of the wires that make up each wire pair ...

Page 102: ...in Numbers DB 9 Port Pin Assignments EIA Circuit CCITT Signal Description Gateway s DB9DTE Pin PC DB9 DTE Pin Modem DB25 DCE Pin Signal Direction DTE DCE CF 109 DCD Data Carrier Detected 1 1 8 BB 104 RxD Received Data 2 2 3 BA 103 TxD Transmitted Data 3 3 2 CD 108 2 DTR Data Terminal Ready 4 4 20 AB 102 SG Signal Ground 5 5 7 CC 107 DSR Data Set Ready 6 6 6 CA 105 RTS Request to Send 7 7 4 CB 106 ...

Page 103: ... 4 DTR DSR 6 5 SGND SGND 5 6 DSR DTR 4 7 RTS CTS 8 8 CTS RTS 7 9 RI RI 9 Barricade s 9 Pin Serial Port CCITT Signal Modem s 25 Pin DCE Port 1 DCD 8 2 RXD 3 3 TXD 2 4 DTR 20 5 SGND 7 6 DSR 6 7 RTS 4 8 CTS 5 9 RI 22 Barricade s 9 Pin Serial Port Null Modem PC s 25 Pin DTE Port 1 DCD 8 DCD 2 RXD 3 TXD 3 TXD 2 RXD 4 DTR 20 DTR 5 SGND 7 SGND 6 DSR 6 DSR 7 RTS 4 RTS 8 CTS 5 CTS 9 RI 22 RI 1 1 2 3 3 2 4 ...

Page 104: ...d in the following table Figure B 3 DB 25 Printer Port Pin Numbers DB 25 Printer Port Pin Assignments Pin Signal Name Direction 1 Strobe To printer 2 Data 0 To printer 3 Data 1 To printer 4 Data 2 To printer 5 Data 3 To printer 6 Data 4 To printer 7 Data 5 To printer 8 Data 6 To printer 9 Data 7 To printer 10 ACK To print server 11 Busy To print server 12 Paper End To print server 13 Select To pri...

Page 105: ...agement Web management Advanced Features Dynamic IP Address Configuration DHCP DNS Firewall Client privileges hacker prevention and logging Virtual Private Network PPTP L2TP IPSec pass through Backup Internet Connection Dial on demand via secondary WAN port Print server Indicator Panel LAN Link Activity WAN Link Activity Power Dimensions 19 5 x 11 25 x 2 55 cm 7 68 x 4 43 x 1 00 in Weight 1 34 lbs...

Page 106: ...6 IP RFC 791 ICMP RFC 792 UDP RFC 768 TCP RFC 793 Telnet RFC 854 859 MD5 RFC 1321 BOOTP Extension RFC 1497 PPP LCP Extension RFC 1570 PPPoE RFC 2516 NAT RFC 1631 PPP RFC 1661 HTML RFC 1866 HTTP RFC 1945 CHAP RFC 1944 DHCP RFC 2131 PPTP RFC 2637 Temperature Operating 32 to 104 F 0 to 40 C Storage 40 to 158 F 40 to 70 C Humidity 5 to 95 noncondensing ...

Page 107: ...rk Emissions FCC Class B VCCI Class B Industry Canada Class B EN55022 CISPR 22 Class B C Tick AS NZS 3548 1995 Class B Immunity EN 61000 3 2 3 EN 61000 4 2 3 4 5 6 8 11 Safety UL 1950 EN60950 TÜV CSA 22 2 No 950 Warranty Limited Lifetime ...

Page 108: ...SPECIFICATIONS C 4 ...

Page 109: ...D 1 APPENDIX D ORDERING INFORMATION Barricade Broadband Router Products SMC7004ABR 4 port Residential Gateway WAN LAN Print Server SMC7004AWBR 4 port Residential Gateway WAN LAN WLAN Print Server ...

Page 110: ...ORDERING INFORMATION D 2 ...

Page 111: ......

Page 112: ...nce 33 0 41 38 32 32 Fax 33 0 41 38 01 58 Italy 39 02 739 12 33 Fax 39 02 739 14 17 Benelux 31 33 455 72 88 Fax 31 33 455 73 30 Central Europe 49 0 89 92861 0 Fax 49 0 89 92861 230 Switzerland 41 0 1 9409971 Fax 41 0 1 9409972 Nordic 46 0 868 70700 Fax 46 0 887 62 62 Northern Europe 44 0 118 974 8700 Fax 44 0 118 974 8701 Eastern Europe 34 93 477 4920 Fax 34 93 477 3774 Sub Saharian Africa 27 11 3...

Reviews: