background image

Engelsk SL 400 Skylifter - N2.14 Revision 1.1 


4.5 - Power supply 

Skylifter has 1 x lithium-ion battery, 24 V, 20.25 Ah.  

Battery capacity at different temperatures: 


-10

o

 C  

60 % 


 0

o

 C  

80 % 


23

o

 C  

100 % 


55

o

 C  

95 % 

 
A new, fully charged battery provides 29 V power. The battery cuts out when it is discharged to 21 V. 
 

4.5.1 - Battery lifetime 

Batteries deteriorate over time and after many recharging cycles. After 1000 recharging cycles, this battery 
retains 80 % of its original capacity.   
 

4.5.2 - External operating battery charger 

Connect to mains power supply: 220V-50Hz  


4.5.3 - Charging time 

4 hours using standard charger. 
The battery is suitable for top-up charging, which means that you can recharge for short periods (e.g. in 
breaks, etc.) You can also charge the battery while it is in use on the Skylifter. Recharging while in use is not 
recommended as the cable may obstruct mounting work and get crushed during operation.  
 

4.5.4 - Remote control unit range 

The remote control unit has a range of up to 200 m as the crow flies. However, range may be impaired by a 
compact building mass, large steel constructions, etc. We recommend that you check that the range is 
satisfactory before beginning work (and especially in a compact building or when there are large steel 
constructions). 


The charger can be switched to 110V, 60Hz.  
Flip switch to select. 


Summary of Contents for SL 400 Skylifter

Page 1: ...r N2 14 Revision 1 1 Instruction Manual Model type SL 400 Skylifter N A Christensensvej 39 DK 7900 Nykøbing Mors Tel 45 97 72 29 11 Fax 45 97 72 39 11 E mail smart smartlift dk www smartlift dk 2006 Copyright www smartlift dk ...

Page 2: ... lifetime 8 4 5 2 External operating battery charger 8 4 5 3 Charging time 8 4 5 4 Remote control unit range 8 5 0 General safety regulations and the operator s responsibilities 9 5 1 Important terms and definitions 9 6 0 General description and main components 10 7 0 Operating SL 400 Skylifter 11 7 1 Starting Skylifter 11 7 2 Manoeuvring Skylifter remote control unit 12 7 3 Precision manoeuvring ...

Page 3: ...fter the carrier performs the long and large movements which bring the load close to the desired position Skylifter holds and manoeuvres the load gently and safely into its final position The only requirement is that the load can be attached to suction pads with vacuum If you are uncertain whether Skylifter is suitable for your specific task or if you want to know if Skylifter can be mounted on a ...

Page 4: ...irective 2006 42EC Low Voltage Directive 2006 95 EC EMC Directive 2014 30 EU The following standards are applied DS EN ISO 12100 1 2009 Safety of machinery general principles DS EN ISO 12100 2 2009 Safety of machinery general principles DS ISO TR14121 2 2012 Risk assessment guidance and methods DS EN 13857 2008 Safety of machinery Hazard zones and safety distances DS EN 13155 A1 A2 2009 Cranes Saf...

Page 5: ... take steps to remedy the situation 1 x SL 400 Skylifter comprises the following components parts 1 x SL 400 Skylifter 2 x traverses 4 sets suction pads with hoses 2 x supporting legs 1 x aluminium box containing 1 x radio transmitter 1 x battery charger for radio transmitter 2 x rechargeable batteries 1 x Lithium ion operating battery 1 x charger for operating battery 1 x instructions for use 1 x...

Page 6: ...u have questions contact your local sales representative Mount the mounting bracket adapter onto Skylifter The mounting bracket must be suitable for use on the specific type of carrier used Always use original mounting brackets If the mounting brackets used are not original the guarantee on the machine is null and void Original mounting brackets are CE marked by SmartLift For bolt positions and to...

Page 7: ...er Functions folded Functions extended to max Length 0 80 m 1 48 m Width without traverse 1 20 m 0 88 m Height 1 20 m 1 20 m 4 3 1 Physical dimensions on machine without transportation bracket and mounting bracket adapter Functions folded Functions extended to max Length 0 80 m 1 48 m Width without traverse 0 88 m 0 88 m Height 0 80 m 1 00 m 4 4 Operating time Maximum operating time is relative an...

Page 8: ...ging time 4 hours using standard charger The battery is suitable for top up charging which means that you can recharge for short periods e g in breaks etc You can also charge the battery while it is in use on the Skylifter Recharging while in use is not recommended as the cable may obstruct mounting work and get crushed during operation 4 5 4 Remote control unit range The remote control unit has a...

Page 9: ...audible alarm is triggered NEVER lift wet or slippery items using the suction pads Before using the machine ALWAYS check that the suction pad brackets are securely fastened The machine must NOT be used in an ATEX zone explosive atmosphere PROHIBITED DANGER NEVER leave the machine with its load suspended on the suction pads Standing under the load during lifting and under the machine is strictly pr...

Page 10: ...ter 2 Chassis 3 Main cabinet 4 Radio receiver 5 Turn unit 6 Lifting unit 7 Tilt unit 8 Rotation unit main boom 9 Elbow joint 10 Carrying arm 11 Front unit 12 Parallel side shift 13 Traverse 14 Suction pad 15 Pad holder Other components are shown on the parts list 14 15 12 5 9 10 7 2 11 4 8 3 1 6 13 2006 Copyright www smartlift dk ...

Page 11: ...he top moves upwards To start remote control unit press briefly on button 2 Lamp 3 flashes red and the remote control unit receiver display 4 lights up 5 To establish a connection with the remote control unit receiver activate the joystick 6 briefly in the direction of the arrow Skylifter is now switched on and ready for use To operate the vacuum system see section 8 5 1 3 2 4 5 6 Battery indicato...

Page 12: ...al level The joystick moves the load to horizontal The load follows the joystick s movements When the load is horizontal it can be shifted sideways To activate press button 6 7 3 Precision manoeuvring Precision manoeuvring at slow speed can be activated stepwise i e all manoeuvring speeds are reduced further There are three steps To activate press button 7 1 x touch to the left reduces speed to st...

Page 13: ...d be positioned as far from each other as possible A large distance between the suction pads ensures that the lift is as safe balanced and stable lifting as possible and minimises sensitivity e g to gusts of wind The suction pads must be positioned at a distance of min 25 mm from frames and edges 3 Check that each suction pad has both a red and a blue hose If this is not the case replace the sucti...

Page 14: ... See photo above 9 The vacuum pumps shut off and the vacuum valve releases the vacuum on the suction pads It takes only a few seconds to release the load 10 When the suction pads have released the load the operator manoeuvres Skylifter away from the mounting area The operator fully retracts the Skylifter s scissor system and signals to the driver that he can remove Skylifter from the work zone Imp...

Page 15: ...el screen The volume is adjustable Adjust the volume to the ambient noise level Never completely shut down the screen as the operator may overhear the alarm If the red lamp flashes and the alarm does not sound the battery is running low The machinery will continue to work for a few minutes before stopping Replace or recharge the battery as soon as possible Do not mount anything until the battery i...

Page 16: ... Skylifter N2 14 Revision 1 1 16 9 2 Fault in radio control system No connection to radio receiver Reset radio control press and hold button for 5 seconds Reset remote control unit press and hold button for 5 seconds ...

Page 17: ...elsk SL 400 Skylifter N2 14 Revision 1 1 17 10 0 Vacuum diagram Circuit 1 Circuit 2 Key to symbols Noise reducer Vacuum pump Check valve Tank Vacuum gauge with display Filter Magnet valve 3 2 NO Vacuum pad ...

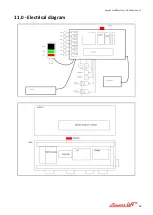
Page 18: ...Engelsk SL 400 Skylifter N2 14 Revision 1 1 18 11 0 Electrical diagram ...

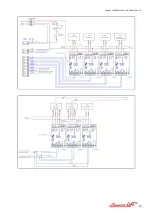
Page 19: ...Engelsk SL 400 Skylifter N2 14 Revision 1 1 19 ...

Page 20: ...Engelsk SL 400 Skylifter N2 14 Revision 1 1 20 ...

Page 21: ...Engelsk SL 400 Skylifter N2 14 Revision 1 1 21 ...

Page 22: ...ter rigging instructions When connecting to the carrier ensure that the Skylifter is fitted with the appropriate mounting bracket i e designed specifically for the carrier in question The mounting bracket must always be rigged to the carrier in accordance with the carrier manufacturer s instructions NB Before using Skylifter check that the mounting bracket is securely mounted and locked See actual...

Page 23: ...indows at height How to connect an extra radio transmitter Switch remote control unit 1 and radio receiver to OFF Connect cable between remote control unit 1 and radio receiver Switch radio receiver and remote control unit 2 to ON Press and hold down Power button until you hear 5 x beep sounds To switch between remote control units 1 and 2 switch the unit you last used to OFF You can now immediate...

Reviews: