background image

User manual  / Handbuch / Navod k obsluze

METIS 4

Depending on the wind conditions or the slope, an adequate 
use of brakes can help you to take-off more quickly.

Towing

The METIS 4 may be tow-launched. It is the pilot’s responsibility 
to use suitable harness, attachments and release mechanism. 
Tow pilot should be qualified to tow. 
When  towing  pilot  must  be  certain  that  the  paraglider  is 
completely over your head before you start. In each case the 
maximum tow force needs to correspond to the body weight of 
the pilot and passanger. 

4.3.  Landing

Because of the exceptional glide, high caution is recommended 
in the stages of approach and landing. METIS 4 is an agile 
glider, any action on the brakes may cause significant reactions. 
It  is  therefore  recommended  to  execute  the  first  flights  in 
a familiar environment and under easy conditions. With negative 
steering there is more time for the maneuvers to be performed 
steadily, which results in reducing the pendulum movements of 
the paraglider.
Reminder:  Negative  steering  involves  applying  the  brakes 
symmetrically by about 30% of the maximum range to slow the 
paraglider and a simultaneous turning by means of releasing the 
outside brake. Speeding up just prior to landing allows a more 
effective flare and therefore a gentler landing. 

4.4.  Turning

METIS 4 is designed to turn efficiently and will core thermals 
without the need for weight-shift piloting. Negative steering 
(see above) slows the paraglider in level flight and can reduce 
excessive  roll  during  turn  reversals. Your  glider  is  not  only 
designed to turn rapidly (with approx. 30% brake) but also to 
fly slowly in order to help identify areas of lift. It will also effect 
a flatter turn (with 15% brake) to minimize sink rate during 
the  turn.  Symmetrical  brake-input  at  20-30  %  enables  you 

to control the glider – to brake further if the canopy pitches 
forward and to release when if the canopy pitches backwards. 

4.5.  Rapid Descent Techniques

In order to descend, the paraglider must be moved away from 
the areas of lift. In case any difficulties occur, the following 
techniques can be used to increase the sink rate. 

Big Ears

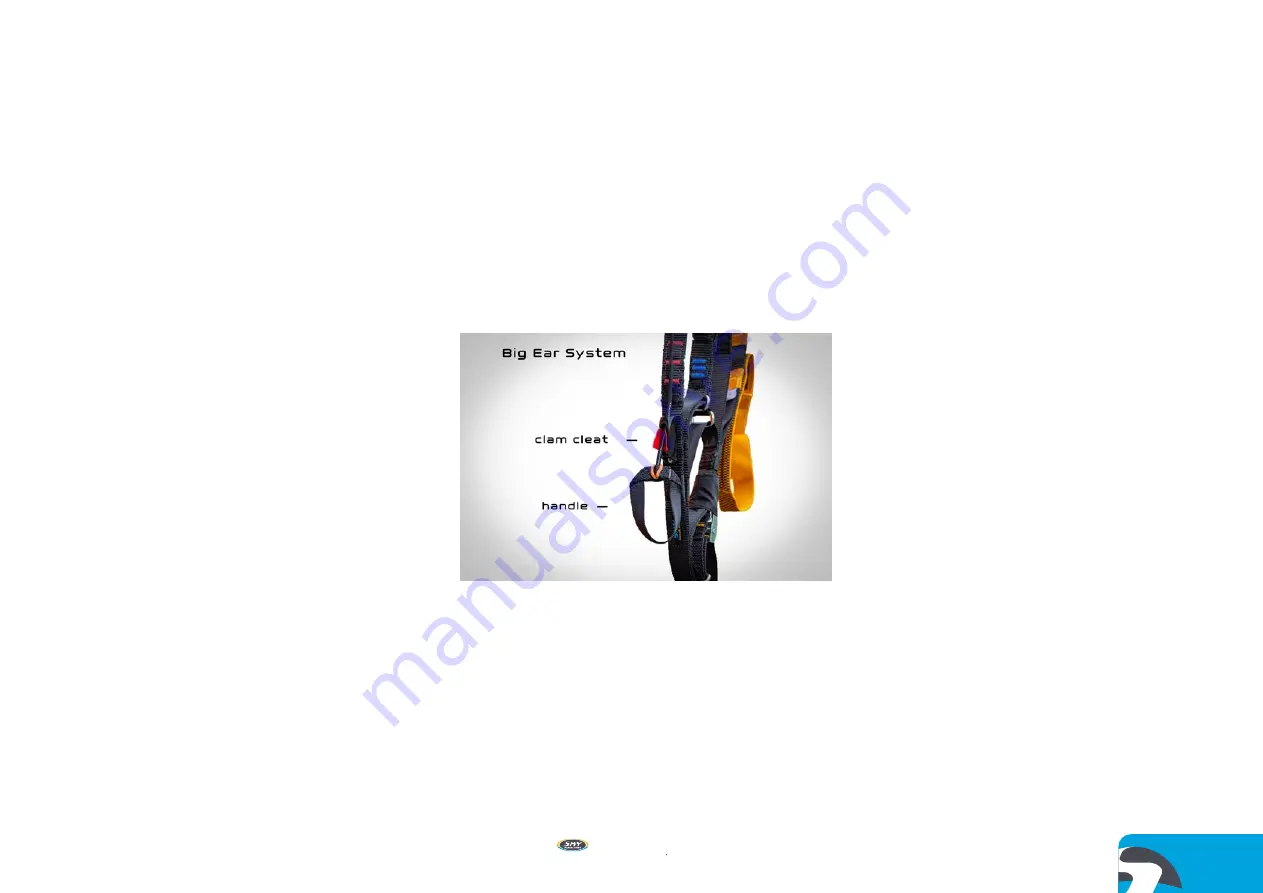
BIG EARS SYSTEM (BES) is comfortable to reach and to use, 
it enables the pilot to pull down & lock or unlock & release the 
ears with great ease. 

To perform the big ears pull the BES handle to the front and 
all the way down, then pull the handles back to lock the lines 
in the cam cleat. To reopen the ears, push the handles to the 
front to release the lines from the cam cleat and let the lines 
slide up, keeping the handles to the front to avoid that the lines 
will get pinched in the clam cleat on their way up. When BES 
is applied, the pilot keeps full steering control and can use the 
trimmers with no restrictions. In case you use the brakes to 
ease or speed up the reopening, we recommend to apply one 
brake and open one side of the canopy and only then apply the 
second brake to reopen the second ear. Applying both brakes

at the same time while the glider is flying with a higher angle of 
attack might induce a stall.

Spiral Dive

METIS 4 is a maneuverable wing that responds to any input 
easily. To initiate the spiral apply one brake progressively to 
about 35% and hold it in its position. The speed of rotation 
will increase progressively as well as the pressure on the brake 
and the centrifugal force that is experienced. The angle or the 
speed of rotation can be decreased or increased by releasing 
or pulling the brake by several centimeters. Once mastered, the 
spiral allows you to descend by more than 10 m/s. Movements 
which are extremely abrupt or badly synchronized, or a very 
quick  initiation  of  the  spiral  can  result  in  an  asymmetrical 
collapse or a spin.

CAUTION: 

A  deep  spiral  is  a  demanding  manoeuvre. The 

kinetic energy obtained must be reduced by slowly releasing 
the inside brake and using at least one whole 360 degrees turn 
to bleed off this energy. 

B-line Stall
B-stall (manoeuvre 4.4.19)  has not been achieved within the 
certification process and should therefore not be performed 
by the pilots.

4.6.  Performance & Use of Brakes

METIS 4‘s best glide is at trim speed (no brakes) – about 37 
km/h. The minimum sink rate is achieved by applying approx. 
15% of the brakes.When using more than 30% of the brakes 
the aerodynamics and the performance of the glider are likely 
to deteriorate and the effort to manoeuvre will increase quickly.
In case of extremely high brake pressure there is a great risk of 
an impending stall, which occurs at a full brake travel (100% of 
the brakes). In normal flying conditions the optimal position for 
the brakes, in terms of performance and safety is within the first 
30% of the braking range.

9

Summary of Contents for METIS 4

Page 1: ...User manual for METIS 4 40 42 Bedienungsanleitung für das Gleitschirmmodell METIS 4 40 42 Návod k obsluze pro METIS 4 40 42 2020 METIS 4 ...

Page 2: ...sich für den Kauf des METIS 4 entschieden haben Wir hoffen dass Sie mit diesem Produkt zufrieden sein werden und wünschen Ihnen viele schöne Flüge Wir empfehlen dringend vor dem ersten Flug dieses Handbuch zu lesen Das Handbuch kann Ihnen helfen sich mit dem Produkt schneller vertraut zu machen Děkujeme že používáte produkty Sky Paragliders Děkujeme Vám za zakoupení padákového kluzáku METIS 4 Douf...

Page 3: ...Contents 5 Inhalt 14 Obsah 23 Version 1 1 17 6 2020 3 METIS 4 ENG DE CZ ...

Page 4: ...rs glider Sky Paragliders is based in the heart of Europe and we pride ourselves on our own purpose built state of the art production facilities in the Czech Republic Our management and development teams are located just 19 steps above the glider production facility This close contact is incredibly important to us and helps to ensure that our products are of the highest quality possible and with m...

Page 5: ... 4 T AKE OFF FLIGHT AND FL YING TECHNIQUES 8 4 1 Pre flight Checks 4 2 Take off 4 3 Landing 4 4 Turning 4 5 Rapid Descent Techniques 4 6 Performance Use of Brakes 4 7 Using trimmers 4 8 Asymmetric or Frontal Symmetric Collapses 4 9 Full Stall 4 10 Flying Without Brakes 4 11 Comments on Testing Procedures 4 12 Harness Adjustment 5 MAINTENANCE CHECKS 11 5 1 Advice on Maintenance 5 2 Pre delivery Con...

Page 6: ...usage of the glider is the pilot s responsibility The manufacturer and distributor do not accept liability for loss or damage as a result of the misuse of this paraglider The pilot is responsible for the airworthiness of the aircraft The pilot must comply with legal regulations in the country of flight This guide conforms to requirements specified by EN 926 2 2013 as well as LTF NFL II 91 09 for u...

Page 7: ...User manual Handbuch Navod k obsluze METIS 4 A Lines red B Lines blue C Lines violet D Lines green Brakes yellow A B C D 3 DIMENSIONS DIAGRAMSANDSPECIFICA TIONS 3 1 Cross section 3 2 Line plan 7 ...

Page 8: ...dly 4 1 Pre flight Checks Check the sail for damage to both surfaces the internal structure ribs diagonals and seams Check that the lines are not damaged or tangled Check that the quick links which connect the lines to the risers are undamaged and correctly tightened Check that the risers are not damaged or twisted Lastly check that the brake handles are correct 4 2 Take off Lay the paraglider out...

Page 9: ...k release the ears with great ease To perform the big ears pull the BES handle to the front and all the way down then pull the handles back to lock the lines in the cam cleat To reopen the ears push the handles to the front to release the lines from the cam cleat and let the lines slide up keeping the handles to the front to avoid that the lines will get pinched in the clam cleat on their way up W...

Page 10: ...a spiral or speeding up after a B line stall Soaked or heavily drenched leading edge from rain or a cloud can result in a stall due to an uneven airflow over the leading edge This process has been related to high levels of porosity in the glider s cloth Whatever the cause a full stall can be either symmetrical or a spin In both cases the pilot has two possible courses of action If the full stall h...

Page 11: ...e your loosely packed glider in a cool 10 25 C and dry 70 humidity place Hot car boots or damp basements lead to damaging of the cloth A paraglider should always be dry when packed but this is particularly important after the last flight of the season But even a completely dry wing should still be stored open in a dry clean and dark place If you do not have room for such winter storage we recommen...

Page 12: ... ends of the rip and apply the tape to both sides Spare parts Your SKY wing consists of many high quality long life components When replacing parts lines risers fabric panels etc only original parts may be used In addition to the continued airworthiness of your paraglider this is important for your safety as well 5 3 Guarantee METIS 4 is guaranteed for two years against any production fault since ...

Page 13: ... genießen werden Die Basis von Sky Paragliders liegt im Herzen von Europa und wir sind stolz auf unsere auf dem neuesten Stand der Technik ausgestatte Produktion in der Tschechischen Republik Management und Entwicklungsteams sitzen nur 19 Stufen oberhalb des Produktionsbetriebes Dieser enge Kontakt ist für uns unglaublich wichtig und hilft uns dabei Produkte höchster Qualität mit minimaler Umweltb...

Page 14: ...4 ST ART FLUG UND FLUGTECHNIK 17 4 1 Prüfung des Gleitschirms vor dem Start 4 2 Start 4 3 Landung 4 4 Kurvenflug 4 5 Abstiegshilfen 4 6 Flugleistung Einsatz der Bremsen 4 7 Verwendung der Trimmer 4 8 Asymmetrischer oder frontaler symmetrischer Einklapper 4 9 Strömungsabriss 4 10 Fliegen ohne Bremsen 4 11 Kommentare zu den Testverfahren 4 12 Gurtzeugeinstellungen 5 INST ANDHAL TUNGS CHECKS 20 5 1 W...

Page 15: ...chVersion vom 17 June 2020 Bitte beachten Sie dass alle Anderungen am Gleitschirm die Musterprufung ungultig machen Der korrekte Umgang mit dem Gleitschirm liegt in derVerantwortung des Piloten Der Hersteller und der Handler ubernehmen keine Haftung Der Pilot ist verantwortlich fur die Lufttuchtigkeit des Luftfahrzeugs Der Pilot muss die gesetzlichen Vorschriften im Land des Fluges einhaltDieses H...

Page 16: ...r manual Handbuch Navod k obsluze METIS 4 A Leinen Rot B Leinen Blau C Leinen Lila D Leinen Grün Bremsleinen Gelb A B C D 3 MASSE DIAGRAMMEUNDEIGENSCHAFTEN 3 1 Flügelprofil des METIS 4 3 2 Leinenschema 16 ...

Page 17: ...raut zu machen 4 1 Prüfung des Gleitschirms vor dem Start Prüfen Sie das Segel auf Schäden an Oberfläche interner Struktur Rippen Diagonalen und Nähten Stellen Sie sicher dass die Leinen nicht beschädigt oder verheddert sind Überprüfen Sie die Schraubkarabiner welche Leinen und Tragegurte verbinden auf Schäden und korrekte Verschraubung Stellen Sie sicher dass die Tragegurte nicht beschädigt oder ...

Page 18: ...gbedingungen überrascht werden so können Sie folgende Techniken zur Vergrößerung Ihrer Sinkrate anwenden Ohren anlegen Das BIG EARS SYSTEM BES kann komfortabel erreicht und benutzt werden es erlaubt es dem Piloten die Ohren auf einfachste Art herunter zu ziehen und zu verriegeln oder zu entriegeln und zu öffnen Einleitung ist der BES Griff nach vorne und ganz hinunter zu ziehen das Zurückklappen d...

Page 19: ...l Vollgesogene oder stark durchnässte Eintrittskannte von Regen oder einer Wolke können aufgrund einer ungleichmäßigen Luftströmung über derVorderkante zu einem Strömungsabriss führen Bekannte Fälle dieses Phänomens sind mit hoher Porosität des Schirmtuches verbunden Unabhängig von der Ursache kann eine Fullstalls entweder symmetrisch oder einseitig sein Trudeln In beiden Fällen hat der Pilot zwei...

Page 20: ...hmutz kann aus den geschlossenen Zellen in die Stabilos geschüttelt und von dort durchVerwendung der Auslassöffnungen entfernt werden Verschließen Sie die Auslassöffnungen danach wieder gewissenhaft Aufbewahrung Transport Verwahren Sie Ihren lose gepackten Schirm an einem kühlen 10 25 C und trockenen 70 Ort Heisse Kofferräume oder feuchte Keller schädigen das Schirmtuch Ein Gleitschirm sollte beim...

Page 21: ...Länge von 4 cm können mit Klebesegel repariert werden Halten Sie eine Überlänge von 3 cm an beiden Enden des Risses und verwenden Sie das Klebesegel auf beiden Seiten Ersatzteile Ihr SKY Schirm besteht aus vielen hochqualitativen Komponenten mit langer Lebenszeit Für den Ersatz von Teilen Leinen Tragegurte Tuchbahnen etc dürfen nur Originalteile verwendet werden Dies ist nicht nur für die Flugtüch...

Page 22: ...itků Sky Paragliders sídlí vyvíjí a vyrábí v České republice ve vlastních prostorách speciálně navržených pro paraglidingovou výrobu Technologické a vývojové oddělení dělí přesně 19 schodů od výrobních prostor Díky tomu můžeme udržet vysokou kvalitu výrobního procesu a postarat se o to aby všechny naše nápady byly s výrobou úzce propojeny a výrobky před tím než se dostanou k Vám našim zákazníkům n...

Page 23: ...T ART LET A TECHNIKA PILOT ÁŽE 26 4 1 Kontrola kluzáku před startem 4 2 Start 4 3 Přistání 4 4 Zatáčení 4 5 Vyklesávací techniky 4 6 Výkon a zásahy do řízení 4 7 Postup pro nastavení trimů 4 8 Asymetrické nebo čelní symetrické zaklopení 4 9 Full stall Symetrické přetažení 4 10 Let bez možnosti použít brzdy řízení 4 11 Poznámky k testování a certifikačním letům 4 12 Nastavení sedačky 5 ÚDRŽBA A KON...

Page 24: ...o uživatelská příručka vešla v platnost dne 17 června 2020 Upozorňujeme že všechny zásahy do konstrukce kluzáku anulují certifikaci Pilot je odpovědný za správné používání padákového kluzáku Výrobce ani prodejce za něj nenese žádnou odpovědnost Pilot je odpovědný za letovou způsobilost kluzáku a musí dodržovat právní předpisy v zemi kde létá Tato příručka odpovídá požadavkům normy EN 926 2 2013 a ...

Page 25: ...l Handbuch Navod k obsluze METIS 4 Řada šňůr A červená Řada šňůr B modrá Řada šňůr C fialová Řada šňůr D zelená Brzdy žlutá A B C D 3 ROZMĚRY NÁKRESYADALŠÍTECHNICKÉÚDAJE 3 1 Půdorys kluzáku 3 2 Schéma vyvázání 25 ...

Page 26: ...nály a švy poškozeny Zkontrolujte zda nejsou šňůry poškozeny nebo zamotány Zkontrolujte zda nejsou karabinky u volných konců poškozeny a jsou řádně utaženy a zajištěny Zkontrolujte zda nejsou poškozené nebo zamotané volné konce Nakonec zkontrolujte šňůry od řidiček zda je každá řidička řádně připevněna a zda každá šňůra vede přes kladku na správné straně volného konce 4 2 Start Rozložte vrchlík ta...

Page 27: ... system BES je pohodlně dosažitelný a použitelný umožňuje pilotovi velmi snadno zaklopit a zjistit nebo odjistit a uvolnit uši Chcete li zaklopit velké uši zatáhněte za rukojeť BES směrem dopředu a úplně dolů poté zatáhnutím rukojeti k sobě zajistěte šňůru v plastové zarážce Chcete li znovu otevřít uši zatáhněte za rukojeti dopředu abyste uvolnili šňůry z plastové zarážky a nechte je vysunout přič...

Page 28: ... B stallu Promočená náběžná hrana při dešti nebo po průletu mrakem při které kapky vody znehodnocují profil náběžné hrany a aerodynamické vlastnosti křídla Podobný problém může nastat i při neúměrně vysoké porozitě na tkanině náběžné hrany Ať už k přetažení dojde z jakéhokoliv důvodu může se přetažení projevit jako symetrické přetažení nebo jako negativní zatáčka spin V obou případech doporučujeme...

Page 29: ... křídel Nečistoty lze setřást z uzavřených komor až do uší křídla a poté uvolnit otvor a nečistoty odstranit Po dokončení otvor k odstranění nečistot opět uzavřete Uskladnění a doprava Skladujte volně zabalený kluzák v chladném 10 25 C a suchém 70 vlhkosti místě Vyhřáté kufry aut nebo vlhké sklepy vedou k poškození tkaniny Kluzák by měl být vždy suchý když je zabalený což je obzvlášť důležité po p...

Page 30: ...u stranách trhliny a nalepte záplatu z obou stran Náhradní díly Kluzák se skládá z mnoha vysoce kvalitních komponentů s dlouhou životností Při výměně dílů šňůry volné konce panely vrchlíku atd mohou být použity pouze originální díly Kromě zachování letové způsobilosti kluzáku je to důležité pro vaši bezpečnost 5 3 Záruka Záruka na kluzák METIS 4 je dvouletá a vztahuje se na jakoukoliv výrobní vadu...

Page 31: ...0 114 281 5 F9 2 7850 080 114 134 8 836 1 F10 2 7850 080 114 119 4 820 7 F11 2 7850 080 114 105 4 806 7 F12 2 7850 080 114 92 5 793 8 F13 2 7850 080 114 86 4 787 7 FO3 4 7850 080 114 137 1 FOU3 2 7850 100 114 281 5 FU 2 7850 240 114 281 5 mark at 30 cm LINESPECIFICA TIONS A Y AL LL Lenght loop loop 1 Before checking the wire length pre tension the line by the load of 22 kilograms for about 3 secon...

Page 32: ... 291 6 F9 2 7850 080 114 139 6 865 9 F10 2 7850 080 114 123 7 850 F11 2 7850 080 114 109 2 835 5 F12 2 7850 080 114 95 8 822 1 F13 2 7850 080 114 89 5 815 8 FO3 4 7850 080 114 141 9 FOU3 2 7850 100 114 291 6 FU 2 7850 240 114 291 6 mark at 30 cm LINESPECIFICA TIONS A Y AL LL Lenght loop loop 1 Before checking the wire length pre tension the line by the load of 22 kilograms for about 3 seconds per ...

Page 33: ...Sky Paragliders a s Okružní 39 739 11 Frýdlant nad Ostravicí Czech Republic Tel 420 558 676 088 info sky cz com www sky cz com ...

Reviews: