background image

SimpliFire •  SF-ALL48-BK, SF-ALL60-BK Service Manual  •  2040-960  Rev. B  •  3/18

10

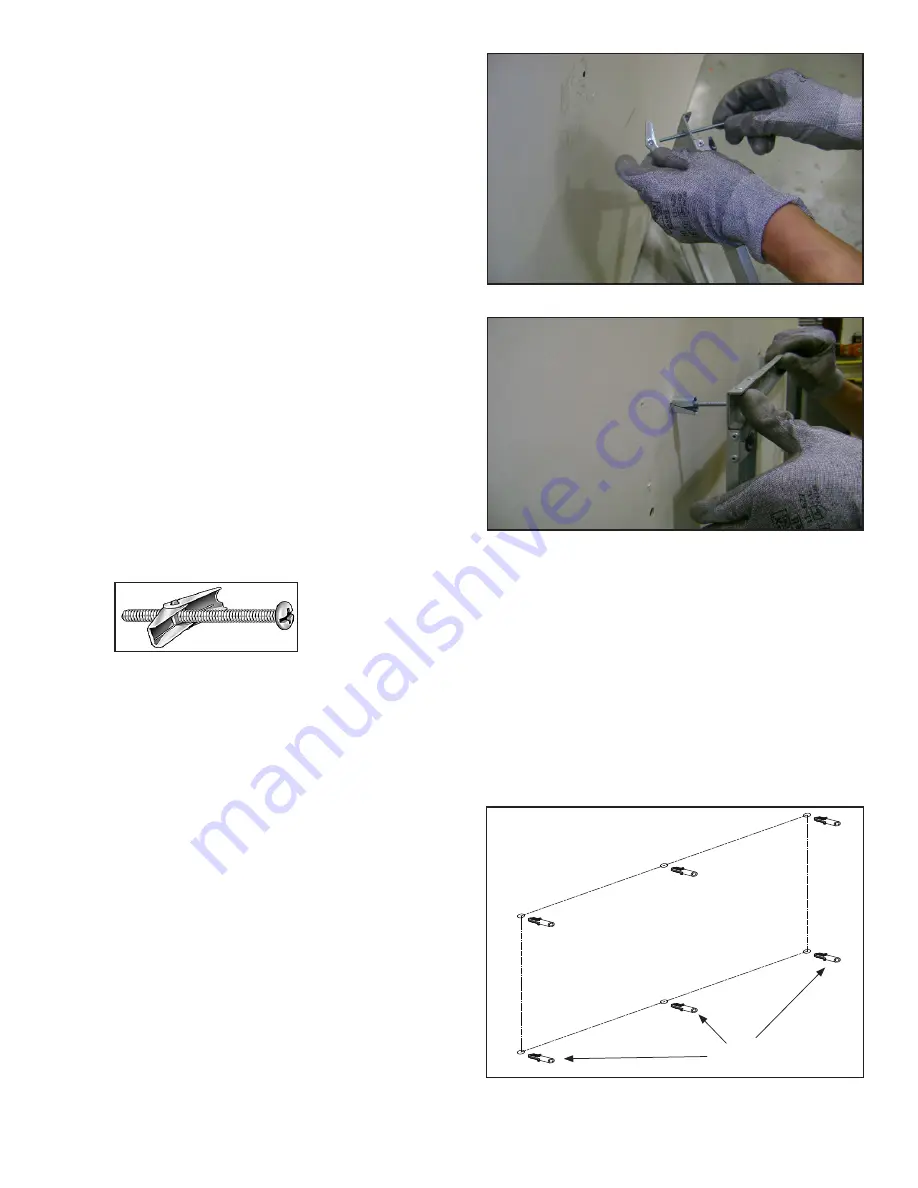
Masonry Wall

•  In the marked locations, drill 5/16 in. diameter x 2 in. 

deep holes.  See Figure 30.  

•  Insert the provided wall anchors into the holes.  
•  Gently tap the anchors with a hammer until they are 

flush with the wall surface.  


•  With mounting hooks pointed up, attach the bracket 

to the masonry anchors with ST5X40 screws .  See 

Figure 31.

Figure 29.  Installing Anchors in Hollow Wall 

Figure 28.  Toggle Bolt Installation through Mounting Bracket

Wall

Masonry Anchors

Figure 30. Masonry Anchor Placement

Figure 27.  3/16 Toggle-Bolt Anchor

•  The toggle-bolt anchors are provided to accomodate 

the required anchor points based on the appliance. 

Use of toggle bolt anchors requires drywall thick-

ness of minimum 1/2 in. and drilled holes size of  

5/16 in. diameter. 

•  Insert the bolt through the front side of the mounting 

bracket and thread the toggle onto it from the rear of 

the bracket.  See Figure 28.   

• 

Fold the toggle wings flush against the bolt and push 

them through a drilled hole until the toggle wings 

expand open on the other side. See Figure 29.  

•  Pull back on the bolt and tighten. See Figure 29.   


Note:

  This product cannot be installed on a wall 

sheathed with drywall less than 1/2 in. thick, unless 

all six (6) anchor points in the mounting bracket 

align with structural framing members. 

WARNING! Risk of Damage or Personal Injury! 

Al-

lowable pull-out and shear strength are 25% of ultimate 

values or less, as required by building authorities.

Framed Wall

•  Locate the mounting bracket on the wall in the 

desired location of the appliance.  Level the bracket, 

then mark its location on the wall, including a mark-

ing for each of the fastener holes in the bracket.     

•  For each of the marked mounting point locations, 

determine which points align with a structural fram-

ing member.   

•  At the points where a wood or metal framing mem-

ber exists, the ST5X40 screw can be installed 

directly into that structural member.  

•  For every mounting hole that does not align with a 

structural framing member, a wall board toggle-bolt 

anchor must be used. See Figure 27.

Direct Wall Mounting with Wall Mounting 

Bracket

The wall mounting bracket can be installed on masonry 

walls such as those constructed of brick or concrete, 

or to framed walls constructed of wood or steel framing 

sheathed with gypsum wallboard, drywall, wood, etc.  

The method used to mount the mounting bracket is dif-

ferent between masonry walls and framed walls.  Refer 

to the following sections for more detail on the method 

applicable to this installation.

Summary of Contents for SF-ALL48-BK

Page 1: ...g supplies are available Tape measure Needle nose pliers Hammer Gloves Level Magnetic Phillips screwdriver Safety glasses Drill Flathead screwdriver Phillips Tip Bit socket and ratchet for Blower Heater 5 16 Drill for 3 16 diameter toggle bolts applicable if installing on drywall sheathed walls Masonry Drill 5 16 in applicable if installing on masonry walls Glass Front Replacement Remove Glass Fro...

Page 2: ...l front panel Locate the J hooks on the back side of the glass on the four shoulder bolts on the appliance opening Engage the shoulder bolts See Figure 2 4 Press down on top edge of glass to fully engage J hooks on the shoulder bolts Note Make sure the glass is fully attached to the fire box so that the control panel can work properly Figure 2 Glass Front Removal Installation 5 Thread the two 2 ST...

Page 3: ...eceptacle 2 Remove the glass front from the appliance Use two people 3 Remove appliance the two screws in upper right and left corners of the glass opening Follow specific instructions from page 1 and 2 for removal of the front glass See Figure 4 CAUTION Two adults recommended for the removal or installation of glass front Use caution when han dling glass Failure to do so could result in personal ...

Page 4: ...s shown in Figure 6 Pry the tabs upward at a 30 degree angle During this step take care not to scratch or damage the glass panel behind the tabs FUELBED PLASTIC COVER TABS Figure 6 Remove Plastic Cover 6 Remove the fuelbed plastic cover that covers the fuelbed LED light strips See Figure 6 4 Remove right and left side panels by turning the panels inward See Figure 5 ...

Page 5: ...See Figure 9 LED LIGHT BOARD CABLE Figure 8 LED Light Board Cable Figure 9 Unplug LED Light Board Cable 4 Remove the LED light board from the bottom isolation columns Starting at one end of the board use a needle nose pliers to compress the plastic barbs from each isolation column as each plastic barb is compressed disengage the LED light board from each barb See Figure 10 LED FOR FLAME ISOLATION ...

Page 6: ...he opening then lift out the the glass panel from the appliance Set glass panel aside in a safe location preferably a soft surface such as carpet or cardboard Figure 11 Fuelbed LED Light Board Screw Location Receiver Board Installation 6 Locate the Receiver Board in the upper right side of appliance See Figure 13 Figure 13 Reciever Board Location ISOLATION COLUMN ISOLATION COLUMN CABLE Figure 14 R...

Page 7: ...nter of the Rotisseire See Figure 17 CENTER SCREW LOCATION 14 Pull the Rotisseire to the left to disengage it from the motor then remove the Rotisseire assembly Figure 15 Screw Location Figure 16 Flame Screen Location Figure 17 Rotisseire Screw Location If replacing only the Rotisseire install replacement part and reverse the installation steps Be sure the flame screen is installed correctly with ...

Page 8: ...Cable 18 Install replacement part and reverse the installation steps Flame LED Light Board Installation NOTE The following steps 15 18 are only for re placement of the motor If replacing Flame LED Light Board continue onto step 19 19 Remove screws used to attach the flame screen bracket See Figure 21 SCREW LOCATION Figure 21 Remove Flame Screen Bracket Screws 20 Remove flame screen bracket 21 Unpl...

Page 9: ...at wires will be reconnected correctly See Figure 24 Figure 24 Unplug Control Board 25 Install new Control Board and reverse the installation steps Blower Heater Installation 26 Locate the four 4 screws on the mounting plate for the blower heater module See Figure 25 27 Remove the four 4 Phillips screws Figure 25 Remove Mounting Plate Screws 28 Drop the Blower Heater module down on the shelf See F...

Page 10: ... cannot be installed on a wall sheathed with drywall less than 1 2 in thick unless all six 6 anchor points in the mounting bracket align with structural framing members WARNING Risk of Damage or Personal Injury Al lowable pull out and shear strength are 25 of ultimate values or less as required by building authorities Framed Wall Locate the mounting bracket on the wall in the desired location of t...

Page 11: ...ectrical Shock and Injury Ensure the power cord is not installed so that it is pinched or against a sharp edge and ensure that the power cord is stored or secure to avoid tripping and snagging Power Cord Kit Installation The appliance power cord has a three pin NEMA 5 15P plug The power cord should not be used unless a grounded receptacle is available 1 Remove the terminal block cover plate locate...

Reviews: