background image

Digital Cylinder AX
(Z5)

Manual

11.01.2022

Summary of Contents for Digital Cylinder AX

Page 1: ...Digital Cylinder AX Z5 Manual 11 01 2022...

Page 2: ...r CO reader on one side 17 6 1 2 Freely rotating cylinder FD reader on both sides 18 6 1 3 Half cylinder HZ reader on one side 18 6 2 Profiles 18 6 2 1 Standard Euro profile cylinder as per to DIN 185...

Page 3: ...7 9 2 7 Insert locking cylinder 49 9 2 8 Fixing the locking cylinder 50 10 Customise Cylinder AX 51 10 1 LockNode 51 10 1 1 Remove cap 51 10 1 2 Installation 53 10 1 3 Attach the cap 55 10 2 Replaceme...

Page 4: ...cal specifications 150 13 1 Euro Profile and SwissRound 150 13 2 Scandinavian Oval Scandinavian Round 151 13 3 Dimensions 153 14 EU UK Declaration of conformity 156 15 Help and other information 157 D...

Page 5: ...re that your AX locking cylinder has the correct length You can measure the length of your AX locking cylinder at any time and adjust it yourself If the AX locking cylinder is too short you cannot mou...

Page 6: ...occur and access through a door can be blocked Modify the product only when needed and only in the manner described in the documentation Do not swallow battery Danger of burns from hazardous substanc...

Page 7: ...lting from aggressive cleaning agents The surface of this product may be damaged as a result of the use of unsuitable cleaning agents Only use cleaning agents that are suitable for plastic or metal su...

Page 8: ...s at the same time Different times for G2 locks The internal time unit of the G2 locks has a technical tolerance of up to 15 minutes per year Qualifications required The installation and commissioning...

Page 9: ...e in various lengths If you order the wrong length the AX lock ing cylinder cannot be installed correctly Order your AX locking cylinder in the correct length or adjust the length yourself Mechanical...

Page 10: ...ning and closing of the door is not obstructed by the locking cylinder or parts thereof Conditions for authorisation security Operation with Mifare Classic and or PinCode keypad excludes authorisation...

Page 11: ...ge of the anti panic cylinder Malfunction of the anti panic function due to unauthorised manipulation The length of the Cylinder AX can be modified If the AP side is removed the anti panic unit may be...

Page 12: ...mb turns only fit on a mounting for electronic thumb turns and mechanical thumb turns fit on a mounting for mechanical thumb turns You can now also use the Digital Cylinder AX with Euro profile see St...

Page 13: ...t differs from the mechanical thumb turn by a door side transparent cover for signalling a removable lid with printed logo The lid is available in different designs and can be replaced see Components...

Page 14: ...nsists of a mechanical thumb turn an electronic thumb turn a cylinder profile 5 4 Freely rotating cylinder FD reader on both sides The freely rotating cylinder consists of two electronic thumb turns a...

Page 15: ...to a half cylinder and consists of an electronic thumb turn a cylinder profile with tappet The Digital Cylinder AX for SO mortise locks can be used in different ways With a second Digital Cylinder AX...

Page 16: ...turn a cylinder profile with tappet The Digital Cylinder AX for RS mortise locks can be used in different ways With a second Digital Cylinder AX for RS mortise locks as freely rotating cylinder With a...

Page 17: ...ion 22 MS Waterproof design 22 For protection class see Technical specifications 150 WP Integrated network node 22 LN Multi point 23 MR You can combine the variants described in the table to create Di...

Page 18: ...reader knob 1 Program freely rotating cylinders with the SmartStick AX or the SmartCD MP 2 Ensure that the short range is selected during programming standard setting for cylinders factory supplied as...

Page 19: ...ndinavian oval SO In this version the Digital Cylinder AX is supplied with a cylinder profile for Scandinavian Oval 6 2 4 Scandinavian Round RS In this version the Digital Cylinder AX supplied with a...

Page 20: ...a spring mechanism which always pulls the tappet into a non critical position area O or area U This means that the tappet can no longer block the panic function of a panic lock Installation does not d...

Page 21: ...ock manufacturer 3 Contact SimonsVoss Technologies GmbH for further information on this subject see Help and other information 157 6 3 2 Access Control ZK This option equips the Digital Cylinder AX wi...

Page 22: ...l Cylinder AX with this option outside for external doors or other areas exposed to high humidity e g washrooms or bathrooms IMPORTANT Failure of the cam due to moisture The cam is not protected by th...

Page 23: ...plied to you fitted with two LockNodes 6 3 6 Multi point MR This option equips your Digital Cylinder AX with a locking bit with dedicated points The locking bit engages at these points when disengaged...

Page 24: ...lar resistant door plates B or C certified according to VdS SKG DIN 18257 class ES 2 or ES 3 2 Make sure that the Digital Cylinder AX does not protrude more than 3 mm 3 Do not use your Digital Cylinde...

Page 25: ...ter You can use this special tool to Pull clamps out of the profile cylinders Unscrew and screw in the bolts in the profile cylinder Z5 LIFTER Spacer You can use this special tool to align the distanc...

Page 26: ...e reader thumb turn cover after assembly to communicate wirelessly similarly to an antenna The LockNode is supplied with a suitable replacement cap see Replacement caps 26 7 2 2 Replacement caps The c...

Page 27: ...full metal caps can only communicate with transponders 1 Only use the full metal cap for non networked active cylinders 2 Use different caps for cylinders that will be activated via WaveNet RFID or B...

Page 28: ...cylinder centre piece Cylinder centre piece Z5 CLAMPS Set contains 50 units Z5 CNT HZ Z5 CNT EU Cam standard WP Inside thumb turn mount Z5 CAM WP Z5 PR IN 7 2 4 Core extension Core protection adapter...

Page 29: ...re information see Core extension 113 7 2 5 Thumb turns Inside thumb turn The inside thumb turn SV Z5 TT IN is also available separately for your Comfort cylinders Escape thumb turn The escape thumb t...

Page 30: ...identification medium Locking only possible from the outside and only with an identification medium The escape thumb turn is suitable for DIN L and DIN R doors Simply adjust the direction of rotation...

Page 31: ...e transponder is rejected once and synchronised with the locking device in the background Transponders will then function as normal LSM software version 3 5 or higher installed LSM open SmartStick AX...

Page 32: ...Programming item 14 Open the Type drop down menu 15 Select the entry Card reader SmartCD MP or SmartCD 16 Click on the Programming button NOTE Programming with SmartStick AX The SmartStick AX BLE inte...

Page 33: ...ic assembly lock before initial assembly NOTE Tool free initial assembly The mechanical thumb turn is only clipped on when delivered A thumb turn lock red plastic part prevents the thumb turn from eng...

Page 34: ...AX locking cylinder with the face plate screw see Fixing the locking cylinder 50 5 Fit the cover plates if required 6 Fit the electronic knob see Mounting thumb turn electr 40 7 Fit the mechanical th...

Page 35: ...lable 1 Dismantle the electronic thumb turn see Unmounting the thumb turn electr 43 2 Insert the AX locking cylinder see Insert locking cylinder 49 3 Secure the AX locking cylinder with the face plate...

Page 36: ...the version If you find a mark on the inside IN of the cylinder body mount the AX locking cylinder so that this side is in a protected area Rosettes may already be fitted 1 Insert the AX locking cylin...

Page 37: ...eps 9 2 1 Mounting thumb turn mech 1 Attach the thumb turn 2 The thumb turn snaps into place with one click 9 Mechanical thumb turn is installed 9 Disassembling the mechanical thumb turn Digital Cylin...

Page 38: ...thumb turn mech Special tool available 1 Align the thumb turn horizontally 2 Attach the special tool 3 Align the special tool so that the logo is parallel to the recess Digital Cylinder AX Z5 Manual 9...

Page 39: ...turn the special tool and the thumb turn counter clockwise 5 Remove the special tool and the thumb turn at the same time 9 The mechanical thumb turn is disassembled Digital Cylinder AX Z5 Manual 9 In...

Page 40: ...9 2 3 Mounting thumb turn electr 1 5 mm hexagonal wrench available 1 Align the thumb turn mount horizontally 2 Attach the thumb turn Digital Cylinder AX Z5 Manual 9 Installation 40 158...

Page 41: ...lied with a hexagonal wrench Use this hexagonal wrench to mount and dismount the electronic thumb turn 3 Insert the hexagonal wrench into the hole provided until it stops 4 Turn the hex key 270 degree...

Page 42: ...5 Pull out the hexagon wrench again 6 Put on the cover Digital Cylinder AX Z5 Manual 9 Installation 42 158...

Page 43: ...nic thumb turn is installed 9 2 4 Unmounting the thumb turn electr NOTE Use the supplied hexagonal wrench The special tool is supplied with a hexagonal wrench Use this hexagonal wrench to mount and di...

Page 44: ...ble 1 5 mm hexagonal wrench available 1 Align the thumb turn horizontally 2 Attach the special tool 3 Align the special tool so that the logo is parallel to the recess Digital Cylinder AX Z5 Manual 9...

Page 45: ...the thumb turn cap can be slippery and the cap can be diffi cult to turn especially with WP versions recognizable by the blue cylinder neck ring or the lasered marking on the inner side of the cylinde...

Page 46: ...7 Turn the hex wrench 270 degrees counterclockwise 8 Pull out the hexagon wrench again Digital Cylinder AX Z5 Manual 9 Installation 46 158...

Page 47: ...nic or mechanical thumb turns 2 Turn the electronic thumb turns The Digital Cylinder AX the AX locking cylinder must not be tight nor rotate the tappet 3 Activate an authorised identification medium 4...

Page 48: ...er engages 4 Turn the engaged thumb turn in the locking direction of the lock through the R section into the O section 9 The dead bolt extends 9 No reset torque detectable 5 Move the thumb turn slight...

Page 49: ...escribed above 9 2 7 Insert locking cylinder The Digital Cylinder AX is modular You can disassemble both the mechanical and electronic thumb turn Accordingly you have the choice Digital Cylinder AX in...

Page 50: ...e AX locking cylinder in the lock 9 2 8 Fixing the locking cylinder Screw the locking cylinder AX tight with the face plate screw 9 Locking cylinder AX is fixed in the lock Digital Cylinder AX Z5 Manu...

Page 51: ...e activated with WaveNet smart cards RFID or BLE Reader thumb turns with full metal caps can only communicate with transponders 1 Only use the full metal cap for non networked active cylinders 2 Use d...

Page 52: ...1 2 clockwise first and then counter clockwise NOTE Slipping when turning The surface of the thumb turn cap can be slippery and the cap can be diffi cult to turn especially with WP versions recogniza...

Page 53: ...5 Remove the tool and cover 9 Cap is disassembled 10 1 2 Installation 1 Push the latch inward and open the battery cover Digital Cylinder AX Z5 Manual 10 Customise Cylinder AX 53 158...

Page 54: ...2 Slide the LockNode into the guides provided as shown Digital Cylinder AX Z5 Manual 10 Customise Cylinder AX 54 158...

Page 55: ...ver and LockNode 9 The locking device bleeps and flashes red four times 9 LockNode is installed 10 1 3 Attach the cap Special tool available 1 Put on the cover Digital Cylinder AX Z5 Manual 10 Customi...

Page 56: ...al cap shields against high frequency electromagnetic radi ation i e the reader thumb turn can no longer be activated with WaveNet smart cards RFID or BLE Reader thumb turns with full metal caps can o...

Page 57: ...p Special tool available 1 Align the thumb turn horizontally 2 Attach the special tool 3 Align the special tool so that the logo is parallel to the recess Digital Cylinder AX Z5 Manual 10 Customise Cy...

Page 58: ...ng The surface of the thumb turn cap can be slippery and the cap can be diffi cult to turn especially with WP versions recognizable by the blue cylinder neck ring or the lasered marking on the inner s...

Page 59: ...10 2 2 Attach the cap Special tool available 1 Put on the cover Digital Cylinder AX Z5 Manual 10 Customise Cylinder AX 59 158...

Page 60: ...lace with one click 10 3 Length modularity 10 3 1 Extend Cylinder AX The core extension and profile extension must be the same length You also need an extension bolt for the desired length Digital Cyl...

Page 61: ...releasing the clamp Spacer for aligning the extension bolt Clamp block for pressing in the clamp 1 Place the Cylinder AX in the thumb turn assembly tool Digital Cylinder AX Z5 Manual 10 Customise Cyli...

Page 62: ...ok the tip of the extractor into the clamp 3 Lever the clamp out of the profile cylinder by moving the extractor to the centre of the cylinder Digital Cylinder AX Z5 Manual 10 Customise Cylinder AX 62...

Page 63: ...4 Pull the clamp completely out of the profile cylinder Digital Cylinder AX Z5 Manual 10 Customise Cylinder AX 63 158...

Page 64: ...5 Disassemble the two cylinder halves Digital Cylinder AX Z5 Manual 10 Customise Cylinder AX 64 158...

Page 65: ...6 Use the extractor to unscrew the extension bolt 7 Insert suitable core extensions Digital Cylinder AX Z5 Manual 10 Customise Cylinder AX 65 158...

Page 66: ...8 Attach suitable profile extensions 9 Place the spacer Digital Cylinder AX Z5 Manual 10 Customise Cylinder AX 66 158...

Page 67: ...the extractor until it rests on the spacer NOTE Length on bolt head You will find a number on the bolt head This number is the length of the cylinder profile to which the bolt fits Digital Cylinder AX...

Page 68: ...11 Reassemble the two cylinder halves 9 Extension bolt is protected against twisting Digital Cylinder AX Z5 Manual 10 Customise Cylinder AX 68 158...

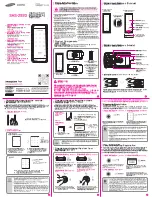
Page 69: ...12 Pull the spacer off again Digital Cylinder AX Z5 Manual 10 Customise Cylinder AX 69 158...

Page 70: ...13 Push the halves together completely Digital Cylinder AX Z5 Manual 10 Customise Cylinder AX 70 158...

Page 71: ...ing the fastening screw and press the clamp with your thumb so that it can no longer fall out 15 Insert the cylinder into the clamping block so that the profile cylinder and the thumb turn lie flush i...

Page 72: ...plate The bracket that was previously inserted lies opposite this metal plate 16 Push the clamp block lever towards the base plate until the clamp is fully seated in the profile cylinder 9 Cylinder AX...

Page 73: ...for the desired length Extractor for releasing the clamp Spacer for aligning the bolt Clamp block for pressing in the clamp 1 Place the Cylinder AX in the thumb turn assembly tool Digital Cylinder AX...

Page 74: ...ok the tip of the extractor into the clamp 3 Lever the clamp out of the profile cylinder by moving the extractor to the centre of the cylinder Digital Cylinder AX Z5 Manual 10 Customise Cylinder AX 74...

Page 75: ...4 Pull the clamp completely out of the profile cylinder Digital Cylinder AX Z5 Manual 10 Customise Cylinder AX 75 158...

Page 76: ...5 Disassemble the two cylinder halves Digital Cylinder AX Z5 Manual 10 Customise Cylinder AX 76 158...

Page 77: ...6 Unscrew the bolt with the extractor 7 Remove the profile extension Digital Cylinder AX Z5 Manual 10 Customise Cylinder AX 77 158...

Page 78: ...8 Remove the core extension 9 Place the spacer Digital Cylinder AX Z5 Manual 10 Customise Cylinder AX 78 158...

Page 79: ...xtractor until it rests on the spacer NOTE Length on bolt head You will find a number on the bolt head This number is the length of the cylinder profile to which the bolt fits Digital Cylinder AX Z5 M...

Page 80: ...11 Reassemble the two cylinder halves 9 Bolt is protected against twisting Digital Cylinder AX Z5 Manual 10 Customise Cylinder AX 80 158...

Page 81: ...12 Pull the spacer off again Digital Cylinder AX Z5 Manual 10 Customise Cylinder AX 81 158...

Page 82: ...13 Push the halves together completely Digital Cylinder AX Z5 Manual 10 Customise Cylinder AX 82 158...

Page 83: ...profile cylinder with the lug facing the fastening screw 15 Insert the cylinder into the clamping block so that the profile cylinder and the thumb turn lie flush in the recesses Digital Cylinder AX Z5...

Page 84: ...late The bracket that was previously inserted lies opposite this metal plate 16 Push the clamp block lever towards the base plate until the clamp is fully seated in the profile cylinder 9 Cylinder AX...

Page 85: ...cylinders Extractor for releasing the clamp Spacer for aligning the extension bolt Clamp block for pressing in the clamp 1 Place the first comfort cylinder AX in the thumb turn assembly tool with the...

Page 86: ...2 Hook the tip of the extractor into the clamp Digital Cylinder AX Z5 Manual 10 Customise Cylinder AX 86 158...

Page 87: ...3 Lever the clamp out of the profile cylinder by moving the extractor to the centre of the cylinder Digital Cylinder AX Z5 Manual 10 Customise Cylinder AX 87 158...

Page 88: ...4 Pull the clamp completely out of the profile cylinder Digital Cylinder AX Z5 Manual 10 Customise Cylinder AX 88 158...

Page 89: ...5 Disassemble the two cylinder halves 9 First cylinder half prepared with centre piece and tappet piece Digital Cylinder AX Z5 Manual 10 Customise Cylinder AX 89 158...

Page 90: ...Digital Cylinder AX Z5 Manual 10 Customise Cylinder AX 90 158...

Page 91: ...6 Place the second comfort cylinder AX in the thumb turn assembly tool with the electronic thumb turn facing upwards Digital Cylinder AX Z5 Manual 10 Customise Cylinder AX 91 158...

Page 92: ...7 Hook the tip of the extractor into the clamp Digital Cylinder AX Z5 Manual 10 Customise Cylinder AX 92 158...

Page 93: ...8 Lever the clamp out of the profile cylinder by moving the extractor to the centre of the cylinder Digital Cylinder AX Z5 Manual 10 Customise Cylinder AX 93 158...

Page 94: ...9 Pull the clamp completely out of the profile cylinder Digital Cylinder AX Z5 Manual 10 Customise Cylinder AX 94 158...

Page 95: ...10 Disassemble the two cylinder halves 9 Second cylinder half prepared without centre piece Digital Cylinder AX Z5 Manual 10 Customise Cylinder AX 95 158...

Page 96: ...Digital Cylinder AX Z5 Manual 10 Customise Cylinder AX 96 158...

Page 97: ...11 Place the first cylinder half on the second cylinder half Digital Cylinder AX Z5 Manual 10 Customise Cylinder AX 97 158...

Page 98: ...profile cylinder with the lug facing the fastening screw 13 Insert the cylinder into the clamping block so that the profile cylinder and the thumb turn lie flush in the recesses Digital Cylinder AX Z5...

Page 99: ...bracket that was previously inserted lies opposite this metal plate 14 Push the clamp block lever towards the base plate until the clamp is fully seated in the profile cylinder 9 Freely rotating cyli...

Page 100: ...tionally received by the second reader knob 1 Program freely rotating cylinders with the SmartStick AX or the SmartCD MP 2 Ensure that the short range is selected during programming standard setting f...

Page 101: ...g the extension bolt Clamp block for pressing in the clamp Half Cylinder Center Section 1 Place the Cylinder AX in the thumb turn assembly tool with the elec tronic thumb turn facing upwards Digital C...

Page 102: ...2 Hook the tip of the extractor into the clamp Digital Cylinder AX Z5 Manual 10 Customise Cylinder AX 102 158...

Page 103: ...3 Lever the clamp out of the profile cylinder by moving the extractor to the centre of the cylinder Digital Cylinder AX Z5 Manual 10 Customise Cylinder AX 103 158...

Page 104: ...4 Pull the clamp completely out of the profile cylinder Digital Cylinder AX Z5 Manual 10 Customise Cylinder AX 104 158...

Page 105: ...5 Disassemble the two cylinder halves 9 First cylinder half prepared without centre piece Digital Cylinder AX Z5 Manual 10 Customise Cylinder AX 105 158...

Page 106: ...6 Place the spacer on the half cylinder centre piece Digital Cylinder AX Z5 Manual 10 Customise Cylinder AX 106 158...

Page 107: ...in a suitable extension bolt with the extractor until it rests on the spacer 8 Place the prepared cylinder half in the thumb turn assembly tool Digital Cylinder AX Z5 Manual 10 Customise Cylinder AX...

Page 108: ...9 Place the half cylinder centre piece on the prepared cylinder half 9 Extension bolt is protected against twisting Digital Cylinder AX Z5 Manual 10 Customise Cylinder AX 108 158...

Page 109: ...10 Pull the spacer off again Digital Cylinder AX Z5 Manual 10 Customise Cylinder AX 109 158...

Page 110: ...11 Push the cylinder parts together completely Digital Cylinder AX Z5 Manual 10 Customise Cylinder AX 110 158...

Page 111: ...rofile cylinder with the lug facing the fastening screw 13 Insert the cylinder into the clamping block so that the profile cylinder and the thumb turn lie flush in the recesses Digital Cylinder AX Z5...

Page 112: ...he bracket that was previously inserted lies opposite this metal plate 14 Push the clamp block lever towards the base plate until the clamp is fully seated in the profile cylinder 9 Half cylinder AX i...

Page 113: ...10 4 Core extension Digital Cylinder AX Z5 Manual 10 Customise Cylinder AX 113 158...

Page 114: ...pre assembled clamp Conical circlip 10 4 2 Installation Disassembling the electronic thumb turn Special tool available 1 5 mm hexagonal wrench available 1 Align the thumb turn horizontally Digital Cyl...

Page 115: ...1 2 clockwise first and then counter clockwise NOTE Slipping when turning The surface of the thumb turn cap can be slippery and the cap can be diffi cult to turn especially with WP versions recogniza...

Page 116: ...ove the tool and cover 6 Insert the hexagonal wrench into the hole provided until it stops 7 Turn the hex wrench 270 degrees counterclockwise Digital Cylinder AX Z5 Manual 10 Customise Cylinder AX 116...

Page 117: ...8 Pull out the hexagon wrench again 9 Pull off the thumb turn 9 Electronic thumb turn is disassembled Digital Cylinder AX Z5 Manual 10 Customise Cylinder AX 117 158...

Page 118: ...sert the extension piece into the thumb turn mount IMPORTANT Damage due to incorrect alignment The extension piece or its contact pins cannot be inserted if installed incor rectly Check alignment of c...

Page 119: ...3 Slide the pre assembled clamp from the extension piece towards the driver until it slides into the groove provided Digital Cylinder AX Z5 Manual 10 Customise Cylinder AX 119 158...

Page 120: ...4 Push the circlip with the smaller diameter in the direction of the driver onto the thumb turn mount as far as it will go Digital Cylinder AX Z5 Manual 10 Customise Cylinder AX 120 158...

Page 121: ...he clamp can no longer slip Installing the electronic thumb turn 1 5 mm hexagonal wrench available 1 Align the thumb turn mount horizontally Digital Cylinder AX Z5 Manual 10 Customise Cylinder AX 121...

Page 122: ...TE Use the supplied hexagonal wrench The special tool is supplied with a hexagonal wrench Use this hexagonal wrench to mount and dismount the electronic thumb turn Digital Cylinder AX Z5 Manual 10 Cus...

Page 123: ...sert the hexagonal wrench into the hole provided until it stops 4 Turn the hex key 270 degrees clockwise 5 Pull out the hexagon wrench again Digital Cylinder AX Z5 Manual 10 Customise Cylinder AX 123...

Page 124: ...6 Put on the cover 7 Turn the cover clockwise Digital Cylinder AX Z5 Manual 10 Customise Cylinder AX 124 158...

Page 125: ...is installed 10 5 Escape knob 10 5 1 Installation on fitted cylinder clockwise unlocking Removing the mechanical thumb turn Special tool available 1 Align the thumb turn horizontally 2 Attach the spec...

Page 126: ...the recess 4 At the same time turn the special tool and the thumb turn counter clockwise 5 Remove the special tool and the thumb turn at the same time 9 The mechanical thumb turn is disassembled Digit...

Page 127: ...ch available 1 Insert the 1 5 mm hex key into the escape thumb turn 2 Turn the hex key fully clockwise until it comes to a stop 9 Escape thumb turn clicks 3 Pull out the hexagon wrench again Digital C...

Page 128: ...ockwise until it engages Functional test 1 Turn and pull the escape thumb turn to check that it is properly locked in position 2 Check that you can unlock the door with the escape thumb turn 9 Escape...

Page 129: ...e removed cylinder anticlockwise unlocking Removing the mechanical thumb turn Special tool available 1 Align the thumb turn horizontally 2 Attach the special tool Digital Cylinder AX Z5 Manual 10 Cust...

Page 130: ...the recess 4 At the same time turn the special tool and the thumb turn counter clockwise 5 Remove the special tool and the thumb turn at the same time 9 The mechanical thumb turn is disassembled Digit...

Page 131: ...Removing the cylinder 1 Unscrew the fastening screw 2 Remove the cylinder Digital Cylinder AX Z5 Manual 10 Customise Cylinder AX 131 158...

Page 132: ...al tool available 1 5 mm hexagonal wrench available 1 Align the thumb turn horizontally 2 Attach the special tool 3 Align the special tool so that the logo is parallel to the recess Digital Cylinder A...

Page 133: ...when turning The surface of the thumb turn cap can be slippery and the cap can be diffi cult to turn especially with WP versions recognizable by the blue cylinder neck ring or the lasered marking on...

Page 134: ...wrench into the hole provided until it stops 7 Turn the hex wrench 270 degrees counterclockwise 8 Pull out the hexagon wrench again 9 Pull off the thumb turn Digital Cylinder AX Z5 Manual 10 Customis...

Page 135: ...scape thumb turn 1 5 mm hexagonal wrench available 1 Insert the 1 5 mm hex key into the escape thumb turn 2 Turn the hex key fully clockwise until it comes to a stop 9 Escape thumb turn clicks Digital...

Page 136: ...exagon wrench again 4 Place the escape thumb turn on the cylindrical shaft 5 Hold the cam firmly and turn the escape thumb turn clockwise until it stops Digital Cylinder AX Z5 Manual 10 Customise Cyli...

Page 137: ...1 5 mm hex key into the escape thumb turn 7 Turn the 1 5 mm hex key fully counter clockwise until it will go no fur ther 9 Escape thumb turn clicks Digital Cylinder AX Z5 Manual 10 Customise Cylinder...

Page 138: ...8 Reinstall the cylinder 9 Tighten the fastening screw Digital Cylinder AX Z5 Manual 10 Customise Cylinder AX 138 158...

Page 139: ...Re fitting the electronic thumb turn 1 5 mm hexagonal wrench available 1 Align the thumb turn mount horizontally 2 Attach the thumb turn Digital Cylinder AX Z5 Manual 10 Customise Cylinder AX 139 158...

Page 140: ...ith a hexagonal wrench Use this hexagonal wrench to mount and dismount the electronic thumb turn 3 Insert the hexagonal wrench into the hole provided until it stops 4 Turn the hex key 270 degrees cloc...

Page 141: ...5 Pull out the hexagon wrench again 6 Put on the cover Digital Cylinder AX Z5 Manual 10 Customise Cylinder AX 141 158...

Page 142: ...thumb turn is installed Functional test 1 Turn and pull the escape thumb turn to check that it is properly locked in position 2 Check that you can unlock the door with the escape thumb turn 9 Escape...

Page 143: ...n medium not author ised 1 briefly 1 long green Flip flop mode Engaged 1 long 1 briefly green Flip flop mode Disengaged 3 briefly after battery change red Successful battery change 8 briefly before en...

Page 144: ...leave a thin film of skin grease on the batteries This film deteriorates the contact between the electronics and the batter ies 1 Do not touch the contacts of the new batteries with your hands 2 Use c...

Page 145: ...ial tool so that the logo is parallel to the recess 4 Hold the special tool and thumb turn cap firmly at the same time and turn them together 1 2 clockwise first and then counter clockwise Digital Cyl...

Page 146: ...5 Remove the tool and cover 6 Push the latch inward and open the battery cover 7 Remove the batteries with the special magnetic tool Digital Cylinder AX Z5 Manual 12 Maintenance 146 158...

Page 147: ...9 Close the battery cover 9 Cylinder signals the successful change with triple red flashing and beeping 10 Put on the cover NOTE Align the thumb urn cover and thumb turn using the triangles as shown i...

Page 148: ...11 Turn the cover clockwise 9 The cover snaps into place with one click Digital Cylinder AX Z5 Manual 12 Maintenance 148 158...

Page 149: ...r metal surfaces Damage resulting from liquids This product contains electronic components that may be damaged by liquids of any kind Keep liquids away from the electronics Dust and dirt can impair th...

Page 150: ...ve hybrid metal ring cap active full metal cap active VdS classification Class BZ applied for Europrofile only SKG classification In preparation Europrofile only Weather protection IP54 standard IP67...

Page 151: ...irmware upgradable via BLE Frequency range max transmission power SRD 25 kHz 15 25 kHz 72 03 kHz 10 dB A m 3 m distance depending on equip ment Frequency range max transmission power RFID 13 56 MHz 13...

Page 152: ...etrofitted Reading technologies 3060 Active 25 kHz passive MIFARE Classic and DESFire hybrid active and passive Bluetooth Low Energy BLE Networking modes Online virtual network and offline can be comb...

Page 153: ...5 mW ERP depending on equip ment Frequency range max transmission power BLE 2402 MHz 2480 MHz 2 5 mW Geographical restrictions within the EU No 13 3 Dimensions CO comfort cylinder FD free rotating cyl...

Page 154: ...HZ Half cylinder SR Swiss round profile SO Scandinavian Oval 32 39 5 39 5 2 4 7 3 5 Digital Cylinder AX Z5 Manual 13 Technical specifications 154 158...

Page 155: ...RS Scandinavian Round 32 39 5 39 5 2 4 7 3 5 Digital Cylinder AX Z5 Manual 13 Technical specifications 155 158...

Page 156: ...responding UK statutory 2016 No 1091 EMC 2012 19 EU WEEE as well as the corresponding UK statutory 2013 3113 WEEE 2011 65 EU RoHS as well as the corresponding UK statutory 2012 No 3032 RoHS and regula...

Page 157: ...onic waste as per European Directive 2012 19 EU Recycle defective or used batteries in line with European Directive 2006 66 EC Observe local regulations on separate disposal of batteries Take the pack...

Page 158: ...sustainable thinking and action and heartfelt appreciation of employees and partners SimonsVoss is a company in the ALLEGION Group a globally active network in the security sector Allegion is represe...

Reviews: