6
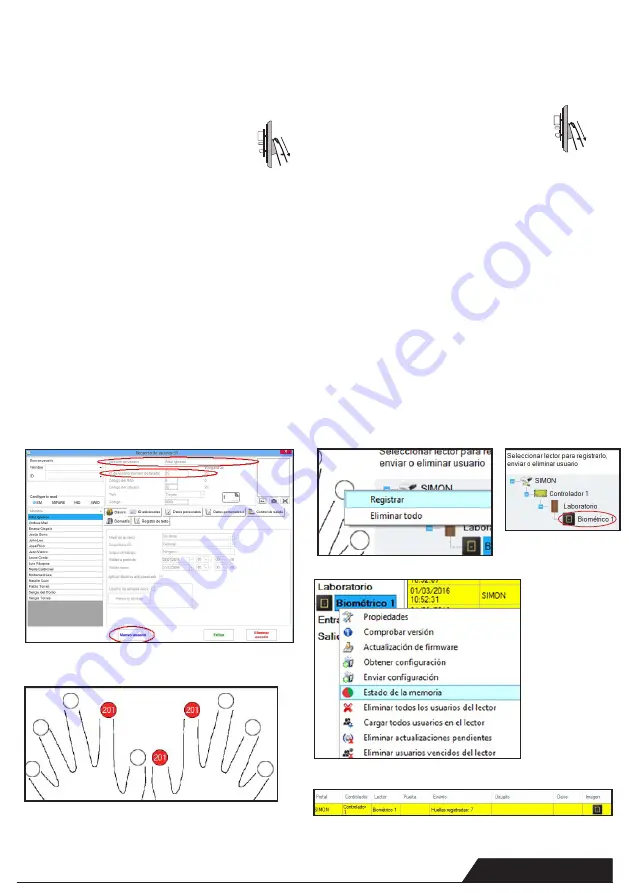
1. Abra la ventana Usuarios y cree un nuevo usuario. Haga clic en
“Nuevo usuario”, ponga un nombre y ID (número de tarjeta)(7)
2. Vaya a la pestaña “Biométrico”
3. Seleccione el lector (haga clic con el botón izquierdo) desde el
cual se va a efectuar el registro. (8)
4. Haga clic con el botón derecho sobre la punta del dedo y seleccio-
ne registrar. (9)
5. En los 25 segundos siguientes, pase el dedo sobre
el lector seleccionado un mínimo de 5 veces y la
punta del dedo se pondrá en rojo. (10). Durante
estos 25 segundos, el lector estará parpadeando
continuamente en naranja.
6. Repita los puntos 4 y 5 por cada dedo que desee registrar.
7. Haga clic en “Guardar nuevo” y la huella dactilar se enviará auto-
máticamente a todos los lectores biométricos a los que tenga acceso
ese usuario, es decir, a todos los lectores según el nivel de acceso
asignado a ese usuario.
Ejemplo:
Si el usuario tiene un nivel de acceso “Ilimitado”, entonces las
huellas dactilares se enviarán a todos los lectores; si el usuario tiene
un nivel de acceso sólo para el Lector 1 y el Lector 3, entonces las
huellas dactilares se enviarán sólo a esos dos lectores.
Nota: Para comprobar si se envían al lector todas las huellas dactila-
res, haga clic con el botón derecho sobre el lector y seleccione
“Estado de la memoria”. (11)
En la ventana de eventos aparecerá una línea indicando el número
de huellas dactilares almacenadas en el lector. (12)
Nota: Si se añaden más huellas dactilares para un mismo usuario,
todas ellas enviarán el mismo código de Wiegand al controlador, el
escrito en el campo Id. de usuario (número de tarjeta).
REGISTRO DE HUELLAS DACTILARES DESDE UN LECTOR
ENROLLING FINGERPRINTS FROM A READER
1. Open the Users Window and create a new user. Click on “New
User”, put a name and ID(card number). (7)
2. Go to the “Biometric” Tab
3. Select the reader(with left click) from which the enrollment will be
done. (8)
4. Right click on the fingertip and select enroll. (9)
5. In the next 25 sec. swipe the finger on
the selected reader min. 5 times and
the finger tip will turn red. (10). In these
25 sec. the reader will continuously blink in
orange.
6. Repeat point 4&5 for each finger that should be enrolled.
7. Click on “Save New” and the fingerprint will be sent automatically
to all Biometric Readers where that user has access, i.e. to all the
readers according to the Access Level assign to that user.
Example
If the user has “Unlimited” Access level then the fingerprints will be
sent to all readers, if the user has Access level only for Reader1 and
Reader 3 then the fingerprints will be sent only to those two readers.
Note:
To check if all the fingerprints are sent to the reader, right click on the
reader and select “Memory Status”. (11)
In the event window a line will appear indicating the number of
fingerprints stored in the reader. (12)
Note:
If more fingerprints are added for one user, all fingerprints will send the
same Wiegand Code to the controller, the one written in the field User
ID(card Number).
www.simon.es
x5
x5
7
10
11
9
8
12


