background image

C3X LINK

4

5

(loss of position within the equidistant vertical bands or instability 
and lack of sharpness on the narrow vertical lines) it may help 
to prompt the system to repeat the input signal analysis and 
determination of the best parameters by calling the automatic 
adjustment procedure with the A key on the remote control or 
the AUTO key on the keypad.
If the automatic procedure fails to have the required effect, 
enter  the  frequency  and  phase  values  manually  and  ap-
proach  the  screen  sufficiently  to  observe  the  effects  of  the 
adjustments.

Table 5

OVERSCAN

Eliminates irregularities around the outer borders of the ima-
ge.
Certain relatively inaccurate sources can produce an image 
with more or less pronounced irregularities around the outer 
edges;  thanks  to  the  overscan  function  these  imperfections 
can be moved to outside the projected area. Overscan values 
can be between 0 (no overscanning) and  (maximum over-
scanning). The resulting image always maintains the selected 
aspect irrespective of the selected overscan value. 

Y/C DELAY

In the case of Video and S-Video signals, it may be necessary 
to correct horizontal colour misalignment within the projected 
image. For a given video standard (e.g. PAL or NTSC) the stored 
value does not normally require further fine-tuning, unless the 
source or connection cable has changed.

SETUP

The  setup  menu  contains  less  frequently  used  adjustments 
that may be required during installation (such as the display 
of Test Patterns).

ORIENTATION

Select the option that best describes the installation i.e. desktop 
front, ceiling front, desktop rear and ceiling rear.

^!#

).

&53%

4

!(

6^

#,!

33

,!3

%20

2/$

5#4

%3#

-%.

5

3/52

#%

#!5

4)/.

FORC

ONTIN

UEDP

ROTEC

TIONA

GAIN

STRISK

OF

FIRER

EPLAC

EON

LYW

ITHSA

METY

PEAN

DRATI

NGFU

SE

!44%

.4)/

.POUR

NEP

ASC

OM

PROM

ETTRE

LAPR

OTEC

TIONC

ONTREL

ESR

ESQ

UES

DINCN

DIER

EM

PLACE

RPARU

NFUSI

BLED

EM

EMET

YPE

ETD

EM

EM

SCARA

CTER

ISTIQU

E

!4%

8!3)

.342

5-%

.434

%#(

./,/

'9

0

I

Fig.23

HORIZONTAL / VERTICAL KEYSTONE

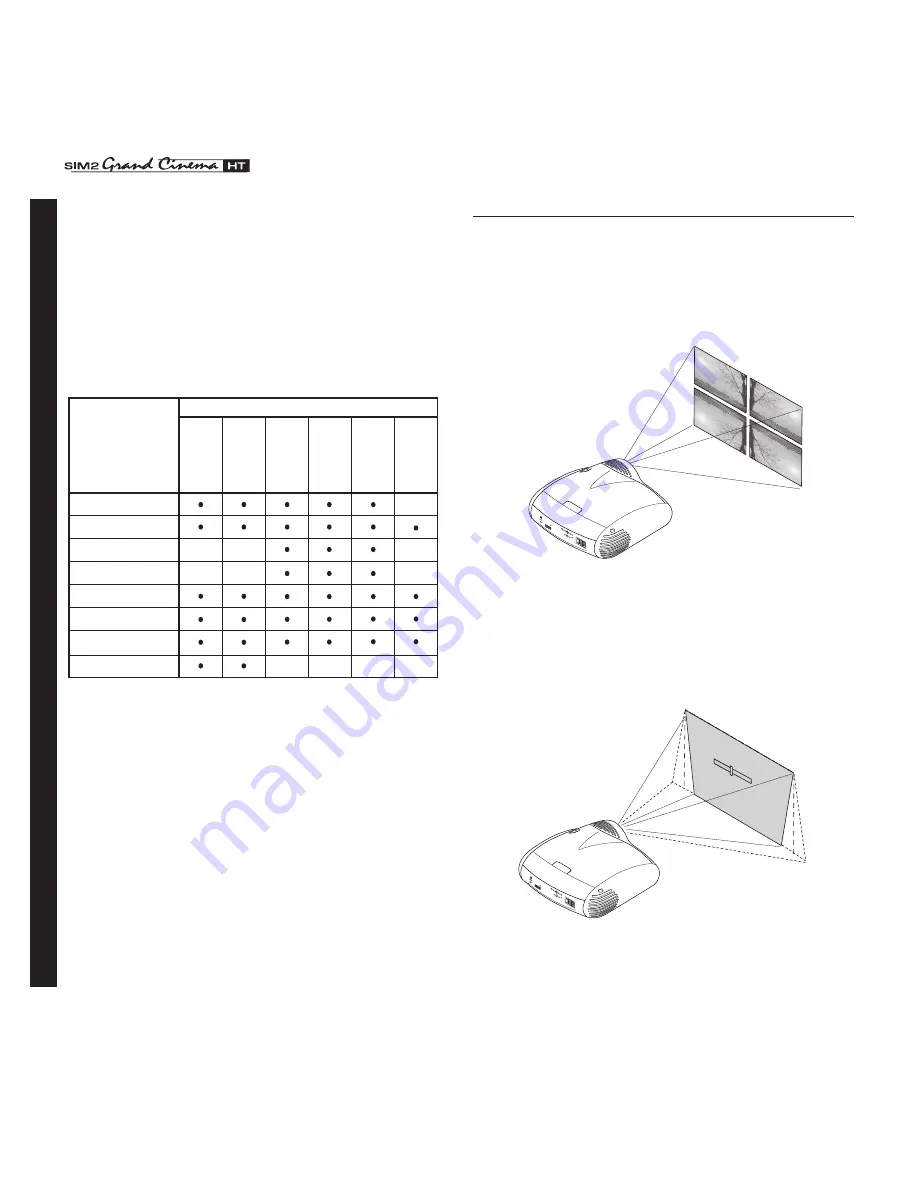
To  obtain  maximum  quality  of  the  projected  image,  we  re-
commend the installation of the projector on a level platform 
parallel and central to the screen.  Adjust the feet undernea-
th the projector to obtain a level position, lining up the base 
of the projected image to the base of the projection screen 

(Fig.24)

.

53"1

&;*0

^!#

).

&53%

4!(

6^

#,!33

,!3%20

2/$5

#4

%3#

-%.

5

3/

52

#%

#!5

4)/.

FORC

ONTIN

UEDP

ROTEC

TIONA

GAIN

STRISK

OF

FIRER

EPLAC

EON

LYW

ITHSA

METY

PEAN

DRATI

NGFU

SE

!44%

.4)/

.POUR

NEP

ASC

OM

PROM

ETTRE

LAPR

OTEC

TIONC

ONTR

ELESR

ESQ

UES

DINCN

DIERE

MPL

ACERP

ARUN

FUS

IBLEDEM

EM

ETYPEE

TDEM

EMSC

ARACT

ERISTI

QUE

!4%

8!3)

.342

5-%

.434

%#(

./,/

'9

0

I

Fig.24

Position
Aspect

Vi

de

o

S-V

ideo

RGBS 

YCrCb 

RGB Grafico 

RGBS 15kHz YCrCb 15kHz

!DJUSTMENTS

)NPUTS

Frequency

-
-

Phase

Gamma Correction

Colour Temperature

Y/C Delay

-
-

-

-

-

-

-

-

Overscan

-

DVI-D

HDMI™

ON-SCREEN MENU

Summary of Contents for Grand Cinema HT C3X-LINK

Page 1: ...User and installation manual Home theater projector C3X LINK 460 544 000 ...

Page 2: ...or 11 Positioning the projector 11 Connecting the two units 11 Connecting the video sources 13 Video 13 S Video 13 Componenti RGB 13 Graphics RGB 14 Dvi D 14 HDMI 14 Control RS232 14 5 CONNECTIONS PANEL 15 6 KEYPAD 16 7 REMOTE CONTROL 16 8 SWITCHING ON AND OFF 17 9 ON SCREEN MENU 19 Imputs 19 Main menu 20 Picture 20 Image 22 Setup 24 Menù 26 Memories 28 Quick menu 29 Messages 29 10 CLEANING AND MA...

Page 3: ...ens zoom adjustment F2 Selects focus lens adjustment It can be pro grammed to call different functions ASPECT Selects picture aspect ratio VCR Improves the video recorder signals quality INFO Displays selected source information and system status MEMORIES Activates the Memories management menu MENU Activates the On Screen Display menus and al lows navigation though the various pages Up Down Left R...

Page 4: ...chnology Projector by linking the two units via a fibre optic cable The DigiOptic Image Processor which should be ideally lo cated close to the signal sources supports and processes a wide range of video signals transmitting them to the Projector by means of a fibre optic link cable Transmission occurs without interference or attenuation over distances of up to 500 metres Moreover the flexibility ...

Page 5: ...aste collection The label affixed on the product shown here alongside with the symbol of a barred wastebin is a reminder to deal with the product appropriately at the end of its useful life Substances such as glass plastic and some chemical compounds can largely be recovered recycled and reused You can make your contribution to the environment by following these simple rules 1 When your electric o...

Page 6: ... S1 L AS ER P RO DU CT 9 10 PO WER DV I D AU DI O OU T HD CO NT RO L RS 23 2 OP TIC AL FIB ER LIN K 3 1 2 11 12 2 3 4 5 1 1 ON OFF power switch 2 External power supply connector 3 Motorised screen outputs 4 Inputs and interfaces 5 Fibre optic cable connectors PROJECTOR Digioptic Image Processor 1 4 2 3 AC IN FU SE T 5A H 250V CLA SS 1 LA SER PR ODUCT ESC MEN U SO URC E CA UT ION for continued prot...

Page 7: ...he units from the electric power supply pull the plug to remove it from the socket outlet Do not pull the power cable Connect the appliance only to the type of power supply indicated Connect the units to a mains electrical supply with rated voltage of between 100 240 VAC 50 60 Hz and equipped with a protective earth connection If you are unsure of the type of mains power supply in your home consul...

Page 8: ...ly ventilated places where there would be insufficient cooling Never look directly at the projection lamp Never look directly at the lens when the projector is on since the bright light could damage your sight In this connection pay special attention to children Be careful with the movements of the lens Do not put anyting into the side slots in the lens and make sure there are no obstructions to t...

Page 9: ...rton follow the direc tions illustrated here Fig 4 The carton and packaging should be retained for future use and in the unlikely event that your system needs to be returned for repair Fig 4 2 3 D I G I O P T I C I M A G E P R O C E S S O R O F F O N 2 1 UNPACKING ...

Page 10: ...for the DigiOptic Image Processor cable with three fibre optic cores two brackets for fixing the DigiOptic Image Processor to the rack user manual If any accessories are missing contact your Dealer as soon as possible PACK CONTENTS Fig 5 Projector Instruction manual Remote control 1 5 V AAA type batteries Power cables Europe UK US C3X Three core fibre optic cable DigiOpticTM Image Processor Power ...

Page 11: ... connector The standard cable length of 20 m will be sufficient for most installation requirements During installation of the fibre optic cable The individual optical cables are delicate always handle the main cable without touching the individual optical cables Fig 7 Never pull the individual optical cables or connectors if necessary you may pull the main three core cable Only remove the cap prot...

Page 12: ...Y 1 2 3 Fig 7 Fig 8 Fig 9 Protective cap Ferrule Connector Fibre Cable Separation point Protective cap Make sure that the single optical cables are not switched the numbers on the cables must match the numbers on the connectors Check that the connectors are correctly inserted Make sure that the cable does not constitute an obstacle for persons moving around the room Take care not to create knots i...

Page 13: ...ipped with an excellent Video Decoder and Deinterlacer and therefore even inferior quality signals will produce high quality results Table 1 shows the types of signals usually available for the most common types of video sources and the corresponding input connectors to use on the DigiOptic Image Processor Table 1 IGI PTIC MAGE 0ROCESSOR ONNECTOR Y green Y Cr red P Cb blue R Y R Y Y V PB B Y U 6ID...

Page 14: ...vice typically a personal computer or game console must be able to provide separate H V synchro nisation or composite H V synchronisation The video or graphic signals that can be connected to this input can have horizontal scan frequencies H sync of between 32 and 80 kHz and a vertical frequency V sync of between 48 and 100 Hz Image resolution can vary between 640x480 and 1600x1200 pixels VGA SVGA...

Page 15: ...C3X LINK 15 HDMI Fig 12 INSTALLATION 5 CONNECTION PANEL ...

Page 16: ... OFF Zoom Focus Info information on the selected input Auto automatic image optimization function Set the projector onto stand by Menu Activates the On Screen Display and Navigates menu pages The remote control handset requires four 1 5V AAA alkaline batteries Insert the batteries taking care to match the polarity as indi cated in the battery compartment in the handset Fig 17 Change the remote con...

Page 17: ...n the rear of the Projector Significant status signals are given in Table 3 If the No optical link or Error signals are active the system cannot be operated if the Warning signal is active the system will operate but it may be unable to read certain input signals correctly 4 Switching on the system Fig 14 with the remote control keys with the Projector keypad key Off Initialisation Status DigiOpti...

Page 18: ... power switches on the units to the O position or disconnecting the power supply cables This is to allow the fans in the Projector unit sufficient time to cool the lamp If power is disconnected from the Projector unit e g setting the mains power switch to the O position or inadvertently unplugging the power cable to restart the C3X LINK system also power off the DigiOptic Image Processor unit and ...

Page 19: ...puts you can now select the input just set by pressing the key During the short time it takes to find the signal a box appears showing the signal requested As soon as the signal is shown in the box additional information is displayed concerning the video standard for video signals or resolution for graphic signals and aspect In the SETUP menu you can select whether or not to display this informati...

Page 20: ...ile exit and return to the upper level occurs by pressing MENU Press ESC on the remote control or keypad to interrupt the menu display or wait for it to disappear automatically after the number of seconds set on theSET UP page PICTURE This menu features the adjustments related to picture quality Adjustments that are not available for a given input do not appear on the menu Table 4 summarises the a...

Page 21: ...es a deinterlace algorithm optimised for this type of signal If the video signal source is not identified as a film or if you select NO the deinterlacer applies a Motion compensated algorithm optimised for video camera signals Video Type Inserts a filter that improves stability of images from videore corders or DVD players To toggle between Normal and VCR mode press the key on the remote control o...

Page 22: ...ed in the centre of the screen and if its horizontal and or vertical dimensions are smal ler than the display it is bounded by vertical and or horizontal black bands User 1 2 3 when none of the preset formulas are suitable The User formulas are available with the facility for continuous horizontal and vertical adjustment of picture size SCREEN Control If an appropriate screen masking interface is ...

Page 23: ...al and automatically sets the most suitable values However if the image is not perfectly centralised it may prove useful to request the system to repeat the input signal analysis and image positioning calling the automatic control procedure with the A key on the remote control or the AUTO key on the keypad When this procedure is called it is helpful to have a while or light coloured background on ...

Page 24: ...r fine tuning unless the source or connection cable has changed SETUP The setup menu contains less frequently used adjustments that may be required during installation such as the display of Test Patterns ORIENTATION Select the option that best describes the installation i e desktop front ceiling front desktop rear and ceiling rear 53 4 6 33 3 2 02 5 4 3 5 3 52 54 FOR CONTINUE D PROTECTIO N AGAINS...

Page 25: ... meter setting is used to vary the power with which the lamp is supplied In this way besides adjusting the brightness of the images to your projection conditions size and type of screen environmental brightness the lamp will have a longer life POWER ON If set on AUTO this option allows the system to be switched on directly from the mains power supply once the initialisation phase is terminated If ...

Page 26: ...tal lines Use the and keys to move the cursor left or right respectively Press the numerical key corresponding to the character Fig 28 the first press selects the first character the second press selects the second character and so forth The available characters are shown in the text insert menu that appears in this configuration mode Use the key to switch from upper case to lower case characters ...

Page 27: ...g away from the curve of the black body The and keys on the other hand are used to select the various colour tempe ratures movement along the horizontal lines of the grid Gamma Correction Successive pressing of the key in question F1 or F2 makes it possible to select from among the available gamma curves Browse through the different values also by using the and keys StandBy Used to assign the F1 o...

Page 28: ...efinitions in Tables 4 and 5 Pressing the key on the remote control or the key on the keypad Fig 30 serves to activate the Memories management menu page 0 Auto 3 S MEMORIA 1 EMORIES Save current settings Save initial settings Rename 2 I 1 S Fig 30 The available operations for each selected memory are described below Saving a memory To save the image parameter current values in memory 1 move the cu...

Page 29: ...the signal in use In effect once it is selected when a source is chosen the system will auto matically reload the settings that were active the last time the memory was retrieved INFO Displays the current status of the projector and information concerning the projected video graphic signal This function is displayed on pressing the key on the remote control or in the absence of the On Screen Displ...

Page 30: ...re the cooling air vents on the units are not blocked and that the ambient temperature is below 35 C Make sure you have followed the power up procedure properly Image is disturbed unstable or noisy Check compatibility of the video or graphic signals with the technical specifications of the system and specifically with the specifications of the selected input Check the condition of the cables used ...

Page 31: ...bility of the video or graphic signals with the technical specifications of the system and specifically with the specifications of the selected input Adjust the Contrast Brightness Colour and Tint para meters in the PICTURE menu If necessary adjust Colour Temperature and Gamma Correction IMAGE menu Graphic image with poor quality vertical detail Check compatibility of the video or graphic signals ...

Page 32: ...1143 cm 406 cm 508 cm 610 cm 762 cm 914 cm 1016 cm 1270 cm 1524 cm 406 cm 508 cm 610 cm 762 cm 914 cm 1016 cm 1270 cm 1524 cm 610 cm 762 cm 914 cm 1143 cm 1372 cm 1524 cm 1905 cm 2286 cm 203 cm 254 cm 305 cm 381 cm 457 cm 508 cm 635 cm 762 cm 80 100 120 150 180 200 260 300 10 0 ft 12 5 ft 15 0 ft 18 9 ft 22 5 ft 25 0 ft 31 3 ft 37 5 ft 13 3 ft 16 7 ft 20 0 ft 25 0 ft 30 0 ft 33 3 ft 41 7 ft 50 0 f...

Page 33: ... connectors gold plated Components signal Y 1 0 Vpp 75 negative or 3 level sync HDTV Cr Cb 0 7 Vpp 75 RGB signal R B 0 7 Vpp 75 G 0 7 Vpp 75 separate H V or HV sync 1 0 Vpp 75 negative or 3 level sync HDTV H V TTL positive or negative 0 3 5 Vpp 1 k 2 RGBHV analog RGB female DB15HD connectors R B 0 7 Vpp 75 G 0 7 Vpp 75 separate H V or HV sync 1 0 Vpp 75 negative or 3 level sync HDTV H V TTL positi...

Page 34: ...5 non condensing Safety EN 60950 Transportability desktop equipment Electromagnetic compatibility EN 55022 Class B EN 55024 EN 61000 3 2 EN 61000 3 3 Transport IEC 68 2 31 IEC 68 2 32 LINK CABLE Composition three 50 125 µm multimode optical fibre cables Connectors LC type Length 20 0 0 2m Diameter 5 mm max Tensile strength 1200N Type Approval UL OFNP traction applied on outer cable not on fibre co...

Page 35: ...harpness Sharpness Mode Brightness Contrast Color Sharpness Filter Cinema Mode Video Type Noise reduction Noise reduction Video S Video PAL SECAM Aspect Color Temperature Gamma Correction Overscan DVI D HDMI Aspect Color Temperature Gamma Correction Overscan Position Y C Delay Aspect Color Temperature Gamma Correction Overscan Position Aspect Color Temperature Gamma Correction Position Frequency P...

Page 36: ...nk Color temperature Gamma correction Standby Yes No Italiano English Français Español Deusch Português 2 VIDEO 3 S VIDEO 9 GRAPHICS RGB 10 11 5 COMPONENT RGBS 6 COMPONENT RGBS COMPONENT RGBS 7 COMPONENT RGBS 8 COMPONENT RGBS 1 VIDEO 1 2 3 4 S VIDEO 4 5 6 7 8 9 10 GRAPHICS RGB 11 DVI D VIDEO 2 S VIDEO 3 GRAPH RGB 9 GRAPH RGB 10 DVI D 11 COMP RGB 5 COMP RGB 6 COMP RGB 6 COMP RGB 7 COMP RGB 8 VIDEO ...

Page 37: ...434 383260 261 www sim2 com e mail info sim2 it SIM2 USA Inc 10108 USA Today Way 33025 Miramar FL USA Phone 1 954 4422999 Fax 1 954 4422998 www sim2usa com e mail sales sim2usa com SIM2 Deutschland GmbH Gewerbepark 17 D 35606 Solms Phone 0800 800 7462 Fax 0800 900 7462 www sim2 com e mail info de sim2 it SIM2 UK LTD Steinway House Worth Farm Little Horsted Nr Uckfield East Sussex TN22 5TT Phone 44...

Reviews: