background image

SilverCrest SIRD 14 A2 


English  -  53 

Package contents 


Internet Radio SilverCrest SIRD 14 A2 

B Remote 

control 

3V button cell battery CR2025 

D Audio 

cable 

E Power 

adapter 

These operating instructions (line-art illustration) 


Summary of Contents for Sird 14 A2

Page 1: ......

Page 2: ......

Page 3: ...V 1 11 Deutsch 2 English 50 ...

Page 4: ...d ausschalten 15 Erstinbetriebnahme 15 Menüsprache auswählen 16 Datum und Uhrzeit einstellen 16 Netzwerkverbindung halten 18 WLAN Region wählen 19 Interneteinstellungen 19 WPS verschlüsseltes Netzwerk die einfachste Art der Verbindungsherstellung 19 Das Konfigurationsmenü 24 Navigation innerhalb des Konfigurationsmenüs 24 Die Menüstruktur 25 Taste INFO Informationen anzeigen 26 Betriebsarten 26 In...

Page 5: ...Interneteinstellg 40 Zeiteinstellungen 41 Sprache 42 Werkseinstellung 42 Software update 42 Einrichtungsassistent Einrichtungsass 42 Info 43 Displaybeleuchtung 43 Hauptmenü 43 Einschlaffunktion Schlummer 43 Wecker 44 Weckruf abschalten 45 Fehlerbehebung 46 Umwelthinweise und Entsorgungsangaben 47 Konformitätsvermerke 47 Hinweise zu Garantie und Serviceabwicklung 48 ...

Page 6: ...LAN Antenne herstellen Bestimmungsgemäße Verwendung Dieses Internet Radio ist ein Gerät der Unterhaltungselektronik und dient zum Empfang und zur Wiedergabe von Audiodaten die über das Internet oder ein Netzwerk empfangen werden Darüber hinaus besteht die Möglichkeit DAB UKW Sender zu empfangen Weiterhin können Audiodateien von externen Audiogeräten wie z B MP3 Playern über AUX Eingang oder von US...

Page 7: ...SilverCrest SIRD 14 A2 Deutsch 5 Lieferumfang A Internet Radio SilverCrest SIRD 14 A2 B Fernbedienung C 3V Knopfzelle Typ CR2025 D Audiokabel E Netzteil F Diese Bedienungsanleitung Symbolbild ...

Page 8: ...lung WEP WPA WPA2 Anschlüsse 10 100 Ethernet LAN RJ 45 Kopfhörer 3 5mm Stereoklinkenbuchsen USB 2 0 AUX IN 3 5mm Stereoklinkenbuchsen LINE OUT 3 5mm Stereoklinkenbuchsen Abmessungen B x H x T ca 21 8 x 11 8 x 15 1 cm Gewicht inkl Netzteil ca 1575 g Betriebstemperatur 5 C bis 35 C Betriebsluftfeuchtigkeit 85 rel Feuchte zulässige Lagerbedingungen 10 C bis 50 C max 85 rel Feuchte Netzteil Hersteller...

Page 9: ...l kennzeichnet Gefahren für die Gesundheit bis zur Lebensgefahr und oder Sachschäden durch elektrischen Schlag Verwenden Sie ausschließlich das mitgelieferte Netzteil Hersteller PSE Typenbezeichnung PSED120200V W zum Betrieb des Internetradios Dieses Symbol kennzeichnet weitere informative Hinweise zum Thema Achten Sie darauf dass keine direkten Wärmequellen z B Heizungen auf das Gerät wirken kein...

Page 10: ...sonen mit Einschränkungen niemals unbeaufsichtigt elektrische Geräte benutzen Es sei denn sie wurden entsprechend eingewiesen oder werden durch eine für Ihre Sicherheit zuständige Person beaufsichtigt Kinder sollten grundsätzlich beaufsichtigt werden damit sichergestellt werden kann dass sie mit diesem Gerät nicht spielen Kleinteile können bei Verschlucken lebensgefährlich sein Halten Sie auch die...

Page 11: ...und an den Anschlussbuchsen Führen Sie Kabel nicht über heiße oder scharfe Stellen und Kanten um Beschädigungen zu vermeiden Machen Sie niemals einen Knoten in ein Kabel und binden Sie es nicht mit anderen Kabeln zusammen Alle Kabel sollten so gelegt werden dass niemand darauf tritt oder behindert wird GEFAHR Batterie Legen Sie die Batterie stets polrichtig ein Beachten Sie dazu die Kennzeichnung ...

Page 12: ...n das Netzteil oder das Gerätegehäuse beschädigt sind Flüssigkeit oder Gegenstände ins Innere des Gerätes gelangt sind oder wenn es Regen oder Feuchtigkeit ausgesetzt wird Reparaturarbeiten sind auch erforderlich wenn es nicht einwandfrei funktioniert oder heruntergefallen ist Wenn Rauchentwicklung ungewöhnliche Geräusche oder Gerüche festgestellt werden muss das Gerät sofort abgeschaltet und das ...

Page 13: ...apitel der Bedienungsanleitung lesen So haben Sie immer eine Referenz zum betreffenden Bedienelement vor Augen Vorderseite 1 Snooze Taste 2 Display 3 Rechter Lautsprecher 4 NAVIGATE Regler Menünavigation manuelle Sendersuche OK 5 BACK Taste eine Menüebene zurückspringen 6 MENU Taste Konfigurationsmenü aufrufen 7 FAVOURITE Taste 8 MODE Taste Betriebsart auswählen 9 INFO Taste Displayanzeigeinhalt w...

Page 14: ...2 12 Deutsch Rückseite 12 Teleskopantenne DAB FM Empfang 13 Hauptschalter 14 USB Buchse 15 LAN Buchse Netzwerkanschluss RJ 45 16 DC IN Buchse Netzteilanschluss Polung 17 Kopfhörer Buchse 18 LINE OUT Buchse 19 AUX IN Buchse ...

Page 15: ...ringern 23 OK 24 Favoriten 25 nächster Titel 26 SHUFFLE REPEAT Zufallswiedergabe Wiederholung 27 Nummernblock 28 INFO 29 EQ Equalizer 30 Stop 31 SLEEP SNOOZE Einschlaffunktion Weckpause 32 Play Pause 33 vorheriger Titel 34 MENU Menü aufrufen 35 MODE Betriebsart wählen 36 Navigationstasten 37 Ein Standby ...

Page 16: ...legen der Batterie auf die richtige Polung nach oben Diese ist im Batteriefach dargestellt Schieben Sie anschließend die Batteriefachabdeckung wieder auf das Batteriefach Batteriewechsel Sollte ein Batteriewechsel notwendig werden ersetzen Sie die alte Batterie durch eine neue 3V Knopfzelle Typ CR2025 Gehen Sie vor wie im vorherigen Abschnitt beschrieben Internetverbindung Sie haben 2 Möglichkeite...

Page 17: ...bedienung verwenden Bevor Sie Anschlüsse an dem Internet Radio vornehmen schalten Sie das Internet Radio mit dem Hauptschalter 13 aus Stellen Sie im ausgeschalteten Zustand alle für den gewünschten Betrieb notwendigen Verbindungen z B Netzwerkkabel etc her Erstinbetriebnahme Beim ersten Einschalten startet das Internet Radio mit folgender Displayanzeige Sie können nun durch Drehen des NAVIGATE Reg...

Page 18: ...und drücken Sie auf den NAVIGATE Regler 4 um Ihre Auswahl zu bestätigen Das Symbol kennzeichnet die aktuelle Einstellung Wurde das 12 Stundenformat gewählt wird im Display 2 hinter der Uhrzeit AM für Vormittagsstunden bzw PM für Nachmittagsstunden angezeigt Anschließend haben Sie folgende Auswahlmöglichkeiten Update über DAB Uhrzeit automatisch über DAB Empfang einstellen Update über FM Uhrzeit au...

Page 19: ...t werden Für Mitteleuropa wählen Sie UTC 01 00 aus Wählen Sie anschließend Ein wenn die Sommerzeit aktuell aktiv ist bzw Aus wenn die Sommerzeit nicht aktiv ist Das Symbol kennzeichnet die aktuelle Einstellung Das Symbol kennzeichnet die aktuelle Einstellung Wenn Sie die Option Kein Update gewählt haben werden Sie aufgefordert Datum und Uhrzeit manuell einzustellen ...

Page 20: ...e zu bestätigen Die Stelle für die Minute blinkt Stellen Sie die Minute durch Drehen des NAVIGATE Reglers 4 ein und drücken Sie auf den NAVIGATE Regler 4 um die Eingabe zu bestätigen Nur wenn das 12 Stundenformat für die Uhrzeit gewählt wurde blinkt AM Wählen Sie nun durch Drehen des NAVIGATE Reglers 4 AM für Vormittagsstunden oder PM für Nachmittagsstunden aus und drücken Sie auf den NAVIGATE Reg...

Page 21: ...in Netzwerkkabel mit Ihrem Router verbunden haben Die Verbindung wird nun direkt hergestellt Manuelle Konfig Manuelle Eingabe der Verbindungsdaten WPS verschlüsseltes Netzwerk die einfachste Art der Verbindungsherstellung Wenn Ihr Router WPS unterstützt können Sie diese komfortable Funktion für eine einfache Einrichtung verwenden Dies ist die einfachste Art das Internet Radio mit dem Router zu ver...

Page 22: ...au über Tastendruck Das Internet Radio fordert Sie auf die Verbindungstaste WPS Ihres Routers zu drücken Symbolbild Verbindungstaste WPS kann je nach Routermodell abweichend angeordnet und bezeichnet sein Anschließend drücken Sie den NAVIGATE Regler 4 um fortzufahren Das Internet Radio versucht jetzt eine Verbindung mit Ihrem Router herzustellen Nach erfolgreichem Verbindungsaufbau zum Router ersc...

Page 23: ...ste INFO 9 und halten Sie diese für ca 1 Sekunde gedrückt PIN WPS Aufbau über PIN Eingabe Es wurde eine PIN vom Internet Radio generiert Diese PIN ist immer nur für den aktuellen Vorgang gültig wird der Vorgang wiederholt wird auch eine neue PIN generiert Geben Sie nun die PIN die auf dem Display 2 angezeigt wird an Ihrem Router ein Beachten Sie dazu die Dokumentation Ihres Routers Anschließend dr...

Page 24: ... ein Zeichen und bestätigen Sie Ihre Eingabe durch Drücken des NAVIGATE Reglers 4 Alternativ können Sie die Eingabe mit dem Nummernblock 27 oder den Navigationstasten 36 und der Taste OK 23 der Fernbedienung vornehmen Nachdem Sie in dieser Weise den Netzwerkschlüssel komplett eingegeben haben wählen Sie durch Drehen des NAVIGATE Reglers 4 OK aus und bestätigen Sie Ihre Eingabe durch Drücken des NA...

Page 25: ...t nun in Ihr Netzwerk eingebunden und kann verwendet werden Bei bestehender Internetverbindung können auch Internet Radiosender empfangen werden Kabel Haben Sie das Internet Radio per Netzwerkkabel mit Ihrem Router verbunden wählen Sie durch Drehen des NAVIGATE Reglers 4 in der Liste den Eintrag Kabel aus Bestätigen Sie Ihre Auswahl durch Drücken des NAVIGATE Reglers 4 Das Internet Radio versucht ...

Page 26: ...stellen der einzelnen Betriebsarten des Internet Radios erfolgt über ein Menü welches über verschiedene Ebenen verfügt Navigation innerhalb des Konfigurationsmenüs Um eine Betriebsart zu wählen drücken Sie einmal die Taste MODE 8 Im Display sehen sie die 5 verschiedenen Betriebsarten Die aktive Betriebsart ist etwas größer dargestellt Wählen Sie durch Drehen des NAVIGATE Reglers 4 eine Betriebsart...

Page 27: ...IRD 14 A2 Deutsch 25 Die Menüstruktur Die Untermenüs können abhängig von der individuellen Konfiguration unterschiedlich dargestellt werden Weitere Informationen zu den Untermenüs finden Sie im Kapitel Betriebsarten ...

Page 28: ...4 Internet Radio aus und bestätigen Sie Ihre Auswahl durch Drücken des NAVIGATE Reglers 4 Das Internet Radio verbindet sich nun mit dem Internet um eine Liste der Radiostationen zu laden Neben den Menüeinträgen Systemeinstellungen und Hauptmenü finden Sie folgende Einträge Zuletzt gehört Zeigt eine Liste der zuletzt wiedergegebenen Radiosender Podcasts etc an Senderliste Ruft eine Liste verfügbare...

Page 29: ...der nach Genre sortiert Sender suchen Nach einem Sender suchen Populäre Sender Zeigt eine Liste von populären Sendern an Neue Sender Zeigt eine Liste von neuen Sendern an Die Senderauswahl kann je nach ausgewählter Rubrik weiter eingeschränkt werden Wurde ein Sender ausgewählt und durch Drücken des NAVIGATE Reglers 4 bestätigt wird dieser direkt wiedergegeben Favoriten speichern Mit dieser Funktio...

Page 30: ...rnet Radio Portal zu registrieren müssen Sie zuerst einen Zugriffscode generieren Wählen Sie die Betriebsart Internet Radio Gehen Sie nun im Menü des Internet Radios auf Senderliste Hilfe Zugriffscode erhalten Sollten Sie beim Generieren des Zugriffcodes die Fehlermeldung Netzwerk Timeout erhalten drücken Sie den NAVIGATE Regler 4 um den Vorgang erneut zu starten oder versuchen Sie es zu einem spä...

Page 31: ...enüeinträgen Systemeinstellungen und Hauptmenü folgende Optionen zur Auswahl Medienbibliothek en Wählen Sie diese Option um Musikdateien aus Ihrem lokalen Netzwerk wiederzugeben Bitte beachten Sie dass hierfür zuvor die Musikdateien zum Streaming in Ihrem Netzwerk freigegeben sein müssen Lesen Sie hierzu die Dokumentation des Gerätes Computer Router usw welches als Wiedergabequelle dienen soll Wen...

Page 32: ...IGATE Regler 4 um diesen abzuspielen USB Abspielen Wenn Sie einen USB Datenträger in die USB Buchse 14 eingesteckt haben erscheint eine Displaymeldung dass ein USB Gerät angeschlossen wurde Bestätigen Sie die Frage ob der Ordner geöffnet werden soll indem Sie JA durch Drehen des NAVIGATE Reglers 4 wählen und bestätigen Sie Ihre Auswahl durch Drücken des NAVIGATE Reglers 4 Die angezeigten Menüs wer...

Page 33: ...ederholen Aus Hier können Sie festlegen ob ein Titel endlos wiederholt werden soll Drücken Sie auf den NAVIGATE Regler 4 um zwischen Wiederholen Aus und Wiederholen An zu wechseln Bei eingeschalteter Funktion wird im unteren Bereich des Displays 2 angezeigt Zufall Aus Hier können Sie die Zufallswiedergabe der aktuellen Playlist bzw des aktuellen Ordners ein und ausschalten Drücken Sie auf den NAVI...

Page 34: ...ewissern Sie sich ob in Ihrer Region DAB DAB empfangen werden kann Anschließend wird Ihnen eine Senderliste der gefundenen DAB Radiosender angezeigt Sie können nun durch Drehen des NAVIGATE Reglers 4 einen Sender auswählen Bestätigen Sie Ihre Auswahl durch Drücken des NAVIGATE Reglers 4 um die Wiedergabe des Senders zu starten Abhängig vom Radiosender werden Ihnen im Display 2 weitere Informatione...

Page 35: ...eichnet Manuell einstellen Mit dieser Option können Sie Sender eines Ensembles manuell zur Senderliste hinzufügen Ist Ihnen das Senderensemble jedoch nicht bekannt verwenden Sie die Option Suchlauf Senderliste bereinigen Ungültige bzw nicht empfangbare Sender sind in der Senderliste mit dargestellt und können mit dieser Option entfernt werden Wählen Sie durch Drehen des NAVIGATE Reglers 4 JA oder ...

Page 36: ... der letzten Drehrichtung des NAVIGATE Reglers 4 startet der Sendersuchlauf auf bzw abwärts Sender speichern aufrufen Gehen Sie wie folgt vor um einen Sender zu speichern Um den aktuell wiedergegebenen Radiosender zu speichern drücken Sie die Taste FAVOURITE 7 ca 2 Sekunden bis sich die Favoritenliste öffnet Wählen Sie nun einen der 10 Speicherplätze mit dem NAVIGATE Regler 4 aus Drücken Sie den N...

Page 37: ...bels D in die AUX IN Buchse 19 des Internet Radios Starten Sie die Wiedergabe der externen Audioquelle Sie können die Lautstärke mit dem VOLUME Regler 10 und an Ihrer externen Audioquelle Ihren Bedürfnissen anpassen Drücken Sie die Taste MENU 6 stehen Ihnen die Menüeinträge Systemeinstellungen und Hauptmenü zur Auswahl Einschlaffunktion Schlummer Mit der Einschlaffunktion können Sie das Gerät eins...

Page 38: ...evor Sie einen Kopfhörer anschließen Danach kann die Lautstärke auf den gewünschten Wert eingestellt werden Vorsicht bei der Verwendung eines Kopfhörers Längeres Hören bei hoher Lautstärke kann zu Hörschäden des Benutzers führen An der Kopfhörer Buchse 17 können Sie einen Kopfhörer anschließen Wenn ein Kopfhörer eingesteckt ist werden die Lautsprecher 3 und 11 automatisch abgeschaltet LINE OUT Buc...

Page 39: ...e Wiedergabe gestartet Sie können nun die Wiedergabe über den Computer steuern Wenn Sie am Internet Radio eine andere Betriebsart auswählen wird die Wiedergabe unterbrochen Eine erneute Wiedergabe kann nur über den Computer gestartet werden Quelle Smartphone Tablet PC Systemvoraussetzung für das DLNA Streaming ist ein Smartphone Tablet PC mit DLNA Streaming App Beachten Sie dass Smartphone Tablet ...

Page 40: ...Aufforderung der PIN Eingabe die aktuelle PIN ein Die voreingestellte PIN lautet 1234 Die aktuelle PIN können Sie am Internet Radio im Menü Systemeinstellungen Interneteinstellg NetRemote PIN Setup anzeigen lassen und ändern HINWEIS Die Steuerung mit der SilverCrest IR Control App ist im Auslieferungszustand nur in der Betriebsart Internet Radio möglich In den Betriebsarten Standby AUX IN FM Radio...

Page 41: ...e Zahlen und Punkte Ihres Radios in der Befehlszeile Ihres Internet Browsers ein und bestätigen Sie mit Enter Auf der nun erscheinenden Seite finden Sie unter dem Punkt Friendly Name den aktuellen Radio Namen Geben Sie unter dem Punkt New friendly Name einen neuen Radio Namen z B Küche ein und bestätigen Sie den neuen Namen mit Apply Sie können nun das Internetradio mit dem geänderten Namen eindeu...

Page 42: ...inem WPS fähigen Router verbinden Weitere Informationen entnehmen Sie bitte dem Kapitel Interneteinstellungen auf Seite 19 Einstellungen anzeigen Hier können Sie sich Informationen zum Netzwerk anzeigen lassen WLAN Region Geben Sie hier die WLAN Region an in der das Internet Radio verwendet wird Es kann nur die Option Größter Teil Europas ausgewählt werden Manuelle Einstellungen Diese Option sollt...

Page 43: ...ebsarten Standby AUX IN FM Radio DAB Radio und USB Wiedergabe der WLAN Betrieb deaktiviert Somit ist in diesen Betriebsarten eine Steuerung über die SilverCrest IR Control App oder das DLNA Streaming nicht möglich Möchten Sie das Internet Radio jedoch in allen Betriebsarten über die SilverCrest IR Control App steuern oder das DLNA Streaming verwenden müssen Sie in dieser Option JA auswählen Verwen...

Page 44: ...usgewählte Option durchzuführen Daraufhin erscheint eine Sicherheitsabfrage Bestätigen Sie diese mit JA um die Werkseinstellungen zu laden Mit Nein brechen Sie den Vorgang ab Software update In diesem Menü können Sie Einstellungen zum Software Update vornehmen Auto Update Diese Funktion prüft von Zeit zu Zeit automatisch ob ein neues Update zur Verfügung steht Das Auto Update ist im Auslieferungsz...

Page 45: ...schlaffunktion und die Weckfunktion einstellen Sie können folgende Betriebsarten wählen Internet Radio Musikplayer DAB FM AUX in Schlummer Wecker und Systemeinstellungen Einschlaffunktion Schlummer Mit der Einschlaffunktion können Sie das Gerät einschalten und nach Ablauf einer ausgewählten Zeit automatisch abschalten lassen Sie können die Einschlaffunktion in allen Betriebsarten verwenden Drücken...

Page 46: ...ker 2 aus Es stehen nun folgende Option zur Verfügung Aktivieren Wählen Sie nun eine der folgenden Optionen Aus Wecker nicht aktiv Täglich Einmal Wochenende Samstag und Sonntag Werktage Montag bis Freitag Wird die Option Einmal ausgewählt muss direkt Datum und Uhrzeit der Weckzeit eingestellt werden Uhrzeit Stellen Sie hier die Weckzeit ein Die Stelle für die Stunde blinkt Stellen Sie die Stunde d...

Page 47: ...chte Wecklautstärke ein Bestätigen Sie diese durch Drücken des NAVIGATE Reglers 4 Speichern Markieren Sie diese Option und drücken Sie den NAVIGATE Regler 4 um die zuvor vorgenommenen Einstellungen zu speichern Bei aktiviertem Wecker wird im Display 2 ein Glockensymbol mit einer 1 Wecker 1 bzw 2 Wecker 2 angezeigt Im Standby wird zusätzlich die eingestellte Weckzeit im Display 2 angezeigt Weckruf ...

Page 48: ...schließen Kein Empfang in der Betriebsart Internet Radio Der gewählte Radiosender ist unter Umständen nicht verfügbar Probieren Sie einen anderen Radiosender Prüfen Sie ob die Verbindung zum Router Internet besteht Schlechter DAB FM Empfang Ziehen Sie die Teleskopantenne 12 komplett aus und richten Sie diese ggf anders aus Kein Ton trotz eingeschaltetem Gerät Überprüfen Sie die Einstellung der Lau...

Page 49: ...en Sammelplätzen zur Wiederverwertung abgegeben werden Folien und Kunststoffe des Lieferumfangs werden über Ihr örtliches Entsorgungsunternehmen eingesammelt und umweltgerecht entsorgt Denken Sie an den Umweltschutz Verbrauchte Batterien gehören nicht in den Hausmüll Sie müssen bei einer Sammelstelle für Altbatterien abgegeben werden Bitte beachten Sie dass Batterien nur im entladenen Zustand in d...

Page 50: ...vor Auslieferung gewissenhaft geprüft Die Garantieleistung gilt für Material oder Fabrikationsfehler Diese Garantie erstreckt sich nicht auf Produktteile die normaler Abnutzung ausgesetzt sind und daher als Verschleißteile angesehen werden können oder für Beschädigungen an zerbrechlichen Teilen z B Schalter Akkus oder die aus Glas gefertigt sind Diese Garantie verfällt wenn das Produkt beschädigt ...

Page 51: ...gkeit der Fehlerursache ein weiterführender Service veranlasst Service Telefon 0049 0 211 547 69 93 E Mail service DE targa online com Telefon 0043 0 1 79 57 60 09 E Mail service AT targa online com Telefon 0041 0 44 511 82 91 E Mail service CH targa online com IAN 106203 Hersteller Bitte beachten Sie dass die folgende Anschrift keine Serviceanschrift ist Kontaktieren Sie zunächst die oben benannt...

Page 52: ...g started 63 Switching the Internet Radio on off 63 First time setup 63 Selecting the menu language 64 Setting date and time 64 Keep network connected 66 Selecting the WLAN region 67 Network 67 WPS encrypted network the easiest way to connect 67 Configuration menu 72 Navigating the configuration menu 72 Menu structure 73 INFO button show information 74 Operating modes 74 Internet Radio 74 Music pl...

Page 53: ...em settings 87 Equalizer 87 Network 87 Time Date 88 Language 89 Factory Reset 89 Software update 89 Setup wizard 89 Info 89 Display brightness 89 Main menu 90 Sleep timer 90 Alarm 91 Switching the alarm off 92 Troubleshooting 92 Environmental regulations and disposal information 93 Conformity notes 93 Warranty and Service Information 94 ...

Page 54: ...na to establish a connection to the Internet Intended use This Internet Radio is a consumer electronics device and has been designed for receiving and playing back audio data from the Internet or a network It can also receive DAB FM radio stations The playback of audio files from external audio devices such as MP3 players via the AUX input or USB storage devices via the USB port is also possible T...

Page 55: ...t SIRD 14 A2 English 53 Package contents A Internet Radio SilverCrest SIRD 14 A2 B Remote control C 3V button cell battery CR2025 D Audio cable E Power adapter F These operating instructions line art illustration ...

Page 56: ... n WiFi encryption WEP WPA WPA2 Connectors and sockets 10 100 Ethernet LAN RJ 45 Headphones 3 5mm stereo jacks USB 2 0 AUX IN 3 5mm stereo jacks LINE OUT 3 5mm stereo jacks Dimensions W x H x D approx 21 8 x 11 8 x 15 1cm Weight incl power adapter approx 1575g Operating temperature 5 C to 35 C Operating humidity 85 rel humidity Storage conditions 10 C to 50 C max 85 RH Power adapter Manufacturer P...

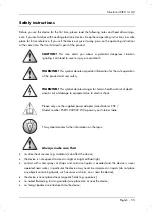
Page 57: ...es danger for human health and risk of death and or risk of damage to equipment due to electric shock Please only use the supplied power adapter manufacturer PSE Model number PSED120200V W to power your Internet radio This symbol denotes further information on the topic Always make sure that no direct heat sources e g radiators can affect the device the device is not exposed to direct sunlight or ...

Page 58: ...e instructed accordingly and supervised by a competent person responsible for their safety Children should always be supervised to ensure that they do not play with the product Small parts can represent choking hazards Keep the packaging away from children and persons with disabilities too There is a risk of suffocation WARNING Risks associated with high volumes Be careful when using headphones Li...

Page 59: ...e cable around hot or sharp objects to avoid damaging them Never tie knots in cables and do not tie them to other cables All cables should be laid so that nobody can trip over them or be obstructed by them CAUTION Battery Insert the battery with the correct polarity Refer to the diagram inside the battery compartment Do not attempt to recharge the batteries and do not dispose of the batteries in a...

Page 60: ...ids or objects have entered the device or if the product has been exposed to rain or moisture Repairs are also necessary if the product is not performing normally or if it has been dropped If you notice any smoke unusual noise or strange smells switch off the device immediately and pull the power adapter out of the power supply If this occurs do not continue to use the device and have it checked b...

Page 61: ...ading the different chapters of this user manual This allows you to refer to the corresponding items at any time Front panel 1 Snooze button 2 Display 3 Right speaker 4 NAVIGATE knob menu navigation manual station search OK 5 BACK button back one menu level 6 MENU button open the configuration menu 7 FAVOURITE button 8 MODE button operating mode selection 9 INFO button display contents selection 1...

Page 62: ...60 English Rear panel 12 Telescopic antenna DAB FM reception 13 Main power switch 14 USB port 15 LAN port network port RJ 45 16 DC IN socket power adapter connection polarity 17 Headphones jack 18 LINE OUT jack 19 AUX IN jack ...

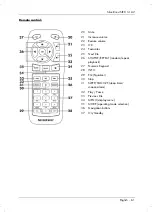
Page 63: ...ume 23 OK 24 Favourites 25 Next title 26 SHUFFLE REPEAT random repeat playback 27 Numeric Keypad 28 INFO 29 EQ Equalizer 30 Stop 31 SLEEP SNOOZE sleep timer snooze alarm 32 Play Pause 33 Previous title 34 MENU display menu 35 MODE operating mode selection 36 Navigation buttons 37 On Standby ...

Page 64: ...ent Fit the battery the right way round with the sign facing up This is shown on a diagram in the battery compartment Next slide the battery compartment cover back to its original position Replacing the battery When you need to change the battery replace it with a new 3V CR2025 button cell battery Proceed as described in the previous section Internet connection There are 2 ways to establish an Int...

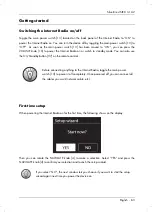
Page 65: ...n also use the On Standby button 37 on the remote control Before connecting anything to the Internet Radio toggle the main power switch 13 to power it off completely Once powered off you can connect all the cables you want network cable etc First time setup When powering the Internet Radio on for the first time the following shows on the display Then you can rotate the NAVIGATE knob 4 to make a se...

Page 66: ...rmat and press the NAVIGATE knob 4 to confirm your selection The icon indicates the current setting If you select the 12 hour format the display 2 shows AM in the morning or PM in the afternoon after the time After this the following options are available Update from DAB Synchronise the time automatically from a DAB station Update from FM Synchronise the time automatically from an FM station Updat...

Page 67: ... Network you must indicate your time zone in the next window Select UTC 01 00 for Central Europe Next choose On for summer time otherwise select Off The icon indicates the current setting The icon indicates the current setting If you choose No update you will have to enter the date and time manually ...

Page 68: ... minute flashes Rotate the NAVIGATE knob 4 to set the minute and press the NAVIGATE knob 4 to confirm AM will flash only if you have chosen the 12 hour time format Rotate the NAVIGATE knob 4 to select AM for the morning hours or PM for the afternoon hours and press the NAVIGATE knob 4 to confirm your selection Keep network connected The icon indicates the current setting The default setting is NO ...

Page 69: ...e connection is then established immediately Manual config Manual input of connection details WPS encrypted network the easiest way to connect If your router supports WPS you can use this user friendly function for easy setup This is the easiest way to establish a connection between your Internet Radio and your router When searching for wireless networks the device will detect any WPS compatible r...

Page 70: ...your router Diagram for illustration only the connection WPS button may be positioned and labelled differently depending on the router model Next press the NAVIGATE knob 4 to continue The Internet Radio now attempts to establish a connection with your router After the connection has been established the display 2 shows the following for a few seconds ...

Page 71: ...O button 9 for at least 1 second PIN establish WPS connection by entering the PIN The Internet Radio generates a PIN code This PIN is only valid for the current task If the task is repeated a new PIN is generated Enter the PIN on your router that appears on the display 2 Please consult the technical documentation that came with your router Next press the NAVIGATE knob 4 to continue The Internet Ra...

Page 72: ...nob 4 to select a character and press the NAVIGATE knob 4 to confirm it You can also use the numeric keypad 27 or the navigation buttons 36 and the OK button 23 of the remote control After you have entered the entire network key in this way rotate the NAVIGATE knob 4 to select OK and press the NAVIGATE knob 4 to confirm The Internet Radio now attempts to establish a connection with your router Aft...

Page 73: ...nnection it is possible to receive Internet Radio stations Wired If your Internet Radio is connected to the router via a network cable rotate the NAVIGATE knob 4 to select the Wired option from the list Press the NAVIGATE knob 4 to confirm your selection The Internet Radio now attempts to establish a connection with your router After the connection has been established the display 2 shows the foll...

Page 74: ...io are configured via a multi level menu Navigating the configuration menu To select an operating mode press the MODE button 8 The 5 available operating mode appear on the display The currently enabled operating mode reads slightly larger Rotate the NAVIGATE knob 4 to select an operating mode Press the NAVIGATE knob 4 to confirm your selection You can also use the navigation buttons 36 and the OK ...

Page 75: ...rest SIRD 14 A2 English 73 Menu structure The submenus may appear differently depending on your individual configuration You can find further information concerning the submenus in the Operating modes chapter ...

Page 76: ... Your Internet Radio now connects to the Internet to load a list of radio stations As well as the System settings and Main menu options the following entries are available Last listened Shows a list of the last radio stations podcasts etc listened to Station list Opens a list of available stations in the following categories My Favourites lists the favourites you have set on the Internet radio por...

Page 77: ...ategory selected further search criteria can be specified Once a station has been selected and confirmed by pressing the NAVIGATE knob 4 it is played immediately Saving favourites This feature lets you create a list of up to 10 favourite radio stations without having to register your Internet Radio on the Internet radio portal Proceed as follows To save the current radio station hold the FAVOURITE...

Page 78: ...work timeout appears when generating the access code press the NAVIGATE knob 4 to restart the process or try it again later This error message does not mean that your Internet radio is defective Then register on the website www wifiradio frontier com Follow the instructions on the website The following information is required for registration access code e mail address password and Radio ID You ca...

Page 79: ...If you have set up Shared media on your local network select this menu item by rotating the NAVIGATE knob 4 and then pressing the NAVIGATE knob 4 to confirm your selection The shared media created is now displayed Rotate the NAVIGATE knob 4 to select the desired shared media and press the NAVIGATE knob 4 to confirm your selection The following submenus are generated by the shared media server You ...

Page 80: ...ection The menus displayed are generated from the USB storage device s folder structure Use the NAVIGATE knob 4 and the BACK button 5 to browse through the folders The display 2 shows the folder and file names but not necessarily the title names Once you have found the title you want to play press the NAVIGATE knob 4 to confirm your selection The title is played USB appears at the bottom of the di...

Page 81: ...fle play On While this function is enabled reads on the bottom of the display 2 Clear My playlist Lets you clear the playlist entries on your Internet Radio To do this press the NAVIGATE knob 4 Rotate the NAVIGATE knob 4 to select YES or NO and press the NAVIGATE knob 4 to confirm Prune servers The Internet Radio saves UPnP servers it finds via your network connection If some UPnP servers are no l...

Page 82: ... the selected station preset Please note that any station presets used will be overwritten To recall a previously saved stations briefly press the FAVOURITE button 7 and use the NAVIGATE knob 4 to select the station from the list Press the NAVIGATE knob 4 to play the selected station If you press the MENU button 6 you can choose one of the following options as well as the System Settings and Main ...

Page 83: ...rked with a Receiving FM Radio Use this operating mode to listen to FM radio stations Selecting a station Proceed as follows to select a station Extract the telescopic antenna 12 fully Rotate the NAVIGATE knob 4 to tune to the frequency you want manually To search for a station automatically press the NAVIGATE knob 4 You can stop the station search by pressing the NAVIGATE knob 4 again The display...

Page 84: ...earches for strong stations only or also for weak stations Rotate the NAVIGATE knob 4 to select and press the NAVIGATE knob 4 to confirm The selected setting is marked with a Audio setting This lets you define that weak stations are to be received in Mono only This can help to reduce noise Rotate the NAVIGATE knob 4 to select and press the NAVIGATE knob 4 to confirm The selected setting is marked ...

Page 85: ...eep timer countdown is running you can power the Internet Radio off at any time by pressing the VOLUME button 11 Press the Snooze button 1 during the countdown to show the remaining countdown time on the display 2 This also permanently appears smaller on the bottom of the display 2 Connecting the headphones Set the volume to the lowest level before connecting headphones in order to avoid damaging ...

Page 86: ...ck on Stream on the top menu bar Click on Turn on media streaming or More streaming options Next turn on media streaming for your Internet Radio SilverCrest SIRD 14 A2 by following the on screen instructions Now you can play a title on your Internet Radio Right click on the title you want and select Play to and SilverCrest SIRD 14 A2 The connection with your Internet Radio is now established and p...

Page 87: ...storage devices Internet radio control Using the SilverCrest IR Control App First install the SilverCrest IR Control App Please note that your smartphone or Tablet PC and the Internet Radio have to be logged into the same WLAN network Power your Internet Radio on in the Internet radio operating mode and launch the app When first launched the app displays all available Internet Radios Select the In...

Page 88: ...P address of the Internet radio You can find it under System settings Network View settings Then proceed as follows Type the IP address numbers separated by dots of your radio in the Internet Browser address bar and press Enter to confirm The page that appears shows the current Internet radio name under the Friendly Name field Enter the new name into the New friendly Name field for example Kitchen...

Page 89: ...k chapter on page 67 View settings Displays information about the network Wlan region Enter the WLAN region where you wish to use your Internet Radio The only available option is Most of Europe Manual settings This option should only be used by experienced users It allows you to adjust network specific parameters Connection type DHCP IP settings Gateway address DNS SSID Authentication Encryption t...

Page 90: ...r DLNA streaming select YES After this use your Internet Radio in Internet radio operating mode once to establish a permanent WLAN connection Time Date This menu lets you set the date and time Set Time Date Here you can set the date and time manually For more information please read the Setting date and time chapter on page 64 Auto update Here you can set the date and time to be synchronised autom...

Page 91: ...ct YES Check now Use this option to search for available updates immediately If an update is available it is shown on the display 2 Follow the instructions on the display 2 Do not power the device off or disconnect it from the mains during the update This could result in a complete device failure Setup wizard With this function you can start the setup wizard at any time Any parameters or stations ...

Page 92: ...l the device will power off After you have pressed the Snooze button 1 you can also toggle between the previous options by using the NAVIGATE knob 4 as long as these options are still showing on the display 2 The Music player and AUX in operating modes require playback to be started manually on the Internet Radio or the external audio source Select Sleep OFF to disable the sleep timer The device s...

Page 93: ... format Rotate the NAVIGATE knob 4 to select AM for the morning hours or PM for the afternoon hours and press the NAVIGATE knob 4 to confirm your selection Mode This let you set how you want to be woken up The following options are available Buzzer Internet radio DAB and FM If no Internet connection is available the buzzer will sound Preset This lets you select the radio station you would like to ...

Page 94: ...net Radio is switched to ON No WLAN connection The distance to the router is too high reduce it Check that the network key has been entered correctly No LAN connection Check that the network cable has been inserted correctly into the LAN port 15 of your Internet Radio and into the LAN port of your router Try a different network cable in case the existing one is damaged No reception in Internet rad...

Page 95: ...ht the device Dispose of all packaging in an environmentally friendly manner Cardboard packaging can be taken to paper recycling containers or public collection points for recycling Any film or plastic contained in the packaging should be taken to your public collection points for disposal Respect the environment Old batteries must not be disposed of with domestic waste They must be handed in at a...

Page 96: ...lies to material and manufacturing faults This warranty does not cover product components which are subject to normal wear and which can therefore be regarded as wearing parts or damage to fragile components such as switches rechargeable batteries or components made of glass This warranty is void if the product is damaged incorrectly used or serviced To ensure correct use of the product always com...

Page 97: ...Phone 0207 36 50 744 E Mail service GB targa online com Phone 01 242 15 83 E Mail service IE targa online com Phone 800 62 175 E Mail service MT targa online com Phone 800 92 496 E Mail service CY targa online com IAN 106203 Manufacturer Please note that the following address is not a service address First contact the service point stated above TARGA GmbH Coesterweg 45 59494 SOEST GERMANY ...

Page 98: ......

Reviews: