


4
Paper Towels
Dremel
®
Tool With Selection of Sanding and Grinding Bits
Large Fuel Tubing
TOP WING ASSEMBLY:
Note that a piece of string has been factory-installed in each wing
panel to make it easier to pull the servo wires and the attached
extension cords through the openings in each wing panel. Use
small pieces of tape to hold the strings out of the way during while
assembling the wing panels.
❑
1) a. Begin assembly of the upper wing by locating the two
cabane attachment mounts and the wing joiner from the parts bag.
Assemble the parts together as a "dry assembly" first to make sure
you fully understand the assembly.
b. Using slow drying 30-minute epoxy glue, apply a liberal
amount of glue to the two cabane attachment mounts and install
them into one of the wing panels. Again, apply a liberal amount of
glue to the inside of the wing joiner socket and to the sides, top,
and bottom on one half of the wing joiner. Install the wing joiner in
the wing socket and wipe off any excess epoxy that has oozed out
with a rag soaked in alcohol. Allow the glue to cure.
❑
2) Apply epoxy glue to the inside of the wing joiner socket of
the opposite wing panel and to the sides, top, and bottom of the
wing joiner and to the cabane attachments including the inside
face of the two exposed ribs on the end of each wing panel. Slide
the two wing panels together and firmly press the two panels
together. Again, wipe off excess epoxy that has oozed out. Use
strips of masking tape at the leading and trailing edge joints to
firmly hold the wing panels together. Check the alignment of the
two wing panels by sighting down the length of the leading and
trailing edges. Place a clean rag on the floor next to the wall.
Stand the wing upright with one wing tip on the cloth, as vertical as
possible, leaning against the wall. Place a weight on the upper
wing tip and allow the assembly to fully cure.
❑
3) After the glue has cured, use one of the provided 1/2" x 14"
Yellow Covering Strips to cover the bottom wing joint, centering the
covering over the joint. Apply another strip to the top wing again,
centering the covering over the joint. Work slowly and overlap the
ends of the two strips by 3/8" at the leading and trailing edges. Try
to arrange the overlaps so the seam is facing downwind.
❑
4) Next you will need to permanently glue the hinges in place.
Notice that four hinges have been factory-installed in each aileron,
but they are not glued.
a. First remove all the hinges from the ailerons and wing.
b. Notice that the holes the hinges came out of are the
correct diameter for the round shank of the hinge, but not large
enough to accept the square "knuckle" part of the hinge. You need
to countersink the holes to accept the knuckle parts of the hinge,
so that the hinge can be pushed in far enough for the pivot point to
line up with the front of "V" point of the aileron leading edge. We
recommend enlarging the opening of the hinge holes slightly with
a held 1/4" dia. drill bit. You only need to twist the drill in about a
1/4" or so. Countersink all the hinge holes in the leading edge in
this manner. This will allow a gapless hinge line with proper hinge
movement.
c. Trial fit the ailerons onto all the hinges and the wing one
more time to make sure everything lines up properly. You want the
beveled leading edge of the aileron to be as close a to the mating
wing as possible while still allowing full movement. When satisfied
that everything is good, take it back apart for the gluing process.
d. We recommend using slow drying epoxy glue for gluing
the hinges so that you will have ample time for clean up and
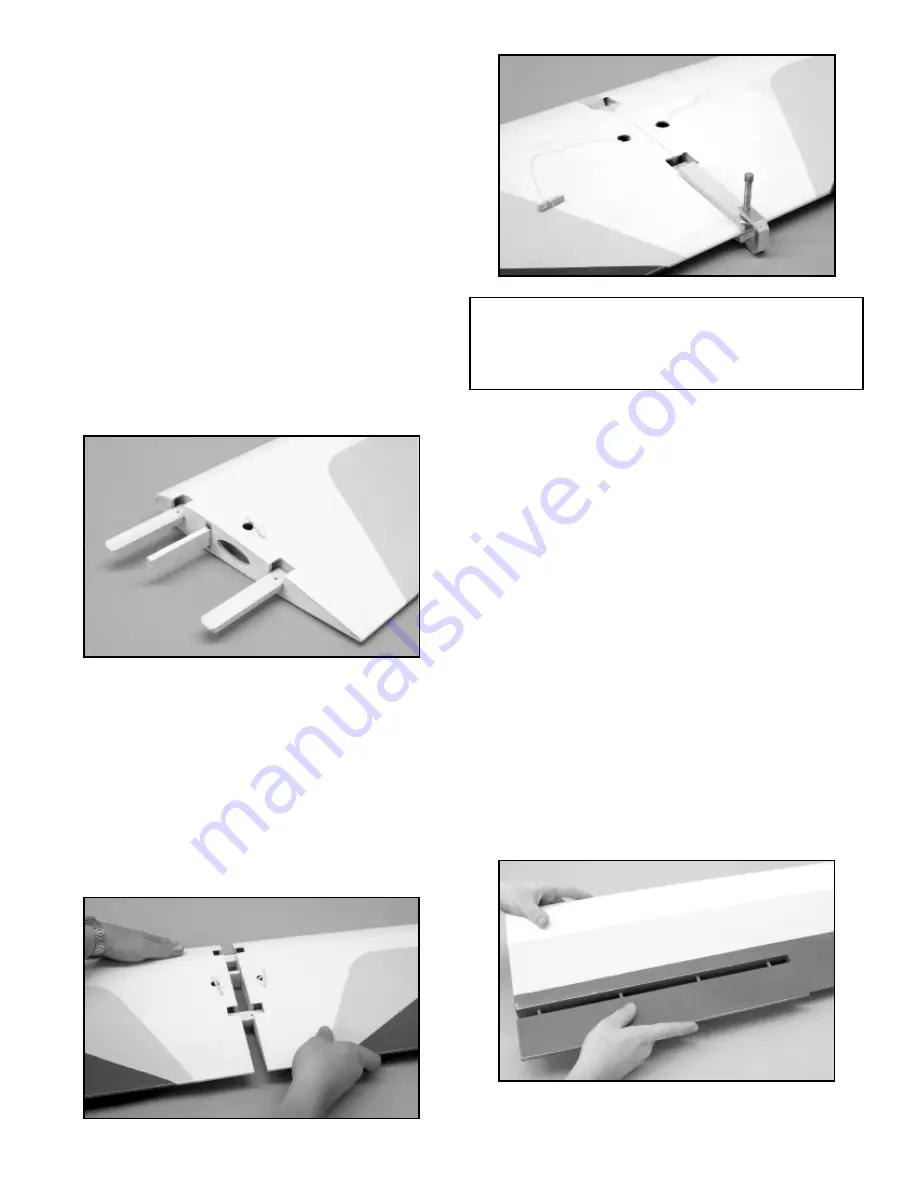
MODELER’S TIP: Use a small "C" clamp and two scrap pieces
of plywood and lightly clamp the trailing edge of the two wing
panels together as shown in the photo. Allow the glue to cure
while checking it periodically to make sure that it is properly
aligned while the glue is curing.