


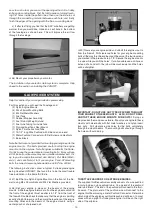


Secure the axle with one of the large Hex Nuts. When tightening
the hex nut, keep the flats of the nut on the axle side of the gear
leg parallel to the front edge of the leg - see photo. This allows
the hex nut to fit inside the narrow notch in the wheel pants when
they are added later.
❑
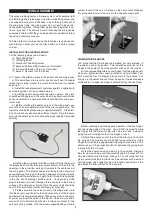
6) Slide a 4mm Wheel Collar onto the axle shaft, but leave ap-
proximately 1/8” of space between it and the nut, to provide proper
spacing of the wheel in the wheel pant. Tighten the wheel collar
set screw securely.
❑
7) Next slide one of the Main Wheels onto the axle and test to
make sure it spins freely. If it does not turn freely, drill out the plas-
tic hub of the wheel with an 11/64" or #17 drill bit.
❑
8) Slide a second Wheel Collar onto the axle and up to the
wheel. Leave a small gap between it and the wheel, so the wheel
will turn freely, and then tighten the wheel collar set screw.
❑
9) Check the orientation of the landing gear to make sure you
know which way is forward. The two outer holes for mounting the
gear to the fuselage go to the front. Once you know which way is
forward, test fit the wheel pants over the wheels and line up the
mounting holes. Screw the wheel pants in place with two M3 x
10mm socket head bolts on each pant.
❑
10) Using three M4 x 20mm Socket-Head Bolts and three M4
Flat Washers, bolt the landing gear onto the fuselage.
TAIL SURFACE INSTALLATION
For the following steps you will need:
(1) Fuselage
(1) Wing
(1) Stabilizer & Elevator set.
(1) Vertical Fin & Rudder Set
(2) M6.5 Nylon Wing Bolts
(1) Tailwheel assembly, including Wheel and Wheel Collars
(2) M3 x 15mm Screws
(1) Nylon Rudder Steering Clasp with Bolt and Hex Nut
(2) Nylon Control Horns
(6) M2 x 15mm Screws
❑
11) Just like the aileron hinges, the elevator hinges are factory
installed, but not yet glued. Hinge the elevator assembly to the
stabilizer, using the same techniques you did for the ailerons -
refer to page 5 of this manual. Let the hinges dry adequately be-
fore proceeding.
❑
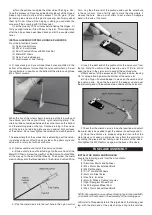
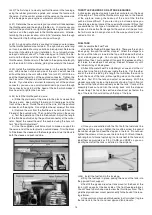
12) Look closely and you will see three holes pre-drilled in one
of the elevators for mounting a nylon control horn. Screw the con-
trol horn in position on the bottom of the right elevator, using three
M2 x 15mm screws. When the tips of the screws begin to emerge
at the top surface of the elevator, add the control horn's nylon re-
taining plate. Continue turning in the screws until the horn and
retaining plate are snug against both surfaces of the elevator. Do
not over tighten the screws and crush the wood.
❑
13) Bolt the wing in place on the fuselage with the Nylon Wing
Bolts provided. Then pin the stabilizer and elevator assembly in
place on the fuselage. It's time to check the alignment of the sta-
bilizer to the wing.
7