


15
COWLING
❑
47) With a glow engine you might prefer to not use the cowling,
so that you have quick and easy access for engine adjustments
and re-fueling.
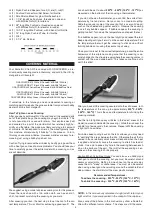
If you do elect to use the cowling, large openings will need to be
made in the cowling to clear the engine cylinder head and muffler,
and to allow access to the needle valve, etc. Don't be tempted to
quickly dive in with a knife and start removing large chunks of ma-
terial. You will achieve a lot better result if you take the time to de-
velope a pattern and mark it on the cowling for guidance when
you are cutting.
There are no hard and fast "rules" for the exact perfect shape for
openings in a cowling. The best method is to "sneak up" on these
openings, continually trial fitting the cowling over the engine until
it finally fits properly. Once the opening is big enough for you to
slip it over the engine and place it in correct location on the model,
then continue modifying as needed.
A Dremel® Tool, or similar powered hand-tool, with a 5/8" dia.
coarse grit sanding drum is without a doubt the best tool to use
for removing the material quickly, easily and accurately. However,
if you do not have access to such a power tool, you can cut the
opening with a drill, a hobby knife, and a file - by first drilling a se-
ries of almost touching holes inside your pattern lines (1/8” dia.
works well); then using the knife to cut through the connecting ma-
terial between each hole; and finally finishing the edges of the
opening with the file or a sanding block.
❑
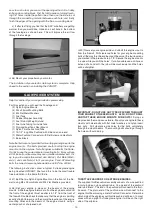
48) Mount the cowl to the fuselage with the four M3 x 10mm
Screws provided. Step 34 on page 12 of this manual describes
mounting the cowling.
COMPLETE THE RADIO INSTALLATION
❑
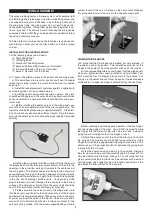
49) Wrap your receiver and battery pack in soft foam rubber to
isolate them from engine vibrations. Install these parts in the fuse-
lage, making sure they cannot shift in flight. We put them in the
space between the back of the fuel tank and the wing joiner tube.
❑
50) Mount the receiver on/off switch in the fuselage side. No-
tice that there is a cutout for the switch in either side of the fuse-
lage. Remove the covering over the cutout you want to use, rhwn
bolt the switch in the cutout.
❑
51) Mount your propeller on your motor.
The installation of your glow engine system is complete.
INSTALL PILOT & CANOPY
Both glow engine and electric motor users resume assembly here.
❑
52) Glue the Pilot in place with epoxy glue.
❑
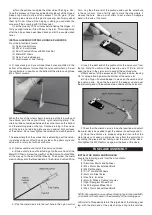
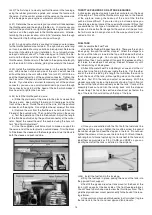
53) Glue the molded plastic Canopy onto the Fuselage Top
Hatch. We recommend a flexible RC-56 type glue, sometimes
called "canopy glue", for this job. You will also need to have on
hand some low tack tape (masking or frosty office tape) to hold
the canopy in place, plus paper towels and water to wipe off any
excess glue.
a) First test fit the canopy onto the top hatch to familiarize yourself
with how it fits on.
b) Place a narrow bead of glue all around the outside edge of
the canopy where it will contact the hatch.
c) Set the canopy on the hatch and confirm that it is properly
aligned. Use a few pieces of tape to hold it in place until dry. Cau-
tion: Do not apply any tape along the back edge of the canopy
where it mates to the wood rear hatch former. Putting tape on
there could put rearward pressure on the rear former, causing it
to arch back just enough to keep the top hatch from fitting properly
back on the fuselage. Use tape along the front and the bottom
sides of the canopy, but not on the back edge. It is not necessary
to put a lot of pressure on the canopy. We used only 7 pieces of
tape (3 at the front and 2 on each side) to hold the canopy in place
with very light pressure.
d) Use a wet paper towel to clean up any glue that seeps out
from the edges. Let dry.
WARNING: Do not
use thin CA glue to attach the canopy be-
cause it can cloud the plastic.
CONGRATULATIONS!
Your Somethin’ Xtra is completely assembled. However, it is NOT
ready for flight! There are a few very critical pre-flight tasks we
must perform before flying. These are extremely important and
should be approached with patience and care.