background image

Revision 09/04


Guiding for comb. mounting unit


Document No.: A5E00353789B 


Page 35


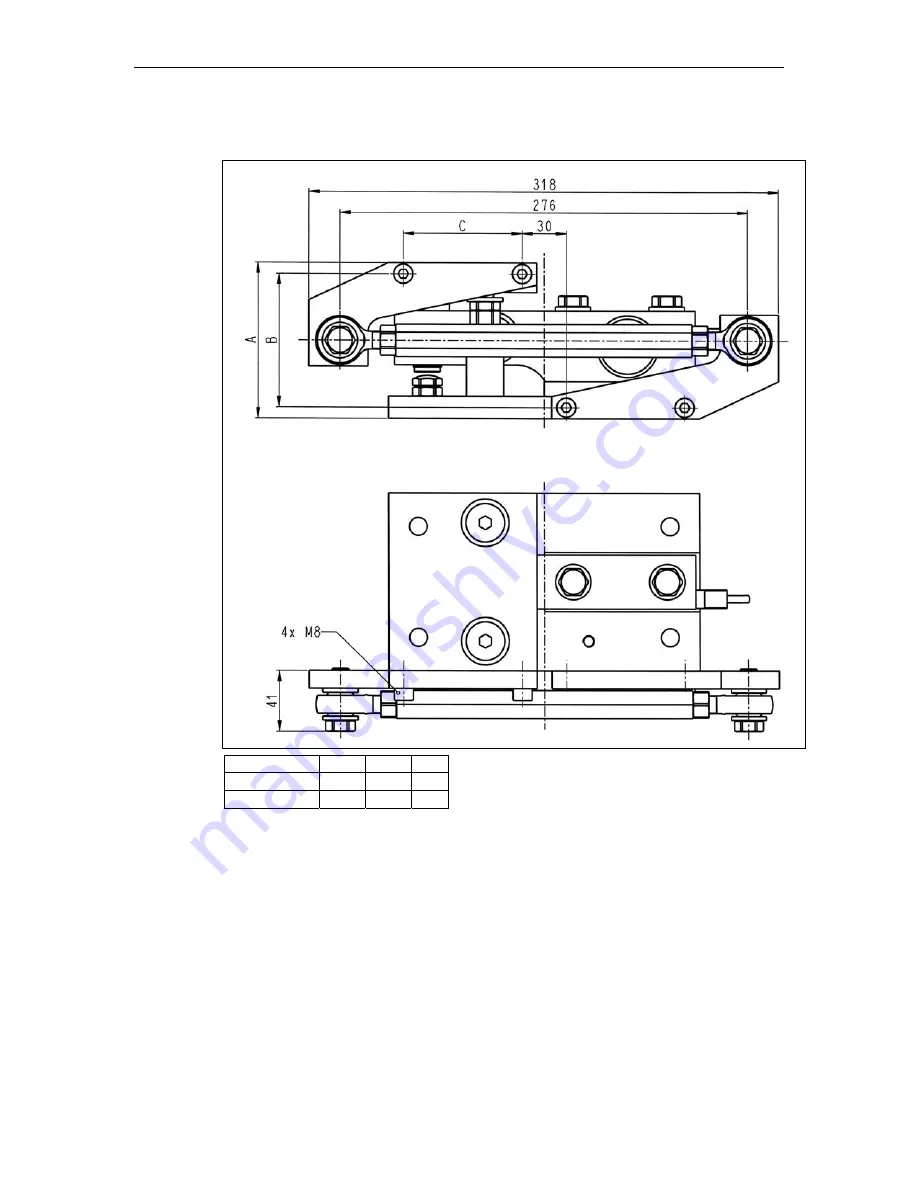
4.3.2 Dimensions 


4.4 Care 

and 

Maintenance 


The guidings must be kept free of contamination. They are normally maintenance-free. In 
case of dynamic fluctuating loads, check regularly for loosening of screws. 


Rated load 


0.5 t, 1 t, 2 t 

105 

90 

80 

 5 

140 120 

100 

Fig. 4-5   Dimensions of guiding  

Summary of Contents for SIWAREX R

Page 1: ...s SIWAREX R Mounting units for SB series Operating Instructions Revision 09 2004 ...

Page 2: ...Guidings 8 1 4 Load cell Dummies 10 1 5 Load Cell Handling 10 1 6 Welding and Installation Work 11 1 7 Mounting 11 1 8 Installation Surfaces 12 1 9 Dismantling 13 1 10 Explosion Protection 13 2 Elastomer Bearing 14 2 1 Technical Description 14 2 1 1 Application Range 14 2 1 2 Construction 14 2 2 Assembly 15 2 3 Technical Data 18 2 3 1 Function Data 18 2 3 2 Dimensions 19 2 4 Care and Maintenance 2...

Page 3: ... for Combination Mounting Unit 31 4 1 Technical Description 31 4 1 1 Application Range 31 4 1 2 Construction 32 4 2 Assembly 33 4 3 Technical Data 34 4 3 1 Function Data 34 4 3 2 Dimensions 35 4 4 Care and Maintenance 35 4 5 Ordering Data 36 5 Grounding Cable 37 5 1 Technical Description 37 5 1 1 Area of Application 37 5 1 2 Structure 37 5 2 Mounting 37 5 3 Dimensions 38 5 4 Care and Maintenance 3...

Page 4: ...forming with the recommendation Copyright Siemens AG 2004 All rights reserved Circulation or duplication of this document utilization and disclosure of its contents are not permitted unless explicitly approved Violations will be liable to claims for damages All rights reserved especially in the event of a patent award or utility model registration Siemens AG Automation and Drives Process Instrumen...

Page 5: ...the nature of the product is described exclusively and conclusively in the sales contract The contents of this product documentation are not part of an earlier or existing agreement acceptance or legal relationship nor do they affect these in any way All obligations of Siemens result from the sales contract which also contains the full and solely valid liability agreement The provisions concerning...

Page 6: ...nt No A5E00353789B Page 6 Brand names Trademarks SIWAREX is a registered trademark of Siemens AG The other designations in this manual may be trade marks which if used by third parties may infringe upon the rights of the proprietor ...

Page 7: ...overloading by placing a stop bolt under the transmission of force The path of measurement for the load cell is limited in this manner On load cells with high rated loads the danger of accidental overloading is not so great Any possible excessive loading can be taken into account while dimensioning the load cells Another way of protecting load cells from overloading is in over dimensioning the loa...

Page 8: ... change in the support points e g thermal expansion Guiding positioning is shown in Fig 1 3 They are used if the weight must be determined under the influence of a transverse force Guidings must be constructed perpendicular to the effective direction of the load cells so that there are no force components in the direction of measurement Stretching the guidings is best avoided when they are positio...

Page 9: ...ation and Assembly Document No A5E00353789B Page 9 The guidings should correspond with the principles used in the weighing technology Round head bolt guides for up to 1000 kN lateral load are also available upon request Fig 1 3 Guiding positioning ...

Page 10: ...etely assembled units The units are set at the approximate installation height for an operational unit Slight adjustments can be made during the installation 1 5 Load Cell Handling DANGER Load cells and mounting units are not machine elements that are constructed using standard safety factors It is therefore absolutely necessary to prepare for the potential danger with respective supports or other...

Page 11: ...be securely connected in the direct vicinity of the point to be welded The load cells must be bridged with a grounding cable The individual load cells are to be disconnected The free cable ends should be insulated 1 7 Mounting Load cells are never to be overloaded Slowly put the load platform on Especially with load cells having lower rated loads there is a danger that external forces during insta...

Page 12: ...allation surfaces to one another should correspond with the general tolerances for welded constructions EN ISO 13920 The foundation must be absolutely solid and unable to sink Level steel plates should be cast in cement foundations upon which the mounting elements are mounted The anchorage points must be perpendicular to the direction of measurement and should preferably all be at the same level I...

Page 13: ...load cell with the lowest value until the output voltages match The load cell seat must be horizontal level over the full coverage and like the load cell underside absolutely clean The contact surface that introduces the force is to be coated with high performance grease 1 9 Dismantling When dismantling the load cells the same safety and security measures are to be followed as for the installation...

Page 14: ...nts base plate with overload protection load cell and elastomer bearing The base plate 1 is bolted to the foundation with four bolts The load cell 3 is fastened to the base plate 1 with two hexagon bolts 5 and the spacer bar 2 The elastomer bearing 10 is affixed to the load cell 3 with a hexagon bolt 8 The elastomer bearing 10 is bolted to the load platform The load platform is centered with the e...

Page 15: ...tected from damages during assembly The load platform must then only be lifted a few millimeters from bracket to bracket to position the elastomer bearing The following description of assembly procedures is based on this situation Assembly procedure numbering see Fig 2 2 1 Load cell preparation A data sheet is supplied with every load cell with the calibration values for that load cell This is fou...

Page 16: ...ell The arrow on the front of the load cell indicates the direction of measurement Lie the spacer bar 2 on the base plate 1 so that both holes are aligned with the threaded holes in the base plate 1 and so that it is even The spacer bar 2 is asymmetrical Put the load cell 3 on the spacer bar 2 using 2x hexagon bolts 5 and 2x washers 4 Tighten 2x hexagon bolts 5 with 110 Nm 0 5 t 1 t 2 t or 540 Nm ...

Page 17: ...Revision 09 04 Elastomer bearing Document No A5E00353789B Page 17 Fig 2 2 Mounting the elastomer bearing ...

Page 18: ...6 to 0 05 0 1 mm see dimension X in Fig 2 3 Dimension X must exist after tightening the nut 6 as well DANGER Contaminated icy or incorrectly set overload protection will create blockages which cause incorrect measurements or can cause injury or damage to the machinery by overloading the scale 2 3 Technical Data 2 3 1 Function Data Rated load 0 5 t 5 t Permitted transverse movement 4 mm Fig 2 3 Set...

Page 19: ...E00353789B Page 19 2 3 2 Dimensions Fig 2 4 Dimensions elastomer bearing Rated load A B C E F G H J K L M 0 5 t 1 t 200 100 170 11 85 156 92 6 100 75 11 231 2 t 200 100 170 11 100 156 92 6 120 90 11 241 5 t 235 120 205 14 100 184 109 9 120 90 11 271 ...

Page 20: ...manual mechanical bond test This is done by pressing the rubber back with a blunt test iron pressure ridge with arc If portions of the rubber surface are coming apart in the bonding zone between the elastomer and the metal or if surface cracks appear in the individual elastomer layers observe those areas in intervals Replacement A replacement is necessary if only 70 of the initial rubber thickness...

Page 21: ...ng Data Elastomer bearing for load cells with a rated load of Order number Elastomer bearing Order number Base plate 0 5 t 1 t 7MH4 135 4AE11 7MH4 135 4DG11 2 t 7MH4 135 4DE11 7MH4 135 3DG11 5 t 7MH4 135 4KE11 7MH4 135 3KG11 The order numbers above do not include the load cells ...

Page 22: ...te 1 with two hexagon bolts 5 and a spacer bar 2 An oscillation housing 13 is inserted in the head of the load cell 3 The pendulum bolt 16 positioned in it The pendulum bolt is supported by two force guiding pieces 14 and 17 The two force guiding pieces 14 and 17 are stuck in the oscillation housing 13 and the top plate 18 The top plate 18 is supported on the pendulum bolt 16 The top plate 18 is b...

Page 23: ...orm should always be built on dummies to begin with so that the load cells are protected from damages during assembly The load platform must then only be lifted a few millimeters from bracket to bracket to position the combination mounting unit The following description of assembly is based on this situation No Designation No Designation 1 Base plate 10 Nut 2 Spacer bar 11 Overload protection 3 Lo...

Page 24: ... 3 mm 3 mm installation height 108 mm 143 mm These preparations and following the handling procedures as described in the following prevent any extra work in adjusting later When using the combination mounting units as dummies this 3 mm of extra height is to be taken into account or it can be adjusted later Unpack the combination mounting unit Scope of delivery combination mounting unit assembled ...

Page 25: ...mmetrical Put the load cell 3 on the spacer bar 2 using 2x hexagon bolts 5 and 2x washers 4 Tighten 2x hexagon bolts 5 with 110 Nm 0 5 t 1 t 2 t or 540 Nm 5 t Do not use the load cell as leverage when tightening the bolts as this can cause damage to the load cell Smear the ball surface of the pendulum bolt 16 with bearing grease and insert it into the oscillation housing 13 Set the top plate 18 on...

Page 26: ...om the first bracket and remove the dummy Set the combination mounting unit in place and loosely install the fastening bolts Slowly lower the loading platform Install the remaining combination mounting units as described Tighten the fastening bolts Loosen nuts 7 and lower top plates 18 slowly Turn nut 7 to nut 6 and tighten Fig 3 2 Mounting the combination mounting unit ...

Page 27: ...the machinery by overloading the scale 6 Assembly Inspection The loading platform must be able to swing freely The countersunk bolts 9 should be positioned as close to the middle of the holes in the top plate 18 as possible The top plate therefore has optimal freedom of movement on all sides and no secondary forces can be generated The countersunk bolts 9 must not protrude past the top plate 18 DA...

Page 28: ...No A5E00353789B Page 28 3 3 Technical Data 3 3 1 Function Data Rated load 0 5 t 1 t 2 t 5 t Permitted transverse movement 3 mm 3 mm Lifting distance of the top plate 3 3 5 mm 3 3 5 mm Max transverse force 10 kN 10 kN Max lifting force 10 kN 25 kN ...

Page 29: ... A5E00353789B Page 29 3 3 2 Dimensions Fig 3 5 Dimensions combination mounting unit Rated load A B C E F G H J K L M N O P R 0 5 t 1 t 2 t 210 120 170 20 105 15 20 26 2 100 20 75 45 80 32 12 5 t 250 150 205 25 140 20 20 28 9 120 25 90 60 100 38 14 ...

Page 30: ... be chosen respectively These are to be kept free of course contamination The flat seal may not be subjected to direct streams of water The round surfaces of the pendulum bolts are to be greased when necessary The overload protection mechanism should be inspected for contamination 3 5 Ordering Data Combination mounting units for load cells with a rated load of Order number 0 5 t 1 t 2 t 7MH4 135 4...

Page 31: ...of movements of the load platform are to be prevented generally guidings are used They are used in conjunction with the combi counting units The layout of the guidings for different load platforms is illustrated in figures 4 1 and 4 2 Fig 4 1 Guidings for round and square surface areas Combination mounting unit with guiding Combination mounting unit without guiding ...

Page 32: ...o the top plate 9 and the base plate 8 of the combination mounting element The two flanges 6 are kept at the necessary distance by two joint heads 5 with left and right hand thread and an adapter 1 The distance is set with the adapter 1 Two lock nuts 2 prevent the joint heads from turning 5 numbering see fig 4 3 Fig 4 2 Guidings for square surface areas ...

Page 33: ...h of the guidings This means the length should be set where required before the guiding is bolted In the correct setting the holes in the flange 6 are in line with threaded holes in the top plate 9 and the base plates 8 Bolting the guiding to the combination mounting unit does not change the length The fastening screws M8 7 should be tightened with 23 Nm No Designation 1 Adapter left right hand th...

Page 34: ...dings should be checked after mounting The joint heads must turn easily every time the load platform is loaded numbering see fig 4 4 4 3 Technical Data 4 3 1 Function Data Permissible horizontal force 1 7 kN Tightening torque of the fastening screws M8 23 Nm Fig 4 4 Mounting the guiding ...

Page 35: ...2 Dimensions 4 4 Care and Maintenance The guidings must be kept free of contamination They are normally maintenance free In case of dynamic fluctuating loads check regularly for loosening of screws Rated load A B C 0 5 t 1 t 2 t 105 90 80 5 t 140 120 100 Fig 4 5 Dimensions of guiding ...

Page 36: ...nit Document No A5E00353789B Page 36 4 5 Ordering Data Guiding for load cells with a rated load of Order number 0 5 t 1 t 2 t 7MH4 135 4DQ12 5 t 7MH4 135 4KQ12 The above order numbers do not include the load cells and combination mounting units ...

Page 37: ...tic discharge The grounding cable is an electrical shunt for the load cell and mounting unit High welding currents can damage load cells mounting units or the electronics Voltage spikes from static discharge can damage the electronics 5 1 2 Structure The grounding cable consists of a fine strand copper wire with a cross section of 50 mm2 and two eyelets Ø 10mm 5 2 Mounting A permanent screw contac...

Page 38: ...3789B Page 38 5 3 Dimensions 5 4 Care and Maintenance The connections of the cable are to be inspected regularly for corrosion and conductivity 5 5 Ordering Data Designation Order number Grounding cable 7MH3 701 1AA1 Fig 5 2 Dimensions grounding cable ...

Reviews: