background image

01.99

8 Diagnosis

© Siemens AG 1999 All Rights Reserved

6FC5198-6AA60-0BP1

SINUMERIK 840C, OEM Version for Windows (BA)

8-9

Table 8-2

Possible alarm acknowledgement actions

POWER ON

Execution of the active NC program is aborted. After eliminating the
error, the control must be switched off and on again and the reference
points must be reapproached.
Caution! when the control is switched off the contents of the NCK
part program memory are lost.

RESET

An active NC program is not aborted, but only stopped.
After eliminating the error, it is possible to continue execution of the
NC program from the point at which it was stopped.

CANCEL

An active NC program is not aborted but only stopped.
After eliminating the error, it is possible to continue execution of the
NC program from the point at which it was stopped.

SK: DELETE

A message does not interrupt execution of the active NC program.
The message is acknowledged in the Alarm window with the CLEAR
softkey.

POWER ON means switching off the control and switching it on again.

Please note the information provided by the machine tool manufacturer.

8.2.3

Display of the alarms and messages in the alarm and message
lines

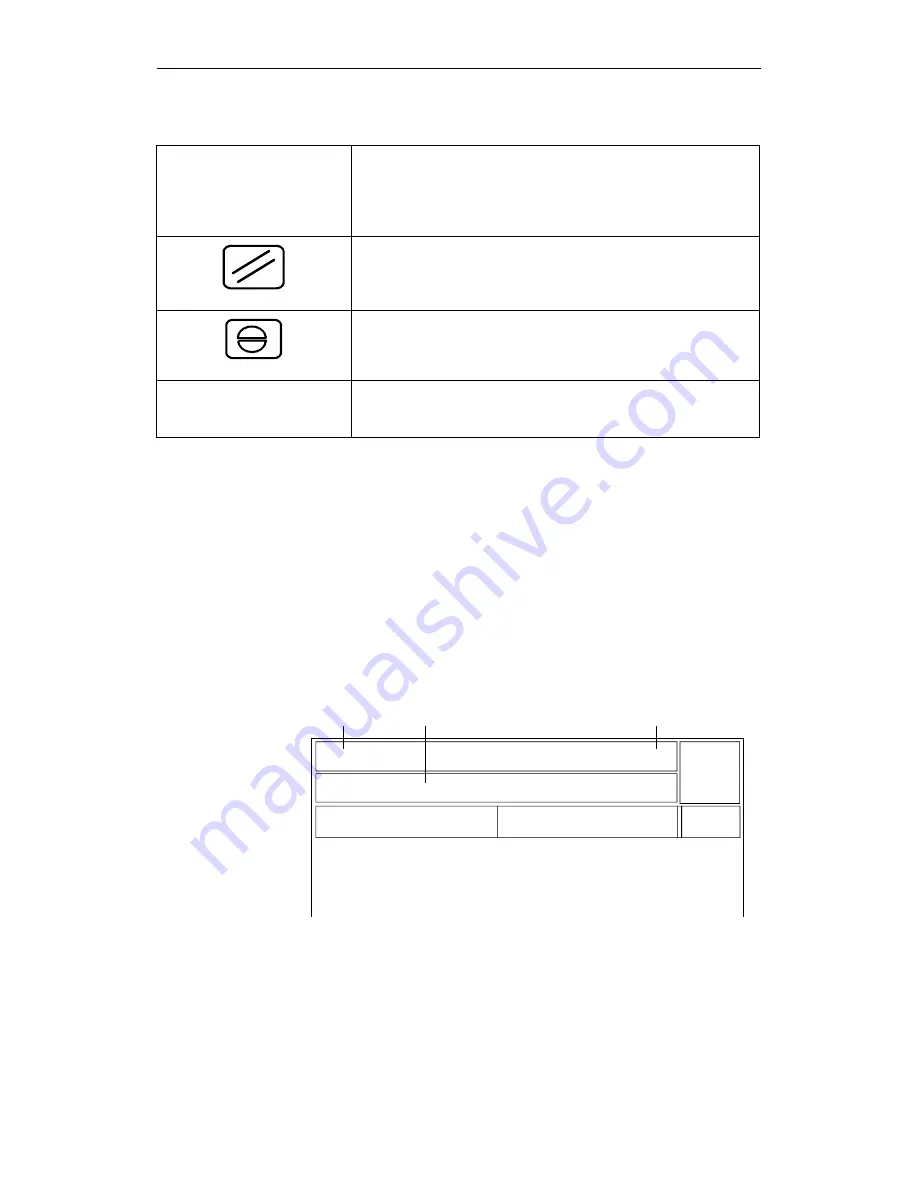
The alarm or message with the highest priority is displayed in the
alarm/message line. The machine manufacturer can configure whether an
alarm/message is displayed in the alarm or message line. Existing comments
are overwritten by alarm texts. The alarm line is the first line on the screen.

AUTOMATIC

Program stop

Mode grp.:1
Channel   :1

PO

Alarm line

Message line

Delete error condition

Summary of Contents for SINUMERIK 840C

Page 1: ...SINUMERIK 840C Software Version 6 OEM Version for Windows Operator s Guide 01 99 Edition User Documentation ...

Page 2: ......

Page 3: ...ocumentation Valid for Control Software Version SINUMERIK 840C CE 6 Standard Export Version 01 99 Edition Introduction 1 Operator Interface 2 MMC Applications 3 Machine 4 Parameters 5 Programming 6 Services 7 Diagnosis 8 Information 9 Exit 10 Maintenance 11 Abbreviations Glossary 12 ...

Page 4: ... or use of this document or its contents is not permitted without express written authority Offenders will be liable for damages All rights including rights created by patent grant or registration of a utility model or design are reserved Siemens AG 1995 1996 1997 1998 1999 All rights reserved Other functions not described in this documentation might be executable in the control This does not howe...

Page 5: ... by the machine tool manufacturer are documented by the machine tool manufacturer More information on other SINUMERIK 840C publications and on publications which are available for all SINUMERIK controls e g Universal Interface Measuring Cycles can be obtained from your Siemens local branch office Other functions not described in this documentation might also be executable in the control This does ...

Page 6: ...tation to draw your attention to information relevant to the subject at hand Important Caution This symbol shown here appears in this documentation when facts of importance must be observed Ordering data option Occasionally you will encounter in this documentation the symbol shown here with a note referring to an option The function described is only executable if the option has been ordered with ...

Page 7: ...onal injury or substantial material damage can occur if the appropriate precautions are taken Warning This symbol appears whenever death serious personal injury or substantial material damage can occur if the appropriate precautions are not taken is a registrated trademark of the Microsoft Corporation is a registrated trademark of the Microsoft Corporation is a registrated trademark of the Microso...

Page 8: ...elements 2 3 2 2 1 Operator panel 2 3 2 2 2 Full PC keyboard MF2 keyboard 2 5 2 2 3 Operating elements of the operator panel keyboard full keyboard 2 7 2 2 4 The operating elements of the machine control panel 2 13 2 2 5 Operating elements of the hand held unit HHU A MPC 2 23 2 2 6 Screen layout 2 24 3 MMC Applications 3 1 3 1 Introduction 3 2 3 2 Components of an MS Windows window 3 4 3 3 Operati...

Page 9: ... mode 4 47 4 2 7 1 Workpiece and program selection with the data selector 4 48 4 2 7 2 SELECT PROGRAM function 4 53 4 2 7 3 Starting and interrupting a part program 4 54 4 3 Additional machine functions 4 56 4 3 1 Overstore 4 56 4 3 2 Extended overstore 4 58 4 3 3 Altering F and S values on line 4 61 4 3 4 Program modification 4 62 4 3 4 1 Description of individual functions DRY M01 ROV ACR DRF DS...

Page 10: ... Structure of data management 6 4 6 2 2 Workpiece management on hard disk 6 7 6 2 2 1 Creating workpieces 6 8 6 2 2 2 Creating NCK files 6 10 6 2 2 3 IKA data 6 12 6 2 3 Creating and editing job lists 6 13 6 2 3 1 Creating job lists 6 14 6 2 3 2 Editing job lists 6 15 6 2 3 3 Syntax description for the job lists 6 16 6 2 4 Copying deleting and duplicating files 6 21 6 2 5 Data communication betwee...

Page 11: ...lays 8 4 8 2 1 Alarm groups 8 7 8 2 2 Alarm numbers clearing alarms 8 8 8 2 3 Display of the alarms and messages in the alarm and message lines 8 9 8 2 4 On line help for alarms and messages 8 11 8 3 PLC Status 8 12 8 4 NC Service 8 12 8 5 Password 8 14 9 Information 9 1 9 1 Selection of Information area 9 2 9 2 NC Information 9 3 9 3 MMC Information 9 4 9 4 Information Logbook 9 5 10 Exit 10 1 11...

Page 12: ...3 1 3 Switching the control on and off 1 4 1 4 Structure of the user interface 1 6 1 5 NCK and MMC areas 1 7 1 6 Data management 1 11 1 7 File manager and control panel 1 12 1 8 Data backup 1 13 1 8 1 RS 232C V 24 output 1 13 1 8 2 Data management PCIN 1 13 1 8 3 VALITEK streamer 1 13 1 8 4 CD ROM access via PC link software SW 6 and higher 1 14 1 8 5 Computer link 1 15 1 9 Online help 1 16 1 ...

Page 13: ...Controlling of the axes and spindles in conjunction with the drives and the measuring systems Scanning and controlling input and output signals via the PLC program Machine operation via the machine control panel Storing user data in the CNC memory Organizing data exchange with I O devices The operator interface monitor displays keyboard is the connecting element between operator action and the mac...

Page 14: ...RIK 840C The three components perform the following functions The main task of the NCK NC kernel is to convert the program blocks of a part program into the traversing movements on the axes Allowance must be made for all the required compensating values such as tool offsets zero offsets etc The PLC mainly performs simple control and monitoring tasks The PLC program must assure the smooth execution...

Page 15: ... is loaded 2 In the next step the user data are transferred from the hard disk of the MMC into the NCK memory The machine manufacturer can configure which individual data are to be transferred Both the Siemens and user cycles can be loaded in this way A cycle disable feature provides protection against unauthorized reading and editing of data both in the NCK memory and on the MMC side The machine ...

Page 16: ...s loaded first Before switching off the power supply the control must always be powered down in order to assure the integrity of the file system on the hard disk and avoid loss of data The control is powered down by selecting the EXIT command in the menu Fig 1 2 SYSTEM DOWN query The power supply may only be switched off when the above safety prompt has been confirmed with Yes and the SYSTEM DOWN ...

Page 17: ...creen the same familiar elements that you have encountered when working with other MS Windows applications The Area Switchover is the central program on the SINUMERIK 840C OEM Version for Windows You can use it to select 5 hierarchically organized functional areas The Area Switchover is activated by the following key Fig 1 3 Area Switchover You can subsequently open the individual menus by selecti...

Page 18: ... differs slightly for each of the groups While the SYSTEM 800 operating principle is used in the NCK the user interface in the MMC areas is oriented to the MS Windows operating system The NC screen contains machine displays which present the user with information communicated from the NCK or PLC Reciprocally all keyboard input on the operator panel is relayed to the NCK or PLC The selection of an ...

Page 19: ...eters Programming Edit NC Diagnosis PLC Status NC Service NC PLC Startup Machine Data Information NC Information Within the NCK areas you will find a hierarchical menu structure operated exclusively using softkeys The softkeys are located below the screen Various functions are assigned to the softkeys The function performed when the key is pressed is displayed in the softkey bar Fig 1 5 Operating ...

Page 20: ...e softkey menu if an extension is available If there is an arrow in the 7th softkey window on the right this key is active You can press the Machine Area key to change directly from any area to the Machine area A menu storage function has also been implemented in the NCK areas The last active menu of any NCK area e g R parameter display is automatically saved If you then select a different NCK are...

Page 21: ...ow for each MMC area If another MMC area is selected the original window is overlaid You can use the task manager to switch between the different MMC areas windows If you call an MMC area that you have already deselected the last display for that area is automatically displayed again Menu storage as featured in the NCK area is therefore not necessary You can call the task manager using the Page ke...

Page 22: ...n the MMC and a peripheral device To help the user keep track of the large volumes of data stored on the hard disk files are organized into directories A directory is similar to a file binder in a filing cabinet All of the data belonging to a particular project are stored in the same directory Similarly the SINUMERIK 840C OEM Version for Windows allows all of the data belonging to a particular wor...

Page 23: ...WINDOWS are available on the SINUMERIK 840C for global file manipulation and system settings within the MMC areas Fig 1 8 MS WINDOWS Control Panel The Control Panel is used particularly for the following settings Screen colors Time Installation and configuration of a printer The File Manager and Control Panel can be selected from the Diagnosis menu in the Area Switchover Selection of these menu it...

Page 24: ...ape format The interface switches automatically RS 232C V 24 between and 20mA mode according to the connected device and cable used 1 8 2 Data management PCIN The output of NCK data in punchtape format is performed using the data manager Other user data can be input or output in binary format with the aid of the PCIN data backup program 1 8 3 VALITEK streamer A complete copy of all the data on the...

Page 25: ...PC by means of a parallel cable Note The PC link connection required for the installation and start up has not been EMC tested as required for normal operation and may therefore only be used for servicing purposes parallel transfer cable Order No 6FX2 002 1AA02 1AD0 3 The following installation procedure is described in the readme txt file in the root directory of the CD Note Before initiating bac...

Page 26: ... up a computer link in the NCK area of the SINUMERIK 840C The machine manufacturer can also implement his or her own computer link The SINUMERIK 840C offers the following components for networking Standard PC network cards These can be plugged into the AT box central unit Pocket network adapters These connect a PC to the network via the parallel interface Please refer to the machine manufacturer s...

Page 27: ...sers to call up help screens for fast information in relation to a task function or command The following features are provided for calling up help displays in these areas With this key you activate a help display for a special operation The possibility is indicated by the i in the 1st left softkey Press RECALL to deselect this help screen Fig 1 9 Online help display in the machine area NCK areas ...

Page 28: ...mation is based on the MS Windows help system Fig 1 10 Online help in the alarm window First select Alarm Window from the Diagnosis menu and position the selection bar on the desired alarm Press this key to display an MS WINDOWS help window containing additional information relating to queries causes and remedies Use the ARROW keys to scroll within the help window Alarm message window ...

Page 29: ...1 Introduction SINUMERIK 840C and its Operation 01 99 6FC5198 6AA60 0BP1 Siemens AG 1999 All Rights Reserved 1 18 SINUMERIK 840C OEM Version for Windows BA ...

Page 30: ...tor panel 2 2 2 2 Operating elements 2 3 2 2 1 Operator panel 2 3 2 2 2 Full PC keyboard MF2 keyboard 2 5 2 2 3 Operating elements of the operator panel keyboard full keyboard 2 7 2 2 4 The operating elements of the machine control panel 2 13 2 2 5 Operating elements of the hand held unit HHU A MPC 2 23 2 2 6 Screen layout 2 24 2 ...

Page 31: ...hover keys 19 NC full keyboard alphabetic group of keys numeric group of keys cursor group of keys 19 slimline operator panel with 9 5 monochrome LC display including NC full keyboard 2x7 softkeys switchover keys alphabetic group of keys numeric group of keys cursor group of keys 19 slimline operator panel with 10 or 9 5 TFT colour LC display including NC full keyboard 2x7 softkeys switchover keys...

Page 32: ...C5198 6AA60 0BP1 SINUMERIK 840C OEM Version for Windows BA 2 3 2 2 Operating elements 2 2 1 Operator panel Fig 2 1 19 operator panel with 14 colour monitor no longer available M A B C D 7 8 9 4 5 6 1 2 3 0 LF ALT i A B C D E F G H I J K L M N O P Q R S T U V W X Y Z ...

Page 33: ...mline operator panel A 14 10 9 5 colour graphics monitor 14 softkeys ETC key Recall key Machine area key Area switchover key B Alphabetic group of keys C Numeric group of keys with editing and input keys D Cursor group of keys with control keyboard A B C D E F G H I J K L M N O P Q R S T U V W X Y Z 7 8 9 4 5 6 1 2 3 0 LF Alt i SIEMENS SINUMERIK M A B C D ...

Page 34: ...ting panel and can be mounted on the standard full keyboard as shown in Fig 2 3 The functions of the machine control cannot be implemented on the MF2 keyboard An MF2 keyboard American keyboard can be connected directly to the keyboard input on the MMC module The following restriction applies to this configuration Note When connected directly to the MMC module the MF2 keyboard does not comply with ...

Page 35: ...2 Operator Interface 01 99 6FC5198 6AA60 0BP1 Siemens AG 1999 All Rights Reserved 2 6 SINUMERIK 840C OEM Version for Windows BA Fig 2 3 Full keyboard ...

Page 36: ... standard version and are therefore not displayed MACHINE AREA key Press this key to switch from any user area to the Machine area RECALL key Return to the higher level menu ETC key Extension of the softkey bar in the same menu DATA AREA key the Area Switchover is selected or deselected if it is already selected by pressing this key When selected the Area Switchover is displayed for the currently ...

Page 37: ...ase letter A Z Underscore SPACE blank Press the SPACE key to select the checkbox in a dialog box Special character less than Digit 1 Special character greater than Digit 2 Exclamation mark Digit 3 Square bracket Digit 4 Square bracket Digit 5 Question mark Digit 6 Round bracket Digit 7 Round bracket Digit 8 Colon Digit 9 Semicolon Digit 0 Inverted commas Oblique stroke division ...

Page 38: ...of the input cursor Identical to the BACKSPACE key on the MF2 keyboard CANCEL key deletes the character underneath the input cursor Identical to the DELETE key on the MF2 keyboard EDIT key for editing words in the NCK areas The EDIT key can be used in the dialog boxes of the MMC areas to jump from one input box to the next Identical to the TABULATOR key on the MF2 keyboard INPUT key confirm input ...

Page 39: ...ing up information by pressing the Help key You can press the HELP key in the alarm window to call up an explanation of the active alarm When you operate this key the screen display of Actual position is shown in double height characters Operating the key again brings you back to the previous full display with standard size characters PAGE UP key press these keys to scroll the screen one page back...

Page 40: ...ivate the cursor in the input line With this key you activate the cursor in the input line NCK only move it by means of the cursor keys in order to correct or insert When operating the key again you deactivate the cursor SELECTION SEARCH key Select toggle fields in machine displays and text in the FlexOS editor Search text SHIFT SELECTION reset a toggle field in a machine display ACKNOWLEDGE ALARM...

Page 41: ...te The channels are assigned to mode groups by the machine manufacturer Pressing this key once switches to the next higher channel number referred to the number displayed in the channel status field Pressing the key again switches on to the next channel or back The channel can be selected directly by entering the channel number and then operating the key The NC area of the SINUMERIK 840C is divide...

Page 42: ...machine control panel or with a special machine control panel from the machine tool manufacturer A maximum of two mode groups is possible The standard Siemens machine control panel is described Should another machine control panel be used please refer to the Operator s Guide of the machine tool manufacturer Machine control panel for a milling machine 0 2 6 10 20 40 60 70 80 90 100 110 120 50 60 70...

Page 43: ...ol Feed control Direction keys with rapid override Keyswitch Reset key Program control You operate the red button in emergency situations When human life is in danger When there is a risk of the machine or workpiece being damaged Operation of the Emergency stop button generally brings all drives to a stop with maximum braking torque Machine manufacturer For further or other reactions to Emergency ...

Page 44: ...matic execution of programs AUTOMATIC If a mode key is pressed the corresponding mode is selected and previously selected modes and functions are cancelled The active mode is indicated and confirmed by the associated LED Table 2 2 REPOS Reference point Key symbol Definition Designation of function Repositioning approach contour again in JOG TEACH IN mode REPOS Reposition Approach reference point i...

Page 45: ... size depends on the display resolution that has been set The INC functions can be activated in conjunction with the following modes JOG mode TEACH IN mode The rotary switch with 16 notched positions enables you to reduce or increase the programmed spindle speed S corresponds to 100 A machine data determines whether the spindle override switch is active i e it is determined by the machine manufact...

Page 46: ...STOP in a program it can be started again with SPINDLE START The associated LED lights up as soon as Spindle start is accepted by the control Machine manufacturer The following is defined in the machine data or setting data Max spindle speed Values for the spindle speed override see machine tool manufacturer s instructions Feedrate rapid override The rotary switch with 23 notched positions allows ...

Page 47: ...as FEED HOLD is accepted by the control Examples for use of FEED HOLD During application in MDA mode a block with a fault is discovered To effect tool change When you operate the FEED START key The part program continues in the current block The feedrate is increased to the value specified by the program The associated LED lights up as soon as FEED START is accepted by the control Machine manufact...

Page 48: ... direction You traverse other assigned axes in the same way If an INC function has been set and the direction key is pressed whether for a long or a short time the axis traverses by only one step 1 10 100 1000 10000 increments depending on the setting If an INC function is not selected the default setting continuous is active The axis traverses as long as the direction key is pressed Please take i...

Page 49: ...position Function Position 0 Data is only displayed Position 1 0 1 key 1 black Generate edit and delete workpiece data Position 2 0 1 2 key 2 green Generate edit and delete interface data and setting data Position 3 0 1 2 3 key 3 red The STANDARD workpiece is not loaded when the control is powered up Use only for start up and servicing Machine manufacturer The key positions can be assigned with ad...

Page 50: ...t it acts on channel mode group or on the whole NC This function allows you to execute a part program on a block by block basis The Single block function can be activated in the AUTOMATIC TEACH IN and MDA modes When SINGLE BLOCK operation is active The SBL Single Block message is shown on the CRT display The current block of the part program is executed only when you press the NC start key When th...

Page 51: ...urer For more information refer to the machine manufacturer s documentation The associated LED lights up Processing can then be continued by pressing NC START If you press the NC START key the part program called is started at the current block the associated LED lights up Processing of a part program interrupted with NC STOP is continued at the point of interruption on pressing NC START Caution T...

Page 52: ...isplay and key functions can be configured by the machine manufacturer For further details refer to the machine manufacturer s documentation SIEMENS 10 20 30 40 50 60 70 80 90 100 110 1 2 3 4 5 6 Fig 2 5 Operating elements of the hand held unit HHU 1 EMERGENCY STOP switch 2 Two line display 3 Group of keys with LEDs 4 Feed rapid traverse override switch 5 Keyswitch 6 Handwheel Meaning of the opera...

Page 53: ...annel status display with icons 5 Softkeys The display is divided into various window areas An alarm line and a message line are displayed at the top left hand side of the screen To the right of this area is a box displaying the current time and the icons The application window starts below the alarm area and extends to the softkey bar Standard Siemens applications are operated using the horizonta...

Page 54: ...FC5198 6AA60 0BP1 SINUMERIK 840C OEM Version for Windows BA 3 1 MMC Applications 3 1 Introduction 3 2 3 2 Components of an MS Windows window 3 4 3 3 Operations with windows 3 6 3 4 Working with menus 3 8 3 5 Working with dialog boxes 3 10 3 ...

Page 55: ...e MF2 keyboard connected to the central unit allows the operation of MS Windows applications exactly as described in the Microsoft documentation The SINUMERIK 840C is operated as standard with the operator panel keyboard Aside from the usual key assignments for operation in the Machine area certain keys have been redefined for MS WINDOWS applications In particular key combinations such as ALT HOTK...

Page 56: ...hat directly access MS WINDOWS resources appear in the selected language The language can be installed at the time of start up and then selected in the diagnostics menu The following languages are available as standard English French German Spanish and Italian Further languages available are Swedish Portuguese and Czech Important If an application crashes it can generally only be operated using th...

Page 57: ...imize Maximize Menu bar Horizontal scroll bar Vertical scroll bar Fig 3 1 Components of a window in MS Windows The title bar shows the name of the application program or the document to be edited If several windows are open simultaneously the title bar of the active window is displayed in a different colour or with a different intensity to all the other windows The menu bar displays the menus avai...

Page 58: ...essing the ALT and SPACE key combination or by pressing the RECALL key twice in succession The control menu box of a document window belonging to an application program can be opened by pressing the ALT and key combination Please note that you must press the two keys consecutively not simultaneously Fig 3 2 Control menu You can use the commands in the control menu to resize move maximize or minimi...

Page 59: ... Program Manager On the SINUMERIK 840C the Area Switchover performs this task However when the Area Switchover is used to select an application that is already running in the background it simply brings that application into the foreground instead of starting a second instance This procedure only applies to standard Siemens applications not to general MS Windows applications Hidden applications i ...

Page 60: ...o move Open the control menu box by pressing ALT and SPACE or ALT and Select the command Move in the control menu The pointer changes to a four headed arrow Now move the window using the ARROW keys An outline of the window moves when you press the ARROW keys Press the INPUT key when the window is in the desired position You can change the size of application windows which have a control menu box A...

Page 61: ...te Note On the SINUMERIK 840C the items in the menu bar are also displayed on the softkeys The menus can be opened in various ways Fig 3 4 Menu items within Area Switchover Press the ALT key The selection bar highlights the first item in the menu bar You can now select the desired menu and open it with the INPUT key Press the ALT key and then enter the HOTKEY for the menu The HOTKEY is the letter ...

Page 62: ...s in the menu bar by pressing the softkeys The fastest way of selecting an item within a menu is to use the HOTKEY You can close a menu without selecting an item by pressing the ACKNOWLEDGE ALARM or RECALL key The menu conventions used on the SINUMERIK 840C are identical to those of MS Windows Elements which are dimmed are not available for the active application You may have to increase your acce...

Page 63: ...ox Option buttons Check boxes Combo box Text box Command buttons List box Fig 3 6 Elements of a dialog box You generally have to move the cursor within a dialog box in order to select the various options or to make entries The currently selected input box is highlighted optically or surrounded by a dotted frame You can change between the various input boxes in the following way using the operator ...

Page 64: ...e the ARROW keys to select the desired option A check box beside an option indicates that you can activate or deactivate the option In contrast to option buttons any number of check boxes can be activated simultaneously Activated options are identified by an X Fig 3 8 Check boxes A check box can be activated or deactivated in one of the following ways Press the EDIT key to move to the desired grou...

Page 65: ...IT key until the desired text box is selected If the text box has been assigned a HOTKEY underlined letter you can use the HOTKEY to select the box You can delete existing text in a text box using the CANCEL or CLEAR key List boxes contain a list of selection options If more options appear in the list than can be displayed in the box at one time scroll bars are displayed at the edge of the list bo...

Page 66: ...x Fig 3 12 Open combo box The items in an open combo box are selected in the same way as in a standard list box Press the ACKNOWLEDGE ALARM key to close the opened combo box Command buttons are used to invoke an action e g to execute or cancel a command OK and Cancel are examples of command buttons They generally appear on the right hand side of a dialog box Fig 3 13 Command buttons Command button...

Page 67: ...ed as softkeys if the dialog box is not system modal System modal dialog boxes are usually only displayed by the operating system They must be filled in or acknowledged before the user can continue working in the application or switch to a different application System modal dialog boxes can only be operated on the MF2 keyboard on the keyboard input of the MMC module They cannot be operated using t...

Page 68: ... 1 Set breakpoints 4 23 4 2 5 2 Edit mode 4 25 4 2 5 3 Block structure settings 4 26 4 2 5 4 Creating a TEACH IN program in the edit mode 4 29 4 2 5 5 Accepting axis positions 4 31 4 2 5 6 MDA in edit mode 4 31 4 2 5 7 Block by block teach in 4 33 4 2 5 8 Modifying an existing part program with block by block teach in 4 34 4 2 5 9 Examples 4 40 4 2 6 MDA mode 4 43 4 2 6 1 Copying MDA programs 4 45...

Page 69: ...K 840C OEM Version for Windows BA 4 3 6 Program correction 4 72 4 3 7 Saving programs 4 75 4 3 8 PRESET Set actual value DRF 4 78 4 3 8 1 PRESET Offset 4 78 4 3 8 2 DRF offset 4 82 4 3 9 Axis specific G functions 4 83 4 3 10 Extended stop and retract 4 84 4 4 Multichannel display 4 85 ...

Page 70: ...he machine area Press the DATA AREA key to activate Area Switchover Fig 4 1 Area Switchover When Area Switchover is selected Press the MACHINE softkey to display the machine area or press the MACHINE AREA key You can press the MACHINE AREA key at any time to activate the machine operation window i e to bring it into the foreground M ...

Page 71: ...oup and a related machine control panel Two mode groups and two machine control panels Two mode groups and one machine control panel Select the desired operating mode by pressing the corresponding key on the machine control panel The associated LED lights up If you have two mode groups and if each is assigned to a machine control panel you select the operating mode by pressing the mode key on the ...

Page 72: ...ing modes JOG TEACH IN MDA and AUTOMATIC If you activate the operating mode key the corresponding operating mode is selected all other operating modes and functions are deselected The operating mode which is active is signalled and acknowledged by the associated LED Machine manufacturer Switchover of the machine control panel is configured by the machine manufacturer Please read the machine manufa...

Page 73: ...ing an axis in another channel are taken into consideration after NC Start Here a program can be a main program a subroutine a cycle or a number of NC blocks e g in MDA mode With certain error statuses e g due to wrong parameterization of machine data NC START is disabled in the respective mode group NC START disable Note The NC Start disable only applies to a single mode group For example if chan...

Page 74: ...modes To AUTOMATIC JOG TEACH IN MDA From Pro gram reset Run ning Stop Pro gram reset Stop Pro gram reset Run ning Stop Pro gram reset Run ning Stop Pro gram reset X X X AUTO MATIC Run ning X X X Stop X X X Pro gram reset X X X JOG Stop X X X Pro gram reset X X X TEACH IN Run ning X X X Stop X X X Pro gram reset X X X MDA Run ning X X X Stop X X X ...

Page 75: ...lect some of the machine functions in every operating mode The table below shows which machine functions can be selected in which operating mode and in which operating state Table 4 2 Overview Machine functions Mode AUTOMATIC JOG TEACH IN MDA Functions Pro gram reset Run ning Stop Pro gram reset Stop Pro gram reset Run ning Stop Pro gram reset Run ning Stop Correction block X X Program modificatio...

Page 76: ...e is set to 0 on at least one machine control panel Axis moves as soon as a traversing command is active Program is being executed when in one channel the signal Program running is active Block search program interrupt if the signal Program running is not active in any channel and if a program interrupt is initiated by means of STOP operating mode change or M00 M01 active or if block search has be...

Page 77: ...play This bar chart displays the percentage of spindle utilization in the current operating mode The display appears only if a digital drive is used Actual value Override Position Setpoint value F 70 F S1 85 0 00 S1 0 0 00 M 0 00 0 Utilization Designation of the bar chart until SW 5 2 Performance as from SW 5 4 Utilization Bar chart Utilization Note ...

Page 78: ...f the machine in JOG mode It is possible to set the effect of the direction keys or the handwheels by way of the INC function The following settings are possible INC VAR INC1 INC10 INC 100 INC1000 INC10000 handwheel MAX INC100 The feedrate is set by machine data A feedrate override in the range 0 to 120 is only possible if certain interface signals are transmitted from the PLC to the NC After a pr...

Page 79: ...osition Press the direction keys to traverse the axes Select the axes Press these keys to traverse the selected axis in the respective direction If you press the key RAPID OVERRIDE as well you traverse the selected axes at rapid traverse speed Machine manufacturer The axis speed and rapid traverse speed are specified by the machine manufacturer The axis speed override can also be effective for rap...

Page 80: ...may be selected by pressing the appropriate key Now press the direction keys on the machine control panel In the case of the machine control panel for a milling machine select the axis first The control checks the selected direction for traversing before the start If the wrong direction key has been pressed e g instead of the operation is not accepted and no movement takes place When the reference...

Page 81: ...ced has been reached The message 1340 300950 Axis is not safely referenced is present Machine manufacturer With regard to referencing incremental absolute encoders please refer to the specifications of the machine tool manufacturer Move the axis to a known position e g visual mark Compare this position with the NC actual value and the Safety Integrated actual value If the position corresponds to t...

Page 82: ...G mode In the case of milling machine controls select the axis first You can reselect this function by pressing the active incremental weighting key JOG mode is automatically effective The selected increment function is displayed in the mode field The direction keys can act in two different ways Modal Non modal Modal means that the axis is always traversed by one increment corresponding to the set...

Page 83: ...d traversing function to individual axes The parameters required are also preset by machine data Please also refer to the machine manufacturer s operating guide Example of Indexed traversing with a rotary axis Number of divisions 7 Number of divisions per absolute dimension Absolute dimension 360 000 corresponds to the path to which the number of divisions refers Indexed traversing with incrementa...

Page 84: ...anel By pressing the appropriate direction keys on the machine control panel you approach the point of interruption On the machine control panel for a milling machine select the axis first After the contour has been reached select AUTOMATIC mode and press the NC START key Repos offsets can only be deleted with mode group reset The REPOS function is cancelled by pressing the REPOS key The direction...

Page 85: ...rupted block Scratching A tool change has not been carried out You are in JOG mode Using the direction keys approach a point which is within the interrupted block On the milling machine control first select the axes Select AUTOMATIC mode and press the NC START key The block end point is approached and program execution continued Machine manufacturer In a block with circular interpolation G02 G03 s...

Page 86: ... such a way that the tip of the tool corresponds to the thread root Press the STORE POSIT softkey The Offset angle and the Starting angle G92A are thus set to zero NC program start Automatic or MDA The offset angle is calculated and allowed for with the first thread set The offset angle is considered until it is set to zero by pressing the DELETE OFFSET ANGLE softkey Tool Turning part Fig 4 3 Fini...

Page 87: ...here are therefore no limitations in editing In addition to the standard editing functions such as edit insert and delete the position of the cursor can be manipulated by the travel keys the handwheel and MDA operation in edit mode Block by block teach in is a feature designed to assist the user in refining part programs In this mode you can start a part program and edit it or expand it only at th...

Page 88: ...coded area Set block structure Test Accept blocks Teach block by block NC start disable Set up disable Other functions Modify program Block search Single block mode TEACH IN Fig 4 4 TEACH IN The machine area has been selected The mode group and the channel for which the program is to be created have been preset The TEACH IN mode in the mode group has been selected To create or modify a program you...

Page 89: ...program is displayed in the program pointer window The first 3 blocks of an existing program appear in the editor box Note In the basic display of TEACH IN mode you can start a part program using NC START as in AUTOMATIC mode It is not possible to set up a program here teach in accept position etc When the Help key is pressed information on the TEACH IN mode is displayed on the screen You scroll t...

Page 90: ...s line Select RECALL to return to the basic TEACH IN display Use the arrow keys to position the cursor on the block where you wish to insert the breakpoint and press the MARK TARGET BLOCK softkey The target block is highlighted in colour When you press NC START the block containing the breakpoint is displayed The started program executes up to and including the selected block with the breakpoint F...

Page 91: ...e and PST is set to YES BRK is automatically reset etc You can reset these functions by pressing the PROGRAM MODIFICATION softkey You will find a description of the functions BRK PST and DEC in the section entitled Program modification Note Teach in is only possible if decoding and processing take place on the same level In other words a program must be interrupted with a decode stop DSB PST BRK E...

Page 92: ...it mode you can edit but not start a part program NC start disable It is only possible to switch between the basic display and edit mode in RESET state This causes the program pointer to be reset to the start of the program when you exit edit mode Decoding begins with NC start TEACH IN is selected You have selected a program with the softkey function SELECT PROGRAM The program is in the RESET stat...

Page 93: ... following display appears Fig 4 7 Block structure settings The following toggle fields selection fields are displayed in the Block structure settings screen Block number Settable zero offset Workpiece dimensions and Axes and the following input fields Next block number Block number difference You can use the window switchover key to switch to the Block structure settings screen The active window ...

Page 94: ...table zero offset selection is used to calculate the axis position for SAVE POSITION and GENERATE BLOCK The zero offset G53 G54 etc is not saved in the part program The axis positions which are displaced by the zero offset value are entered directly in the generated block Before the block is generated you should check which zero offset is to be used in the part program For the axes you can choose ...

Page 95: ...s with the selection YES NO You use the toggle fields to decide which axes are used in the teach in see examples 1 and 2 Machine manufacturer The settings Axes and Axis selection are generally modified or overwritten by the PLC application program Please refer to the manufacturer s documentation for more information Press RECALL to return from the selection screens to the edit mode display The axe...

Page 96: ... entry in the input line see examples 1 With Axis selection screen tra v e rs e d A x e s A x is s e le c tio n X Y Z A y e s y e s n o y e s Fig 4 9 Axis selection screen If axes X Z and or A have been traversed during the teach in the axis positions are entered in the program with Accept position If a selected axis has not been traversed the position is not accepted Generated NC blocks without t...

Page 97: ...o n X Y Z A y e s y e s y e s n o Fig 4 10 Axis selection screen The axis positions of axes Y Z and A are entered in the NC block with Accept position regardless of whether or not a movement has taken place Generated NC block N10 Y 50 Z 100 A 220 LF 2 Entry in the input line Enter the axis names X Y and Z in the input line Regardless of the selection in the Axis selection screen a block is generat...

Page 98: ... of the axes whose positions are to be saved in the input line the settings in the axis selection display no longer apply see the section Modifying an existing part program with block by block teach in 4 2 5 6 MDA in edit mode MDA allows you to start NC blocks in edit mode TEACH IN for purposes such as testing setting up etc MDA mode provides a third way of reaching a position in addition to the u...

Page 99: ...nt to insert the MDA block Pressing the ACCEPT MDA BLOCK softkey saves the selected MDA block in the TEACH IN program Fig 4 12 Accept MDA block If you want to save more MDA blocks switch to the MDA mode again Use the arrow keys to select the next block switch back to the edit mode and save the block in the teach in program as described above The functionality of the MDA mode in edit mode teach in ...

Page 100: ...rogram is opened for example you must first start it using NC start Only then can you switch to block by block teach in otherwise the message Edit error no edit allowance is displayed In Block by block teach in you can start the program and only modify or extend it at breakpoints The advance decoding is switched off at the breakpoint You can advance to a breakpoint by RESET program start Traversin...

Page 101: ...ock teach in An existing program has been selected in the TEACH IN basic display using SELECT PROGRAM A program breakpoint has been selected see the section Setting breakpoints Press the TEACH BLOCK BY BLOCK softkey The following softkey bar is displayed Accept position Generate block Enable JOG handwheel Mark target block Insert overwrite Search Block struc ture settings Press this softkey to ent...

Page 102: ...in the input boxes using the keyboard and pressing the INPUT key Switch to the Axis selection screen and enter the desired settings You will find a detailed description of these selection screens in the previous sections Press RECALL to exit the selection screens Now start the part program by pressing NC START The program executes until the selected breakpoint The program can also be started from ...

Page 103: ... disappears and the dialog text JOG handwheel enabled is displayed Select the appropriate axes and traverse these according to the desired scale in positive or negative direction Traverse each axis to the required position Pressing the ACCEPT POSITION softkey causes the current position on the traversed or selected axes according to the block structure settings and the axis selection to be entered...

Page 104: ...ositions defined in the input line are accepted regardless of the settings in the Axis selection screen By pressing the END key you can return to the edit window You can insert a block before the teach block Position the cursor on the first digit of the teach block the N of N20 and press the INPUT key Fig 4 14 Insert block You can edit or insert the axis positions with Accept position in this gene...

Page 105: ...function GENERATE BLOCK generates the block created in the block structure For the example in the figure the following settings would be required Block number Next block number Block number difference Axes Block structure settings selected 5 16 yes Axis selection X Y Z A ja no yes yes no Fig 4 16 Settings for block structure Generate block MPF 4711 Workpiece SHAFT1 Insert 4 N10 X0 Y0 Z0 G0 LF N15 ...

Page 106: ...or the REPOS function in the section JOG mode If after REPOS the function SAVE POSITION or GENERATE BLOCK is activated and Traversed axes was selected the repositioned axis is not saved in the part program If further axes are to be traversed after REPOS REPOS should be deselected first 2 If the axis positions in the teach block have been accepted the travel keys and the handwheel remain disabled u...

Page 107: ...he editing cursor is placed on the block with position 3 The missing positions 7 to 9 are subsequently approached using JOG keys and similarly entered in the part program with the softkey GENERATE BLOCK Fig 4 17 Teach in in edit mode It is possible to edit the part program at any point in any order without traversing Edit mode example 1 2 3 4 5 6 7 8 9 Position to be taught Place cursor before the...

Page 108: ...Positions 6 to 9 are each approached using the handwheel inserted in the part program using the GENERATE BLOCK softkey and executed by pressing NC Start Finally run the program until the end Fig 4 18 Block by block teach in 1 It is only possible to teach or edit in the following block You must observe the machining sequence Every block that you modify must be processed by pressing NC Start Example...

Page 109: ...s interrupted the program one block too soon He does not want to save the position but to run the program until position B But NC Start is interlocked because of the movement away from position A In step 3 he must first move the position back to A He can then execute the missing block to position B in step 4 Now he can teach in position C and D Fig 4 19 Block by block teach in 2 Contour already re...

Page 110: ...hannel 2 etc When you press NC Start the control processes the blocks You can set CLEAR CLR under program modification to determine whether the block sequence is to be cleared after processing If CLR is not active the block sequence is retained after processing Used for example in connection with operations in JOG mode Fig 4 20 Basic display in MDA mode The machine area has been selected The mode ...

Page 111: ...can use the DELETE BLOCKS softkey to clear the program blocks You can interrupt program execution in one of the following ways Setting the DSB BRK and PST program modifications Pressing NC STOP Pressing FEED STOP The program is restarted by pressing NC START FEED START If you press the RESET key execution is terminated A RESET is also generated by changing the mode i e execution is interrupted Pre...

Page 112: ...he contents of the MDA program are retained if clear CLR is not active and the softkey DELETE BLOCKS has not been pressed The contents of the MDA program can be copied into a part program using the data selector see next section 4 2 6 1 Copying MDA programs First select the area Programming Edit NC A list appears with the program types MPF SPF and MDA Fig 4 21 List of program types in the NC edito...

Page 113: ...the purposes of this example You can see how the selected directory is updated Now enter the program type and the program number e g MPF 1234 and press the softkey COPY The NC blocks of MDA 1 now become main program MPF 1234 COPY is possible only within the directory NCK e g from MDA to MPF To save the data on disk it is best to use in the NC editor area the softkeys EDIT ETC SAVE UNDER Saving of ...

Page 114: ...am in this mode the control calls the blocks in sequence and evaluates them Evaluation takes all the offsets addressed by the program into account The blocks prepared in this way are processed in sequence The part program can be entered via the universal interface e g by means of computer or PC or through the keyboard or it can be loaded from the MMC hard disk to the NCK memory While one part prog...

Page 115: ...The data selector appears in the basic display for Automatic Note When selected first the data selector displays automatically the workpiece directory LOCAL If you want to deselect another workpiece directory select the root directory first For this position the selection cursor by means of theARROW keys on the entry Press the INPUT key The workpiece directories in the root of the data selector ar...

Page 116: ...dditional entries might be directories on the local hard disk also directories of the FlexOS file system diskette drives and or network drives Please consult the documentation supplied by the machine manufacturer for additional information The workpieces are stored in the directory LOCAL A job list load list exists for every workpiece Please refer to the Section Programming for more detailed infor...

Page 117: ... and a job list exists the data manager and current processing is displayed during data transfer You can use this softkey to abort workpiece data transfer from the hard disk to the NCK memory Important If workpiece data transfer is aborted incomplete program parts might be left in the NCK memory If a workpiece does not have a job list or the standard job list and if several or no main programs exi...

Page 118: ...isabled Table 4 4 Alarm messages during loading Error Alarm message The workpiece does not exist on the MMC hard disk Workpiece not available The job list on the MMC is faulty Job list faulty An error occurs during job list processing Several alarms A workpiece without job list and with several or no main programs has been transferred to the NCK Transfer workpiece no program selected The instructi...

Page 119: ...data selector When you press the INPUT key the program types available in the NCK memory are displayed The following are available MDA MPF SPF Now position the selection cursor on the program type you wish to select e g MPF and press the INPUT key This action lists all the main programs in the NCK memory Fig 4 27 Select program Now select the program you require with the CURSOR keys and press the ...

Page 120: ...nel Press this key to select AUTOMATIC mode If you wish to execute a new program enter the program number Enter the program number and the corresponding identifier L MPF or SPF via the keyboard You can delete character by character from right to left in the input line with the DELETE INPUT key Press the SELECT PROGRAM softkey The selected program is accepted by the program pointer Caution If a pro...

Page 121: ...ile the part program is being executed a Program running display appears in the mode field If during program execution FEED HOLD is activated FST Feed stop is displayed in the status field and the feed drives are brought to a standstill while maintaining the programmed path movement In the case of NC STOP the NC STOP display appears in the mode field If the RESET key is pressed execution of the pa...

Page 122: ...PST program modification BREAKPOINT BRK program modification FEED STOP keypress or signal Switch to JOG mode A program can be edited at the breakpoints The section Program correction describes which type of interruption allows editing without RESET Note The active block display only displays blocks related directly in terms of traversing logic Subroutine calls calculation blocks etc are not displa...

Page 123: ...number is not checked in the OVERSTORE mode The program will run with these values until a new value appears in the program for the overstore function or until you enter values modified by Overstore Overstoring is only possible when the input window is active The machine area has been selected The mode group and channel in which you wish to overstore have been selected One of the following four mo...

Page 124: ... on a desired input field Fig 4 28 Overstore input window Enter the correction values via the keyboard and conclude each value by pressing the input key Press the NC START key when all corrections have been carried out To simplify the input you can enter the values in sequence Assignment to the input field is performed automatically e g S500 M4 H12 Overstore S M T D H Note ...

Page 125: ...ing a mode change or RESET necessary The program state and point of interruption are noted The overstore program is processed and processing is then continued from the point of interruption N20 N25 N30 N10 N15 The blocks prepared before the interruption are traversed as if no interruption had taken place N1 N2 NC STOP select Extended overstore Inserted program blocks MDA1 1234 1234 The machine are...

Page 126: ...tual As soon as the Extended overstore function has been terminated the state of the NC channel is displayed again You can enter the required block sequence in the MDA1 window The NCK editor is available to you here The entered blocks can be executed with NC START A complete program can be executed by calling a subroutine Press the RECALL key to exit Extended overstore This action takes you back t...

Page 127: ... Extended overstore Mode Channel state Message AUTOMATIC JOG TEACH IN Running No extended overstore possible RESET Extended overstore NC STOP Extended overstore Program stop Extended overstore Extended overstore Running Termination not possible Simple overstore not possible RESET Termination not possible Simple overstore not possible NC STOP Termination not possible Simple overstore not possible P...

Page 128: ... selected One of the 4 operating modes MDA JOG TEACH IN and AUTOMATIC is active Extend the softkey bar with the ETC key Press the softkey F S on line to call up the following display Fig 4 30 Changing F S values Press the HOME key to switch to the S value and F value window The active window is marked with a yellow frame Now enter the desired F or S value in the input line Transfer the entered val...

Page 129: ...he function S F ON LINE with RECALL The values entered remain active until they are again altered see above 4 3 4 Program modification The machine area has been selected The mode group and the channel in which you wish to modify programs have been preset One of the following modes is active AUTOMATIC TEACH IN or MDA In JOG mode program modification is only active if there has been a changeover fro...

Page 130: ...hine function can be used to set the following parameters and thus modify program execution correspondingly Dry run feedrate Display DRY DRY RUN All those blocks in which a feedrate is programmed GO1 G02 G03 G33 G34 G35 are traversed at the Dry run feedrate preset by a setting data instead of at the programmed feedrate The dry run feedrate then also applies in place of the revolutional feedrate G9...

Page 131: ...ible within subroutines When you return from the subroutine to the main program level the advance decoding is switched off and the block sequence is interrupted The main program block following the subroutine call is not executed When PST is active DSB and BRK are switched off and vice versa 1 of 3 principle Stop at target block Display BRK Break This feature allows you to interrupt the program at...

Page 132: ... If no workpiece is known new program the modified program is stored in the directory LOCAL STANDARD Machine manufacturer Via technology MD the machine manufacturer can provide the workpiece NCKTMP instead of STANDARD for this case To allocate an original workpiece use the softkey SAVE ON DISK and enter the workpiece name in the input line Note With the setting date 5001 2 1 you can activate perma...

Page 133: ...calculations without outputting them to the machine or the PLC R parameter operations The signal generated takes effect at the end of the current block Once you have activated the SINGLE BLOCK function the SBL display appears in the status field and the LED for the SINGLE BLOCK key on the machine control panel lights up After executing a block Stop single block operation is displayed NC START must...

Page 134: ...3 2 X1 Threading blocks without dry run feedrate X1 X1 1 Single block 2 Single block A stop comes into effect only at the end of a current block without thread 3 With tool radius compensation Blocks can no longer be stopped if they have been preprocessed in the buffer memory but not yet executed without the Decoding single block being present A Decoding single block can be modified by Overstore No...

Page 135: ...Block search with calculation from the last main block You can use the block search functions to reach a breakpoint in a program e g after a program error tool break etc This causes the program to be decoded until the breakpoint is reached It is not necessary to process the entire program If the position at the breakpoint has been left in JOG mode e g during a tool change you can use the JOG handw...

Page 136: ...ers if the program has no block numbers The block search is performed with block and line numbers e g N10 Block N10 3 Line 3 The ACCEPT POINTER softkey automatically enters the breakpoint The block search after completion of a program correction or tool change takes you to this precise position During program correction in the AUTOMATIC or TEACH IN mode the function MARK TARGET BLOCK accepts the b...

Page 137: ...on or soft approach to contour the PROGRAM START key must be pressed several times before the axis moves or the message Block search terminated is displayed cause e g calculation of the intersection point of the tool radius compensation requires at least two blocks With decoding single block it is possible that several blocks are traversed when pressing the PROGRAM START key once e g tool radius c...

Page 138: ...block and subblock must be in the main program level Once the target block has been found it is adopted as the current block Press the SEARCH FROM MAIN BLOCK softkey The block search is carried out by the control After NC START the program is started and executed The function includes a block search without calculation to the last main block before the target block and from there on a block search...

Page 139: ...m modifications BRK PST or DSB are used to interrupt a program the advance decoding terminates at the breakpoint Any of the blocks following the breakpoint block can be edited Pressing NC START causes execution of the program to begin after the breakpoint block i e any changes become effective immediately To use these program breakpoint features you must define the breakpoint before starting the p...

Page 140: ...r in the alarm Neither is the block marked nor is the block number displayed in the alarm If necessary complete the relevant program section with block numbers and start the program again If a program is interrupted by a CANCEL alarm execution of the program can be continued from the breakpoint by pressing NC START after the program error has been eliminated When you press the CANCEL key you ackno...

Page 141: ...s cancelled Note When a program is processed externally the program correction screen cannot be displayed Machine manufacturer The RESET function can be configured by the machine manufacturer The RESET is generated internally if required so that acknowledgement by means of the key is not required Read the machine manufacturer s documentation The CORRECT PROGRAM function enables you to edit part pr...

Page 142: ...rating branch because only here i e in AUTOMATIC mode can programs be altered It is therefore only possible to save programs here The softkeys for saving part programs are to be found in the operating mode TEACH IN in the extension of the softkey bar which is called up with the ETC key A program can be saved in two ways The program can either be saved in the current workpiece that is the SAVE TO D...

Page 143: ... the program is being saved the message Transfer running is displayed Note If no workpiece is selected only the path USER LOCAL is offered The workpiece name must be entered via the keyboard The softkey SAVE UNDER is to be found in the menu extension of the PROGRAM CORRECTION AUTOMATIC mode Now save using the DATA SELECTOR Block search Tool path simulation Display block Mark target block Insert ov...

Page 144: ...to be saved Is also possible to enter a new workpiece name Now the softkey SAVE TO DISK must be pressed in order to save the program The message Store in workpiece appears The program is saved by pressing the softkey SAVE TO DISK again The message Transfer running is displayed while the program is being saved Note Programs can be saved in all displayed workpieces including network drives and or di...

Page 145: ...DRF 4 3 8 1 PRESET Offset In the PRESET machine function you can offset the control zero to any point in the machine coordinate system M W ZO Y X Fig 4 36 Machine coordinate system before PRESET DRF offset M W ZO Y X PRESET DRF M Fig 4 37 Machine coordinate system after PRESET DRF offset M Machine Zero W Workpiece Zero ZO Zero Offset M Control Zero ...

Page 146: ...ly a tool offset can be included in the calculation of PRESET offset Enter the tool offset data correction number correction direction and identifier in front of Set actual value When calculating the tool length compensation the identifier must be entered Generally the values 2 or 3 are entered here Tool length compensations P2 or P3 are then calculated in the offset see PARAMETER area The value t...

Page 147: ...os 1 neg 1 0 0 0 0 0 0 0 000 0 000 0 000 0 000 0 000 0 000 Preset ID No DRF Fig 4 38 Input window PRESET DRF Position the cursor to the input field for the ID number Enter the appropriate value via the keyboard Confirm your input by pressing the INPUT key Switch to the lower input window Enter the value for the correction number D via the keyboard Position the cursor on the correction direction in...

Page 148: ...ftkey The DELETE OFFSET key is used to clear all PRESET offsets of the selected mode group The offset displayed includes the input value and the included tool correction If the Help key is pressed once the function has been selected information on the function is displayed on the screen The PRESET offset remains stored After End of program After RESET Machine manufacturer Machine data is used to d...

Page 149: ...indows BA 4 3 8 2 DRF offset The DRF offset allows an additional incremental zero offset to be made by the handwheel Note The DRF offset is displayed on the screen in the DRF input window In the actual value display however the DRF offset is not visible An active DRF offset can be deleted via the program 434 ...

Page 150: ...105 Endless rotation OFF G103 Endless rotation ON clockwise G104 Endless rotation ON counter clockwise G119 Oriented STOP G94 Simultaneous feedrate F in mm inch degrees per min G195 Simultaneous feedrate F in mm inch degrees per revolution with reference to the speed feedrate setpoint of the defined spindle or rotary axis G295 Simultaneous feedrate F in mm inch degrees per revolution with referenc...

Page 151: ...se consult the machine manufacturer s documentation Activation or deactivation of the monitoring and the response can be programmed via G commands Press the STOP RETRACT softkey to display the function specific G functions This is only a display It is not possible to enter G functions here The G functions G420 Switch off switch off Extended stop and retract all or selectively for axes and or spind...

Page 152: ...el display to the other The channel display currently active is marked e g yellow frame There are additional softkeys in the AUTOMATIC display in conjunction with the multichannel display With the channel change key you advance the channel in the active window With the mode group change key you change the displayed mode group on the screen Instead of the display Current block the current G functio...

Page 153: ...hine manufacturer Display screens for more than two channels of a mode group can also be configured by the manufacturer WS 800A Machine manufacturer The machine manufacturer defines the effect of keys and rotary switches of the machine control panel on individual channels axes and spindles For example the operating mode keys may have an effect on the display mode group with one machine control pan...

Page 154: ...inate rotation 5 14 5 3 4 R parameters 5 14 5 3 5 Plane 5 17 5 3 6 Setting data 5 3 6 1 Working area limitation 5 18 5 3 6 2 General setting data 5 18 5 3 6 3 Spindle setting data 5 19 5 3 6 4 Scale 5 20 5 3 6 5 General setting data bits from SW 6 3 and higher behind setting bits 5 20 5 3 6 6 Axial setting data bits 5 21 5 3 6 7 Additive protection zone adjustment via setting data from SW 6 3 and ...

Page 155: ...rved 5 2 SINUMERIK 840C OEM Version for Windows BA 5 1 Selecting the parameter area First press the DATA AREA key to select Area Switchover Fig 5 1 Area Switchover When Area Switchover has been selected Press the PARAMETER softkey This opens the relevant area immediately ...

Page 156: ... Parameters The program parameters and setting data are referenced by the control during execution of a part program and throughout operation of the machine In contrast all of the workpiece files in the Programming Data Management areas are stored on the hard disk Their values therefore have no immediate effect on machine operation The program parameters and setting data assigned to a workpiece ar...

Page 157: ...rea The following sections describe the operating procedure for editing data via the NC keyboard With SW 4 and higher of SINUMERIK 840C the function Flexible memory configuration is provided for altering the memory allocation You can configure the size of the following memory areas 1 User data Part programs IKA data UMS data R parameters TO data 2 Drive software Number of real axes 3 Number of axi...

Page 158: ... the cursor keys With these keys you page the screen display down and up If you are searching for a specific item of data enter the desired number via the alphanumeric keyboard and then operate the SEARCH key do not complete your entry by pressing the INPUT key If the value you are looking for is within the selected data range the cursor is positioned on this value Tip Instead of using the SEARCH ...

Page 159: ...te the cursor in the input window and move it with the cursor keys to insert and delete characters If you press this key again you deactivate the cursor With the EDIT WORD key you can modify the current value by addition or subtraction does not apply to setting data and R parameters Current value 50 New value 45 If you wish to delete the value Overwrite the value with zero With the PLUS and INPUT ...

Page 160: ...designations in plaintext into the control and edit them The following rules for operation apply You cannot input more than 27 characters per line With the INPUT key the current text is overwritten left justified with the contents of the input line The text line is deleted with the CANCEL key Example of a configured display not available as standard MILL Automatic Program reset Mode grp 1 Channel ...

Page 161: ...s TO geo base TO wear Zero offset Angle of rotation R param central R param chan spec Search The following data is stored in the PARAMETER PROGRAM PARAMETERS area Tool offsets Zero offsets Angles of rotation R parameters channel specific and central Plane 5 3 1 Tool offsets You press the PROGRAM PARAMETERS softkey The tool offsets geo base i e P0 to P4 and P8 and P9 are displayed on the screen Fig...

Page 162: ...o 8 characters long Leading zeros are suppressed Normally you do not need to perform an input however input may be necessary with flexible tool management Machine manufacturer The machine tool manufacturer determines whether the control is equipped with flexible tool management see the machine tool manufacturer s documentation Tool type 1 Lathe tool Example Turning tool Facing tool 2 Lathe tool Ex...

Page 163: ...meter radius For the TO parameters 5 to 7 it is possible but not absolutely necessary to enter the wear data of the tool in the input screenform L1 base L2 base The TO parameters 8 and 9 are provided for special applications The Base dimension makes a further tool length compensation possible Machine manufacturer It is possible to disable input of the geometry and wear data of the tool by means of...

Page 164: ...numbers are called by the PLC program of the machine manufacturer Otherwise the D numbers have to be specified in the part program as absolute values see machine tool manufacturer s documentation 5 3 2 Zero offset With this softkey in the Program Parameters area you select the input menu of the zero offsets Editing is described in the Editing data in the parameter area section The actual value mem...

Page 165: ...is meaningful only for the Z axis There are two settings in each case for G54 to G57 A coarse offset and A fine offset correction of the zero You input the values for the settable zero offset into the control as Program parameters The zero offsets which are entered are activated in the part program called The values for the G58 and G59 offsets are stored in the program and can be modified only in ...

Page 166: ...ndows BA 5 13 Note From SW version 5 also zero offsets from a subprogram Lx under Ny can be activated via G58 Lx Ky or G59 Lx Ky The number of the zero offsets which can be stored is limited only by the size of the part program memory Z ZMR M ZMV XMV XMR W WR X X Fig 5 8 Example Drilling and milling machine ...

Page 167: ...umber except ASCII R parameters Select the desired channel for channel specific parameters by pressing the CHANNEL SWITCHOVER key You press the R PARAMETER CHANNEL SPECIFIC softkey and the channel specific R parameters are called up R0 R699 The input range is 99999999 to 99999999 This standard number of 700 R parameters may be modified see also the planning note below Press the R PARAMETER CENTRAL...

Page 168: ...ndows BA 5 15 Note Only certain R parameters are freely available to the user The parameter assignments are shown in the following overview Machine manufacturer The SINUMERIK 840C has a variable memory configuration R parameter areas can be reconfigured Please consult the machine manufacturer s documentation ...

Page 169: ...mens measuring cycles are used R200 to R219 Internal assignment cycle converters R220 to R239 WS800 compiler R240 to R299 Provided for internal assignment R300 Stack pointers for 040 041 042 043 R301 to R599 Stack area for 040 041 042 043 R600 to R699 Reserved for users R700 to R999 Typical use Higher level store for all NC channels e g for buffering target positions which are being used by anothe...

Page 170: ...e ETC key to extend the softkey bar With this softkey in the Program Parameters area you select the display menu for plane selection The planes are preset by the machine manufacturer in the machine data and are simply displayed here Fig 5 10 Menu for plane selection in the parameter area The possible planes are displayed on the screen Plane ...

Page 171: ...itches The axes are displayed for a specific mode group When switching over from the METRIC to the INCH input system and vice versa the values of the working area limitation are adjusted in the respective measuring system only if the maximum possible value is exceeded If the value of the working area limitation is possible in the current measuring system no adjustment is made 5 3 6 2 General setti...

Page 172: ...ed in the program by means of G26 S The programmed spindle speed limitation can be used in addition to the fixed spindle speed limitation to reduce the spindle speed in the program using the G92 function The programmed spindle speed limitation is only active at a constant cutting rate G96 The value is entered in the setting data automatically When M19 is programmed positioning takes place at this ...

Page 173: ... behind setting bits You select GENERAL SETTING DATA BITS The display with the setting data bits of setting data 5000 to 5599 appears on the screen The setting data from byte No 5000 up to 5799 are made up of 8 bits each 0 to 7 You can set the desired bit pattern for any byte in the range from 5000 to 5799 on the screen by way of an input screenform The following bits can be set SD 5000 bit 0 1 2 ...

Page 174: ...le factor G51 is effective during machining 5 3 6 7 Additive protection zone adjustment via setting data from SW 6 3 and higher You can select the displays for the protection zone adjustment using the softkeys PARAMETERS SETTING DATA PROTECTION ZONE Note For further information regarding the protection zone adjustment function please refer to the documentation SINUMERIK 840C SIMODRIVE 611D Install...

Page 175: ... and Z of these two points are displayed here Furthermore the names of the motion axes are given on the abscissa the ordinate and the applicate Two setting data one for each coordinate direction are available for each protection zone coordinate The setting data is added to the basic dimensions of the protection zone and thus enlarges the protection zone in the respective coordinate direction The v...

Page 176: ...xisting hardware cams Input range 99999999 Machine manufacturer The software cams function must be configured in the PLC user program by the machine manufacturer Please refer to the documentation for the machine concerned The software cam function is an option This function can only be used for linear axes The software cam signals can only be activated after referencing the NC axes The cam positio...

Page 177: ...e been changed you must first activate a signal Transfer of cam values with an operating sequence see manufacturer s documentation before the changes become effective 5 3 6 9 Cycle setting data Press the ETC key to extend the SETTING DATA softkey bar You select CYCLE SETTING DATA The first display for cycle setting data system data appears on the screen Cycle setting data are separate for each cha...

Page 178: ...pindle converter With this function you can convert axis and spindle addresses into other axis and spindle addresses Place the cursor on the toggle field Axes no If the contents can be switched to yes the function can be used in this channel Machine manufacturer This function must be released and activated by the machine manufacturer for the channel affected technology MD In addition a release is ...

Page 179: ...lation from the parameter setting data menu It is possible to program the gearbox interpolation groups completely via the input field The input field is also used to display the current status and configuration of the groups You select a gearbox interpolation group by entering the name of the following drive in the Following axis field The input screen is then in DISPLAY mode and shows the current...

Page 180: ...o checks whether following axes spindles are real axes spindles You cannot enter the axis type The axis type axis or spindle is entered by the system according to the axis spindle name The toggle field GI type offers the following options Linear K01 K04 Curve K11 and K12 The link structure for the GI type linear can be selected by toggling between the options in the right hand field The following ...

Page 181: ...ation position for flying synchronization 8 decimal places decimal point leading sign An absolute value must be entered The reference system is always the machine coordinate system Activate the entry by pressing the FLYING SYNCHRON softkey twice The machine position is only accepted if a gearbox interpolation group has been configured After the link has been activated by pressing the softkey the v...

Page 182: ...his softkey is identical to the G command G400 FA Press this softkey twice to perform link_on for the entire gearbox interpolation group selected by the following axis The current entered link factors remain active The positions of the main drives are cleared The status is set to LINK_ON for every axis This softkey is identical to the G command G402 FA LINK_ON for the entire gearbox interpolation ...

Page 183: ...ng a gearbox interpolation group is as follow 1 Define following axis 2 Define leading axis and link type the IKA data must be loaded for link via IKA tables 3 SK Accept configuration 2x 4 Enter link factors 5 SK KOP_On KOP_Switch 2x 6 If necessary enter start position 7 Possibly SK Start position KOP_on switch 2x 8 SK KOP_on all 2x Any modification of the configuration is possible only completely...

Page 184: ...ping workpieces e g tailstocks sleeves grippers etc The clamping force for this function is entered in the input fields assigned to the axes Input range 0 to 999999 Tolerance 0 1 of max power setpoint motor torque The function Travel to fixed stop is an option The function can be used for all axes Spindles that are to travel to the fixed stop must first be switched to C axis mode Machine manufactu...

Page 185: ...5 Parameters 01 99 6FC5198 6AA60 0BP1 Siemens AG 1999 All Rights Reserved 5 32 SINUMERIK 840C OEM Version for Windows BA ...

Page 186: ...files 6 27 6 2 6 Data communication between MMC and peripheral devices 6 28 6 2 6 1 Output of workpieces 6 28 6 2 6 2 Output of individual files 6 30 6 2 6 3 Input of files 6 30 6 2 6 4 Transferring data to the FD E2 diskette drive 6 33 6 2 7 Description of the WEdit editor 6 34 6 2 7 1 Starting the WEdit editor 6 35 6 2 7 2 Key functions 6 37 6 2 7 3 Editing text 6 38 6 2 7 4 File management 6 41...

Page 187: ...ment Fig 6 1 Area Switchover When Area Switchover has been selected First press the PROGRAM softkey to open the menu You can select the areas in the menu by entering the following letters D Data Management E Edit NC Select Data Management to manage files on the hard disk or transfer files between the NCK and MMC The Edit NC area is used exclusively to manage and create part programs in the NCK mem...

Page 188: ... data such as main programs subroutines setting data tool offsets zero offsets and R parameters can be assigned to a workpiece A workpiece corresponds to a directory This directory can either be on the local hard disk of the MMC on a disk drive or on a remote computer All the data required for a workpiece can be transferred from the hard disk to the NCK or peripheral device with a single operator ...

Page 189: ...e square brackets that can be freely configured by the machine tool manufacturer The identifier refers to a higher level directory container for workpieces that is either located on the local hard disk the diskette box or a remote computer Examples network flexos etc For workpieces that lie in a FlexOS directory the workpiece names are displayed together with their extension 064 The same higher le...

Page 190: ...x xxxx 4 digit program number WORKPIECE Cycle spfxxxxzpfxxxx xxxx 4 digit program number CYCLES USER CYCLES STANDARD WORKPIECE Zero offset zoa0 zoak k 1 6 channel number WORKPIECE Tool offset toak K 1 6 channel number WORKPIECE R parameter rpa0 rpak k 1 6 channel number WORKPIECE NC setting data sea WORKPIECE Cycle setting data sea4 WORKPIECE Cycle machine data tea40 MD user Cycle machine data tea...

Page 191: ...e not displayed in the left hand list box and cannot therefore be transferred to the NCK or via the serial interface or to the diskette drive The NCK program memory and the system data memory of the NCK The FD E2 diskette drive if installed The settings for the serial interfaces devices of the MMC You can use the EDIT key to switch between the individual list boxes in the data manager The directio...

Page 192: ...elected In all other cases no rights are dissplayed The focus marks the list field Write right if the selected file may be deleted Read right if the selected file may be edited In all other cases no rights are displayed Machine manufacturer The files are displayed together with the date in the left hand list box in the data manager The date display can be configured by the machine manufacturer 6 2...

Page 193: ...kpieces New workpieces directories can be created on the hard disk or on other drives with the data manager When created these workpieces automatically appear in the workpiece directory selected MMC hard disk network drive etc Workpieces cannot be created in a FlexOS directory When the data manager is active Fig 6 3 Data manager Press the EDIT key to select the combo box on the left hand side of t...

Page 194: ...he list field In the left hand text box enter the name of the workpiece to be created WELLE_1 in the above example Press the CREATE softkey A workpiece with the desired name is created in the workpiece directory selected and displayed in the single line list box You can use the RIGHT ARROW key to open single line list boxes Note By entering the workpiece name e g WELLE_1 you have simply created a ...

Page 195: ...an only be read by the WEdit editor They cannot be created or edited First press the EDIT key to select the combo box on the left hand side of the data manager Open the single line list box with the RIGHT ARROW key Select the desired workpiece with the vertical ARROW keys Press the INPUT key The selected workpiece is displayed in the single line list box Fig 6 5 Creating NCK files Press the EDIT k...

Page 196: ...As from the File menu The following dialog box appears Fig 6 6 Save As dialog box Enter the file name in the text box Press the OK softkey The file is stored in the selected directory Note The file name is only displayed in the left hand list box of the corresponding directory if the naming complies with NCK conventions If an illegal name has been assigned to the file e g 100 instead of mpf100 the...

Page 197: ...data are entered by the machine manufacturer stored in the MD user directory and protected by password 2 IKA data defining a workpiece The function is used here to describe the contours of a workpiece in terms of IKA data Up to 16 000 interpolation points can be defined in a table Up to 32 IKA relationships IKA data records are supported This function can be used to generate complex contours using...

Page 198: ...the individual channels of the NCK The job list is executed whenever a workpiece is selected in the Machine area AUTOMATIC display or copied loaded into the part program memory using the data manager If no job list is stored in a workpiece all the files of the workpiece are loaded when the workpiece is selected in the Machine area or copied from the data manager to the NCK memory When you create a...

Page 199: ...atically generated when the workpiece is created It then serves as a template for the job list in your selected workpiece In the left hand single line box select the workpiece for which you want to create a job list example welle_1 In the right hand single line box select the workpiece that you have already created e g welle_2 Check that the selection bar is highlighting the file job in the right ...

Page 200: ... manager Fig 6 8 Editing the standard job list An operating guide is displayed in the job list with a complete list of the instruction set A job list can contain the following instructions in any order 1 Clear files for NCK memory CLEAR 2 Load instructions LOAD or LOADCYC 3 Start preparation SELECT 4 Start of MMC applications CALL 5 Comments Each line contains exactly one instruction The instructi...

Page 201: ...rt program memory CLEAR name attr LF blank The following identifiers can be used for name MPFn one main program SPFn one subroutine MPF n m part programs MPFn MPFm SPF n m subroutines SPFn SPFm MPF all main programs SPF all subroutines refers to all part programs in the part program memory in the NCK The following attribute can be used for the CLEAR command u unconditional deletion If cycle disabl...

Page 202: ...F n m subroutines SPFn SPFm ZPF n m cycle files ZPFn ZPFm selects all part programs of a workpiece i e all files of a workpiece are loaded into the NCK memory The cycle files ZPFn are renamed automatically into SPFn during loading from MMC into the NCK memory Important Drive identifiers such as C must not be included in the name identifier If a drive identifier is used the job list is aborted with...

Page 203: ...711 LF The file PATH with the following entries exists in workpiece WELLE1 path mpf4711 h network parts welle2 mpf3933 m partprg motor Part program MPF4711 is loaded in the specified network path Note The PATH file is not searched if wild card characters are used LOAD WELLE1 LF load all NCK files LOAD LF In Example 2 the file PATH is not searched LOAD WELLE3 MPF 10 99 LF LOAD LOCAL WELLE3 MPF 10 9...

Page 204: ...NDARD SPF n m LF Loads all standard Siemens cycles from SPFn to SPFm LOADCYC USER SPF4711 x u w LF or LOADCYC USER SPF4711 xwu LF Cycle SPF4711 is read from the USER directory and loaded into the NCK memory as an undeletable and non executable file Note When the control is started up the cycles are transferred to the NCK memory by the LOADCYC entry in the job list independently of cycle disable Wi...

Page 205: ...ction SELECT MPF7 CH 1 LF Select part program MPF7 in channel 1 SELECT MPF7 CH 1 DISK LF Select part program MPF7 in channel 1 for Execution from external After NC START part program MPF 7 is loaded section by section from the remote mass storage device from the workpiece specified in the program pointer Important Execution of the job list of a FlexOS workpiece is only possible if the job list con...

Page 206: ...r s documentation Important If a syntax error occurs in the job list loading is interrupted with an error message If this is made by the data management a dialog box is displayed with the text of the defective line If this is made via PLC no dialog box is displayed but the error message is sent directly to the PLC 6 2 4 Copying deleting and duplicating files The data manager on the SINUMERIK 840C ...

Page 207: ...COPY softkey The file is copied under the same name to the selected workpiece and displayed in the appropriate list box If a file with the same name already exists in the destination workpiece a dialog box prompts you to confirm whether the existing file is to be overwritten Press the YES softkey to overwrite the existing file otherwise select NO Note This function can be used to transfer a comple...

Page 208: ...ly below the combo box using the EDIT key Position the selection bar on the file to be deleted mpf123 in the example Press the DELETE softkey The following dialog box appears Fig 6 10 Dialog box Query before deleting If you do not have sufficient access rights DELETE is dimmed and the function cannot be executed If necessary use the keyswitch to increase your access rights before attempting to del...

Page 209: ...ory in the right hand combo box only Press the INPUT key The selected item is entered in the combo box Select the list box below the combo box using the EDIT key Use the vertical arrow keys to position the selection bar on the file to be duplicated Press the DUPLICATE softkey The following extra input boxes appear Fig 6 12 Duplicating Enter a new name for the duplicated file and confirm your entry...

Page 210: ...ical ARROW keys to position the selection bar on NC Program Memory Press the INPUT key to enter the selected item in the combo box Select the left hand combo box with the EDIT key Open the combo box with the RIGHT ARROW key and use the vertical ARROW keys to position the selection bar on the desired workpiece Fig 6 13 Loading workpieces Press the INPUT key to enter the workpiece in the combo box P...

Page 211: ...nd combo box Select the left hand combo box with the EDIT key Open the combo box with the RIGHT ARROW key and use the vertical ARROW keys to position the selection bar on the workpiece which contains the desired file Press the INPUT key to enter the selected item in the combo box Fig 6 14 Loading individual files Select the list box immediately underneath using the EDIT key Position the selection ...

Page 212: ...nter the selected item in the left hand combo box Select the right hand combo box with the EDIT key Open the combo box with the RIGHT ARROW key and use the vertical ARROW keys to position the selection bar on NC Program Memory or NC System Data Fig 6 15 Saving files on the hard disk Press the INPUT key to enter the item in the combo box Select the list box immediately underneath using the EDIT key...

Page 213: ...rus protection activated in the BIOS It monitors the boot sector and the DOS File Allocation Table FAT 6 2 6 1 Output of workpieces To transfer a complete workpiece to a peripheral device proceed as follows Select the right hand combo box with the EDIT key Open the combo box with the RIGHT ARROW key Use the ARROW keys to position the selection bar on an active device name declared in V24 Configura...

Page 214: ...e data output is taking place and the name of the file currently being output is displayed in the status line The Cancel V24 menu item is also enabled The data transmission can be cancelled at any time by pressing the appropriate softkey Note Direct reading in out of workpieces in the FlexOS file tree is not possible Remedy You can use the data manager to create any workpiece and then copy the wor...

Page 215: ...ediately underneath using the EDIT key Position the selection bar on the desired file Press the COPY softkey The data output is started i e the V 24 interface is initialized and the selected file is activated The Cancel V24 menu item is also enabled The data transmission can be cancelled at any time by pressing the appropriate softkey 6 2 6 3 Input of files The data manager can be used to transfer...

Page 216: ...s should be noted with reference to data input Password protected data such as IKA data GIA data and machine data are not copied into the specified workpiece but are always stored in the Clipboard Files of the type UMS cannot be read in using the data manager the data transmission is cancelled with the error message Illegal object type UMS files can be read in using the PCIN data transfer program ...

Page 217: ... data input dialog box prompts you to choose between the append overwrite or skip modes If the program being read in is of the type MPF or SPF you can only select the overwrite or skip buttons It is not possible to append part programs Fig 6 18 Append overwrite Please refer to the machine manufacturer s documentation for further information ...

Page 218: ... oriented data management is not supported on a diskette drive selected via the right hand combo box You can only transfer individual files between the hard disk and the diskette drive selected in this way Up to 112 files can be stored on a 3 1 2 DD diskette and up to 224 files can be stored on a 3 1 2 HD diskette Only formatted diskettes can be used to transfer data with the aid of the data manag...

Page 219: ...the mode overwrite or insert mode and the number of the line in which the cursor is located Block numbers can be automatically generated in the part program Part programs in the NCK memory can be edited as well as files on the hard disk or other network drives of the MMC The modification of files can be disabled individually using the keyswitch Files can only be edited if the write access is enabl...

Page 220: ...CK memory Use the DATA AREA key to select Area Switchover Select the Data Management command from the Programming menu Fig 6 20 WEdit NC editor Use the EDIT and ARROW keys to select the file to be edited To create a new file select the file name untitled Selecting the EDIT softkey starts WEdit and opens the selected file Machine manufacturer Cycles on the hard disk and in the NCK memory can only b...

Page 221: ...ifies the position where entered text appears When WEdit is started or an existing file is opened the input cursor appears in the top left hand corner of the window In addition the status line of WEdit displays in which line the input cursor line is located The style of the input cursor identifies the current mode in insert mode the input cursor appears as a blinking line in overwrite mode it appe...

Page 222: ...the input cursor at the end of the line PAGE UP DOWN Pressing these keys scrolls the screen one page up down SHIFT PAGE UP DOWN Puts the input cursor at the beginning end of a file The CANCEL key deletes the character underneath the input cursor Identical to the DELETE key on the MF2 keyboard The CLEAR key deletes the character to the immediate left of the input cursor Identical to the BACKSPACE k...

Page 223: ...The selected text block is displayed inversely and can be edited using the commands in the Edit menu When a block is selected the menu items Delete Block and Copy Block which are normally gray deactivated are available for selection As the position of the start and end mark is of no importance the start mark may be set before the end mark in the text You can use the commands Copy and Paste to copy...

Page 224: ... to the chosen position You can delete sections of text as follows Select the section of text to be deleted Select Delete from the Edit menu The marked text block is transferred to the Clipboard The automatic find is an invaluable aid when working with longer files You can search for individual characters words sentences or complete sections of text Select Find from the Find menu The Find dialog b...

Page 225: ...f you select the Replace All button all text matches found in the entire text are replaced without prompting If you start the find replace process by selecting the Find Next button the first text found to match the original text is selected The text can be replaced by selecting the Replace button Select the Find Next button to continue the search for the next match If no match is found a dialog bo...

Page 226: ...ent name The WEdit Save As dialog box appears Fig 6 25 Save As dialog box Enter a valid DOS name for a part program in the file name box 8 characters 3 characters The file is only displayed in the left hand list field of the data manager if a valid NCK name has been entered Otherwise the file is merely displayed in the right hand list field and can therefore not be transferred to the NCK memory Se...

Page 227: ...ton Note The above dialog box only appears if a block of text has been selected If no text is selected the loaded file is simply output to the printer interface when the Print command is chosen In the WEdit General Options dialog box you can define whether WEdit automatically creates a backup copy when saving a file When the option is selected a backup copy is created every time an edited file is ...

Page 228: ... insert mode Select the General command from the Options menu The WEdit General Options dialog box appears Fig 6 27 WEdit General Options dialog box You can use the ARROW keys to switch the input focus between the two boxes You can select each of the check boxes using the SPACE key Select the OK button to save the option settings When this option is selected WEdit automatically starts in insert mo...

Page 229: ...utton to save the option settings The number in this input box is entered at the current cursor position when the Block Number menu item is activated Specifies the value by which the block number is automatically incremented Specifies the number of digits used for the block number When this option is selected the settings are saved WEdit subsequently automatically starts with these settings This c...

Page 230: ...ange text via the MS Windows Clipboard The Next Window command in the menu bar can be used to switch the input focus between the two files Fig 6 29 WEdit loaded twice Note If you try to edit a third file in parallel the two open edit windows of WEdit are automatically put to the foreground and the corresponding message Already 2 files opened is displayed One of the two editors must be closed befor...

Page 231: ...i e the part programs edited here must be saved to the hard disk if they are to be retained in the control after switching it off Display overviews of main programs subroutines and MDA programs in the part program memory of the NCK If the letter i is displayed in the softkey window on the right hand side notes relating the selected area appear after pressing the HELP key Important The part program...

Page 232: ...e following display appears for example when you select area Main programs Fig 6 31 Overview Main programs Place the cursor on the program that you wish to edit and press the softkey EDIT The part program is called up and can be edited If you wish to enter a new program select MPF or SPF and then change to the keyboard and enter the desired program number as L MPF SPF Then press the softkey EDIT Y...

Page 233: ...ARROW again at the end of a block the cursor is positioned at the beginning of the next line Pressing LEFT ARROW at the beginning of a block moves the cursor to the last character in the previous block In the input line you can delete character by character from the right to the left using the CLEAR key Press CANCEL to delete the character directly under the cursor The result of a text search is d...

Page 234: ... towards the end of the program The search function is used to find character strings This means that if you enter N1 as the search text the cursor finds the character strings N10 N11 N100 etc Spaces are also treated as characters For example if you enter the search term N1 space the cursor will only find the block numbers N1 When you press the SEARCH softkey again the old search text appears in t...

Page 235: ...ith the ETC key The softkey SAVE UNDER are used to save the edited program on the hard disk This function is described in the Section Machine SAVING PROGRAMS Note If the edited part program already exists in the target workpiece this program is overwritten on the hard disk If you want to keep the version in the workpiece duplicate the part program i e you insert it on the hard disk under another n...

Page 236: ...ig 6 32 Block number setting The values are entered via the keyboard with INPUT The presetting is 5 i e the first block number is N5 the next N10 etc N5 LF N10 LF N15 LF A maximum of 4 numbers can be input The block settings made here are also effective in TEACH IN mode This calls the program Press this softkey to generate a block number The block number is inserted at the cursor position accordin...

Page 237: ...in more detail in the Programming Guide In the PROGRAMM EDIT NC area you can create a program via the keyboard and or with the help of the operator support function you can also work alternately with keyboard or operator support Important The part program memory has no battery backup If an NC program is edited in the part program memory and is to be retained in the control after it has been switch...

Page 238: ...Entering an opened program with menu guidance where frequently recurring input functions are presented as a menu Choose operator support by calling up the SUPPORT function After pressing the associated softkey the following softkey functions are displayed Contour Turning Drilling and Milling Plane After pressing the CONTOUR softkey the following display appears in which you can select contour elem...

Page 239: ...cursor keys you can choose any input field for example if you wish to subsequently modify geometric values for the selected contour Watch out for input fields in which several values are marked in reverse video in curly brackets on the screen X and Z in the example In this case you can only enter one value i e only the X value or only the Z value in the example If you enter more than one value the...

Page 240: ...mming Guide 6 3 6 Plane Press the PLANE softkey Switch over to the desired channel Press the softkey for the desired plane e g G18 Press the STORE PLANE softkey After entering the channel number via the keyboard and selecting the plane G17 G18 and G19 via a softkey the abscissa ordinate and applicant fields and the two interpolation parameters are filled in automatically by the control You can als...

Page 241: ...splay of the CONTOUR DEFINITION and CYCLES function On selecting the G16 plane you enter the values marked in the input display via the keyboard By pressing the STORE PLANE softkey you transfer the G16 plane into the part program You then additionally enter the axis names in the part program 6 3 7 Program management 6 3 7 1 Changing the access rights The following access rights can be defined in t...

Page 242: ...hts MPF1 rw I e MPF1 is read write but cannot be processed Use the X operator action and the MODIFY RIGHTS softkey to define MPF1 as follows MPF1 rwx I e MPF1 can be selected for processing Note The access rights are not saved on the hard disk with the SAVE function i e the selected access rights are deleted when the system is switched off Whenever a program is loaded from the hard disk it automat...

Page 243: ...ess the softkey COPY to copy a program The following screen form appears Fig 6 35 Copy MPF SPF 01 The directory and the selected program the program to be copied are automatically entered in the line Copy In the example Program MPF100 is to be copied to SPF1111 The cursor is placed on directory SPF This selects the directory and the new program number can be entered Operating sequence Copy ...

Page 244: ...rogram overview A main program can also be copied to a subroutine and vice versa The different program end i e M17 M30 M02 should be checked if this is done MDA programs can be copied to main programs and subroutines but not vice versa i e an MPF SPF to an MDA program Note The copy function described above is executed in the part program memory i e a copied program is not backed up when it is copi...

Page 245: ...e If you press the softkey RENAME before entering the program number the message Please enter new name appears Do this and then press the softkey RENAME again 6 3 7 4 Delete program Deleting with the data selector Select the program that you wish to delete with the cursor Fig 6 37 Deleting NCK programs Press the softkey DELETE The following message appears Delete data If you press the softkey DELE...

Page 246: ...am name e g MPF All of the main programs with a single digit program number are deleted i e MPF0 to MPF9 MPF2 The programs MPF 200 to 299 are deleted You can also delete areas of a program by entering the start and end of the area and pressing the delete softkey For example if you enter 700 710 or 700 710 all of the main programs between 700 and 710 are deleted Note Cycles must be enabled before d...

Page 247: ...on The SIEMENS cycles and the user cycles are stored on the hard disk You can load the cycles into the memory using the LOADCYC job list command see the Section Syntax description for job lists If the cycle disable see the machine manufacturer s documentation is configured you can cancel a cycle protection by modifying the access rights to the NCK memory see the Section Changing the access rights ...

Page 248: ... Siemens AG 1999 All Rights Reserved 6FC5198 6AA60 0BP1 SINUMERIK 840C OEM Version for Windows BA 7 1 Services 7 1 Selecting Parameter Assignment V24 7 2 7 2 Description of parameters 7 3 7 ...

Page 249: ...AREA key to activate the Area Switchover Fig 7 1 Area Switchover When Area Switchover is selected First press the SERVICES softkey to open the services menu In the open menu select the following HOTKEY to select the user area P Parameter Assignment V24 Note The other areas are described in the documentation SINUMERIK 840 C Start Up Difference Description OEM Version for Windows ...

Page 250: ...urations on the control as devices and activate these devices as the need arises When you select the Parameter Assignment V24 menu item the following dialog box appears Fig 7 2 Parameter Assignment V24 dialog box All of the interface settings are shown in the Devices list box When the dialog window is opened the data record of the first device is displayed Up to 10 settings can be saved The active...

Page 251: ...oose between three protocols RTS CTS With this protocol the flow of data between the two devices is controlled by additional hardware signals in the transmission cable These control lines allow the receiver to request the transmitter to stop the data transmission if the receive buffer is in danger of overflowing Xon Xoff When this protocol is selected the flow of data is controlled using control c...

Page 252: ...character set in the End of Transmission input box Here you can choose between the following two options CRLF The NC terminates a block in the data output with CR LF This is the standard end of block identifier used in the PC sector You should use this end identifier if you want to edit the output files externally with a PC word processing program The NC outputs an LF CR CR at the end of a block T...

Page 253: ...s The Parameter Assignment V24 dialog box is closed without saving the modified settings The Parameter Assignment V24 dialog box is closed All of the settings are saved Important It is important to note the following because of the internal features of the MS Windows driver for serial interfaces When data entry is completed the MS Windows RTS signal is not set to LOW but remains in the HIGH state ...

Page 254: ...8 1 Selecting Diagnosis area 8 2 8 2 Alarm and message displays 8 4 8 2 1 Alarm groups 8 7 8 2 2 Alarm numbers clearing alarms 8 8 8 2 3 Display of the alarms and messages in the alarm and message lines 8 9 8 2 4 On line help for alarms and messages 8 11 8 3 PLC Status 8 12 8 4 NC Service 8 12 8 5 Password 8 14 8 ...

Page 255: ...ress the DATA AREA key Fig 8 1 Menu Diagnosis First press the DIAGNOSIS softkey to open the Diagnosis menu When the menu is open you can choose the various areas by entering the underlined letter hotkey as follows A Alarms L PLC Status N NC Service U NC PLC Start Up M Machine Data C NC Memory Configuration S MSD FDD Status B Backup FLEXOS W Password When Area Switchover is selected ...

Page 256: ...l areas within the DIAGNOSIS menu mainly contain functions related exclusively to start up or servicing You will find a detailed description of these functions in particular those which are password protected against unauthorized use in the following publication SINUMERIK 840 C Start Up Difference Description OEM Version for Windows ...

Page 257: ...messages can only be viewed in the alarm window You can select the alarm window via the Area Switchover and the DIAGNOSIS and ALARMS softkeys or directly using the hotkey SHIFT ETC Fig 8 2 The Alarm window Alarms and messages are displayed in a single line with their number text clearance class alarm type date and time You are also provided with information on the interlocks on the NCK The current...

Page 258: ...u can influence the following functions with the menuViews The alarm and message line configuration The following dialog box appears when you select menu item Configure alarm line You can show or hide the status line at the lower edge of the alarm window via menu item Status line The machine tool manufacturer can configure the status line to display additional information about each alarm or messa...

Page 259: ...ts in the alarm and message line Paging is only performed if the check box Page is marked These options specify whether the alarm or message with the highest priority or the last alarm or message to be output are displayed This selection is only made if the check box Page is not selected Machine manufacturer The above settings can be disabled via the PLC The above settings are only activated if th...

Page 260: ...arms Note At POWER ON RESET switching on control all NC alarms are cancelled Note The CANCEL alarms can be deleted in the associated operating area only Note The PLC alarms are assigned error numbers 6000 to 9999 The alarm text alarm action and deletion conditions are configured by the machine manufacturer Note MMC alarms do not interrupt an active NC program The alarms are acknowledged automatica...

Page 261: ... 9999 PLC error messages or PLC operational messages 10000 to 19999 Axis specific alarm 20000 to 20999 Spindle specific alarms 30000 bis 99999 Reserved for Siemens 100000 to 159999 MMC messages 160000 bis 199999 MD dialog 200000 to 209999 PLC dialogs 300000 to 399999 611D alarms 400000 to 999999 Reserved for Siemens 1000000 to 1099999 Reserved for OEM applications The machine manufacturer can conf...

Page 262: ...ly stopped After eliminating the error it is possible to continue execution of the NC program from the point at which it was stopped SK DELETE A message does not interrupt execution of the active NC program The message is acknowledged in the Alarm window with the CLEAR softkey POWER ON means switching off the control and switching it on again Please note the information provided by the machine too...

Page 263: ... order in which the alarms have occurred Max 6 characters for alarm number Alarm display in block number order cycle alarms 3000 1 N0045 General programming error C A Approx 38 characters for explanatory text Clearance cond 2 characters Max 5 characters for block number E g The error has occurred in block N0045 Max 5 characters for alarm number 1 character for channel number PLC error and operatio...

Page 264: ... alarm description provides information on the alarm number the alarm text and the clearance mode Table 8 3 Overview On line help Alarm number Alarm text Clear key Query Details of the state in which the alarm occurred Effect Details of the effect of triggering the alarm Explanation Details of the reasons for the occurrence of the alarm Remedy Instructions for eliminating the alarm state The help ...

Page 265: ...n addition to other start up and diagnostic functions the NC Service area can be used to perform a drift compensation on the axes The cause of the drift is attributable to the temperature dependency of semiconductor components in the motor actuator unit The axes drift from the setpoint position and a permanent offset results If the or indicators remain visible following a traversing movement with ...

Page 266: ...rol mode The axes are stationary Fig 8 7 Drift compensation for axis 1 in the Diagnosis area Press the following softkeys consecutively NC SERVICE AXIS SINGLE DRIFT COMPENSATION AXIS 1 etc The drift compensation is performed for the selected axis Caution On high precision machines the drift compensation should be performed several times a day during operation as the drift directly affects the foll...

Page 267: ...n for Windows BA 8 5 Password For start up and service it is necessary to enter the password to increase the access rights The SINUMERIK 840C provides a special menu for this purpose Fig 8 8 Password in the Diagnosis area Please refer to the machine manufacturer s documentation for further information n ...

Page 268: ...999 All Rights Reserved 6FC5198 6AA60 0BP1 SINUMERIK 840C OEM Version for Windows BA 9 1 Information 9 1 Selection of Information area 9 2 9 2 NC Information 9 3 9 3 MMC Information 9 4 9 4 Information Logbook 9 5 9 ...

Page 269: ...or Windows BA 9 1 Selection of Information area With the selected area switchover you can open the information menu via the INFORMATION softkey Fig 9 1 Menu Information Using the following characters you can select the relevant areas in the open menu NC information MMC information OEM information Information ...

Page 270: ...ubmodule Fig 9 2 NC information in the Information area Press the NC INFORMATION softkey to display an information menu providing you with details of the NCK software version and the control type This information is important for servicing Pressing the UMS softkey displays information on the contents of the user memory submodule languages menus etc The NOTEBOOK function is intended for servicing a...

Page 271: ...BA 9 3 MMC Information The message box MMC information contains information about the MMC software version of the control Fig 9 3 MMC information The copyright message disappears after approximately 5 seconds In the same way the OEM user can display information about his own applications under menu item OEM information ...

Page 272: ...98 6AA60 0BP1 SINUMERIK 840C OEM Version for Windows BA 9 5 9 4 Information Logbook The message box Information contains information about the software version of the individual components MMC Windows NCK PLC 611 FDD MSD and MMC FlexOS Fig 9 4 Menu Information n ...

Page 273: ...9 Information 01 99 6FC5198 6AA60 0BP1 Siemens AG 1999 All Rights Reserved 9 6 SINUMERIK 840C OEM Version for Windows BA ...

Page 274: ... integrity of the files on the hard disk and avoid loss of data The control can be powered down by pressing the Exit key in the Area Switchover menu Fig 10 1 SYSTEM DOWN dialog box The power supply must not be switched off until the exit command has been confirmed by pressing the Yes button in the SYSTEM DOWN dialog box Please refer to the machine manufacturer s documentation for further informati...

Page 275: ...10 Exit 01 99 6FC5198 6AA60 0BP1 Siemens AG 1999 All Rights Reserved 10 2 SINUMERIK 840C OEM Variante Windows BA ...

Page 276: ...60 0BP1 SINUMERIK 840C OEM Version for Windows BA 11 1 Maintenance 11 1 Operating data 11 2 11 2 Replacing the battery 11 3 11 3 Handling modules 11 5 11 4 Practical tips on remedying electromagnetic compatibility problems 11 7 11 5 Cleaning 11 9 11 ...

Page 277: ...th DIN 40040 F Air pressure 860 to 1080 hPa Shock protection safety class in accordance with DIN VDE 0160 I Type of protection in accordance with DIN 40050 Front of operator panel Rear of operator panel Front of machine control panel Rear of machine control panel IP 54 IP 00 IP 54 IP 00 Complete data on use and operation can be found in the documentation Interface Part 2 Connection Conditions ...

Page 278: ...ance warning if the battery voltage falls below 6V Alarm 101 Advance warning battery replacement is triggered Alarm 1 Data lost at power off the threshold value is 4 8 V The period between warning steps 1 and 2 of battery monitoring is approximately 4 weeks Note The battery may not be replaced unless the control is switched on Store and transport the battery in its packaging Prior to installation ...

Page 279: ...D with an alkaline battery it is possible that the advance warning time of 4 weeks or the backup time of 1 year cannot be maintained under adverse environmental conditions temperature Press the battery into the battery cover Fix the battery cover with the screw to the CSB Important Batteries must never be thrown into fires Batteries must never be taken apart Used batteries must be disposed of sepa...

Page 280: ...e components are identified on the component side by this warning symbol ELECTROSTATIC SENSITIVE DEVICES ESD can be destroyed by voltages and energy levels well below those perceived by the human body Such voltages are present even if a component or module is touched by a person who has not undergone electrostatic discharge Components exposed to such overvoltages are not immediately recognizable a...

Page 281: ... cabinet socket earth contact immediately beforehand Modules must not be brought into contact with materials that are good insulators e g plastic foil insulated desk tops clothing made from synthetic fibres Modules must be placed on conductive surfaces only Modules must be plugged in or unplugged only when at zero potential The power supply must be switched on before any signal voltages are applie...

Page 282: ...djacent permanent magnet Remove cause of fault and screen with MUMETALL Note Effect on screen will only disappear a few days after removal of the cause Sporadic failure Contactors not connected Connect contactors coils Adjacent machines producing sparks welding sets Lay cable to the control differently increase distance to cause of fault Radio transmitter centralized multi station control system A...

Page 283: ...ctly to the control not to separate voltage bus High equalizing current to setpoint cable screening when screen is connected to housings on both sides Interrupt screen connection on the control side Bonding conductor between SINUMERIK and drive control laid too far from setpoint cable Shorten distance between bonding conductor and setpoint cable Setpoint input on the drive control does not match S...

Page 284: ...hese cleaners will also remove dirt containing graphite Cleansing agents which contain one or more of the following ingredients can be used for a short period of time Diluted mineral acids Bases Alcohol Organic hydrocarbons Detergent solutions The plastic materials used on the front of the SINUMERIK 840C are suitable for application of the control on machine tools They are suitably resistant to Gr...

Page 285: ...11 Maintenance 01 99 6FC5198 6AA60 0BP1 Siemens AG 1999 All Rights Reserved 11 10 SINUMERIK 840C OEM Version for Windows BA ...

Page 286: ...dinate Rotation Central Processing Unit Cutter Radius Compensation Central Service Board Clear to Send Digital to Analog Converter Data Block Data Input Output Dynamic RAM dynamic read write memory Differential Resolver Function Dry Run Decoding Single Block Data Ready Data Word Special punchtape code number of perforations per character always odd Erasable Programmable Read Only Memory 12 ASCII B...

Page 287: ...ions per character always even Jogging Key Request Unit Channel max 6 channels with SINUMERIK 840C Light Emitting Diode Line Feed Machine Data Machine Control Panel Machine Coordinate System Manual Data Automatic Man Machine Communication PC area in SINUMERIK 840C Main Program File Numerical Control Numerical Control Kernel Operator Panel Interface Programmable Logic Controller Procedure step prog...

Page 288: ...o Send Single Block Setting Data Active NCK memory for setting data Setting Data Skip Sub Program File Software Limit Switch Testing Date Active refers to machine data Tool Offset Tool Offset Active memory for tool offsets Tool Radius Compensation User Memory Submodule Workpiece Coordinate System Zero Offset Active memory for zero offsets ROV RPA RTS SBL SEA SD SKP SPF SW limit switch TEA TO TOA T...

Page 289: ...ea switchover REGIE EXE allows the operator to start further applications ASIC Application Specific Integrated Circuit Integrated circuit which as opposed to standard circuit is designed and manufactured in accordance with application specific characteristics AUTOMATIC Mode of the control block sequence mode in accordance with DIN Mode in NC systems where a part program is selected and continuousl...

Page 290: ...xes etc to identify the position Cutter radius compensation When programming a contour the tool is assumed to be pointed Because this is not a real life situation the radius of curvature of the tool used by the control is specified and allowance is made for this The centre of curvature is shifted by the radius of curvature equidistantly around the contour Cycle Protected subroutine for executing a...

Page 291: ...rical equipment to function without fault in a given environment without having an unacceptable influence on the surroundings Enter box Predefined area for entering values and texts EPROM Erasable Programmable Read Only Memory Non volatile programmable memory which retains its contents even if the power is switched off Feed override The programmed feedrate is modified from the machine control pane...

Page 292: ...the JOG mode the machine can be set up Individual axes and spindles can be traversed in the JOG mode using the direction keys Other functions in the JOG mode are reference point of approach and preset set actual value Keyswitch The keyswitch on the machine control panel has four positions that are interpreted by the operating system of the control Furthermore three keys with different colours fit ...

Page 293: ...ages Mirroring In mirroring the signs of the coordinate values of a contour are interchanged with respect to an axis Mirroring is possible with respect to several axes at the same time MLFB No Order number Machine readable product designation MMC Man Machine Communication operator interface Another designation for the integrated PC of a machine tool control Mode Execution concept for operating a S...

Page 294: ...c characteristics or functions of physical modules and software programs Part program A series of instructions to the NC control for producing a specific workpiece part PART program manager The part program manager on the MMC of the control is workpiece oriented Each workpiece is assigned a directory in which the data required to produce a workpiece e g part programs tool offsets R parameters etc ...

Page 295: ...t R parameter Arithmetic parameter can be set or called in the part program for any purpose by the programmer Rack Mounting frame of the control Recall Jump back into the next higher horizontal menu Reference point Point on the machine tool to which the measuring system of the machine axes refers Remanence Data areas in data blocks are remanent as well as timers counters and flags if their content...

Page 296: ...tion is active screen and back lighting on the operator panel are switched to dark after a settable time The screen darkening function is not implemented in the OEM version for Windows screen saver Screen saver MS WINDOWS application that can be activated via the Control Panel After a parameterizable time varying figures appear on the screen and thus prevent screen burn in Scroll bar Slider that s...

Page 297: ... technology Subroutine subprogram A series of instructions in a part program that can be repeatedly called with different supply parameters The subroutine is called from the main program Every subroutine can be locked to prevent unauthorized output and display Cycles are one form of subroutine TEACH IN Mode of the control Part programs can be created or corrected with TEACH IN The various program ...

Page 298: ...he values assigned to the various vocabulary words are used as initialisation parameters for the associated application Workpiece Part to be made or machined by the machine tool A workpiece is the name given to a directory in which programs and other data such as main programs initialisation file tool offsets see data structure description are stored The workpieces are in turn stored in a director...

Page 299: ...12 Abbreviations Glossary 01 99 6FC5198 6AA60 0BP1 Siemens AG 1999 All Rights Reserved 12 14 SINUMERIK 840C OEM Version for Windows BA ...

Page 300: ...CCCCCCCCCCCCCCCCCCCCCCCCCCCCCCCCCCCCCCCCC 3TIVEXSVkW YMHI 3VHIV 2S 4 HMXMSR SQTER ITX HHVIWW CCCCCCCCCCCCCCCCCCCCCCCCCCCCCCCCCCCCCCCCCCCCCCCCCCCCCCC 8IPITLSRI CCCCCCCCCCCCCCCCCCCCCCCCCCCCCCCCCCCCCCCCCCCCCCCCCCCCCCC 8IPIJE 7LSYPH SY GSQI EGVSWW ER TVMRXMRK IVVSVW LIR VIEHMRK XLMW TYFPMGEXMSR I SYPH EWO SY XS MRJSVQ YW EGGSVHMRKP YWMRK XLMW JSVQ I SYPH EPWS IPGSQI ER WYKKIWXMSRW SY QE LEZI MR XLI E ...

Page 301: ...and training to DIN ISO 9001 Reg No 2160 01 This edition was printed on paper bleached using an environmentally friendly chlorine free method Copyright Siemens AG 1999 All Rights Reserved Subject to change without prior notice Progress in Automation Siemens Siemens Aktiengesellschaft Order No 6FC5198 6AA60 0BP1 Printed in the Federal Republic of Germany 570 093 1011 77 72453 BA 11950 15 ...

Reviews: