92
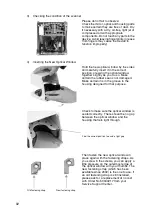
3) Checking the condition of the scanner
4) Inserting the New Optical Window
Please do not fail to observe:
Check the mirror, optics and housing parts
to make certain they are free of dust. Dry
if necessary with a dry, oil-free, light jet of
compressed air with appropriate
components. Do not touch any parts in the
device. Avoid leaving fingerprints (grease
from fingers may cause the device to
function improperly)
Hold the new optical window by the sides
and carefully insert it in the correct
position, pressing the optical window
together slightly as you do so. Make
certain the rubber seal is not damaged.
Make certain it is in the groove in the
housing designed for that purpose.
Check to make sure the optical window is
seated correctly. There should be no gap
between the optical window and the
housing that lets light through.
Then fasten the new optical window in
place again with the fastening straps. As
you screw in the screws, you can apply a
little pressure on the outermost edge of
the optical window with your thumbs. The
new fastening strap (which has been
available since 2002) is the one to use. If
an old fastening strap is still installed,
please ask for a replacement at no cost
with Order No 50040217 from your
Service Support Center.
Find the correct position to avoid a light gap
Old fastening strap New fastening strap
Summary of Contents for SIMATIC FS600
Page 2: ...600672 ...
Page 109: ...109 ...

