s
Product documentation 1D
3.8.
en
Rev. E, 10/13
page 26/42
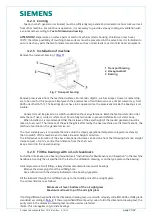
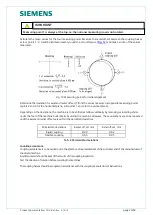
Calculate the mean values for the four measuring points. Measure the radial off-set between the coupling halves
at four points 1, 2, 3 and 4 distributed evenly round the circumference (
) and make a note of the values
measured.
Fig. 12 Measuring points for radial alignment
Determine the deviation for axial and radial off-set () from the values measured at opposite measuring points
(points 2 and 4 for the horizontal plane, and points 1 and 3 for the vertical plane).
Depending on the deviations, the machine is to be shifted as follows vertically by removing or inserting shims
under the feet of the machine horizontally by sliding the machine sideways. These operations are to be repeated
until the axial and radial off-sets are within the permitted deviations.
Permissible deviations
Radial off-set mm
Axial off-set mm
Rigid coupling
0,03
0,02
Flexible coupling
0,05
0,05
Tab. 4 Permissible deviations
Coupling acceptance
Coupling acceptance is to be carried out in the presence of representatives of the customer and of the manufacturer of
the driven machine.
A written record should be kept of the results of the coupling inspection.
Test the direction of rotation before coupling the machines.
The coupling halves should be coupled in accordance with the coupling manufacturer's instructions.
Measuring point 1 is always at the top; i.e. the notional measuring cross is not rotated.
IMPORTANT

